This plugin system allows you to modify any functionality of the script at your discretion. Installing plugins on the site and updating plugins is done in one click, directly in the DataLife Engine control panel. If the plugin is developed for a new system, then users will no longer have to read installation instructions, edit something directly in the script files, etc. All they need to do is simply upload the plugin to the admin panel and that’s it.
The plugin system is built using virtual file system technology. You describe in the plugin which file and what actions need to be performed, based on this information DataLife Engine will create virtual copies of these files, with all the necessary changes and modifications, and will work with the created virtual copies without affecting the original files. At the same time, you can describe changes in almost all files, with the exception of a number of basic ones, for example root files, but they do not carry any functionality other than connecting other files. The functionality of the files responsible for AJAX functions can also be changed; for this purpose, they were completely rewritten to work through the controller. What benefits does this provide? Firstly, the original files always remain unchanged, so plugins can be easily modified, removed, updated, etc. Secondly, this system uses the minimum possible load on sites as a whole, because virtual copies of files are created only once, at the time of installing or updating plugins, after which DataLife Engine works with these modified files as with ordinary native files and there is no memory consumption for call points, storage and control of information about where and what functionality needs to be changed etc. The load on the server will increase only by the load that the plugin itself brings with it, and the plugin management system will not cause any additional load. Thirdly, there are no problems directly with updating the script, the script can be updated to new versions, and your plugins will automatically be applied to new versions. In this case, different plugins can modify the same file without causing conflicts, provided, of course, that different plugins do not perform actions that are directly opposite to each other.
So, in the plugin management module itself, you can either create a plugin directly in the control panel or upload a ready-made plugin. Let's consider adding a new plugin directly in the control panel:
On the first tab you specify general information about the plugin. Its name, its brief description. To make it easier to differentiate from other plugins, you can give it an icon that it will use in the list of plugins. You also specify the version of the plugin itself, and the version of DataLife Engine with which it is compatible.
On the next tab, you directly specify the actions on the files that need to be performed. You can add one or more files on which you need to perform actions, and also assign one or more actions to each file that need to be performed. In the files you can perform the following actions:
1. Find and replace any code.
2. Find and add the required code above.
3. Find and add some code below.
4. Completely replace the contents of the file with your own.
5. Create a new virtual file that does not exist in the original DLE.
You can also add or delete files, change or delete actions on files at any time. For ease of perception and editing, all code is highlighted, and fields can be dynamically stretched.
Thus, the situation in which you previously manually edited the script files, and stored the changes somewhere in your notepad, and each time you updated the script, re-entered them into the script files, is completely a thing of the past with the new version. You can independently create your own personal plugin directly in the admin panel, describing once the changes you need in the script, and when you update the script to a new version, you will no longer have to worry about it, your changes will be automatically applied to new versions.
On the next tab you can add the necessary actions in the MySQL database that the plugin should perform in certain situations. You can specify a list of MySQL queries that must be executed when installing the plugin, when updating it, when disabling it, when enabling it, when deleting it. Moreover, for each action you can specify either one or a list of several queries to the database.
For an existing plugin, you can perform the following actions: You can disable it, in which case it remains on the site, but is completely ignored by the script, and all its actions on files are suspended. You can update it to a newer version, if available. Download the plugin to your computer to install it on another site. In this case, the file itself is downloaded in XML format, and this XML contains a description of all actions. Essentially, the plugin is an XML file that can be installed on a website in the admin panel.
Let's consider uploading a ready-made plugin to the site. You can download and install a ready-made plugin on your website. When you click the corresponding button, you can download either an XML file with the plugin. Or a ZIP archive with a plugin. This allows you to create very complex plugins that contain a large number of other additional files, both graphic and PHP files. In order, for example, not to describe all the actions directly in the plugin itself, you can create additional files and pack them into an archive, placing them in new places. It is important to know that the archive can only contain PHP files that are not included in the distribution, but only your additional files; if there are files included in the distribution, such downloading will be blocked. Modification of standard files must be described in the plugin itself. The file with the XML plugin itself should be located in the root of your archive.
If you download an archive with a plugin, and DataLife Engine will not have the rights to write the files in your archive. It will automatically request FTP access in order to download your archive. If accesses are not required, then everything will be copied automatically without them. In this case, these accesses will not be stored anywhere, but will be automatically deleted when they are no longer needed.
The new plugin management system also has a built-in system for logging errors in the plugin. If any action on the files cannot be performed, or any errors occur, you can easily see and correct them. For example, this is extremely convenient; if your plugin is not compatible with the next version of DLE, you will quickly see this, and you can easily adapt the plugin.
From the author: Greetings, friends. In this short overview article we will look at how the DLE admin panel works, where the entrance to the DLE admin panel is located and how to get to the admin panel. As you understand, the article is primarily aimed at those who have just begun their acquaintance with CMS DLE.
So, you have installed the DLE engine on your hosting or local server. How can I get into the DLE admin area now? It’s simple, to do this, just go to the main page of your site and add the line admin.php to the address, and then go to the new address. For example, the address of my website is dle.loc, respectively, the DLE admin panel is located at the following URL - dle.loc/admin.php

When we try to log into the DLE admin panel, we will quite logically see an authorization form where we must enter the administrator login and password that we created during the DLE installation stage. Let's log in. After successful authorization, we find ourselves in the holy of holies of our site - the DLE control panel.

It is worth noting that the DLE admin panel is built quite logically and intuitively. If you try to compare with the admin panels of other CMS, then the DLE admin panel will be a little more complex than the WordPress admin panel, but simpler and more understandable compared to the Joomla admin panel. The appearance of the DLE admin panel is also worthy of praise; working with the admin panel is quite pleasant and convenient.
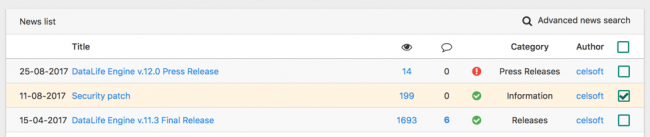
In the upper right corner we can see data on our profile, where you can change your E-mail, name, password and other similar data. Also nearby there is access to the two most frequently used functions when managing a site - adding news and Editing news. Since DLE is a news engine, it is logical that news management functions are provided for easy access.

Let's try to add the first news, or article, if you will, to our site. To do this, click the Add news button and fill out the form provided to add news. Essentially, we just need to indicate the title of the article, select a category for it, and fill out a short and complete description of the article to be added.

Let's save the news and see if it appears on the main page of the site. The article has appeared and this is great, because you can add your other articles and news just as easily and simply.

Let's also change the name of the site. This can be done in the Script Settings - System Settings section. In the Site Name field, enter the desired name.

Now in the browser tab we will see what we need as the name of the site. As you can see, everything is really convenient, logical and understandable in the DLE admin panel. In the following articles we will get acquainted with other DLE capabilities, but this is where we will probably end the current article. If you want to get to know DLE more deeply and learn how to create websites on this engine, then be sure to pay attention to our course. Well, with this I say goodbye to you. Good luck!
There are a huge number of sites on the Internet, and they all run on different engines. The differences mainly lie in the functionality of the engines and the ease of use for third-party site users. The most popular engines are Joomla, WordPress, Drupal, DLE. Let's look at the latter in more detail, since, being one of the most convenient and simple engines, it is increasingly chosen by webmasters and becomes the basis of most web resources.
The DLE engine is DataLifeEngine - the basis that was previously expected to be used for resources with news feeds and reviews. Today, a wide variety of sites dedicated to any topic run on this engine.
The DLE engine has earned its popularity thanks to its enormous functionality, all of which is written about in detail on the website dle-news.ru. The creators of this engine offer two versions of their product: paid and free. It is logical to assume that the free version will have more limited capabilities. But despite this, the free version of the DLE product is an excellent engine for both novice webmasters and more advanced ones. Sites not only with news, but also those dedicated to cooking, medical topics, etc. work great on it.
On which hosting can you install DLE?
Before you start installing the DLE engine, it would be a good idea to familiarize yourself with the requirements that it places on the server. First, there are several installed libraries: PHP Zlib, PHP XML, PHP GD2, PHP iconv. In addition, the software must include Apache version 2.0 or higher, PHP 4.3.2+ or PHP 5.0+ and MySQL version no older than 4.0. RAM must be at least 8 megabytes in size, but this is the minimum. Nobody forbids using RAM with 16 megabytes, on which the product will work even better.
When using the DLE engine on the server, it is better to disable the safe mode, which is designated SafeMode.
Checking hosting for compliance
The description of the installation process that you will read below is based on the conclusions made after installing the engine on a test web resource. For a more visual example, screenshots of each stage of the installation process are provided.
We begin the installation by checking the full list of settings. To do this, add a text document to the root of the site, give it the name phpinfo.php, and write the code into it:
Then we run the script that we managed to create. In the browser we type the following: https://my_site.ru/phpinfo.php. After this we can see the following picture on the page:
Those places circled in red are the main parameters that determine the further operation of the web resource being created. For example, in order to be able to work with graphic objects, the PHP GD2 Library needs to work properly. If it is installed incorrectly, the captcha will not be displayed on the site.
Also, in order for the created web resource to work normally, it is necessary to install the MySQL database. The system will request a login and password. In order not to forget this data, it is better to write it down somewhere. To configure the database, we use the control panel that is available on the hosting.
Detailed instructions for installing DLE
After the package with the engine is downloaded to your computer, you need to unpack and install it. But we will not install everything, but only the upload folder and the Documentation folder. If the hosting has a function for recognizing zip archives, the installation process will go faster. If this function is not supported, then files from the archive will have to be downloaded separately.
It is very convenient to work with TotalCommander when installing the DLE engine. When you copy files or folders to the server, the checkbox “Translate file names to lowercase” must be removed.
If the server allows you to recognize and unpack the archive, we place all the files that are in the upload folder into it at once. 
Now we shut down TotalCommander and continue the installation using the ftp client. For the site to work correctly, you must very carefully enter the data on the server files and folders. 
To adjust the Attributes, you need to select the desired folder. Once you change folder permissions, they are not replaced with the contents of the folders. The most convenient way to select files and folders that we will change is through TotalCommander or the keyboard shortcut Alt+A. 
In the window that opens, enter what we need and click OK.
— Set the templates folder and all its subfolders to write permission (CHMOD 777)
— Set all files in the templates folder to write permission (CHMOD 666)
— Set write permissions (CHMOD 777) for the backup, uploads folders, as well as for all folders located inside them.
— Set write permissions (CHMOD 777) for the /engine/data/, /engine/cache/, /engine/cache/system/ folders.
When all adjustments have been made, enter the following entry in the browser: https://proba.regciti.ru/install.php. It means that we are going to run a file called install.php. After the file is launched, hints will appear in each window that opens. Based on these signatures, we continue the installation process. Basically, it will start automatically, and the system itself will check all those files that need to be installed and notify you when the installation is complete.
Now you can see the preliminary result of what you have been working so hard on all this time. Enter https://your site name/index.php into the browser line. A demo page will open in front of you. To log into the admin panel and start working, you need to enter the following entry in the address bar: https://your site name/admin.php. If installation is correct, the following image should appear on the screen: 
We agree with the proposal that is displayed in the lower left corner and begin the installation. After clicking this button, a window will appear asking you to read the terms of the license agreement. You will be able to move to the next page only if you accept this agreement and check the appropriate box. Click “continue”: 
After this, the process of checking all those components and files that have been installed will automatically begin. The script will automatically indicate the errors that were made and that need to be corrected in order to continue working. This picture contains a list of several items. They should be without a red outline - this will mean that the script did not detect any errors and you can continue working. If any item is outlined in red, we correct the error. In principle, the script may require you to fix errors, and you can refuse, but then expect the system to crash at some points. And it will only be your fault, not the providers or users. If the errors cannot be corrected, you can ask for advice or help from the provider who provides you with space on the server. 
At the bottom of the window there is also a list of items that should be without a red outline. But these errors are not so critical and may not affect the operation of the future site. The thing is that the script has certain standard settings, and they may not always coincide with the user settings. It is better at this stage to consult with the hosting provider and clarify whether any of the settings highlighted in red may not coincide with those proposed by the system.
We continue and get a new window that opens. Here you can find out what mistakes were made when you made changes to Attributes for folders and files. The script itself will tell you where you made mistakes or missed something. 
If there are still errors, it is better to correct them through an FTP client. After the adjustment, we update the page and see if there are still places where adjustments need to be made. If you did everything correctly and the system did not allocate any places with errors, congratulations! You have successfully completed one of the most difficult and critical stages of installation, and now you can safely continue! 
MySQL Server:
MySQL encoding:
The following picture shows places that need to be entered very carefully and correctly. 
The name of the database will be the same as we assigned it at the very beginning. In our case it is proba_regciti.
In the “User name” section, enter the login of the user on whose behalf the database was created. At that stage, we also wrote down the login and password just in case.
Enter your email address in the E-mail line. Click “Continue”. If there are no input errors, the following message will appear on the previous page: “Congratulations! Installation completed successfully."
In the next window that opens, we pay attention to several points. 
When you installed the script, a database was automatically created with it, an admin account was created, and system operation settings were created. To avoid losing all settings and having to re-install, it is recommended to delete install.php.
I hope now you understand how to install DLE on your hosting. If you still have questions, ask them in the comments to this article.
Published by authorThe following changes have been prepared and implemented:
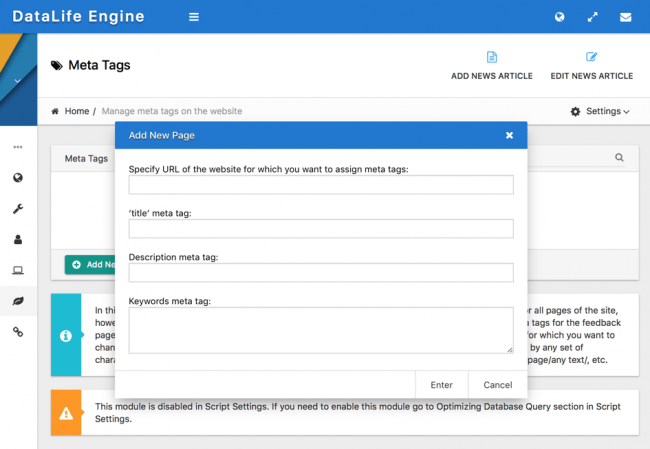
1. Control Panel has been completely redesigned. We made it modern, readable and contrasting. Besides visual changes the new design also has a number of functional features. The new control panel has ten color schemes to choose from, not just one, and a special night template designed in dark colors for comfortable work in the dark. You can adjust the width of the sections side bar and width of the whole control panel. You also can enable a full-screen mode when working on devices with small screen sizes, hiding the browser bar and tabs to increase the working space of the panel. Each user of the Administration Panel can configure its custom look, its parameters and the color scheme. A special dual system for storage settings is used to save parameters of the panel. The settings are saved both on the server and locally in a browser providing unique features when using the control panel settings. Server-based saving of settings allows to avoid the "flickering" effect when applying the user's custom design, and also to automatically apply selected settings when using another browser. Whereas storing the settings locally allows you to restore the selected settings after a parameters reset on the server, for example, in case of engine re-installation or after its global update. We hope that you will enjoy the new control panel. You can see a small demo of the new panel in the video above.


5. Now you can enable a function in Static Pages section of Control Panel which allows you to save the location of a user on a website before editing or adding the page. It allows to return user back to the previous location. This feature is useful when there is a large number of pages or setting any search parameters. After editing the user will not have to search or go back to the needed page manually.
6. This feature allows you to choose the action right after you saved a page. You can choose between: "Add another page", "Edit page", "Go to list of pages". It allows you to go to the most frequently used actions in one click.
7. This feature allows you to choose the action during the editing right after the page is saved. You can choose between: "Back to page edit" and "Go to pages list." Thus, users who frequently save text of the page during editing can quickly go on edit after saving.


15. You can exclude certain static pages from the site search results. When adding or editing a page in Administration Panel, you can check "Exclude from search results" option for each static page separately.
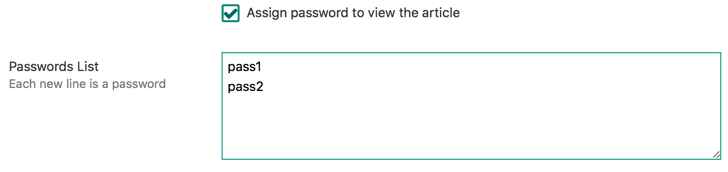
16. Now you assign a password or a list of passwords for each static page to view it. If a password is set for a static page, then password will be asked to open the page and it will be opened only if the correct password is entered. The entered password will remain in effect until the user closes the browser, and the password will not be requested again within the same session on the site.
17. Autosuggestion for extra fields which have the type of "cross-references" when adding and editing publications is added. Words list for autosuggestion is obtained from the database. It makes it easier to fill these fields in, and also reduces the probability of an error in words.
18. You can use masks to specify a template for redirects in Redirects module. When specifying URL to perform redirect from, you can specify the "*" character which means that any set of symbols may be instead of "*". E.g., you can specify /page/*/ to set redirect from pages like /page/1/, /page/2/, /page/any text/, etc.

20. For static page templates (static.tpl and other assigned pages), the new tag text is added, which displays the enclosed text as a link to edit the static page for user groups who are allowed to edit static pages. This allows to quickly move to editing the needed page, when there is a large number of static pages.
21. A new parameter "id_as_list" is added for custom articles tag (custom...) that works in conjunction with the "id" parameter, and sorts the publications as they appear in the list. For example, the tag (custom id = "3,4,1,2" order = "id_as_list") will display articles first with ID 3, then 4, then 1, and 2. This feature is useful when you want to display the required articles in a strictly defined order.
22. A new parameter "id_as_list" is added for custom comments tag (customcomments...) that works in conjunction with the "id" parameter, and sorts the comments as they appear in the list. For example, the tag (customcomments id = "3,4,1,2" order = "id_as_list") will display comments with ID 3, then 4, then 1, and then 2. This feature is useful when you want to display the required comments in a strictly defined order.
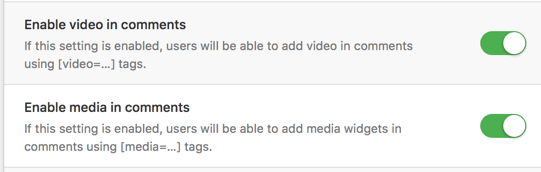
24. You can allow to attach media widgets in comments using the tags in user group settings. This option is used to allow or deny certain user groups to attach media widgets in comments.
25. Changes have been made to quick editing of articles. Now in quick editing mode only those fields are shown that were previously filled in during article adding or full editing mode. This applies to both the article annotation and full article fields. If the article annotation and full article fields have not been filled in, they will not be displayed in quick edit mode. This feature is useful for those who use only extra fields in articles. They will not see unnecessary fields.
26. You can remove such fields as "article annotation" and "full article" from the article addition template, while retaining all other functionality of editors. This feature will be useful for those who use just extra fields to add articles.
27. A new global tag for the (category-id) templates is added which allows to display the ID of the category viewed by the visitor. This tag will be useful when organizing the menu on the site and when you need to quickly reassign any CSS classes or the names of template files, when you edit articles display templates.
28. A new global tag (category-title) is added for templates, which allows to display the name of the category viewed by the visitor. This tag will be useful when you need to display the name of the category you are viewing.

(category-description) You can limit the output of this information using additional tags , for example, only on the first page of the category.
30. You can use a new "only" value for the "subcat" parameter of the output tag (catmenu ...) of the category menu, which allows to display only subcategories of the specified category. For example, if you use the (catmenu id = "1" subcat = "only") tag, only the subcategories of the category with ID "1" will be displayed. This feature is useful to display only subcategories of a certain category. For example, you can automatically display a list of subcategories from the viewed category using the simple expression (catmenu id = "(category-id)" subcat = "only").

32. Now you can display the uploaded images separately for extra fields of "Image Gallery" type. For this the tag is used in templates, where "X" is the name of the extra field, and "Nr" is the number of image from the gallery. For example, if you apply , then image number two will be displayed and loaded into an additional field named "test". Thus, you can use one field, and at the same time display a preview from the gallery in one picture in article annotation, and full gallery when viewing the full article.
33. Now you can safely use (title) tag in HTML attributes when displaying articles. For example, you can use alt="(title)" !} and the text will preserve the validity of the document if the header contains quotation marks.
34. Support for attaching videos and posts from Facebook has been added for tag.
35. Gzip compression for CSS files used by the engine is added, which allows to significantly reduce the size of CSS files, and therefore to speed up the loading of pages. Compression can be enabled together with the compression of JS files in the engine settings. When you enable compression, only DLE engine’s own CSS files are compressed. To compress your own CSS files of your template, see our article https://dle-news.ru/tips/917-szhatie-css-fajlov-shablona.html
36. Now you can enable automatic reset of the browser cache for CSS and JS files used by the engine after its update. This feature allows the browser to use the newest files after the engine update, not use the old ones from the browser cache.
37. Tag (THEME) is now supported in promotional materials preview in the engine control panel.

39. If the protocol of your site is not specified in the engine settings, DLE will use a secure SSL connection and will generate links to HTTPS protocol starting from this engine version.
40. Preventive measures are added to protect the site from "endless" redirects if only HTTPS protocol is enabled in the engine settings and the server is not configured properly and does not transmit information about the used protocol.
41. Preventive measures are added for the word filter section to protect against accidental deletion of words from the word filter in Administration Panel. Now this action requires confirmation.
42. 403 HTTP code (access is denied) is sent to the browser for personal article bookmarks pages if an unregistered user goes to the bookmark address. Thus the page’s data will not be indexed by the search engines. Search engines are not indexing a page with just one access error.
43. The database load has been significantly reduced when displaying the latest comments on websites with a large number of comments.
44. The display of the tag cloud block is optimized for databases with a large number of articles on the site. The database query is improved and speeded-up.
45. Support for curly braces "(" and ")" in the "Word Filter" module is added and now you can use words containing these symbols in the filter.
46. Articles from the site map are automatically hidden from search engines if access to the article is denied for guests in "Access" tab of the article.
47. Froala and TinyMCE editors have been updated. Previously found issues are fixed in both of them.
48. HTML code parser for published articles is updated.
49. An issue with the incorrect CRON notification of search engines about the site map updates is fixed when the site name was specified without a protocol in the engine settings.
50. An issue is fixed where visual editors could not be displayed on the article publication page if there were "custom" tags on the page.
51. An issue is fixed where the visual editor could not load during quick editing if articles display was done only by (custom ...) tag, without using the main (content) tag.
52. An issue is fixed where the merged text was sent without line breaks in e-mail notifications about new comments or personal messages.
53. An issue is fixed where line breaks were lost in empty lines when using the TinyMCE editor for articles.
54. An issue is fixed where some template tags for static pages were displayed incorrectly when displaying static pages in search results.
55. All previously declared and found small errors are fixed.
Information on the engine installation for clients:
Attention! This information is only available to users with a valid license for DataLife Engine. If you have already purchased the script, you must log in with your account.
If you are not a customer, you can on our website.
“Dark horses” come across not only among people, but also among CMS. One of these “horses” is DLE.
While there is a lot of information about other PHP engines on the Internet, you can only find a few decent materials about this CMS. Let's make this article worthy by telling readers how to install a template on DLE:
Known about unknown CMS
This engine is not as popular on the world Internet as WordPress or Joomla. It is the creation of Russian programmers. Therefore, you can most often stumble upon a site running on this CMS and template for DLE in RuNet.
CMS DLE is positioned by its creators as the basis for the deployment of information portals and blogs. The internal engine system is adapted for heavy loads and has a high degree of fault tolerance:
Like most engines, DLE (DataLife Engine) runs on php and MySQL. The main disadvantage of this content management system is that it is paid. Despite this, DLE ranks fourth in terms of prevalence among resources located in the ru zone. Although most of them (59 thousand sites) use pirated versions of the engine.
A license for a basic CMS package for a period of 1 year costs RUB 2,190. Its extension for the second year (and subsequent ones) will cost 1,490 rubles. The price of the extended version is 2790 rubles.
In addition to paid versions, there is also a free version. This version of the CMS is presented by the manufacturer as a trial version of the engine and the basis for creating your first website:
The main disadvantage of DLE is its poor security. Back in 2008, experts criticized CMS for the poor security of its internal system when handling requests. Most likely, this problem has not been eliminated today.
According to Yandex analytical data for 2011, sites that work specifically on the basis of CMS DLE are most often infected. The latest release of the engine at the moment is version 10.3. It was released in September 2014.
Features of the template for DLE
Templates for DLE websites have a number of features that fundamentally distinguish this CMS from other content management systems:
- The engine template structure is built on the basis of TPL files. This greatly simplifies the process of layout and adaptation of the template design;
- The main structure file is main.tpl. All additional template elements ( menu, sidebar) are also specified using TPL files;
- Style decisions are written in two files: styles for the software part are specified in engine.css, and everything else is specified in style.css:
Then you need to go to the site’s control panel (file admin.php). After that, in the menu on the left side, select “ Script settings», « System settings»:
At the bottom, in the “General settings” section, go to “ Default site template" Select the desired template from the drop-down list. After making changes, do not forget to click the “Save” button:
After this, the new template will be activated and the site will change its appearance. But before you put the template on DLE, do not forget to unzip it.
IN CMS DLE Unlike other popular content management systems, the template installation does not occur from the archive.
Unfortunately, most of the templates for DLE, like the engine itself, are paid. But if you search hard, you can find a couple of decent resources on the RuNet where you can download templates for free. Here are a few of them:
- dle-shablony.net – about 50 different templates are available here for free download. But they are all “lumped” in one general section without sorting by category. Although among them you can find very “strawberry” specimens:
- newtemplates.ru – the site presents a large collection of paid and free templates. All of them are conveniently sorted by thematic headings. But even among the paid ones you can find samples costing $5-10 and with a circulation of only 5 copies. And this will provide the resource with a design with a fairly high degree of uniqueness!
- 10.dle-shabloni.ru is a cool resource with a huge collection of templates for DLE websites. Tags will help you find the ones you need by topic or even color. You can see how the template works using the built-in demo version or in the video played in the Youtube video player window:
Don't forget that each template was developed for a specific version of CMS DLE. Their compliance must be checked before downloading the selected sample.
How to edit a DLE template
Unlike other popular content management systems, DLE has a simpler template design. Thanks to this, editing them is much faster and easier. The administrative part of the engine includes an integrated code editor.
To access this tool you need:
- Go to the site admin panel;
- In the menu on the left, select “ Template management", "Site templates";
- In the drop-down list located in the " Selected template for editing"Install the desired instance and click on the "Run" button:
- After this, the built-in code editor window will appear below. But before you edit the template, you need to select a file to edit. The template file tree is located on the left. After clicking the cursor on the desired source, its contents will be displayed in the editor window:
Technical documentation for CMS DLE is available for review at official website manufacturer.