Our car in its life can change more than one stereo system, because the equipment becomes obsolete, and the tastes of the owners can change towards higher requirements for sound in the car. The car may not have a radio at all. It is in such circumstances that our instructions for installing and connecting a do-it-yourself car radio for a Ford Focus 2 car will be useful.
In the article, we provide typical plugs for various car models and audio system manufacturers. So, starting position:
As you can see in the photo, initially we have a panel with a standard plug, which is installed when choosing a car without an audio system. Gently squeeze the latches and remove the plug:

The reverse side of the plug has several latches / hooks:

This is the appearance of the future working area without a plug. There is enough space to install your audio system:

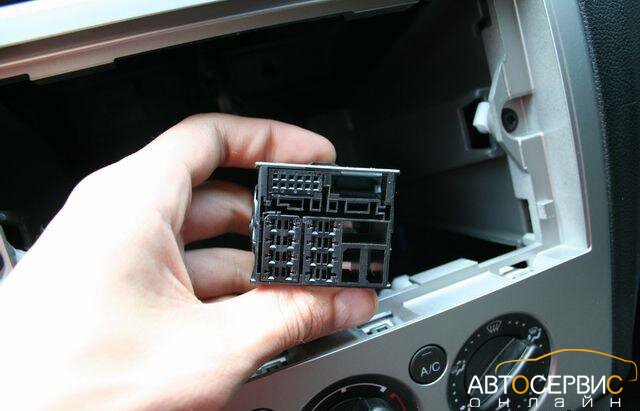
Pay attention to the standard connector for connecting the radio:
For convenience of connecting equipment and maintaining an aesthetic appearance, you can use an adapter like: Ford Focus 2 -> ISO. It looks like this:

Having installed the indicated connector, we fix everything with a regular clamp (side view):

Wires leading to the connector. Four twisted pairs - wiring to the speakers, the fifth is a voltage regulator, leads from the dashboard lighting to the radio backlight contact, if any.

According to the connection diagram below, we will get a fairly bright backlight of the radio during the day and moderate, not blinding at night:

Here are the rest of the wires in question:

Antenna connector:

In our case, before installing the new equipment, there was another radio tape recorder, so the AUX-input wire was put into a pocket adjacent to the gear knob. Accordingly, it had to be removed. Next, remove the frame. You don't have to worry about a possible breakage - the plastic is strong enough and of high quality.

After unscrewing the screws, we squeeze out the special clamps:

This is what the panel looks like without a border:

The photo shows that there are vertical rectangular holes on the right and left below, where you want to insert steel frame clamps.

The main thing is peace! Without further ado, we continue to disassemble. Finally, we pull out the AUX input.

Our case also required extending a microphone wire to install a speakerphone. We think this information will be useful for those who plan to connect a subwoofer, but do not know where to attach the power switch to it. It is usually attached to double-sided tape in a separate pocket from the checkpoint. If necessary, you can always remove it without spoiling the appearance.
Now let's start reassembly:

Install transition frame type: Ford Focus 2 -> 1 DIN. The approximate cost of this device is about 1500-2000 rubles, a small shelf under the radio will be a bonus.

The next step should be to connect the Ford Focus 2 connector to the car radio connector contact through the adapter that we mentioned earlier: Ford Focus 2 -> ISO. We combine the antenna plugs with each other. Please note: since YELLOW-GREEN - 3 is a plus from the ignition, our radio will only function when the ignition is on. We suggest connecting the wire from the radio, which leads to the ignition, to the contact of the wire going to the battery, and connect everything to the output of the connector from the battery (ORANGE-BLACK thick - 4).
For more convenient operation and a more presentable look, you can purchase two male and female connectors at any radio store, then connect them with two wires, as shown in the diagram below:

After connecting all the connectors, we install the “body” of the radio, making sure that no wires are pinched. It remains to fix the radio panel.

The end result with the panel installed is definitely pleasing to the eye:

We wish you success in the technical improvement of your car!
Ford Focus 2 cars were equipped with a Sony 6000 CD radio. Before restyling, 4 slots were used for fastening, and after that they began to install a “transition frame”. You can remove it without special tools, but it is easily damaged. Before you remove the radio, on Focus 2 from "generation 1" you must also remove the volume control. And you can make a special tool yourself.
Where to look for slots? The answer is in the video.
Removing the head unit for Ford Focus 2 until 2008
First, 4 fasteners are snapped off: plates are installed in the slot “on the face”. The cutouts of the plates look inward.
Left top notch
Installation order: 2 lower, then 2 upper. Each plate is pressed in until it clicks.

6000 CD, 2007
The radio tape recorder is pulled towards itself by the ears of the plates. And if they are not - for the regulator shaft. To do this, remove the volume knob - pry it with screwdrivers, etc.
Usually, at Focus 2, the radio is removed to install something else. Surprise: the antenna connector is not quite standard.

There are ready-made adapters.
First, the antenna connector is disconnected from the housing, then the main one. Assembly is in reverse order.
Set of tools
The corporate set is called FORCE F-910C1 490.00. The cost is high. But pullers can be made according to the drawing.

Puller, 1 pc.
4 pullers are needed at the same time.
Articles
- 1387728 - radio frame black;
- 1509717 - black frame for climate control;
- EEC GV3301 is equivalent to this: F-910C1 490.00.090417.
Removing the head unit for Ford Focus 2 after 2008
Under the outer frame, 4 strips of a plastic card are installed, as in the photo.

Oval radio
The part is pulled towards itself, it is removed. Then 4 self-tapping screws are unscrewed - this is the radio mount. You may need a T25 key, but for many it’s just a “cross”.

Down with fasteners
The radio tape recorder is pulled out, the antenna cord is disconnected, etc.
The main thing is not to lose the screws when unscrewing.
Articles
- 1539347 - frame for air conditioning (silver);
- 1547160 - the same, under climate control.
aux input
If there is an AUX button on the radio, then there is an input. You need to look at the 12-PIN block with rear speaker wires:
- RSE L+
- RSE R+
- AUX L
- AUDIO GND
- RSE L-
- RSE R-
- AUX R
We connect to 5-6 and 11-6 contacts. We press AUX, and ... nothing happens.
This option does not work on radios with a CD/DJ button. For everyone else, the FINIS-1310208 connector will do.
Often the wiring is already routed, and then there will be a plug under the glove box trim. Color - pink, soldering not clear.
Video with the dismantling of the oval radio
The second generation Ford Focus was in great demand among consumers. This is not surprising, since for relatively little money you could get an excellent, reliable and modern car. Of course, today it cannot be called such, since their release ended back in 2010. It is logical that the owners of this model are trying to somehow improve it, add modern devices and make it as comfortable as possible. In our article, we will discuss such an issue as replacing a head unit, tell you how to do it and what you need for this.
It is quite difficult to imagine a car without music. Moreover, moving around the city, standing in traffic jams is simply boring if you don’t have your favorite songs with you. Favorite performers can make even a long trip not so tiring and tedious. In addition to listening to your favorite music, you will also have access to the latest news and entertainment on the radio. In general, car radios are extremely important devices, although they do not directly affect movement.
Device replacement process
The second generation Ford Focus has a fairly simple structure as a whole. The design features of the audio system are also not distinguished by ingenuity, and therefore replacing the radio should not be particularly difficult. To do this, follow these steps:
- Using a plastic card (or other strong, thin object), we hook the frame around the entire perimeter of the radio.
- We dismantle the frame and remove the 4 bolts for fastening.
- We pull the device towards ourselves and disconnect the connectors.
- We connect the new radio to the wires. Moreover, if you have chosen a suitable device, then you will not need to redo anything, and standard mounts will do. We also connect the antenna.
- We put the device in a regular place.
- Reattach the 4 mounting screws.
- We fix the frame and snap the latches.
In general, removing the old one and installing the new radio takes about 15-20 minutes. After that, you need to start a new system and enter the unlock code. This completes the replacement and all that remains is to enjoy high-quality and clear sound!
Additional features
 In addition to replacing the head unit, there are also several other ways to improve the audio system on the second generation Ford Focus. You can do the following:
- Install USB connector.
- Connect the multiwheel.
It is not necessary to change the radio completely if you do not like something. It can be easily upgraded, since there are a large number of different devices on the market today. If you want your changer to be able to play flash drives, then you can use a special USB adapter for this, which can be easily integrated into a standard system. One of the good options is the device from Connects2. There is no need to purchase an expensive device, since any adapter can handle playing flash drives. The main thing is to connect everything correctly so that control is carried out from the radio.
You can also make a multifunction steering wheel on your Ford Focus of the second generation, which will allow you to control the audio system without taking your hands off the steering wheel. To do this, you need to purchase a special steering adapter that connects to the head unit. If your car is not equipped with buttons on the steering wheel, they can be purchased separately and mounted. Moreover, you can even purchase a system that will allow you to receive and make calls.
Radio for Ford Focus 2
In this article, we will learn all the advantages of a Ford head unit and how to install it. The car radio for Ford Focus 2 is easy to mount with your own hands, if you know the basic rules and nuances.
Car radios for Ford Focus 2 have a good set of additional accessories that come with it.
Installing the radio
Note. To begin with, remember that the car radio will be installed in the same place where the factory one stands. If the car does not have a radio at all, then to the place intended for this in the panel.
No additional frames or chips are needed, because the head unit cover completely repeats the curves and shapes of the intended place. In addition, the regular car radio fits perfectly into the overall interior.
We also note that there will be no difficulty. It is not necessary to contact the service, where they charge a lot of money for the operation. Installation will take only half an hour of time, even including the analysis of the torpedo.
It is enough to be a person who at least once fixed the outlet in the house or repaired the tap:
- We arm ourselves with the necessary tools: plastic rulers and a curly screwdriver.
Note. Rulers can be any, plastic or wooden. Suitable, for example, kitchen spatulas for Teflon dishes. As for metal rulers, it is not recommended to use them, as they can inadvertently scratch the overlay panels.
- We insert the rulers (there should be 4 pieces) into the gaps between the torpedo and the frame that goes along the circumference of the car radio. This is not so easy to do, because the Ford Focus is a car that is assembled with high quality and the gaps are minimal. But having inserted the first line, things will go easier further.
- We insert all 4 rulers (more are possible) in order to prevent the lining from being skewed during the replacement process.
- Gently bend the trim from the torpedo. It is not recommended to completely bend one of the sides. It is better to do this a little on each side.
- As soon as we feel that the panel is giving in, we must begin to act more actively. We pull the panel towards ourselves with our hands.
Advice. The panel is most firmly held in the center, near the panel controls and temperature control. You need to try to pull harder in these places.
- We pull the panel towards ourselves and at the moment of a characteristic click we understand that it has already come out. Everything terrible is behind. We have completed the most difficult task!
- Now it remains to carry out a couple of mechanical actions. We take a curly screwdriver and begin to unscrew the screws on the 4 sides of the radio.
- After unscrewing the screws, we remove the radio tape recorder from the sled.
- Now it's time to do the wires. They are connected to the head unit at the back. This is a wiring harness that ends with a massive plug.
- Now you need to remove the plug and for this we raise the rotary lock of the connector, releasing the plug from engagement with the radio.
Most of the operation is done. The old radio is no longer needed.
Ahead is waiting for the comfort of touch control and DVD playback. You can also throw paper maps out of the glove compartment, because they will no longer be needed - there is a navigator (see), and a high-quality one.
We also advise you to get a rear-view camera so that parking always goes with a bang, even at the tightest intervals.
We continue our process:
- We insert the chip from the car into the head unit connector.
- Next, we connect everything you need to the radio: the central wire, the receiver antenna and GPS.
Note. When connecting the GPS antenna cable, we take into account that the antenna will have to be placed either on a shelf under the rear window or under the dash panel. In any case, there must be free space on top of the antenna. There should be no metal panels or other components that may interfere with communication with the satellite.
- Do not forget to lay the cables for connecting the iPod and the rear view camera if we want to use the capabilities of the standard head unit to its fullest. There is a separate plug and cable set for this.
That's all. We check everything and enjoy the functions.
Review of radio tape recorders Ford Focus 2
In conclusion, I would like to give a description and the capabilities of some models for the Ford Focus. This overview will help to get acquainted superficially with the functions and technical components.
Specifications head unit Ford Focus 2
It:
- HD touchscreen 7 inch panel.
- GPS-module with support for navigation programs Navitel and others.
- Bluetooth built-in, which supports hands-free calling and automatic reception of incoming calls.
- Powerful 45W HiFi amplifier.
- DVD player that reads most modern formats.
- FM/AM radio receiver supporting RDS.
- The ability to control the radio from the buttons mounted on the steering wheel.
- Simultaneous use of the navigator and radio / TV / DVD.
- Support for iPod, USB, various memory cards.
- A unique opportunity to connect a rear view camera or parking sensors.
- Support for PIP function, i.e. picture in picture.
- The ability to control the radio with a remote control.
The presented set of functions is not new today. This will not surprise anyone, but such a set is only for premium cars, which is the Ford Focus.
As for the buttons on the steering wheel, not all Ford models have them. As for the Ford Focus, it has a multi-wheel, with which the device works without problems.
Redpower 12003B and its review
This head unit is a real computer. The “brain” of this head unit is the Windows CE 6.0 operating system, which greatly expands the multimedia capabilities of the entire system.
You can fully enjoy the work of a DVD player that reads various formats or use a GPS navigator that has a Navitel software license agreement. In a word, by installing this semi-computer instead of the factory radio, you can feel like a real astronaut in space, there are so many different functions here.
Specifications
So:
- Processor Arm11 533 MHz.
- Good bright 8-inch display with anti-reflective coating. It has a resolution of 800x480 pixels and can work with 65,000 different colors.
- The presence of a GPS receiver with high sensitivity.
- The presence of Bluetooth (see).
- Built-in microphone and the ability to connect an external microphone.
- Supports A2DP.
- It is possible to listen to music via Bluetooth from a phone, via the Internet, a player, etc.
- The presence of a notebook with support in Russian.
- Possibility to export contacts from a mobile phone in one package.
- Powerful amplifier 4x45 W with a separate output to the woofer (subwoofer).
- The presence of a 3-band equalizer with support for all frequencies and the use of cutoff filters.
- 3D function.
- 4 amplifier line outputs, which a priori helps to create real acoustics with clear sound.
- Radio receiver with FM/AM/VHF support.
- TV receiver analog, supporting Pal/Secam.
- Possibility to connect the parking sensors system.
- Ability to read most modern media and formats.
- Dual zone support.
- Extended on-screen menu with the ability to change the car logo and wallpaper.
- Good navigation with voice prompts for individual settings.
Note. You can set the navigator so that the music from the Audi is not interrupted when audio messages come from the navigator, or you can set it to pause. In addition, in the navigator, you can configure the option of traffic jams.
- The presence of various utilities: a system for diagnosing a HOBD car, a calculator, all kinds of interesting games.
The manufacturer gives a one-year warranty for all models.
Overview of the radio NaviPilot Droid
The most long-awaited novelty. At least, before her release, there was a whole box of conversations.
Expectations were fully justified. There is a regular navigation and multimedia system on the Android platform. The most advanced operating system is Google Android.
It:
- Full integration with the standard interior design of the cabin.
- Ease of installation due to the successful execution of connector technology.
- 7 inch touch screen with HD resolution.
- The processor is high performance.
- GPS with support for almost all known navigation programs, including Navitel, CityGuide and others.
- Ability to work with Google Play.
- DVD drive that plays various formats.
- Radio receiver with memory for 32 stations.
- Support for speech recognition and more.
Do-it-yourself installation of the head units described above can be carried out according to the instructions. The main thing is to use photo and video materials.
Model prices vary. So, the Navitel Pilot Droid radio tape recorder costs about 30 thousand rubles.
It's hard to find a driver who doesn't listen to music or the news while driving. The built-in audio system helps him with this. Every car has a head unit. It is also present in Ford Focus 2. Looking through the pages of car forums, it was noticed that the owners of this car encounter difficulties when removing the head unit, especially in models before restyling. After unsuccessful attempts, many turn to a service station. But to tell the truth, it is not difficult to remove the standard audio system. From our article you will learn how to do this quickly and efficiently, without resorting to the services of a service station specialist.
Types of head units
Two types of Sony 6000 CD receivers were installed in a Ford Focus 2 car. Outwardly, they differ in the shape of the front panel. Before restyling, the head unit had a rectangular shape. Later, cars began to be equipped with second-generation head audio devices. The "muzzle" is more like an irregular oval. To dismantle car radios of the first and second generations, you need a different tool.

The head unit for the Ford Focus 2 of the first generation has a rectangular shape

The 'muzzle' of the second-generation Sony 6000 CD radio has the shape of an irregular oval
Special removal tool
At branded service stations, special pullers are used to remove the head unit for Ford Focus 2 before restyling. Outwardly, they look like half of ordinary scissors. Four pullers are required for disassembly. In the online shop for car repair tools, look for a special set of keys FORCE F-910C1 490.00 or EEC GV3301. The cost is in the range of 20-40 US dollars. If you plan to shoot radios on Ford cars every day, then it makes sense to purchase them.

The set includes four specially shaped pullers. They help to remove the head unit on Ford cars
How to make a puller yourself?
For a one-time dismantling of the head unit, a special tool is made by hand. For this you need:
- old plastic card;
- mounting knife with replaceable blades;
- needle file or small file;
- ruler.
From the card, cut four strips along the long side with a width of 8 millimeters. Cut one end of each strip at a 45 degree angle. For ease of removal, small cuts are made on the strips. The drawing of the puller is shown below.

It is not difficult to make such a puller yourself. All dimensions are in millimeters
Dismantling instructions for Ford Focus 2 dorestyling
Carry out the dismantling of the car radio without haste. The help of a partner will come in handy.

Video: How to remove the car radio
For clarity of the process of dismantling the radio, watch the video:
With Ford Focus 2 after restyling
On Ford Focus 2, after restyling, dismantling the standard head unit of the audio system is much easier. There is no need for a special tool. Need to cook:
- a plastic puller (in the absence of one, it will be replaced by an ordinary plastic card);
- Phillips screwdriver or "asterisk" T25.
Step-by-step instruction

The whole process of removing the car radio on a Ford Focus 2 car takes no more than 15-20 minutes. Using a special tool that is easy to make with your own hands, you can remove the head unit yourself. The main thing: do not rush, be careful, but act confidently. Good luck!