Since our site is designed for average users, some disagreements arose within the non-Oshibka.Ru team regarding the usefulness of this article. Typically, such material is intended for more experienced users who at least have a good knowledge of the Windows OS.
On the other hand, where should a novice user go who has only a vague idea of what RDP, TCP, UDP are? But you really want to know? Again, is this necessary for the average user? Maybe one simple program is enough for him?
A difficult situation.
Explain in one article what remote access to a computer via the Internet is, but in such a way as not to frighten off the visitor.
We decided to experiment. Talk about difficult things as clearly as possible. We will take your comments into account.
What is this article about?
This article will tell you about two types of remote connection, briefly tell you what it is ID. Will tell you about the programs Remote access And Remote Desktop. We will also try to configure your computer in order to access it remotely without using third-party programs. Complex terms in the article are highlighted in brown and provided with explanations in the form of tooltips.
Remote access concept
Remote access to a computer via the Internet refers to operating system tools or a third-party program that allows you to gain visual or file access to a computer located at a remote distance, but still connected to the Internet.
How is the required computer identified on the Internet?
Conventionally, all remote access programs can be divided into two groups according to the type of connection:
- Using ID
- Using IP addresses And domain names
Remote access programs using ID
Of great interest are programs that use ID(unique identificator). Receipt method ID something like this: when a remote access program is launched on the computer to which you plan to connect, it sends a request to its server through which the connection will occur.
Having received this data, the server generates for the computer unique identification number — ID. This number is assigned to the computer. In the screenshot below it is highlighted in red.
Knowing this identification number and password, you can connect to a computer from anywhere in the world with this ID.
It remains unchanged until the hardware is replaced or the OS is reinstalled.
So using such programs is very convenient. When you change Internet provider, city, and even country, your computer ID Will not change.
Lack of programs using ID one - they are paid or shareware. Condition - you must not use the program for commercial purposes.
Example of programs using ID— TeamViewer, Ammy Admin. But the list is not limited to these two. They are simply the most popular and always heard by users.
We will not spend a lot of time on these programs, since their interface is simple and allows you to learn the program in 5-10 minutes. We may look at each of them in the future.
You won't have any problems with these programs. Use it for your health without overusing it. If TeamViewer will connect to a large number of ID- then sooner or later, the communication session will be limited to five minutes.
Remote access programs using an IP address or domain name
With this category everything is a little more complicated. They need a static IP address or domain name. Connection via IP address, this is a classic connection type. It does not allow as much flexibility in the location of the computer and is most often used in "office space".
In order to use it, you need to do the following.
Connecting a fixed IP address or domain.
You need to activate an additional service from your provider - Fixed IP address . This service is provided by many providers, including mobile ones. This service will assign your home network an external IP address in the format 123.123.123.123
It is this address that will allow you to find your computer from outside.
An alternative to a fixed IP address can be the service DynDNS. When registering, you will be given a custom domain, for example:
neoshibka.dyn.com
Next, you simply install a program on your computer that, when turned on, will track your current IP address and send it to the server DynDNS, which in turn will match your current dynamic ip address , with address yourlogin.dyn.com
Thus, no matter where you are, no matter what provider you use, no matter how often your IP address—the address of your computer—changes, yourlogin.dyn.com
We won’t undertake to say, but getting a fixed IP address from a provider is somewhat easier and cheaper than using DynDNS. For example, at the time of writing this article, the cost of a dedicated IP address was only 20 rubles. / month
Advertising
Opening a port to a target - a remote computer.
Even now, knowing our IP address or assigned to us DynDNS domain, we can hardly connect to the computer - the firewall will not let us through. Most likely the port 3389 used by the program Remote Desktop which we will tame in this article will be closed. For everything to work as it should, we will have to open it and redirect it to the desired computer on the network.
Difficult? Not at all. Let's try to figure it out in practice.
Remote access to a computer via the Internet using Remote Desktop
So, first what we did was get a fixed ip address from our ISP. Let's remember, write it down, draw it.
Second. Let's find out intranet IP address our computer. To do this, we will follow the following path: Network and Sharing Center => Local Area Connection => Details  As you can see in the screenshot, the address of our computer within the network 192.168.1.102
Third the point will be opening the port 3389 to the above address. To do this, let's go into the router. In our case it is ADSL modem TP-LINK. We will show everything using his example. There’s nothing you can do about it, but you can’t do without instructions if you don’t know how to configure the modem yourself.
In our case we enter through Google Chrome by the address 192.168.1.1 and under the combination admin/admin. We get to the information page.
Let's go to Advanced Setup => NAT => Virtual Servers and press the button

Here you can choose ready-made services or create your own.
We will create our own and call it Udalenka, but the name can be absolutely anything. We register the local address of the computer, the one we spied earlier. In the table we enter the port everywhere 3389 and select the protocol TCP/UDP. We do all this based on a standard Windows application. Remote Desktop. For other programs, the ports may be different. A good list of applications and the ports they use is provided. (What we are learning may even be useful for games).
If, for example, you want to use Remote Desktop, and advanced RAdmin, then you will have to register a different port for it: 4899 .
Press the button

Item fourth, we will run on the computer we are going to control - Terminal Server Service. It’s worth clarifying something here.
Using the method described below is not recommended from the point of view of licensing purity if you do this in the organization where you work. Not sure about Windows 10, but in Windows XP - 7, the license was not violated if only one user connected to the computer.
We do all this for the purpose of familiarization and in order to learn the principles of remote access to a computer via the Internet.
So, to run it on your computer Terminal Server Service. In Windows XP this was done simply - Go to Administration — Services and applications — Services found it and simply turned it on. This allowed one user to connect to the computer. In this case, the user who was sitting locally was disconnected.
In Windows 10 we need to do things a little differently. We need a special patch. You can download it from here. This patch will allow you to run on the system Windows 10 terminal service.
Recently, the search engines Google and Yandex began to consider this file as a virus threat. In fact, the file lay on the site for two years, and not a single scanner ever considered it to be malware. However, the file is now stored outside of notOshibka.Ru - you download it at your own peril and risk.
Let's unpack the downloaded file to any location. For example on Desktop. Run as Administrator file install.bat

A successful result will be indicated by a black command line window with the following content:

Fifth In this paragraph, we will set a password for our user, and also add him to the group.
For this purpose on the icon Computer and right-click to select Control.

In the window that opens, on the left side, we need to expand the list Local users and groups, select sub-item Users.
In the list of users, you need to find yourself and right-click.

Enter your password twice, press

Now we need to add our user to the group Remote Desktop Users.
To do this:
Right click on the user - Properties.
In the window that opens, go to the tab Group Membership and press the button <Добавить…>

Next, do everything in the same order as in the screenshot: 
As a result of the work done - Remote Desktop Users should appear in the general list of groups to which the user belongs.

We would like to draw your attention to the following. The above describes how to assign a password to your user. But it’s better to create a new one and add it to the groups. Otherwise, you may end up losing some data. For example, we logged out wherever possible. I had to enter all the passwords again.
Let's check if we were able to gain remote access to the computer via the Internet using Remote Desktop.
We go to another computer, go to START menu => All programs => Accessories and run the program "Remote Desktop Connection".
Enter the IP address previously assigned to us by the provider into the window that appears, click the button <Подключить> .

If we did everything we did earlier correctly, then we will be asked almost immediately Name And Password user on Remote machine. Enter them and don't forget to check the box to remember your credentials.

And the last “security touch” will be checking the Remote Machine certificate. Here, too, you need to agree with everything. And also check the box.

That's all. If everything works as it should, you can go through the Remote Desktop program settings. Here you can turn on/off the sound, change the picture quality, connect local resources to the remote machine.
Technical support for users of your own software product, administration and control of a corporate network - all this requires remote control of the client’s computer. And the field of software products for remote access is not empty: tools are provided both by the Windows 7 operating system itself and by numerous third-party programs. Built-in tools are good for their accessibility, third-party tools have an intuitively simple interface, “tailored” for ordinary users. Having analyzed the principles of operation, the pros and cons of each method, you will be fully armed, and the network and users will be under control.
Setting up Windows 7 Remote Desktop
Remote Desktop is available in Windows 7 Premium edition and higher. You will need it if you need to work with it on computers running Windows 7 Home Edition (the cheapest), provide support for multiple remote desktops - to connect to several computers at the same time - or change the port address used by the RDP service. To do this, you will need non-trivial settings that can be made to the system using the system registry editor or third-party programs. But it is better to spend a little of your time than a large amount of money on buying a new operating system.
Remote Desktop Port
The RDP service, whose functions ensure the functionality of the remote desktop, uses port No. 3389 as standard. The likelihood of hacker attacks on this port is very high, so to increase the level of network security, the port number can be changed. Since there are no settings for this in the Control Panel, you will have to use the system registry editor.
- From the command line, run Registry Editor with system administrator rights.
Launching Registry Editor to change the RDP port address
- In the editor window, navigate to HKEY_LOCAL_MACHINE\System\CurrentControlSet\Control\TerminalServer\WinStations\RDP-Tcp\PortNumber. A list of registry branch variables will be displayed on the right side of the window.
The required variable is hidden deep in the depths of the system registry
- From the context menu, select “Change” and enter the new port address, first making sure that the value entry mode is decimal.
Switch the number system to decimal and enter a new port address value
- Now, to connect to a computer, you will need to enter not its network name, but an address with a port number, for example, 175.243.11.12:3421.
Changing the port address from the standard 3389 to a custom one will not allow the Remote Assistance service to work on computers running Windows XP. Take this into account if you have any on your network.
Remote Desktop in Windows 7 Home Premium with support for multiple remote desktops
To encourage users to spend more money, Microsoft has severely limited the capabilities of its Remote Desktop service depending on the OS version. For example, in “Home Advanced” and below there is no ability to connect remotely at all, and in any others the number of sessions is limited to one, that is, you will not be able to connect remotely to two or more computers at the same time. The manufacturer believes that for this you should purchase a special edition server version of the system (Terminal Edition).
Fortunately, caring enthusiasts have worked to resolve this difficult problem. The result of their efforts is the RDP Wrapper Library software package. Once installed, it injects itself as an intermediary between the Remote Desktop Service (RDP) and the service manager, and then tricks them into emulating the network presence of Windows Server Terminal Edition and enabling the RDP service on computers running Windows 7 Home.
The program is available for download from the author's page and is completely free. After downloading and running the installer, all settings are made automatically, including making changes to the firewall rules.
RDP Wrapper Library - installation is automatic
The included RDPConf.exe utility allows you to enable or disable remote access on the fly, change the number of simultaneous access sessions and the port number for accessing the RDP service.
Using Rdpwrapper you can configure remote access settings
How to allow or deny remote access
All options for allowing or denying remote access to your computer are located in the “Computer Properties” section of the Control Panel. You can enable or disable remote control in just a few steps. Don't forget that you must be logged in with an account with administrator rights to make these changes.
- Press the Win+Pause key combination to display the system properties window.
The Win+Pause keys will help enable “System Properties”
- In the left column of additional actions, click on the “Setting up remote access” link.
- The following control settings are available in the dialog box that opens:

- It should be noted that for remote control to be possible, the user account opening such a session must have administrator rights. To provide remote control to a regular user, you should add his name to the list of permissions, which can be accessed using the “Select users” button.
If the user you want to grant remote access does not have administrator rights, you can add him in this dialog box
Video: how to allow remote access to your computer
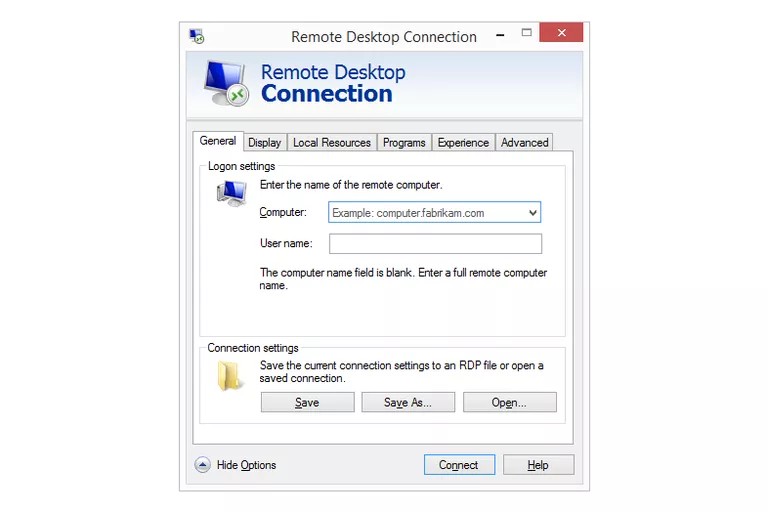
Remote Desktop Connection
Connecting to a remote desktop is very simple. Naturally, before this you need to enable all the necessary permissions on the client machine and create a list of users on it who will be allowed remote control.
- Call up a standard command line dialog and run the mstsc.exe utility using it.
Calling a remote desktop client program
- On the “General” tab, enter the name of the computer to connect in the top column of the dialog box, and the user name in the bottom column (if you need a name different from the one under which you logged in). Don't forget that the user account must have administrator rights.
Entering the computer name on the network for remote control
- In the “Interaction” tab, select the planned connection speed based on the capabilities of your network. If you find it difficult to choose settings, leave them on automatic. The system will test the channel speed and select the optimal values.
Select the channel speed based on your network capabilities
- If everything was done correctly, and remote access is allowed on the client machine, you will see a window for entering your username and password. Enter the username and password of the client machine.
- After clicking the “Connect” button, a window with the desktop of the remote PC will appear. It can be expanded to full screen and create the complete illusion of working on a client machine.
Avoid working in high-resolution video modes: this will create a large load on the network, and the interface of the remote PC will be displayed jerkily. The ideal option is a resolution of 1280x1024 pixels and a color depth of 16 bits.
What to do if remote desktop does not work
Problems connecting to a remote computer can be caused by many reasons. Among the most common, the following should be noted:
- on the client machine, permissions to access the remote desktop and remote assistant are not enabled in the settings;
Make sure your settings allow remote access to your PC
- the account with which you are trying to access remotely does not have administrator rights;
Make sure your account has administrator rights
- your computer and the client computer are not part of the same workgroup or domain on the local network;
The slave and master computers must be members of the same workgroup
- the local network router used by both computers blocks port 3389, through which Windows 7 remote control services communicate;
Enabling a firewall in a router without additional configuration blocks most ports
- Outgoing requests from Remote Desktop Services are blocked by the antivirus package.
The Remote Desktop Service may be blacklisted in your antivirus package
remoteapp is disabled
A message about disabling remote access often awaits the user when trying to connect to it, and a dialog box also appears that can confuse an inexperienced user.
Licensing service error will prevent you from starting a remote desktop session
Meanwhile, everything is very simple: the rights of the user who is trying to “raise” a remote desktop session are not enough to change the system registry section responsible for licensing. The error is corrected in two stages.

Why is the remote desktop slow?
Uninterrupted operation of a remote desktop access session requires a high-speed channel, the lion's share of which is consumed by the transmission of the remote desktop image itself. Depending on the operating resolution on the client machine, the traffic can be so dense that it will overwhelm the average office 100-megabit local network. But on the network, in addition to two communicating PCs, there are also clients. To prevent network collapse, the remote access program begins to reduce the number of transmitted frames (frames) per second.
If at 60 frames per second you see a smooth, smooth picture, then at 30 the interface will be displayed with noticeable jerks. Further reducing the screen refresh rate will make the work unbearable: you will not even be able to accurately position the mouse cursor on interface elements. To prevent this from happening, you should optimize both the network connections of the slave and master computers, as well as the screen settings of the client computer.

Remote access to Windows 7 components
In addition to managing a remote desktop by emulating the keyboard and mouse of a client computer, Windows 7 remote access tools also allow you to remotely run programs and system commands from the command line interface, manage the system registry and firewall, as well as restart or shut down the slave PC . This requires fewer network and system resources than remote desktop management and can be done without the user being aware of the computer.
Remote command line
For the needs of system administrators, Microsoft has developed a special service utility. By interacting with the remote access services of the operating system, it allows you to access the command line interface of any computer on the local network, run programs on it, and even remotely install programs before launching them. The utility is called PsExec and is available for free download from the official Microsoft website as part of the PSTools package.
Download the utility from the server, run the installer executable file on the computer from which control will be carried out and, having agreed with the text of the license agreement, carry out the installation.
Install the PSExec utility
Now you can call the utility from the command line and use the full range of its wide capabilities.
Let's take a closer look at the command syntax and additional parameters for its launch: psexec [\\computer[,computer2[,…] | @file][-u user [-p password]][-n s][-l][-s|-e][-x][-i [session]][-c [-f|-v]] [-w directory][-d][-<приоритет>][-a n,n,… ] program [arguments].
Table: psexec command launch options
| Parameter | Description |
| computer | Tells PsExec to run the application on the specified computer or computers. The computer name is not specified - PsExec will run the application on the local system. If instead of the computer name the asterisk character (\\*) is specified, then the PsExec program will launch the application on all computers of the current domain. |
| @file | Tells PsExec to run the application on all computers listed in the specified text file. |
| -a | The processors on which the application can run are separated by commas, with processors numbered starting from 1. For example, to run the application on processors 2 and 4, enter “-a 2,4” |
| -c | The specified program is copied to the remote system for execution. If this parameter is not specified, then the application must be located in the system folder of the remote system. |
| -d | Indicates that there is no need to wait for the application to complete. This option should only be used when running non-interactive applications. |
| -e | The specified account profile is not loaded. |
| -f | The specified program is copied to the remote system, even if such a file already exists on the remote system. |
| -i | The launched program gains access to the desktop of the specified session on the remote system. If no session is specified, the process runs in a console session. |
| -l | When the process starts, the user is granted limited rights (the rights of the Administrators group are overridden and the user is granted only the rights assigned to the Users group). In Windows Vista, the process starts with a low level of trustworthiness. |
| -n | Allows you to set the connection delay to remote computers (in seconds). |
| -p | Allows you to specify an optional password for the username. If this parameter is omitted, you will be prompted to enter a password and the password will not be displayed on the screen. |
| -s | The remote process is launched from the system account. |
| -u | Allows you to specify an optional username to log into the remote system. |
| -v | The specified file is copied to the remote system instead of the existing one only if its version number is higher or it is newer. |
| -w | Allows you to specify the working directory (path inside the remote system) for the process. |
| -x | Displays the user interface on the Winlogon desktop (local system only). |
| -priority (priority) | Allows you to set different priorities for a process:
|
| program | The name of the program to be launched. |
| arguments | Arguments to be passed (note that file paths must be specified as local paths on the target system). |
Examples of the PSEXEC utility
The procedure for working with the PsExec utility is as follows:
- Launch another computer's command prompt using the psexec \\ command<сетевое имя компьютера>cmd.exe.
- Open any program on the remote computer. If the program is not on the slave PC, it will be copied from the administrator's machine. To do this, enter psexec \\<сетевое имя компьютера>-c test.exe, where test.exe is the program to be executed remotely.
- If the program you want to execute remotely is not in the system folder, specify its full path when running the psexec \\ command<сетевое имя компьютера>-c c:\program files\external_test.exe
Video: PSTools - a set of console system administrator utilities
Remote registry
In order to be able to remotely edit the registry, you must first activate the corresponding services on the client computer. This is easy to do if the account has administrator rights. To do this, launch the Service Manager snap-in from the command line window and select the “Remote Registry” service from the list in the main window. Click the Start button on the top control panel.
The Remote Registry service must be running on both client PCs and the administrator's computer.
Now you can connect to the registry of a computer on your local network remotely.

The registry branch of the remote PC will appear in the registry editor window and you can edit it as easily as your local registry.
Remote firewall management
Unfortunately, there is no convenient graphical tool for remote firewall management. Therefore, all manipulations will have to be performed using the command line. First you need to connect to the remote PC using the Telnet service. If the Telnet client is not installed, you need to add it through Add/Remove Windows Components.

Now you need to establish a communication session with a remote computer via the telnet protocol.

Once the connection is established, you can remotely manage the firewall on the remote computer using the netsh command. The following commands will be available to you:
request firewall rules. You can find out the Windows Firewall configuration on a remote PC using the command netsh advfirewall firewall show rule name=all;
enable or disable the firewall with the commands “netsh advfirewall set allprofiles state on” and “netsh advfirewall set allprofiles state off”;
return to default settings using the netsh advfirewall reset command;
opening a port is perhaps the most common task that will need to be performed. For example, you can open port 2117 for a torrent client to work like this: netsh advfirewall firewall add rule name="Utorrent rule" dir=in action=allow protocol=TCP localport=1433;
allowing incoming and outgoing requests to an arbitrary program using netsh advfirewall firewall add rule name="Allow Miner" dir=in action=allow program="C:\Bitcoin\miner.exe";
allowing remote management using the Windows console: netsh advfirewall firewall set rule group= “remote administration” new enable=yes.
Once you have completed the necessary settings, be sure to close the Telnet session with the quit command.
Remote reboot
The standard OS shutdown command allows you to shut down or restart any computer on the local network if it has permissions configured for Remote Assistance and Remote Desktop. From a command prompt window, run the command in the format shutdown / /m \\computername /c “comment” and press Enter.
Table: shutdown command parameters
| /s | Ending the remote PC session. |
| \\Computer_name | Name or network address of the remote PC. |
How to control another computer via a local network? Recently, this issue is increasingly affecting not only ordinary users of personal computers, but also local network administrators. I'll start by considering a program that not only controls a computer, but can also control several machines simultaneously.
Radmin – please love and favor!
Radmin: what is this program and how to use it?
This program is very famous on the Internet. It is advisable to download it from the official website. The program consists of two subprograms, these are “Radmin Viewer” and “Radmin Server”. The first subroutine is installed on the computer from which control will be carried out, and the second, accordingly, on the remaining computers. Let's start by setting up "Radmin Viewer".
How to configure Radmin Viewer?
After you install the program on your computer and run it, the main settings window will open in front of you.
Don’t forget to install “Radmin Server” on the rest of your computers, since without this subroutine the work will be impossible.
So, click on the “Connection” tab and go to the “Connect to” tab, a window will open in which you will need to specify the IP of the remote computer and click the “Ok” button.

The next window will ask you for a username and password, which you will need to set in the “Radmin Server” setting.

After entering the data, a connection will occur and you will be able to control another computer over the local network.
How to find out the IP address of another computer and configure access to the “Radmin Server”?
Now it's time to set up the second subroutine. After installing Radmin Server on the computer that you wanted to manage over the local network, you will see an icon of two computers in the lower right corner, and when you hover over it you will see the IP of your computer.

Right-click on this icon and go to the “Radmin Server” settings tab.


Now you need to select the “Radmin” tab and click on the “Access Rights” button again.

In the next window, click the “Add” button and enter any username and password.

Check the “Full Control” tab and click the “OK” button. Now you have configured access rights in the program and can manage this computer via a local network.
Hello to all site readers! Please advise program for remote computer control. I want to control a computer at work from home or control a home computer from work. Sometimes you also want to help friends solve computer problems remotely, for example, without leaving home, install an anti-virus program for a friend (who lives on the other side of town), set up Skype, remove a virus, and so on. It is desirable that the program be free, and you do not need to register anywhere, that is, download it, launch it and work. Sergey.
Program for remote computer control
Hello, friends! Without a doubt, such programs are free, and TeamViewer, today’s article is about the latter, it is free for personal use, works without installation, can be carried on a flash drive, and you can register if you wish, now see for yourself.I'll give you two instructions.
1) How to use TeamViewer quickly and without registration.
2) In the second part of the article, we will look at what registration in the TeamViewer program will give us. Registration in the program will help us connect to a remote computer from anywhere and we won’t even need a partner.
The TeamViewer program is so easy to use that all my friends, even those who are very far from computer matters, also got used to using it. When, for example, something is not working correctly in their operating system, they immediately launch the “little blue program with arrows” and call me. They say, come on, help, your program has already been launched, ID is such and such, password is such and such.
There was such an interesting incident in my life. One of my friends asked me to install several free programs on his laptop with Windows 7, he himself was in another country at that time, with the help programs for remote computer control TeamViewer's plan has come true. Any experienced user can give you hundreds of similar cases when, using TeamViewer, he helped his friends fix some problem in the operating system. Now it’s your turn to get acquainted with this program, if you are not already familiar.
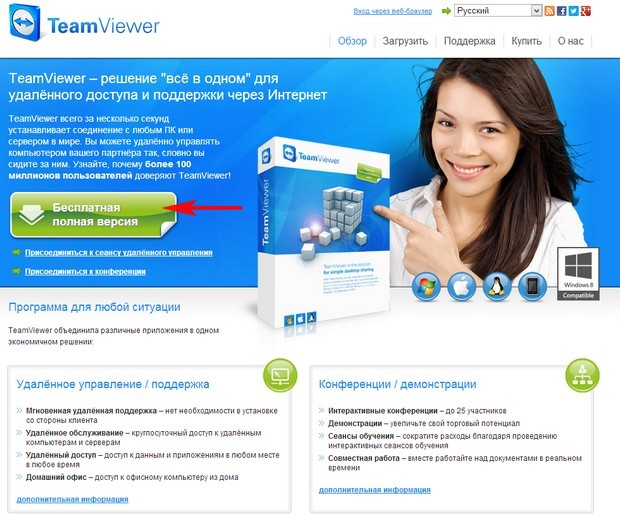
Go to the program website http://www.teamviewer.com/ru and click “Free full version”
The program installer is downloaded to our computer,

Let's launch it. Check the box “Run only” and “Personal/non-commercial use”. Accept - run.

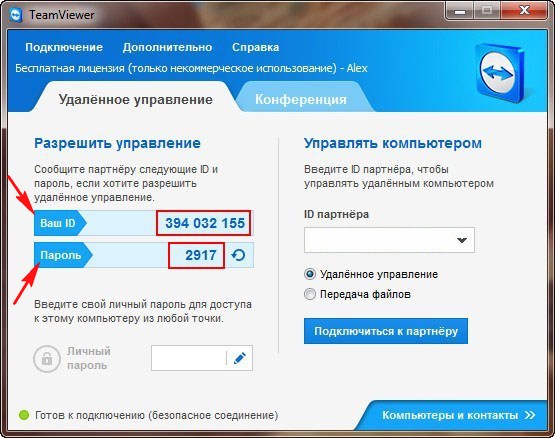
Pay attention to the main program window. TeamViewer has assigned an ID and password to our computer. If you tell them to your partner, he can easily connect to your computer.
How will he do this? Yes, very simple! On the remote computer you need to do the same thing, namely, launch the TeamViewer program and check the “Launch only” and Personal/non-commercial use checkboxes. Accept - run.

On the remote computer, the TeamViewer program will launch in the same way with its own ID number and password.
Then your partner will enter your identification number ID - 394032155 and click on the Connect to partner button,

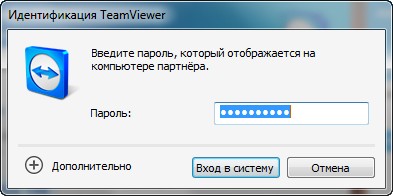
The Password field will immediately appear. Your partner enters the password 2917 and clicks Login.

That's all, your partner has connected to your computer and sees your desktop, he can work in the same way as at his desktop. In exactly the same way, you can get onto your partner’s computer. Enter his ID and password in the program and help your friend remotely.

What does registration in the TeamViewer program give and how to set up uncontrolled access
If you register for TeamViewer, you will have a much better experience using the program. You will have your own account (permanent ID and password) and with it you can very easily set up permanent access to the computers you need. For example, from your home you can log into your work computer, and from your work computer to your home computer; for this you just need the computer to be turned on. There is no need to specifically launch TeamViewer on a remote computer; after installing the program, the TeamViewer service will constantly run in the operating system.
We install the TeamViewer program, for example, on a home desktop computer. Let's launch the installer. During installation, select "Install so you can manage this computer remotely" and "personal/non-commercial use." Check "Show Advanced Settings". Accept - next.

Ready.

The one I installed (a cool program, I recommend it) signaled that the TeamViewer service had entered autoload.

Set up uncontrolled access.

Enter the invented Computer Name (account) and password. Further.

Create a TeamViewer account for free. Enter your name, email and password. Further.

Ready.

We go to our mailbox, find a letter from TeamViewer and confirm our account, click on the link.

Now, when you start the TeamViewer program, this computer will have a permanent ID and password for the account.

Let's say this is our home computer. You can connect to it like this. On any other computer (for example, we have a laptop and it’s at work), launch TeamViewer, and simply check the “Launch only” and Personal/non-commercial use checkboxes. Accept - complete. Enter the ID code. As we can see, the program keeps a log, so we simply select our account and click “Connect to a partner”,

Enter the account password
And we can control our home computer.
In the same way, you can control your work computer from home.
Remote desktop software, more accurately called remote access software or remote control software, allows you to control one computer remotely from another. By remote control, we really mean remote control - you can take your mouse and keyboard and use the computer you're connected to just like your own.
Remote desktop software is truly useful for a variety of situations, from helping your dad who lives 500 miles away work through a computer problem, to remotely managing from your office in New York the dozens of servers you run in a Singapore data center!
Typically, accessing a computer remotely requires installing a piece of software on the computer you want to connect to, called host. Once this is done, another computer or device with the correct credentials, called client, can connect to the host and control it.
Don't let the technical aspects of remote desktop software scare you away. The best free remote access programs listed below require no more than a few clicks to get started—no special computer knowledge required.
Note. Remote Desktop is also the actual name of the built-in remote access tool in Windows operating systems. It is ranked alongside other tools, but we believe there are several remote control programs that do a better job.
Remote access programs:
TeamViewer
TeamViewer is the best free remote access software I've ever used. There are a ton of features that are always great, but also very easy to install. No changes to router or firewall configurations are required.
With support for video, voice calls and text chat, TeamViewer also allows you to transfer files, supports Wake-on-LAN (WOL), can remotely monitor a user's iPhone or iPad screen, and even remotely reboot the PC into safe mode and then reconnect automatically.
Host side
The computer you want to connect to with TeamViewer can be a Windows, Mac or Linux computer.
Full, installable version TeamViewer is an option here and is probably a safe bet if you're not sure what to do. A portable version called TeamViewer QuickSupport, is an excellent choice if the computer you want to remotely control will only need to be used once or if installing software on it is not possible. Third option - TeamViewer Host is the best choice if you will be connecting to this computer regularly.
Client side
TeamViewer has several options for connecting to the computer you want to control.
Installable and portable programs are available for Windows, Mac and Linux, as well as mobile apps for iOS, BlackBerry, Android and Windows Phone. Yes—that means you can use your phone or tablet to connect to your remote-controlled computers on the go.
TeamViewer also allows you to use a web browser to access your computer remotely.
A number of other features are also included, such as the ability to share one application window with someone else (instead of the entire desktop) and the ability to print remote files to a local printer.
I suggest trying TeamViewer before any other program on this list.
The complete list of supported desktop operating systems for TeamViewer includes Windows 10, 8, 7, Vista, XP, 2000, Windows Server 2012/2008/2003, Windows Home Server, Mac, Linux and Chrome OS.
Ammyy Admin

Ammyy Admin is a free, fast and easy way to get remote access and remote desktop solution for both individuals and businesses. Unlike powerful remote desktop software, the tool comes as a tiny application under 1 MB. In addition to connecting to another system remotely, you can also perform actions such as file transfer and chat. Windows supported, secure connection and easy software management make Ammyy Adminn one of the most preferred free remote desktop clients.
While it's free for non-commercial use, the Starter, Premium, and Corporate licensed tools are priced at $33.90, $66.90, and $99.90, respectively.
AnyDesk is a remote desktop program that can be portable or installed like a regular program.
Host side
Launch AnyDesk on the PC you want to connect to and record AnyDesk-Address, or a custom alias if configured.
When the client connects, the host will be asked to allow or deny the connection, as well as manage permissions, such as allowing audio, clipboard, and the ability to block host keyboard/mouse control.
Client side
On another computer, launch AnyDesk, and then enter the AnyDesk host address or alias in the " Remote desk" on the screen.
If automatic access is configured, the client does not need to wait for the host to accept the connection.
AnyDesk automatically updates and can enter full screen mode, balance connection quality and speed, transfer files and audio, sync the clipboard, record a remote session, run keyboard shortcuts, take screenshots of the remote computer, and restart the host computer.
AnyDesk works with Windows (10 to XP), MacOS and Linux.
AeroAdmin is perhaps the most simple program for free remote access. There are virtually no settings, and everything is fast and precise, which is ideal for spontaneous support.
Host side
AeroAdmin is very similar to the TeamViewer program that tops this list. Just open the portable program and share your IP address or ID data with someone else. This is how the client computer will know how to connect to the host.
Client side
The client PC simply needs to run the same AeroAdmin program and enter the ID or IP address into their program. Before connecting, you can select " View only" or " Remote control" and then simply select " To plug" to request the remote control.
When the host computer confirms the connection, you can start controlling the computer, sharing clipboard text, and transferring files.
It's great that AeroAdmin is completely free for both personal and commercial use, but it's too bad that it doesn't include a chat option.
Another note to make is that although AeroAdmin is 100% free, it limits the number of hours you can use per month.
AeroAdmin can be installed on 32-bit and 64-bit versions of Windows 10, 8, 7 and XP.
RemotePC

Pros: Simple, straightforward interface with a flat learning curve. Fast performance. Easily transfer files between local and remote desktops. Inexpensive.
Minuses: Cannot display more than one remote monitor in the same window.
RemotePC is one of the best remote access apps that offers identical features on PCs and Macs, fast performance, and a minimal yet intuitive interface.

Remote Utilities is a free remote access program with some really great features. It works by linking two remote computers together with what they call an "Internet ID". You can control a total of 10 PCs using Remote Utilities.
Host side
Install part of the remote utilities called " Host on a Windows PC" to have constant access to it. You also have the option to run Agent, which provides native support without installing anything—it can even be run from a flash drive.
The host computer is given an Internet ID which they must use in order for the client to establish a connection.
Client side
Program Viewer used to connect to host or agent software.
The viewer can be loaded on its own or in a combo file Viewer + Host. You can also download the portable version of Viewer if you don't want to install anything.
Connecting the viewer to the host or agent is done without any changes to the router, such as port forwarding, making setup simpler. The customer simply needs to enter an online identification number and password.
There are also client apps that can be downloaded for free for iOS and Android users.
With the viewer, you can use various modules so that you can access your computer remotely without even viewing the screen, although screen viewing is definitely the main feature of Remote Utilities.
Some of the Remote Utilities modules are: Remote Task Manager, File Transfer, Power Management for Remote Reboot or WOL, Remote Terminal (Command Line Access), Remote File Launch, System Information Manager, Text Chat, Remote Registry Access, and Remote View webcams.
In addition to these features, Remote Utilities also supports remote printing and multi-monitor viewing.
Unfortunately, configuring Remote Utilities can be confusing on the host computer, as there are many different options.
Remote utilities can be installed on Windows 10, 8, 7, Vista and XP, as well as on Windows Server 2012, 2008 and 2003.
Another remote access program is UltraVNC. UltraVNC works a bit like Remote Utilities, where server And viewer installed on two PCs and the viewer is used to manage the server.
Host side
When you install UltraVNC you are asked if you want to install Server , Viewer or both. Install the server on the PC you want to connect to.
You can install UltraVNC Server as a system service so that it always works. This is ideal so you can always connect to it using client software.
Client side
To establish a connection to the UltraVNC server, you must install the Viewer part during setup.
Once you set up port forwarding on your router, you can access the UltraVNC server from anywhere using an Internet connection - either through a mobile device that supports VNC connections, a PC with a viewer installed, or an Internet browser. All you need is the server's IP address to establish the connection.
UltraVNC supports file transfer, text chat, clipboard sharing, and can even boot and connect to a server in safe mode.
The download page is a bit confusing - first select the latest version of UltraVNC, then select the 32-bit or 64-bit installer that will work with your version of Windows.
Users of Windows 10, 8, 7, Vista, XP and Windows Server 2012, 2008 and 2003 can install and use UltraVNC.
Windows Remote Desktop
Windows Remote Desktop is remote access software built into the Windows operating system. No additional download is required to use the program.
Host side
To enable connecting to your computer using Windows Remote Desktop, you must open Settings system properties(accessible via Control Panel) and allow remote connections through a specific Windows user via the " Remote ».
You really must configure the router to forward ports so another computer can connect to it from the network side, but this is usually not a big hassle to complete.
Client side
Another computer that wants to connect to the host computer must simply open the already installed software to connect to remote desktop and enter the host's IP address.
Advice. You can open Remote Desktop from the Launch dialog box (open it using the shortcut Windows Key + R); just enter Mstsc command to run it.
Most of the other programs on this list have features that Windows Remote Desktop doesn't, but this remote access method seems to be the most natural and easiest way to control the mouse and keyboard of a remote Windows PC.
Once everything is set up, you can transfer files, print to a local printer, listen to audio from a remote PC, and transfer clipboard contents.
Remote Desktop Availability
Windows Remote Desktop can be used on Windows from XP to Windows 10.
However, while all versions of Windows can connect to other computers with inbound connections enabled, not all versions of Windows can act as a host (i.e., accept incoming remote access requests).
If you are using version Home Premium or below, your computer can only act as a client and therefore cannot be deleted remotely (but it can access other computers remotely).
Incoming remote access is only allowed for professional, corporate And final Windows versions. In these editions, others can be deleted into the computer as described above.
Something else to remember is that Remote Desktop will log out the user if they are logged in when someone connects to that user's account remotely. This is very different from any other program on this list - everyone else can remotely connect to a user's account while the user is still actively using the computer.
Chrome Remote Desktop is an extension for the Google Chrome browser that allows you to set up your computer for remote access from any other computer running Google Chrome.
Host side
The way this works is that you install the extension in Google Chrome and then provide authorization to remotely access that PC using a personal PIN that you create yourself.
To do this, you need to log into your Google account, such as your Gmail or YouTube account information.
Client side
To connect to the host browser, sign in to Chrome Remote Desktop through another web browser (it must be Chrome) using the same Google credentials or using a temporary passcode generated by the host computer.
Since you are logged in, you can easily see the other PC name from where you can simply select it and start the remote session.
Chrome Remote Desktop (copy and paste only) doesn't have the same file sharing or chat features you see in similar programs, but it's very easy to set up and lets you connect to your computer (or anyone) from anywhere using just your web browser.
Moreover, you can work remotely on the computer when the user is not opening Chrome, or even when they are completely logged out of the user account.
Because Chrome Remote Desktop runs entirely within the Google Chrome browser, it can work with any operating system that uses Chrome, including Windows, Mac, Linux, and Chromebooks.
Seecreen (formerly called Firnass) is an extremely tiny (500KB) but powerful free remote access program that is ideal for instant, on-demand support.
Host side
Open the program on the computer you want to monitor. After creating an account and logging in, you can add other users to the menu by their email address or username.
Adding a client to the Without Participation section allows them to have automatic access to the computer.
Client side
To connect to the host computer using Seecreen, another user needs to enter the host ID and password.
Screen sharing must be initiated from the client computer.
Seecreen does not support clipboard synchronization.
Seecreen is a JAR file that uses Java to run. All versions of Windows are supported, as well as Mac and Linux operating systems

LiteManager is another remote access program, and it is strikingly similar to the one we talk about above.
However, unlike Remote Utilities, which can only control 10 PCs, LiteManager supports up to 30 slots for storage and connection to remote computers, and has many useful features.
Host side
The computer you want to access must install the program LiteManager Pro — Server.msi(it's free) which is included in the downloaded ZIP file.
There are many ways to provide connectivity to a host computer. This can be done using an IP address, computer name, or ID.
The easiest way to set this up is to right-click the server program in the taskbar notification area, select " , erase content that already exists, and click " Connected" to create a new ID.
Client side
Another program called Viewer is installed to connect the client to the host. After the host computer has issued the ID, the client must enter it from the " Connect by ID" on the menu " Compound", to establish a remote connection with another computer.
Once connected, the client can do all sorts of things using Remote Utilities, such as working with multiple monitors, transferring files in the background, gaining full control or read-only access on another PC, running a remote task manager, running files and programs remotely , record audio, edit registry, create demos, lock another person's screen and keyboard, and text chat.
There is also a QuickSupport option, which is a portable program for servers and viewers that makes the connection much faster than the above method.
I tested LiteManager on Windows 10, but it should also work fine on Windows 8, 7, Vista and XP. This program is also available for macOS.

Comodo Unite is another free remote access program that creates a secure VPN connection between multiple computers. Once the VPN is established, you can remotely access applications and files through the client software.
Host side
Install Comodo Unite on the computer you want to control, and then create an account with Comodo Unite. Account is how you keep track of the PCs you add to your account, so it's easy to connect.
Client side
To connect to the Comodo Unite host computer, simply install the same software and then log in with the same username and password. You can then simply select the computer you want to monitor and start your VPN session immediately.
Files can only be shared when you start a chat, so it's not as easy to share files with Comodo Unite as it is with other remote desktop programs on this list. However, the chat is protected in VPN, which you cannot find in similar software.
Only Windows 7, Vista and XP (32-bit and 64-bit) are officially supported, but I was able to get Comodo Unite to function the same as it does on Windows 10 and Windows 8.
Note. Comodo Unite has been replaced by Comodo ONE, but it is still available for download and is more suitable for most people.
ShowMyPC is a portable and free remote access program that is almost identical to UltraVNC (number 3 on this list) but uses a password to connect instead of an IP address.
Host side
Launch ShowMyPC on any computer and then select " Show my computer" to obtain a unique identification number called common password .
Client side
Open the same ShowMyPC program on another computer and enter the ID from the main program to establish a connection. Instead, the customer can enter the number on the ShowMyPC website (in the "View PC" field) and launch the Java version of the program in their browser.
There are additional options here that are not available in UltraVNC, such as using a webcam through a web browser and scheduled meetings, which allow someone to connect to your PC via a personal web link that launches the Java version of ShowMyPC.
ShowMyPC clients can only send a limited number of keyboard shortcuts to the host computer.
Select ShowMyPC Free on the download page to get the free version. It works on all versions of Windows.

join.me is a remote access program from the makers of LogMeIn that allows you to quickly access another computer through an Internet browser.
Host side
A person requiring remote assistance can download and run join.me software, which allows the entire computer or just a selected application to be displayed to the remote viewer. This is done by choosing launch buttons.
Client side
The remote viewer simply needs to enter the personal join.me code into their own installation under connections .
join.me supports full screen, conference calling, text chat, multiple monitors, and allows you to view up to 10 participants simultaneously.
The customer can instead visit the join.me home page to enter the code for the host computer without having to download any software. The code must be entered in the MEETING CONNECTION field.
All versions of Windows can install join.me, as well as Mac.
Note. Download join.me for free using the small download link below the paid options.
WebEx Free
While it's free for 3 people, paid plans include Premium 8 ($24 per month for eight members), Premium 25 ($49 per month for 25 people), and Premium 100 ($89 per month for up to 100 people).
Supreme
Supremo offers free and paid plans to remotely manage PCs/servers and host Meetings. It allows multiple connections only through ID and password exchange and can be configured for automatic access. No router configuration or firewalls required, making it a great solution for fast support, even from iOS and Android devices. Supremo is a secure app thanks to TLS 1.2 cryptographic protocol and can be customized with your brand/logo.
Free for personal use, it provides a highly flexible and affordable commercial offering. Users can choose between business and solo plans, depending on the number of simultaneous sessions. Both can be billed annually or quarterly, starting at 8€/month for unlimited installation on an unlimited number of devices.
RD Tabs
The built-in Windows Remote Desktop Connection utility is a bit basic; it offers few options, and multiple connections fill the taskbar, making it difficult to navigate between desktops. If you regularly access multiple remote computers or just want a better remote desktop client, check out RD Tabs from Avian Waves. It uses a tabbed interface to manage open remote connections with familiar functionality similar to existing browsers, keeping everything in one place. But it offers much more than just better organization, with additional features such as password encryption, remote terminal server management, connection thumbnails, and command line scripts.
DWService
DWService is a free, multi-platform (Windows, Linux, Mac, Raspberry) solution that allows users to remotely connect to end-user systems from their computer or mobile device using any browser. It provides instant, secure and uninterrupted connections using the latest industry standards and infrastructure to ensure the highest level of security and privacy for our users. You can connect to any computer within any local network. It covers major web proxies and firewalls and is protected by industry standard security.
Splashtop
Splashtop offers free and paid remote desktop solutions for individuals and businesses. Splashtop is easy to use once you get past the installation hurdles. Supported by Windows, OS X, Linux, Android and iOS, Splashtop PC remote access software offers fast connections and multiple layers of security. You can use the tool for free if you use it for personal purposes on 5 computers. Setting up the tool on your Windows or Mac and accessing it remotely through your Android or iOS mobile phone is where Splashtop achieves great results. Minimum latency for audio and video streaming, making it easier for you to even listen to multimedia remotely.
It's free for 6 months, then $1.99 per month (individual use) and $60 per year per user.

DesktopNow is a free remote access program from NCH Software. After optionally forwarding the correct port number to the router and registering for a free account, you can access your computer from anywhere via a web browser.
Host side
To access your computer remotely, you must install DesktopNow software.
When the program is launched for the first time, you must enter your email address and password so that you can use the same credentials on the client side to establish the connection.
The host computer can either configure its router to forward the proper port number to itself, or choose cloud access during installation to make a direct connection to the client, bypassing the need for complex forwarding.
It's probably best for most people to use the direct cloud access method to avoid port forwarding issues.
Client side
The client simply needs to access the host via a web browser. If the router has been configured to forward the port number, the client will use the host PC's IP address to connect. If cloud access was selected, a specific link would be provided to the host you would use to connect.
DesktopNow has a good file sharing feature that allows you to upload your shared files remotely into an easy-to-use file browser.
There's no dedicated app for connecting to DesktopNow from a mobile device, so trying to view and control your computer from your phone or tablet can be difficult. However, the site is optimized for mobile phones, making browsing your shared files very easy.
Windows 10, 8, 7, Vista and XP are supported, even 64-bit versions.
Another free and portable remote access program is BeamYourScreen. This program works like some of the others on this list, where the presenter is given an ID number that they must provide to the other user so they can connect to the presenter's screen.
Host side
BeamYourScreen hosts are called hosts, so the program BeamYourScreen for organizers (Portable) is the preferred method that the host computer should use to accept remote connections. It's quick and easy to start screen sharing without having to install anything.
There is also a version that can be installed called BeamYourScreen for organizers (installation) .
Client side
Customers can also install a portable or installable version of BeamYourScreen, but there is a special program BeamYourScreen for participants, which is a small executable that can be run similar to the Organizer Portable.
Enter the host session number in the section session ID programs to join the session.
Once connected, you can control the screen, share text and clipboard files, and chat with text.
BeamYourScreen works with all versions of Windows, as well as Windows Server 2008 and 2003, Mac and Linux.
GoToMyPC

Pros: Simple interface. Works mainly from the browser. Drag and drop file transfer. Desktop icons for remote computers. Smooth support for multiple monitors. Possibility of direct connection to the network or via the Internet.
Minuses: Distracting message from the test server while the computer is booting. Slightly reduced functionality when using a Mac system.
Bottom Line: GoToMyPC is a mature, easy-to-use remote access program with the best available balance between features and ease of use. If you don't need support for Linux or enterprise-level systems, this is the app you want.
VNC Connect

Pros: support several platforms. Relatively simple interface. Fairly inexpensive subscription plans, including a free plan for personal use.
Minuses: separate server and viewer applications make setup confusing. No dragging and dropping of files between the viewing application and the desktop. Do not send one-time invitations from a remote computer.
VNC Connect is rugged, secure and easy to use once you get the hang of it. It has fewer features than other enterprise-level remote access software, but it is also much cheaper.
Microsoft Remote Desktop

Microsoft introduced remote desktop apps for Android and iOS a few years ago, but this one is ideal for accessing Windows computers. It's also free with no usage restrictions, and unlike Chrome Remote Desktop, the setup process is a bit more complicated, but only the first time you go through it.
Where is LogMeIn?
Unfortunately, LogMeIn's free product, LogMeIn Free, is no longer available. It was one of the most popular free remote access services available, so it's too bad it's gone.
LogMeIn also runs join.me, which still works and is listed above.