In the harsh Russian winter, it would be nice to have a snowmobile. Previously, such a car was a luxury and could only be bought abroad. Today, this vehicle can be found in almost any motorcycle dealership. A snowmobile can be purchased just for fun (for winter fishing and hunting), sometimes you cannot do without it at work (rescuers, foresters, surveyors). The cost of a snowmobile depends on the manufacturer, modification, power and other factors. The simplest model can cost about 100,000 rubles, while the price of a more advanced snowmobile reaches 1,000,000 rubles. Of course, if this technique is necessary for work, then it is not worth saving, because the lives of people can depend on the reliability of the snowmobile, especially if it is operated by rescuers. But for fun, you can assemble this wonderful machine at home.
A homemade snowmobile can be built by any person who is more or less versed in technology. Before you start making a snowmobile, you need to understand what benefits you will get from it.
Pros of self-assembly:
- Price. For some, this may be the most important plus. The price of a homemade snowmobile will cost several times less than if you buy it in a store.
- Specifications. Making a snow unit, you yourself control the whole process, choose the configuration, power and appearance.
- Reliability. When assembling the device yourself, you will use the best components and parts.
A well-made car with your own hands can be used not only in the city, it is quite safe to travel outside settlements, to ski resorts and travel off-road on it.

Where to begin?
It is best to start assembling the device with your own hands from the drawings. Engineering skills will not be superfluous to create a drawing. However, if you have not succeeded in this, then you should use the Internet and print out the finished diagram. On the World Wide Web, it is possible to find drawings of snowmobiles of various modifications, from the simplest and cheapest options to complex ones, which only an experienced mechanic can design. Drawings are in the public domain, and by printing them you can easily build the car of your dreams.
When studying the drawings, pay attention to the mass of the unit, the lighter it is, the higher its permeability will be. The snowmobile will easily maneuver in loose and deep snow. However, not only the weight of the finished product affects the passability, the support area of the track is no less important.
What is a snowmobile made of?
Any snowmobile consists of basic parts that will not be changed, regardless of the modification of the device, such as:
- Frame. You can use a frame from an old motorcycle or scooter, if one is not available, then you can weld it to order. A turner can easily cope with such a task.
- Engine. You can use a motor from a walk-behind tractor, although it is worth saying that with its power, the resulting product is better called a children's snowmobile, it will not work to accelerate it to a decent speed. There is an alternative to using a motor from a motorcycle or scooter. The choice of engine also depends on the weight of the snowmobile.
- Caterpillars. The most important and challenging part of a snowmobile at the same time.
- Drive unit. Connects the engine and track. A chain from a motorcycle is great for driving.
- Steering wheel. Here you need to build on personal preference and convenience, but most often it is also taken from a scooter or motorcycle.
- Skis. Here, a ready-made version is used, if there is one, or you can make skis from plywood. It is better to give preference to plywood sheets with a thickness of at least 3 mm.
- Fuel tank. For this part, you should choose a container made of plastic or metal. The capacity of 15 liters is sufficient to cover long distances without taking up much space.
- Seat. It is best to be custom made, since the homemade snowmobile will operate in harsh conditions, strong, wear-resistant materials should be preferred. Do not forget about convenience, you should feel comfortable on it.

Can you make your own caterpillars?
This is the most difficult element to make on your own. The tracks of the machine play a decisive role in how much speed the machine will develop and how much the ice is trapped. Caterpillars made with high quality by handicraft method are able to serve for quite a long time. Most often, tires from a car are used for tracks. First you need to free the tires from the sides, leaving only a flexible track. Now you need to make the lugs. To do this, use a plastic pipe with a diameter of 4 cm. It needs to be cut into pieces 50 cm long, the resulting blanks should be cut along. These parts are bolted to the tire. It is important to maintain the same lug spacing, otherwise the track will bounce off the roller. It will be optimal to fix them at a distance of 5 cm from each other.
Caterpillars are made in a similar way. For their manufacture, you need to use a conveyor belt, which should be cut off, making the length optimal for a homemade unit. It is important to hook the cut tape correctly and securely. To do this, its ends are superimposed on each other by 5 cm and are fixed with bolts.
Alternatively, V-belts can be used to make the tracks. They are held together by lugs, forming a caterpillar with ready-made grooves for the gear.
When making tracks with your own hands, you need to take into account the following nuance: the larger the track area, the better the device will pass through the snowdrifts, but it will be worse in control. In stores, finished products are most often presented in three varieties, with standard tracks, wide tracks, and extra wide.
To make things easier for yourself, instead of making your own, you can purchase tracks from the store. Thus, you will be able to purchase tracks suitable for the terrain and travel conditions.

Assembly features
A finished frame, welded with your own hand or borrowed from other equipment, must be equipped with a steering wheel by welding. The engine is installed strictly in accordance with the drawing. It is best to keep it as close to the carburetor as possible. On the finished structure, you need to install tracks that were made in advance.
When the main work has been done, you can start connecting the tank, throttle and brake cables, and installing the seat.

The easiest way to make a snowmobile
Taking a walk-behind tractor as a basis and transforming it into a snowmobile is probably the easiest way to create a unit for moving on snow. It can be used in its entirety, you can take only a few details.
If the walk-behind tractor is used completely, then a frame with a rear axle must be welded to it and the working shaft must be modified into a drive, which must transmit rotational movements from the engine to the track.
If the walk-behind tractor is not fully used, then only the engine and the steering fork should be taken from it. Tracks will need to be installed on the bottom of the fork.
In this case, it must also be borne in mind that the power of the walk-behind tractor is designed for the weight and pressure of the wheels, which are less than the tracks. To avoid wasting gas and cushioning parts, the snowmobile's wheels should be low pressure.
The mini homemade snowmobile is easy to drive. By the way, if a homemade snowmobile is not very powerful and develops a speed of up to 15 km / h, then it is not necessary to equip it with brakes. To stop a homemade snowmobile, simply slow down and it will stop by itself.
Having approached work seriously and having studied all the available information, you will surely be proud of your unit assembled with your own hands!
Remembering the history of creating a homemade snowmobile, I realized how long ago my passion for designing equipment began. Even in my youth (and now I am already a pensioner) I received the specialty of a locksmith and mastered independently welding, other specialties of metalworkers. But to tell the truth, he could not "boast" of knowledge of design, and there was nowhere to learn. On a whim, I built all sorts of "dry-rods" on wheels and tracks: I drove them both off-road and in the snow, but there was no reliability or beauty in them.
But at the beginning of 1988, "Modelist-Constructor" came out, in which there was an article about the snowmobile "Caterpillar around the ski". This is where it started!
The places we have are such that the snow cover lies for six months or even more! Local roads are usually cleaned at the wrong time, and even then so that only an all-terrain truck can pass. Well, there is nothing to say about country roads. In addition, I had hobbies: hunting and fishing. All this prompted me to make a solid passable snowmobile.
I built it for myself, helped my friends, family, and gained experience. He constantly improved the design "according to the laws of evolution": he replaced the heavy - with a light one, unreliable - with a strong one, introduced suspension: spring, spring, shock absorber. In total, he built more than a dozen snowmobiles: on tracks with wooden and plastic tracks around the ski-skis; rubber with a block of rollers; and with one steering ski, and with two.
I'll tell you about my last snowmobile. I can't say that it has no flaws, but I put all the experience I had gained into its design and the car turned out to be, it seems, successful, albeit without frills (or, as they say now, utilitarian), but it looks good, and the reliability on height.
The layout of the snowmobile is the most common, both on similar domestic machines and on foreign ones: two front steerable skis; the power unit located in front under the hood; further - the track block, and above it the seat and behind it - the trunk. The total length of the snowmobile is 2300 mm, the width along the outer edges of the skis is 900 mm, the height to the handlebars is 1000 mm, and to the seat is 700 mm.


1 - guided ski (2 pcs.); 2 - steering ski suspension (2 pcs.); 3 - arc (pipe Ø32); 4 - hood (from the side trailer of the Java motorcycle); 5 - windshield; 6 - steering wheel; 7 - fuel tank (welded from two moped); 8 - seat; 9 - tool box; 10 - trunk rail (pipe Ø16); 11 - mudguard (steel sheet s0.5); 12 - spring shock absorber for the suspension of the tension pendulum levers of the tracked unit (2 pcs.); 13 - headlight; 14 - tracked block

1 - lower spar (pipe 28 × 25, 2 pcs.); 2 - upper spar (pipe 20 × 20, 2 pcs.); 3 - L-shaped bracket for fastening the support bearing housing of the output shaft extension of the power unit (pipe 28 × 25); 4 - under-skew inter-spar rack (pipe 20 × 20); 5 - removal (pipe 28 × 25.2 pcs.); 6 - support bar of the steering shaft glass (steel sheet s3); 7 - a glass of the steering shaft (pipe Ø32); 8 - steering column (pipe Ø32); 9 - stand-arc, 2 pcs.); 10 - seat frame (tube Ø20); 11 - seat post (tube Ø20); 12 - tool box strapping (steel corner 20 × 15); 13 - welded-in bracket for fastening the track block and track tension (2 pcs.); 14 - brace of the bracket (pipe 20 × 20, 2 pcs.); 15 - half-frame of the trunk platform (pipe 20 × 20); 16 - an eyelet for attaching the rear shock absorber (steel s4, 2 pcs.); 17 - brace of the trunk half-frame (pipe 15x 15.2 pcs.); 18 - strut of the lower spar (pipe 28 × 25.2 pcs.); 19 - traverse (pipe 28 × 25); 20 - offset cross member (pipe 28 × 25); 21 - cross-members of the steering column suspension (pipe Ø16); 22 - motor subframe (tube 28 × 25); 23 - tie-support (steel plate); 24 - cross member of the lower side members (tube 28 × 25); 25 - coupler-lock of the fuel tank; 26 - longitudinal element of the seat niche (tube 20 × 20.2 pcs.); 27 - king pin bushing (bicycle, reinforced, 2 pcs.); 28 - strut of the king pin bushing (pipe 20 × 20, 2 pcs.)

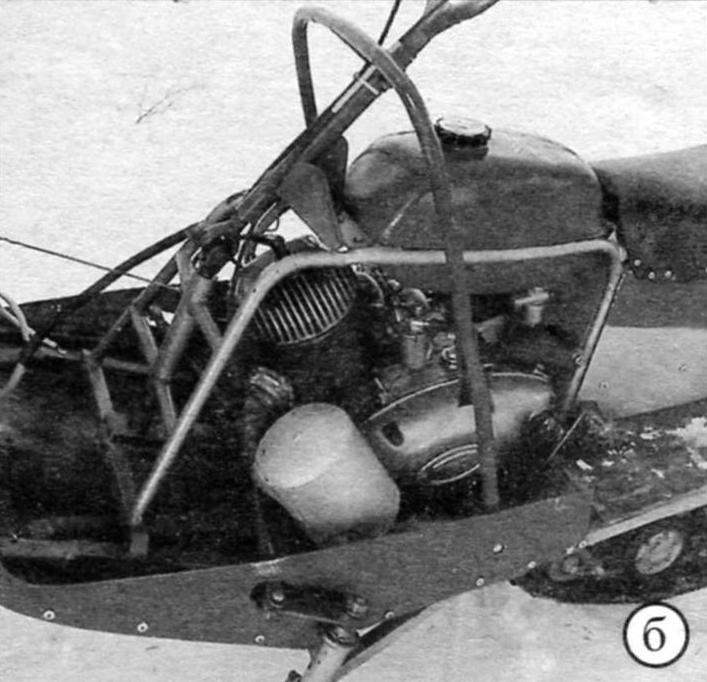
Under the hood:
a - right side view; b - left view
Power unit (engine, clutch and gearbox in one block) - "Tula-200m" produced by TMZ (Tula Machine-Building Plant). It was installed on all motor vehicles produced in Tula: scooters (including the cargo "Ant"), motorcycles, etc. The unit is quite reliable, although it is heavy.
The power of the new engine was 11 hp. with a speed of up to 3600 per minute. But he is more than a dozen years old. However, forces eight or nine, according to my feelings, are still preserved in him. The engine has a displacement of 196 cm3, two-stroke and runs on a mixture of low-octane gasoline with engine oil ("Autol" type) in a ratio of 10: 1.
The cylinder is equipped with standard forced air cooling.
The gearbox has a gear ratio of 2.353.
To transfer rotation from the secondary (output) shaft to the sprocket of the drive shaft, it was necessary to make a welded extension from a pipe with spline ends. At one end, internal splines are cut directly into the pipe (for pushing the extension onto the shaft). On the other, external splines for the adapter, bearing seat and M20x1.5 thread for mounting on an asterisk extension are made on a welded tip.
Looking ahead, I note that exactly the same tip is welded to the drive shaft of the caterpillar, which is made of the tension rear axle of the caterpillar from the Buran snowmobile.
Snowmobile frame - spatial, welded from steel pipes of rectangular, square and round sections.
The base of the frame is two paired tubular spars - upper and lower. The upper spar of each pair is made of a pipe with a section of 20 × 20 mm. Most of the auxiliary elements are made of the same pipe: intermediate cross-members, struts and even the rear frame of the luggage rack. The lower side members are made of a 28x25 mm tube - this is the thickest tube in the frame structure. From the same pipe, the front traverse, front cross-members and consoles, sub-engine ridge.
I must say that the frame tubes are small and not even thick-walled. Therefore, in the places where I drilled holes, I inserted bushings into them and welded in a circle.
The superstructure of the frame (posts, arches) is made of a round tube with a diameter of 20 mm - from old chairs, thin-walled, but strong enough. It was just difficult to weld them, but if this is done with the help of a semi-automatic apparatus, then the process is greatly facilitated. The trunk frame under the seat, as well as the frame of the middle part of the platform, is made of an equal 15 mm corner. In between these frames, I put long items such as skis. The steering shaft column - made of a 32 mm diameter tube - is integrated into the front of the superstructure. Kingpin bushings are cut from bike frames and welded to the ends of the crosshead. The frame also integrates (welded to the rear ends of the lower side members) brackets for the track tensioners. The same brackets also serve as attachment points to the frame of the bearing housings of the balance shaft of the track. In addition, numerous ears are welded to the frame elements, eyes for installing the power unit, fuel tank, seat, shock absorbers, etc.

1 - extension cord; 2 - tip for fitting onto the shaft; 3 - tip for the drive gear


1 - caterpillar; 2 - drive cogwheel of the caterpillar (2 pcs.); 3 - track drive shaft assembly; 4 - spring (2 pcs.); 5 - balance block bracket (2 pcs.); 6 - pendulum lever of the tensioning axle (2 pcs.); 7 - track tension cogwheel (2 pcs.); 8 - support roller (10 pcs.); 9 - extreme cart (2 pcs.); 10 - middle cart; 11 - axis of the balancer block; 12 - support roller (2 pcs.); 13 - housing with bearing of the balancer block axis (2 pcs.); 14 - bracket for fastening the spring to the axle of the balancer block (2 pcs.)

The track block (more precisely, its longitudinal half) is borrowed from the old industrial snowmobile "Buran". Why half? Because, firstly, it is easier. Secondly, it is less expensive and simpler to construct. And thirdly, I intended to ride not on virgin snow, but in the footsteps of the “pioneers”.
However, in combination with a pair of fairly wide skis, the snowmobile confidently overcomes both deep snowdrifts and freshly fallen powder.
The outer bogies have been redesigned - the springs have been removed and the bushings are welded together, as the bogies balance on their own, sitting on their axis at the ends of the springs.
The track tensioner has also been redesigned. The front ends of its swing arms sit on a common axle with a spring balancer assembly, while the rear ends are suspended on homemade spring dampers from the frame.
The snowmobile is driven by a rubber track 380 mm wide (there are two of these on the Buran). The caterpillar drive is carried out from the drive shaft through a pair of 9-tooth "Buran" nylon wheels. The drive shaft is tubular. As noted earlier, it is made from the rear tracked "Buranov" axle, mounted in bearings 80205, the housings of which are attached directly to the upper frame spars. The caterpillar is tensioned by a tensioning axle with toothed wheels (the same as the drive ones) through a pair of pendulum levers mounted on the axle of the balancer bogie (by moving its bearings along the frame side members). The tension shaft of the caterpillar (or rather, the axle, since this part does not transmit torque) with toothed wheels are also "Buran" ones. The track's contact with the road is just over a meter long.
Previously, the propellers were built with a support ski-slide. They are good on "puffy" snow and drifts, but very sensitive to hard bumps in the road. From them - not only discomfort is transmitted to the driver, but breakdowns of tracks and even the slip itself occur. Therefore, this time I decided to make a propulsion device with a rubber track and road wheels, since I intended to ride on rolled snow and even ice.
The transmission of a snowmobile, as they say, couldn't be simpler, although not without twists. It consists of a single-stage chain transmission from an IZH motorcycle with a pitch of 15.875 mm with a pair of sprockets: the leading one has 15 teeth, the driven one - 21, that is, the gear ratio is 1.6. The secondary (output) shaft of the power unit is lengthened by a pipe with internal splines on the end fitted onto the shaft and a spline tip on the other. The free end of the extension is installed in bearing 80205, the body of which is fixed on an L-shaped bracket welded to the frame. The drive sprocket of the chain drive is mounted on this tip through an adapter with internal and external splines. The driven sprocket is seated (also through the spline adapter) on the spline tip of the track drive shaft. I made the adapters from gears: annealed, grinded, milled. Thanks to the spline adapters, the sprockets (and, consequently, the gear ratio) can be easily changed even in the field for road conditions (more precisely, for the density and depth of snow cover).
The controlled snowmobile skis are homemade, 900 mm long (workpiece - 1000 mm) and 200 mm wide. Made of 2 mm thick sheet steel. The runners are stamped: in the middle there is a triangular groove, and along the edges there are flanges-undercuts, in front they are bent upwards (the contact surface with snow is 800 mm). On top of the runners are welded longitudinal ribs of U-shaped cross-section, bent from the same steel sheet, and to them - ears and lugs for attaching suspension units, and in front - bows from a steel 10-mm bar.
Each ski has a suspension consisting of a shock absorber (from the Tula scooter) and a homemade lever made of a 20 × 20 mm square tube.
The steering is a mixed type. The steering wheel itself is a motorcycle lever, and the rest is like a car. The steering shaft is "breaking" with a cardan joint and even a kind of steering mechanism. I made it a "turning point" because it did not fit into the "parallel" with the pivot bushings in any way (in fact, a straight shaft is better). It should be noted that the lower end of the shaft is structurally in front of the swing arms and rods, and the bipod is directed backward. In this position, when turning to the right, the steering wheel had to be turned to the left, and vice versa, which was contrary to common sense. Therefore, it was necessary to introduce a steering mechanism that serves to coordinate the rotation of the rudder and the direction of the skis. The mechanism is a pair of identical gears in the body. The drive gear is spline-mounted on the end of the steering shaft, and the driven gear shaft is connected (welded, although it is advisable and easy to make this assembly also collapsible) with a T-bipod. From the bipod through the tie rods and steering knuckles, the skis are now simultaneously turned in the same direction as the steering wheel is turned.
Equipment. The fuel tank is welded from two tanks from the Riga moped.
The seat - from the motorcycle "Minsk" is mounted on racks covered with duralumin sheet. There is a tool box under the seat, and between the box and the floor there is a free recess with an opening in the back. If necessary, I put skis, a shovel and other long objects in it. The hood is a redrawn front part of the sidecar (side trailer) of the Java-350 motorcycle. Standard electrical equipment. The headlight is from the Minsk motorcycle.

1 - runner; 2 - amplifier; 3 - bow; 4 - shock absorber mounting eye; 5 - an eyelet for attaching the lever


1 - steering wheel (bicycle); 2 - upper knee of the steering shaft; 3 - support bracket for the upper knee of the steering shaft (situation); 4 - cardan joint; 5 - steering column; 6 - the lower knee of the steering shaft; 7 - clamp of splined connection of the lower knee and pinion shaft; 8 - drive shaft-gear wheel; 9 - driven pinion shaft; 10 - bipod; 11 - axis of the bipod and steering rods; 12 - steering rod (2 pcs.); 13 - tip for adjusting the length of the steering rod (2 pcs.); 14 - lock nut 15 - steering lever (2 pcs.); 16 - axle of thrust and lever (2 pcs.); 17 - steering knuckle (2 pcs.)

1 - inlet pipe; 2 - case; 3 - muffler; 4 - outlet branch pipe


1 - drawbar; 2 - cross member; 3 - bracket-eyelet (2 pcs.); 4 - thrust (2 pcs.); 5 - ski (2 pcs.); 6 - body; 7 - rack (10 pcs.)

The trailer sled is homemade. I believe that it is better to have a small sled than a large trunk on a snowmobile: if you get stuck somewhere, you can unhook the sled, trample the path and reattach it. The body was once the body of the side trailer of the Java-350 motorcycle, or rather what was left of it after the hood for the snowmobile itself was made. It was shortened by cutting about 200 mm in the middle. Then he riveted the front and back parts with blind rivets. Under the body, I placed several cross-members from a 40 × 20 mm rectangular pipe, one of the wide walls of which I left as ears at both ends. The ears were attached to the sidewalls of the body with blind rivets.
The body is mounted on skis from aluminum panels of the electric bus duct by means of tubular racks with a square section of 20 × 20 mm. The uprights are welded at the top to the crossbars with ears and at the bottom - to the "heels" - steel square plates 2 mm thick. I riveted the "heels" to the ski runners with the same blind rivets.
I want to note that the drawings of the assemblies are not working, but are introductory: some do not have all the dimensions (for example, frames), somewhere something may not coincide, since the drawings were made according to a ready-made structure.
In general, I believe that making a structure according to drawings is already production, not creativity.
V. SMIRNOV, settlement Syava, Nizhny Novgorod region
A snowmobile is a unique vehicle for daily use in winter. It is used to move around snowy terrain during scientific expeditions, excursions, hikes, hunting animals, and protecting the territory. Such a product can be purchased at a specialized store or made by hand. If ready-made structures have a fairly high price, and not every person is able to afford such a purchase, then homemade ones are a more affordable alternative made from scrap materials and equipment.
A homemade snowmobile can be made with your own hands from available equipment. For these purposes, experts recommend using:
- chainsaws;
- walk-behind tractors;
- motorcycles.
Important! To make a portable snowmobile at home, you definitely need to have skills in working with locksmith tools.
Drawings, options for finished works
Designing a snowmobile must begin by creating a drawing of the desired product. He will help in the process of making practical and functional equipment that will serve for more than one year.
 Finished work option
 If you can use ready-made drawings to create a snowmobile from a walk-behind tractor or motorcycle, then for a construction from a chainsaw, they are not provided, since each tool has its own technical characteristics and features.
Chainsaw snowmobile
Advice. The snowmobile can be made both tracked and skiing.
Before you start making a snowmobile from a chainsaw, you need to choose equipment that will have all the necessary characteristics. The best option for this purpose is the Druzhba, Ural and Calm chainsaw (the power of these tools is ideal for creating high-speed snowmobiles).
Important! The engine and gearbox are the main parts of the chainsaw that are used in the process.
The construction of a snowmobile consists of four parts:
- Caterpillars.
- Transmissions.
- Engine.
 Chainsaw Ural
 The assembly of a homemade snowmobile is not carried out according to some proposed scheme or a standard drawing, but based on the materials and tools that are at the disposal of the master.
Instructions for assembling a snowmobile from a chainsaw
Assembling the product is quite an interesting job. It consists of several sequential steps that must be performed carefully and responsibly.
- The first stage is the assembly of the frame base of the future homemade snowmobile. For work, you will need steel corners (size - 50 x 36 cm) or steel sheets (thickness - at least 2 mm). The middle part of the structure is made from the corners, and the front and back from the sheets.
Advice. To give the necessary rigidity to the structure, the metal is bent at an angle of 90 degrees.
- Carefully make two through holes for the placement of the track shaft and track wheel guides (tensioners are installed on both sides of the side members).
Important! The front device is specially designed to tension the second stage of the idler, and it also helps in adjusting the track itself.
- Special brackets are carefully welded to the lower part of the side members (they are fixed at the same distance from each other), support rollers are installed in their open grooves.
- Rollers (in rubber covers) are positioned on five axles, each of which is attached to the underside of the open grooves.
- Special duralumin bushings are installed between each of the elements (they are made from a suitable pipe).
Advice. In order not to waste time making rollers and axles for them, they can be borrowed from old equipment for digging potatoes.
- The axles of the brackets themselves are fastened with nuts and locknuts (they are designed to strengthen the snowmobile frame, hold the side members at a certain distance from each other).
- From three metal corners, racks are made for fastening the prepared chainsaw gearbox, and the intermediate shaft of the chain drive is installed.
- A seat for the user is installed on the prepared frame (for this purpose, a suitable box or car seat is used), it is fixed in the area between the middle and rear of the structure.
 Chainsaw snowmobile
 - On the front section of the frame, a hole is made to accommodate the steering wheel; it is made from a pipe with welded control handles.
- In the places where the snowmobile struts are attached, metal kerchiefs are installed (they strengthen the structure, make it more durable and reliable).
Important! In order for the future home-made snowmobile to have good cross-country ability on snowy terrain, it is equipped with a caterpillar mechanism.
- A snowmobile drive shaft is made from a metal pipe, a special round flange is inserted into it for attaching gear wheels.
- To create steering, equipment from old motorcycles or mopeds with three-lever control is used.
The finished snowmobile is lightweight, easily fits into the trunk of a car for long-distance transportation. Its controls are so simple and straightforward that even a child can use it with ease.
Snowmobile from a walk-behind tractor
A walk-behind tractor is another option for equipment that is used in the process of making a snowmobile with your own hands. Its design practically does not need to be redone, since it is initially multifunctional.
There are three types of walk-behind snowmobiles:
- wheeled;
- on tracks;
- combined.
 Motoblock
 Before you start working with a walk-behind tractor, you need to decide on the type of future design. The complexity of the master's work, as well as the duration of the entire process, will depend on him.
Designing a snowmobile from a walk-behind tractor
Important! To create a wheeled snowmobile, you do not need to redo the steering system, special attention should be paid only to the frame of the device and the ski.
- The snowmobile frame is made of metal pipes or corners (it should be rectangular).
- A box or seat is attached to the finished base to accommodate the driver.
- Skis are made separately from corners and sheet metal, welded to the frame.
- The finished structure is attached to the walk-behind tractor, used for its intended purpose.
 Blueprint: walk-behind snowmobile
 Snowmobile from Motorcycle: A Craftsman's Guide
Making a snowmobile from a motorcycle is not so easy. If the assembly of previous products practically does not cause difficulties, then you will have to suffer with this design. For work, you will need not only tools, materials and equipment, but also skills in working with a welding machine and other equipment.
Important! Motorcycles "Ural", "Izh" and "Dnepr" are the most suitable models for making a snowmobile with your own hands.
Snowmobile design technology
- A suitable frame is made of metal pipes of different diameters and steel corners. Its base is made in the form of a rectangle (its dimensions are 150 x 43.2 cm).
- The steering boom is constructed from metal corners (its dimensions are 50 x 50 x 5 mm), its parts are sheathed with dense metal linings. The finished structure is installed horizontally on a drilling machine.
 Motorcycle Izh
 - The frame and the finished beam are processed at the joints, and special grooves are prepared for reliable fixation of the elements.
- The front frame bar is equipped with a sturdy corner.
- Attach the seat to the frame of the structure.
- Holes are made in the side members.
- A channel is welded between the steering and middle section.
- Select a suitable track sprocket and rubber band for further installation (suitable dimensions - 2200 x 300 mm, thickness - no more than 10 mm).
- The caterpillar itself is carefully sheathed with nylon so that the material does not delaminate during use.
 Snowmobile from motorcycle
 - A transmission is installed, which consists of a front and rear axle. The front one is the leading one, it consists of a tubular shaft, a caterpillar sprocket and rollers (the sprockets themselves are fixed on through bolts). The rear axle structure consists of a caterpillar drum and a tubular shaft.
- The skis are welded to the structure of the snowmobile (sheets of steel and metal corners are used for their manufacture).
The control system of a homemade snowmobile from a motorcycle is quite complex in design. It consists of:
- longitudinal thrust;
- lateral thrust.
From the information provided, we can conclude: a homemade snowmobile from elements of a walk-behind tractor, chainsaw or motorcycle is a reality. Any master can make it. For productive work, only certain skills, equipment, tools and materials are required.
Homemade snowmobile: video
»From the presented material you will learn how to independently assemble a snowmobile with an engine from a walk-behind tractor. Provided step-by-step photos of the assembly and video from the running-in of a mini-snowmobile. Every avid fisherman and hunter knows perfectly well that in winter it is not very convenient to ski on loose snow, and when it is necessary to overcome a distance of several tens of kilometers to a hut, a winter hut, a hunting hut, or to a reservoir, then there is generally a “pipe”)) For Overcoming long distances requires a snowmobile, but the prices for factory cars are beyond the means of an ordinary person, again, repairs and spare parts will cost a pretty penny. So we do it ourselves, with our own hands))


 This snowmobile is very compact and at the same time it is quickly assembled and disassembled, in just 5 minutes. It also easily fits unassembled into the luggage compartment of a car.


 The caterpillar is made of a BURAN caterpillar cut in half, additionally installed aluminum tracks made of a profile.


 Here's a snowmobile)
During cold weather, transport on two wheels becomes irrelevant, and sometimes it is impossible to drive on the snowy expanses even by car. What to do in a situation if there is no money to buy transport more adapted to the harsh winter?
In this case, you can make a homemade snowmobile. Winter vehicles are most often equipped with a caterpillar drive, steering skis are installed in front. The snowmobile has a high cross-country ability, light weight (70-80 kg), which allows it to ride both on valuable snow and on packed snow-covered roads. This vehicle is easy to operate and the speed is low. So riding a snowmobile in the countryside in winter is not only convenient, but also safe.
Features of homemade snowmobiles
A huge number of companies are engaged in the sale of snowmobiles in the CIS. But their prices are high, even for families with decent incomes. If you don't want to pay extra money for advertising and are a hardworking and creative person, then try making a homemade snowmobile.
Self-made self-propelled guns cost 7-10 times cheaper than the cheapest factory-made models.
The success of making your own snowmobile depends on several factors:
- your personal skill;
- your engineering thinking;
- the presence of parts and assemblies from other snowmobiles, motorcycles and others.
It should be borne in mind that riding a snowmobile, as with any vehicle, is associated with increased danger. Despite the fact that home-made devices, as a rule, are not able to reach speeds of more than 15 km / h, the quality of parts, welding, and bolting of elements should be taken seriously. The issue of operational safety and reliability of the final unit should be the main one for anyone intending to make a snowmobile with their own hands.
Training
Before you start making a snowmobile, you need to calculate the basic parameters of the device. If you are a bit of a design engineer, then it is appropriate to make a drawing of the assembly. In principle, all snowmobiles are designed in the same and simple way. Your task is to make a reliable device based on the model and likeness of all other variants of this vehicle class.

What is required for manufacturing:
- Tube for the frame, for hangers and other frame elements.
It was experimentally found that the optimal pipe diameter is 40 mm. If you are using a profile, 25 x 25 mm will suffice. Wall thickness - 2 mm. With smaller parameters, the resistance of the device to deformations will be reduced. At large - the weight of the car will occur, which, accordingly, will affect the already not brilliant driving characteristics.
- Wheels with rubber on the axle.
Wheels from ATVs (small models with a wheel diameter of 30-40 cm), some carts, etc. will do. In total, you need 2 axles with 2 wheels each.
- V-belts or conveyor belt.
The main element of the "caterpillars". The optimum thickness is 3 mm. This is sufficient for stability and durability.
- PVC pipes.
From them lugs are made - the second element of "caterpillars". The optimum diameter is 40 mm with a wall thickness of 5 mm.
- Propulsion system.
Typically, they use an engine, carburetor, motorcycle fuel tank.
- Transfer mechanism.
As a rule, they use stars and chains from a motorcycle, stars from snowmobiles. The drive shaft from any unit, suitable in size.
- Guide skis.
It is optimal to take skis from another snowmobile. Since this element must be as reliable as possible, designed for the load of the unit itself, plus - the driver and possible passengers.
- Steering wheel.
As a rule, they use a handlebar from a motorcycle, respectively, with a throttle stick and a cable.
- Platform, seat, body.
In principle, you can do without a platform by fixing the seat (s) and body (optional) directly to the frame. But sometimes an additional platform is constructed on the frame, for example, from wooden boards, which provide little shock absorption, allow you to place several seats, and at the same time slightly make the structure heavier.
- Shock absorbers.
This element introduces additional complexity to the design. Therefore, they often do without it, especially if it is supposed to ride on uncompressed snow. The damping is installed on the front suspension and driver's seat. Can be taken from an old snowmobile or motorcycle.
- Small parts.
In addition to those listed above, other standard parts will be required to make a snowmobile: bolts, studs, nuts, hinges.
How to do it: instructions
First, the frame is cooked - the frame. Obviously, the larger the frame, the heavier the machine will be and the slower it will move. The optimal frame length is 2 m plus / minus.
On the frame are sequentially fixed:
- drive shaft with a receiving sprocket;
- power plant with a transmission star and a gas tank;
- front wheel axle (fixed to the frame by welding or bolting);
- rear wheel axle (fixed with a movable guide element);
- front suspension with steering structure and guide ski (s);
- seat (s) and body.
Tracks are made from V-belts or conveyor belts. The optimum track width is between 40 and 50 cm. A smaller width (40) will make the sled more maneuverable and better controllable. With a greater (50+) - the throughput of the device improves.
The function of the lugs is performed by pvc pipes of the above diameter cut in half lengthwise. They are attached to the rubber base with bolts and nuts. V-belts of insufficient width can be fastened together with metal lugs.
In order to be able to adjust the tension of the caterpillar track, the rear wheel axle is secured with a movable guide element, which allows the axle to be fixed in a certain position.
Additional notes:
- The center of gravity should be approximately at the center of the structure. Since the power plant is mounted in front, the driver's seat should be offset to the center above the front axle or slightly offset to the rear.
- The distance between the drive shaft and the power unit should be kept to a minimum to minimize the loss of energy transmitted to the shaft.
- If you install the shock absorber under the seat, the front seat support is rigidly attached to the profile arch, and the rear seat rests on the shock absorber.
- If you are making a snowmobile with the expectation of a large load, then to remove some of the weight from the tracks, it is advisable to install an additional ski in the middle of the base (between the two tracks). This ski is 50-70 cm long and attaches directly to the frame. However, this design assumes a more accurate preliminary calculation with the subsequent leveling of the height of the "leg", which complicates the manufacture of the snowmobile.
- It is advisable to maintain a low pressure in the tires of the snowmobile in order to avoid rapid wear of parts and high fuel consumption.
The considered version of the snowmobile is the simplest in design. If you have tools, a welding machine, it can be assembled in the garage without any problems.