Nowadays you don’t have to study tons of thematic literature and don’t spend months on master courses to solve any problem. It's the same with a car. On the Internet you can find a wide variety of master classes and tips on creating a homemade machine, be it a sports car or an ordinary tractor. But what materials are they made from? How to draw the right drawings? And what else can you do with your own hands for a homemade car?
A little history
The production of homemade passenger cars began several decades ago. This activity gained particular popularity and distribution during the Soviet era. At that time, the production of exclusively mass-produced models was launched, which had many errors and shortcomings, as well as an almost complete lack of comfort. Therefore, Russian craftsmen created individual cars from a variety of improvised means.
Most often, a new car was assembled from several non-working old ones. Also, for towns and villages, ordinary passenger cars were converted into real trucks. To achieve this, the carrying capacity was increased and the body lengthened. There were models that easily overcame any water obstacles.
Such homemade products were not prohibited by law. Some restrictions were introduced only at the end of the USSR, but they practically did not interfere with personal production. There were a huge number of tricks and gaps in the laws, thanks to which many hundreds of handicraft cars were registered in those days.
What is required for a homemade car
Before assembling your own vehicle, you need to carefully consider every step and all the details of the work ahead. First you need to decide on the main purpose of creating the machine. The design itself and the capabilities of future transport depend on this. If you need a universal household assistant, capable of lifting significant loads and passing any obstacles, then you will need to stock up on special parts and materials, and also focus on a reinforced structure. When creating a model of a sports car or any other fashion car, you need to think about the appearance.
In addition, different components are needed to work with motorcycles, scooters and various trailers. However, in any case, a homemade car, created with your own hands, requires several wheels, sheets of steel, special bolts for metal structures, a steering wheel, transmission, screws, etc.
What materials are best to use

Designing a car is not an easy task. The car must be safe for both the owner and others. Therefore, high-strength and wear-resistant materials should be used. In addition, we must not forget about comfort.
Most often, craftsmen use metal and wood in construction. For equipment and comfort you need glass, plastic, various fabrics and leatherettes, rubber, etc.
Moreover, each specific housing material has its own disadvantages and advantages. For example, a homemade car made of wood will be much cheaper than the same one made of iron or plastic. It is known that until the early 40s, all transport frames were made of wood. But such material makes the car less safe, and it is also impractical and short-lived. In addition, the weight of such a vehicle is quite large.
It is easier and more practical to use various metal structures or corresponding elements of old cars.
How to make drawings correctly
Any serious project requires preparation. Therefore, before you start making any homemade car with your own hands, you need to draw a detailed plan and drawing of the future structure. You can use several sketches: a general view of the vehicle, as well as a detailed drawing of each element. To do this, you will need a large Whatman paper, pencils and an eraser, paints and rulers, as well as other office supplies.
The easiest way, knowing modern technologies, is to make drawings on a computer. In addition, there are many special programs for this, for example, Compass, Splan or AutoCADe. You can also make diagrams in Word. Each such application has its own characteristics and advantages.
Now you can create absolutely any homemade cars. Craftsmen present their drawings for public viewing. Then they can be printed in any convenient format.
How to convert a personal car
Not everyone can design a completely new vehicle model, so most often one or more old, deregistered cars are used. In our country, these are usually “Zhiguli”, “Volga” or “Zaporozhets”. They are converted for different purposes: for children's carousels, transportation of heavy loads, driving in particularly dangerous conditions, etc.

Many car mechanics say that they start assembling a new car from scratch. First, they remake some elements of old personal cars, then add some new parts. And after that, a completely new model is designed. Very interesting are converted hybrids that can drive equally well on land as well as in snow or water.
Registering a homemade car
So, more than one month has passed, and you have finally designed and assembled your own homemade car. But in order to be able to ride it safely and unhindered, you must go through the registration procedure. And for this you need to take several difficult steps. It should be noted that only those cars that weigh more than 3.5 tons are subject to registration. Any semi-trailers and trailers, motorcycles and scooters are also registered.

Initially, the correctness and reliability of the machine design is checked. This is done by a special testing laboratory. Here the main parameters are checked, without which safe operation of the device is impossible. After carrying out the necessary tests, the owner is issued with these conclusions, as well as official documents for the parts used in the transport, should be contacted by the State Traffic Safety Inspectorate. Certification from the Institute for Highway Safety is also required.
The MREO receives a certificate confirming the absence of an identification number. To get a new one, you should contact the traffic police with your passport and all the documents received. Then, in your own car, you go to the MREO for final registration.
Do-it-yourself transport devices

Making a homemade car is just the beginning. It is also necessary to create all the conditions for more comfortable and safe operation. You will need all kinds of lighting fixtures, fans, additional accessories, etc.
For example, you can make a special starting device to start a car in the cold season. An industrial design will hit the pocket well, and a homemade device will help significantly save the family budget. To do this you will need transistors, switches, diodes, resistors, connecting wires, etc.
Individual anti-theft devices are also quite popular. Such homemade devices for cars help ensure the safety of the car in any conditions. The simplest one consists of just a single diode installed between the battery, toggle switch and voltage generator.
Some interesting facts about homemade products

Of course, in this area there were some extraordinary cases and episodes:
- The title of the lowest car belongs to the homemade Flatmobile. Its height is only 50 cm. You can only ride in it on flat and smooth asphalt.
- For lovers of modern vehicles, jewelry companies have created rings with patterns in the shape of various protectors. These products look quite original.
- Several British students have constructed a homemade one. Its peculiarity lies not only in speed and design, but also in the engine, because it runs on hydrogen. This technique is absolutely safe for nature. These homemade mini-cars are designed for highways and cities.
- the legendary Henry Ford could not leave the creator's garage for a long time, because... had impressive dimensions. Only after breaking the wall, the master was able to take out the new product.
Nowadays, it’s hard to surprise with some new car model, but a vehicle made with your own hands has always attracted attention and excitement. A person who makes a car with his own hands is faced with two scenarios. The first is admiration for the creation, and the second is the smile of others at the sight of the invention. If you look at it, there is nothing complicated about assembling a car yourself. A self-taught engineer is only required to know the design of a car and the basic properties of its parts.
Historical facts
The beginning of automobile construction was preceded by certain historical conditions. During the existence of the union, mass production of cars was carried out. They could not satisfy individual consumer needs. That is why self-taught inventors began to look for ways out of this situation and did this by constructing homemade cars.
In order to make one car with your own hands, three non-working ones were required, from which all the necessary spare parts were removed. If we take into account people living in remote villages, they most often improved various bodies, thereby increasing their capacity. Cars began to appear that had high cross-country ability and could even overcome water. In a word, all efforts were devoted to simplifying life.

A separate category of people attached great importance to the appearance of the car, and not just its technical properties. In addition to beautiful passenger cars, sports cars were made that were not much inferior to factory copies. All these inventions not only surprised others, but also became full-fledged participants in traffic.
During the Soviet Union, there were no specific restrictions on homemade vehicles. Bans appeared in the 80s. They concerned only certain parameters and technical characteristics of the car. But most people could get around them by registering one vehicle with the relevant authorities under the guise of a completely different one.

What is needed to assemble a car
To proceed directly to the assembly process itself, you need to think through everything in detail. You need to clearly understand how to make the future car, and what technical characteristics it should have. First you need to determine for what purposes the car will be used, and then implement the idea. If you need an outright workhorse, then in order to make it yourself, you will need special materials and parts. It is also important to make the body and frame of the car as stress-resistant as possible. When a car is made just for driving, the only question is its appearance.
You can learn how to make a car with your own hands for a child from the following video:

How to make drawings
You shouldn’t trust your head and imagination; it would be better and more correct to think about what exactly the car should be like. Then transfer all available considerations to paper. Then it is possible to correct something and as a result a hand-drawn copy of the future car will appear. Sometimes, just to be sure, two drawings are made. The first one shows the appearance of the car, and the second one shows a more detailed image of the main parts in detail. Before making a drawing, you need to prepare all the necessary tools, that is, a pencil, an eraser, whatman paper and a ruler.

Nowadays, there is no need to draw a picture for a long time using a regular pencil. To facilitate this task, there are special programs that have wide capabilities and with their help you can make any drawing.
Advice! If there are no engineering programs, then the usual Word test editor will help in this situation.
If you really want to, you can make any car with your own hands. If you don’t have your own ideas, then you can borrow ready-made ideas and drawings. This is possible because most people who create homemade cars do not hide their ideas, but, on the contrary, present them to the public.

Kit cars
In the vastness of Europe and America, so-called “kit cars” have become widespread. So what is it? This is a certain number of different parts with which you can make a car with your own hands. Kit cars have become so popular that there are many variants of them that can be folded into any car model you want. The main difficulty is not in the assembly, but in registering the resulting car.
To fully work with a kit car, you need to have a spacious garage. In addition, you need tool kits and knowledge. If you do not have certain skills, then the work will not give the desired result. If the work is done with the help of assistants, the assembly process will be faster and more fruitful.

This kit includes everything from small screws and instructions to large parts. There shouldn't be any serious difficulties for this to work properly. It should be noted that the instructions are not in printed form, but are presented in a video master class, where everything is discussed down to the smallest detail.

It is very important to assemble the car correctly. This is necessary for the creation to comply with all standards and norms prescribed in the regulations of the State Traffic Safety Inspectorate. Since failure to comply with the points leads to problems with registering the vehicle with the relevant authorities.
Advice! If there is such an opportunity, then you can consult with experts in this field.
You can learn more about what kit cars are and how to make them in the following video:
Designing a car using scrap materials
To make the task of assembling a home-made car as easy as possible, you can take as a basis the base of any other car that is fully functioning. It is best to take a budget option, since you never know in which direction the experiments will lead. If there are old worn parts, they need to be replaced with serviceable ones. If possible, you can make parts with your own hands on lathes, but this is only if you have professional skills.

First of all, you need to start assembling the car with the body, instruments and necessary interior parts. Modern inventors use fiberglass for the body, but previously there was no such material, and plywood and tin material were used.
Attention! Fiberglass is a fairly elastic material, which allows you to implement any idea, even the most unusual and original.

The availability of materials, spare parts and other components makes it possible to design a car that, in terms of external parameters and appearance, will not be inferior to the car models of the most leading automakers in the world. This requires ingenuity, good imagination and certain knowledge.
DIY supercar:
Construction of a fiberglass car
Assembling a fiberglass car should begin from the moment you select a suitable chassis. After this, the necessary units are selected. Then you should move on to marking the interior and securing the seats. Once this is completed, the chassis is strengthened. The frame must be very reliable and strong, since all the main parts of the car will be mounted on it. The more precise the dimensions of the space frame, the better the parts fit together.

For the manufacture of the body, it is best to use fiberglass. But first you need to make a base, that is, a frame. Sheets of foam plastic can be attached to the surface of the frame, matching the existing drawings as closely as possible. Then holes are cut out as needed, and if necessary, the parameters are adjusted. After this, fiberglass is attached to the surface of the foam, which is puttied on top and cleaned. It is not necessary to use foam plastic; any other material with a high level of plasticity will be useful. Such material can be a continuous sheet of sculptural plasticine.

It is worth noting that fiberglass tends to deform during use. The reason is exposure to high temperatures. To maintain the shape of the structure, it is necessary to reinforce the frame with pipes from the inside. All excess parts of the fiberglass must be removed, but this should be done after it is completely dry. If everything is done correctly and there is no other work regarding the design, you can move on to interior equipment and electronics mounting.
If re-design is planned in the future, a special matrix can be made. Thanks to it, the body manufacturing process will be faster and easier. The matrix is applicable not only for making a vehicle with your own hands from scratch, but also for the purpose of improving the condition of your own existing car. Paraffin is used for production. To get a smooth surface, you need to cover it with paint on top. This will increase the ease of fastening parts for the new car body.

Attention! Using the matrix, the entire body is made. But there is an exception - the hood and doors.
Conclusion
In order to implement your existing idea and make a car with your own hands, there are a number of suitable options. All sorts of working parts will be useful here.
With your own hands you can make not only a passenger car, but also a larger and more powerful truck. In some countries, craftsmen manage to earn decent money from this. They make cars to order. Cars with various original body parts are in great demand.
How to make a Porsche with your own hands:
Do you have a car that you designed and built yourself? Then, in order to be able to do so, you need to register it. However, not all home-made cars can be registered, but only those whose maximum weight is no more than 3,500 kilograms. In addition to passenger cars, you can register motorcycles, trailers and semi-trailers.
Procedure
You need to start with the requirements for the design of the car. They are put forward by the testing laboratory. It also issues a conclusion on the conformity of the design of your car. There are certain parameters that must be met. Therefore, we recommend that you first agree on the design of the machine by contacting the Automotive Research Institute. At the same research institute, your vehicle will be tested, after which you will be given a test report.
You are required to present a document that confirms the legality of its acquisition. If you have assembled a vehicle from components of an old car, you must obtain a certificate about this in advance. If you bought your previous car second-hand, attach it to the documents notarized. You will need to present all this to the traffic police.
Once you receive the test report, you need to go to the Highway Safety Institute. This authority will issue you with a conclusion that your car is safe to drive in the city and its design complies with established standards. To receive such a document, you must provide a test report. Certification must be carried out within a month after you submit the corresponding application to government authorities.

After the work has been done, you can go to the MREO. There you will be given a decision stating that your car does not have an identification number. Then you will need to go with this paper to the forensic bureau, where they will prepare a referral for you to the traffic police for the car. There you will have to present the following documents:
- passport of a citizen of the Russian Federation;
- opinion from the Institute for Highway Safety;
- conclusion of a forensic expert from the MREO.
The traffic police will assign an identifier to the car and prepare a conclusion about the number. After the number is filled in, you must go to the MREO in your homemade car, taking all the documents received during the procedure. Then your vehicle will finally be registered.
Please note that you will have to pay state fees for each document. After registering the car, you will receive a technical passport. It will indicate “homemade” in the “Brand” column. “Special marks” may indicate which model your car was based on.
Video review of homemade cars of the USSR:
About trailers
If you plan to register a trailer or semi-trailer, the conditions for the procedure change slightly. You will also need to present the purchase receipt to the traffic police. In addition, you will need to provide a technical passport of the vehicle with which the trailer will be used.
A little history
Making homemade cars has become popular for a reason. This was preceded by certain historical conditions. The fact is that during the Soviet Union, cars were not produced that would meet the requirements of a specific group of consumers - only mass models were produced. In this regard, our craftsmen created cars with their own hands, from improvised means.
Then, from three old non-working machines, one new one was assembled. In villages, enthusiasts converted passenger cars into trucks. They independently lengthened the bodies and increased the load-carrying capacity of the vehicles, since at that time trucks were not provided for personal use. Craftsmen even created amphibians that were able to overcome water obstacles. And all in order to simplify your life.
There were also aesthetes who were concerned not only with the technical and operational characteristics of cars, but also with their appearance. They created a wide variety of vehicle options. All these masterpieces were displayed at exhibitions and drove quite legally on city roads.

During the Soviet period, homemade cars were not prohibited. Restrictions appeared in the eighties. They concerned power (50 hp per ton) and dimensions (4.7 m - length; 1.8 m - width). But car enthusiasts of that time used some tricks. For example, they registered them with Rostechnadzor under the guise of tractors. Thanks to the lenient requirements for home-made products, a large number of hand-built vehicles were registered during that period.
Ban on homemade cars
In 2005, registration of homemade cars was completely banned. This was argued by the need to develop clear requirements and standards for such vehicles. However, the real reason for this, most likely, was the emergence of a new phenomenon in the automobile markets - the sale of “construction sets”. The scheme was simple: to evade taxes, craftsmen imported them into the Russian Federation, and then collected them and registered them as homemade.
But in practice, this ban also affected those who actually made domestic cars with their own hands. However, car enthusiasts did not lose their enthusiasm because of this. This is evidenced by the holding of annual exhibitions “Autoexotics”, at which home-made masterpieces were presented. Unfortunately, these cars did not have license plates, were transported on tow trucks and could not be used for driving on city roads. The most annoying thing is that many homemade products could give odds to some production cars. Later, the authorities nevertheless signed an order, according to which it is allowed to register vehicles manufactured independently.

Certification standards
In order to do so, you must first be certified. The requirements defining the procedure are approved in the corresponding order of Rostekhregulirovaniya. Now cars are evaluated according to a simplified scheme - as a vehicle that is produced in “small series”. A small series means a single copy of a machine.
This is a little trick of the state, with the help of which it was able to get rid of the import of so-called designers. The number of cars in a small batch is carefully checked. It is clear that the author of a homemade car that he assembled for himself will not produce more than one vehicle of the same type. Thus, it is no longer profitable for someone involved in industrial assembly to work according to such a scheme. It is not possible to go through the certification procedure again.
European requirements
The requirements for home-made cars are no lower than the standards established. There are no “indulgences”; in addition, such vehicles must comply with the standards of the Economic Commission for Europe. True, certification of small batches is carried out according to a reduced list of requirements. However, this is still a fairly serious procedure, which not all homemade products undergo.
The video shows a homemade Ukrainian sports car:
In accordance with a document approved by the European Commission, vehicles are checked for compliance with the following requirements:
- traumatic safety;
- braking performance;
- and places of their fastening;
- the quality of glass and glass, as well as the correctness of their installation;
- , light alarm;
- good machine controllability;
- high car stability;
- low level of harmful substances in the cabin;
- low level of harmful substances in the exhaust pipe.
All these requirements apply to passenger cars manufactured independently.
Good news
By sending your car for certification, you don’t have to worry about it being damaged during testing. According to the regulations, individual vehicles are subjected to only those tests that will not cause damage to them. Instead of tests that harm the machine, expert evaluation of the design is allowed.
After carrying out all the necessary examinations, the owner of the vehicle (if it complies with the established standards) receives type approval. This document allows him to go to his place of registration. When registering a car, all data is entered into the register.
Video review of a homemade SPACER car:
Restrictions
Self-made cars made from components that were imported into the Russian Federation for more than six months are not subject to registration. They must be provided with appropriate documents confirming the legality of their appearance on the territory of the country. All of them must be certified. If you make any changes to the design of a registered vehicle, including the design of its components, spare parts and additional equipment, you will have to go through the certification and declaration of conformity procedure again.
If you are not certified
If your homemade vehicle does not meet safety requirements, you may be denied registration by the certification authorities. You have the right to appeal such a decision through the court. However, it will be much more effective if you try your vehicle in accordance with the reasons for the refusal. After the changes, you can submit an application again for approval of the refurbishment.
If you re-equip the car in accordance with the issued conclusion, and use the same units that, for example, your friend who received the permit used, then things will go much faster. Of course, if he submitted a similar model for certification. However, do not forget that you can obtain a permit for each car individually. Coordinating mass production of homemade machines will be more expensive.
Video review of a homemade Ferrari:
If you receive a refusal, you can have the vehicle refurbished at or at a repair shop. Of course, you can do this work yourself, but you will still need to obtain a certificate of its completion at a certified station. After conversion, the electric vehicle will need to be certified again for compliance with the requirements and conditions determined by the expert organization. These organizations include testing laboratories that have a valid accreditation certificate in this area. If you are now given a permit, go to the MREO and register your car.
Car lovers should understand that in most cases, building a car is much easier than registering it. Therefore, before registering a homemade vehicle, think about whether you have enough patience and money for it. When going through the certification and registration procedure, you must pay state fees.
But if all this doesn’t scare you, go for it! Now that you know how to register a homemade car, you can start assembling your masterpiece. By the way, it is quite possible that you can do it, because today some models of home-made cars are very popular among lovers of luxury cars.
Please leave your comment on the article! We are interested in your opinion.
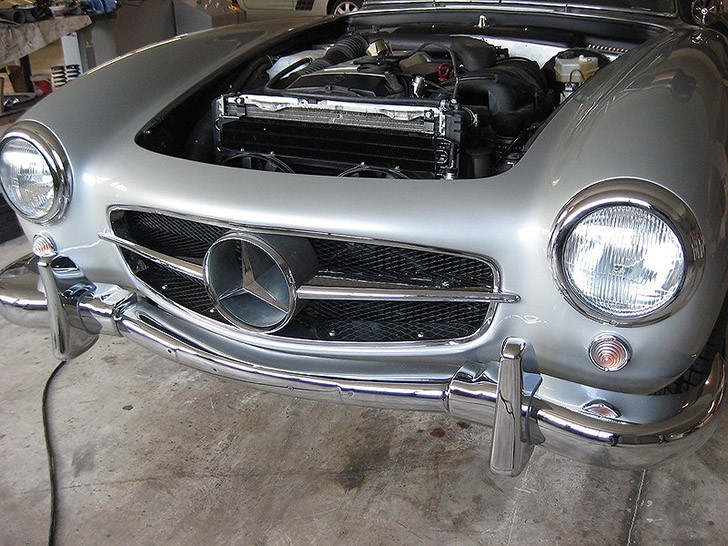
Looking for content for the community kak_eto_sdelano I accidentally came across a blog in which the author described how he created the car. It was not just any car, but a legendary car with an interesting history - the Mercedes 300SL “Gullwing”. I became interested in the history of recreating an automobile rarity and immersed myself in fascinating reading about how a copy of a legendary car was made from scratch, and not just a copy, but a car assembled from original parts.
Later I was able to meet Sergei, who made his dream come true, and learn some details about the creation of the car. He allowed me to take text and photos from his blog and make a post for community readers.
(Total 90 photos + 5 videos)

1. In the process of creating the Mercedes 300SL “Gullwing”, suspension from the Mercedes W202 and W107 was used. Remembering that the best is the enemy of the good, we install adjustable shock absorbers. Particular attention should be paid to the rear axle gearbox; usually it is with this that the biggest problems arise, which is why customizers are so fond of solid axles. On a Mercedes, this unit, along with the drives, is assembled on a subframe, which makes working with it much easier.


5. The stainless steel exhaust system complies with the Euro-3 standard, and the fuel tank is a real work of art: to prevent fuel from splashing, partitions and overflow tubes are installed in it. One of the photos shows the steering wheel lock.


10. In the Gullwing project, it was decided to use the next generation of M104 engines with a volume of 3.2 liters and a power of 220 hp. paired with an automatic 5-speed transmission. The choice of engine was not accidental - it is more powerful, lighter and quieter. The gearbox is primitive, with a torque converter; many are familiar with these units from the Mercedes W124, W140, W129, W210. A hydraulic booster was also installed, all units are new, so there should be no problems.


12. Making the body.

13. Back in 1955, Daimler-Benz produced 20 cars with an aluminum body and one with a composite body. We decided to try composite.


15. After making the body and assembling the chassis, the crossing of the body with the frame begins. The process is so painstaking and dreary that no photographs or words can convey it. Assembly and disassembly, adjustment - all this takes more than one day. Many parts are modified on site, and the body is attached to the frame through special dampers with bolts in 30 places.

16. All body parts are installed and adjusted - doors, hood, trunk lid. There is a lot of hassle with glass - they are mounted on rubber seals, and since all the seals are original and designed for steel, you have to strictly observe the thickness of the frames of the openings. Each part is removed, adjusted by hand and only then installed in place.


24. Many parts for the most popular rare models are still produced in small batches in some workshops, which is actively used by all restorers. But let’s be honest: the factories themselves counterfeit their rarities, and Audi and Mercedes have especially succeeded in this.

25. Many museums have explicit copies. So, recently a lot of “Khorchs” have proliferated. This is especially interesting considering that all factory documentation was lost during the war. Dozens of workshops use equipment from those years to produce fakes, passing them off as carefully restored products. The devil is in the details.

26. So we simply bought and collected all the details that could decorate any rarity for 500 thousand euros. I assure you, every nut and bolt (I'm not even talking about rubber bands) is correctly marked as 1955. Everything is original, even the seat slides.

27. Now the body is primed, and this is the most important point, because the composite is a special material for painting, because it requires plasticizers and all sorts of other complex things. The secrets of the primer are kept and no one will ever tell you. But it looks beautiful.


A short video of the painting process

31. Well, while the body is being painted, let’s prepare the components for assembly. As I already said, the devil is in the details, and there are more than 2 thousand of them in the car! The dashboard, we were looking for it for a very long time.

32. We also find devices and relays; not everything, of course, can be obtained at once.

33. But with enviable patience and perseverance, you will have the opportunity to get a completely authentic instrument panel, consisting of 80 (!) parts.

34. The main thing is that it will work later: all the devices are expensive. Cheap is never good.


36. The body is covered with 6 layers of varnish, it is very beautiful and there is no need to cover it with chrome film. Yes, shagreen is a must, and the grain should be fine. Nowadays they don’t paint like that anymore, they dilute everything with water, they care about the environment, they take care of nature. By the way, paint 744 (silver) is the most difficult to paint, as any painter will tell you.


41. The chassis and body have finally been married.


45. Doors installed. It would seem like a simple matter, but I want to tell you a story. The Mercedes 300SL “Gullwing” had many design flaws. One of them was the doors themselves: they were steel, heavy and attached with hinges to the roof of the body, and were fixed by a spring enclosed between hollow steel tubes with hinges at the end.
In the uppermost position, the spring was compressed, and when the door was lowered, it stretched and slammed the door with a roar. When opening, it was necessary to overcome the resistance of the spring, which simply tore out the door along with the brackets (900 euros each).
Experienced Gullwing owners know that if used improperly, this will inevitably lead to deformation of the roof, and the brackets themselves simply break. Over time, the rod and spring assembly became a frantic shortage and its cost increased to astronomical heights. Each owner of such a rarity repairs these units once a season. We decided to go the other way and install gas shock absorbers.

46. It would seem that it could be simpler, but it was not so. We had to develop the entire unit, which took 4 months of hard work. Fortunately, a workshop was found that brought the ideas and drawings to life. With complete external authenticity, the doors today open like the rear fifth door of a German SUV. The knot turned out to be so successful that it immediately became an object of desire for all owners of rarities; I think that soon all “gulvings” will have doors that open very effectively and smoothly, without knocking. Now this process has truly become like the flapping of a seagull's wing - graceful and smooth.
This is just one, and the simplest, example of the problems that had to be solved during the construction of this car.

47. By the way, the door lock mechanism has also undergone changes. Despite the cost of 1,500 euros, it very often jammed and did not fix the door, but that's another story.


49. At the very beginning of the project, it seemed that finishing the interior was the smallest problem, fortunately there are workshops at every step for re-upholstering interiors, and now any craftsman can handle the leather. It’s a big deal to cover a bunch of parts with leather, but as it turned out, this is a HUGE PROBLEM! After four attempts to create interior parts in tuning studios, I realized: everything is much more complicated.
The products being created did not want to look like the originals. Everything looked like a cheap fake: the leather was bristling, traces of heat treatment were visible, the texture did not match, and no one could match the material. In short, I began to delve into the subtleties and found out that modern craftsmen do not know how to work with felt, wool and other materials used at that time. They stupidly warmed and stretched the skin, used foam rubber wherever they could, actively worked with an iron, in short, mercilessly destroyed materials, depriving them of their naturalness and nobility. I'm not even talking about durability.
After suffering for six months, we came to the conclusion that only restorers are capable of such work. They have special foam rubber and felt. In general, we found a company, guys - wolves, guys about 60 years old, who have been restoring only Mercedes for 40 years. What they showed and told us is just a novel about leather, and they guard their secrets in much the same way as the secret of making paper for a dollar.
The video shows an approximate progress of the process.

50. Interior details for my baby took 4 months to complete. The skin is simply alive.

51. I’ll also add that the leather that manufacturers offer today is chemical bullshit with impregnations. It’s not for nothing that all owners of Mercedes and BMWs are freaked out after a year of use - the interiors look like those of ancient redvans: not fresh, the skin stretches out and peels off. As I said earlier - the devil is in the details.

52. I'm not even talking about vinyl, widely used by the Japanese, and indeed by all manufacturers in principle. Nowadays in a Mercedes there isn’t enough leather for a jacket, it’s just bullshit, that’s why options appear - “design”, “individual”, “exclusive”. Leading manufacturers will offer you real leather for at least 10-15 thousand dollars, but what they sew for you for 50 thousand rubles is hard to even call leather.


54. Wheels are one of the important parts of a car. So for our handsome man there were two types of wheels. The first ones were installed on the civilian version.

55. The second were offered as an option. They came from sports - real ones, with a central nut. Of course, it’s nice to have chrome wheels, but the price of 5 thousand euros per wheel is somewhat annoying.

56. How can you then hit a nut with a hammer, knowing that it is gold? The original disc for the classics is also not cheap - 3 thousand euros. So I think I really want to save 8 thousand euros.

57. One of the main factors in engine operation is the removal of exhaust gases (combustion products). I don’t want to remember the laws of thermodynamics here, I’ll just say that for the last 150 years the exhaust pipe has been a symbol of progress. Remember locomotive chimneys, steamships, blast furnaces. Remembering my love for detail, I want to assure you that the most careful attention was paid to the pipe. This is a masterpiece of engineering.
The exhaust system is made of stainless steel, which no manufacturer can afford, and is a complex system of thick-walled and thin-walled pipes mounted one inside the other, this made it possible, with complete authenticity of the appearance of the pipe, to solve the problem of “guzzling” - noise and heating of the interior . Well, the main thing is the sound of the exhaust, it’s just a song. The problem was solved using resonators installed inside the system.
If you want to understand what kind of car you have, look at the exhaust pipe!
Don’t pay attention to the date in the photo, you just bought a decent camera. So they clicked it, but they didn’t understand the instructions, and it turned out to be the wrong date. Well, to hell with it, everyone interested - enjoy.

58. We made a lot of changes to the design, we try to make everything as authentic as possible. A very tricky handbrake.

59. The tank is a different story; we made ours from stainless steel, slightly changing the location of the neck, but that’s a separate story.


63. There is a good saying - it is better to see once than to read about it a hundred times. Everyone who reads and watches my blog knows my favorite expression - THE DEVIL IS IN THE DETAILS. It is these details that I will show you today. There is no point in writing for a long time, you will understand everything yourself.
64. Braided harnesses and wiring, well, I think you just haven’t seen anything like this before, a two-tone horn, in short, just look, all this is called TECHNOLOGY.


67. The main task facing the implementation of this project was to create complete authenticity of all interior details. It would seem that it could be simpler than copying an existing sample, but, as they say, everything is not so simple, and much more difficult than even restoration.
So, we needed to make all analog devices work and work correctly with the electronic components of modern units; stick a bunch of additional equipment into a cramped little car, such as air conditioning, power steering, and brake booster. All this should work from standard toggle switches and switches. The heater dampers used to have mechanical drives, like on the Volga GAZ-21, so the heater also had to be thoroughly redesigned. But the biggest problem was making the gear selector.

68. The whole difficulty was that the car was originally built for sports, it was small and very low, even the engine had to be placed at an angle of 30 degrees so as not to disturb the silhouette of the car. The box was located in a tunnel and had a direct articulated drive.

69. There was no more than 2 cm of free space between the box and the box itself. I have already said that the car itself was cramped and very noisy, this problem also had to be solved. Since a standard engine-box pair was taken, the task became even more difficult, because the automatic gearbox is much larger in size and has a completely different control principle.


71. After much torment, a hinge and a rod system were designed, which made it possible to completely imitate this unit, which is easy to verify by looking at the original.

72. Well, the most interesting thing: if you carefully study the photographs, you will see that the seats are much lower than those of the original, this is also a trick. The fact is that the car was so cramped that a person with a height of 180 cm rested his head on the roof and was forced to sit hunched over at the steering wheel, but I like to drive with straight arms, so I had to change the angle of the steering column to ensure comfort and not disturb general form. How this was achieved is a whole novel, from the manufacture of unique sleds to the redesign of the floor and seats.

73. I'm not the first who decided to recreate the legendary car. Back in the late 70s, similar attempts were made in America; Tony Ostermeier, a former mechanical engineer from Gardena, advanced the furthest. He managed to build about 15 cars in 10 years using units from Mercedes of those years. Today these cars themselves are rarities.
I have seen them, of course, they are not nearly as high quality products as I would like, but they are the best that have been made. In the 90s, there were attempts by the American company "Speedster", using Tony's matrix, to implant it on the components of the Chevrolet Corvette C03. Only two cars were produced. One of them is now in Ukraine, and the other is in Moscow. The cars were sold for $150 thousand.

74. Actually, that's all. True, there were attempts to put a shell on SL and many more loud statements, but it was all zilch, people ran ahead of the locomotive, as with our e-mobile: there is nothing yet, but 40 thousand applications have already been submitted.
By the way, working with composites is very difficult. Only its high-quality painting costs about 10 thousand euros. Well, and most importantly: FORGING AND COPYING ARE TWO BIG DIFFERENCES.

75. They say that everything in a car should be perfect - both the engine and the trunk. On the first car they decided to use gas shock absorbers to open and secure the trunk lid.

76. We slightly redesigned the filler neck, reasonably considering that if it fits tightly to the trunk lid, this will reduce the risk of the smell of gasoline spreading inside the cabin if it is spilled.
I didn't like the idea. On this car they made it closer to the original, changing only the shape of the filler neck (the steel funnel around the cap should prevent fuel from spilling onto the carpet).

77. Of course, the collective farm couldn’t do it without it: they built a leather gondola around the filler neck. It seems to look nice, and they abandoned the shock absorbers, installing the original mechanism (stick) for fixing the trunk lid. You could, of course, mess with the springs, like on modern cars, but it seems to me that this would kill the very spirit of the car. The trunk looks very nice when open.

90. Let's go around the car.
I can only add one thing: before you start doing something, think carefully about whether you have the strength to complete what you started.
After arriving in Russia.
Video from inside the recreated car.
In this video you can see how the Germans are restoring the hero of the report, the same “gullwing”.
Agree, it’s nice to be a car owner. But it’s even more enjoyable to build a cool car with your own hands.
Today we will share information about what you need to build a cool car in your garage.
A Kit Car or “component car” is a set of parts from which the buyer can assemble the car themselves or entrust the assembly to a third party. Kits can vary significantly in content, ranging from those in which the complete set + instructions to those in which the set of parts is not complete (that is, for example, you will have to order the engine and transmission separately).
When assembling such a car yourself, it will not hurt you:
- spacious garage;
- a complete set of necessary tools;
- good knowledge of auto mechanics;
- support team in the form of friends who will always help.
The importance of the team is difficult to overestimate. For example, the guys in the video below assembled the car in just 7 days!
History of Kit Cars
The basic definition of a Kit Car is a car assembled from spare parts put up for sale. parts from a specific manufacturer. Most manufacturers tend to sell a full range of spare parts needed to completely assemble the car. Such kits are usually accompanied by detailed instructions and the model can be assembled in the garage on your own.
Essentially, a Kit Car is just as good as a factory-produced car, but in no case can one rule out factors such as efficiency and safety, which largely depend on the person doing the assembly.
The first Kit Car was designed by Englishman Thomas Hyler White in 1896. As you can see, it took a long time for this species to gain popularity.
By the 1950s, Kit Cars shifted into second gear and their production increased significantly. And in the 1970s, the real Kit Car began in Great Britain - a revolution associated with the fact that such cars were not considered a vehicle and were not subject to appropriate tax. Models such as the Lotus Elan appeared on the market, which could be assembled at home without paying tax on the purchase.
Most modern "build models" are replicas of famous cars from the mid-20th century. With bodies made primarily of fiberglass and polyester panels, such models were lighter and easier to handle than the average factory car.
What is in the box?
If you're thinking, "Is this crazy?" then think again!
Every year thousands of assembly kits are sold around the world. this means that when you read this article, some guys are sitting in their garage making their own car after work. Kit Cars are relatively cheap and typically cost less than $3,000.
Most companies selling these kits expect you to come and purchase your chosen kit on designated days. Depending on the company you purchase the kit from, this period can vary from 1 to 10 days per year.
Regardless of the model you buy, the basic set will include: chassis, body parts, engine, radiator, transmission, clutch, brakes and shock absorbers. The kit comes with a huge bag of nuts and bolts, as well as other parts that depend on the type of car you want to build. If you don't have an assembly manual, this will be quite difficult to figure out.
At the next stage, the most important thing is to assemble everything correctly, because people will ride in the assembled car and it is important that the car does not fall apart under them and is safe. Most kits also include an instructional video where you can watch someone assemble the car.
If the instructions provided by the manufacturer are not enough for you, you can always consult with other experienced kit cars enthusiasts for special instructions. forums and resources on the Internet, but it’s better to meet them in person (if there are such guys in your city). If you are assembling a car for the first time in your life, then use this option.