Symptoms: sucks air into the engine cylinders, a suction sound is heard from under the hood; exhaust gases escape under the hood.
Possible reason: the seals of the intake pipeline (manifold) are worn out; seal worn out exhaust manifold.
Tools: a set of wrenches, a set of sockets, a set of screwdrivers.
1. Place the car on an inspection hole or overpass.
2. Drain the engine cooling system.
3. Disconnect the exhaust manifold and the exhaust pipe.
4. Remove the air filter housing from the vehicle.
5. Disconnect the drive rod from the carburetor air damper, and then disconnect from it lateral thrust drive throttle valve.
6. Dismantle battery. This operation is optional, but is recommended to improve access to other parts and fasteners.
7. Using a 13mm socket wrench, unscrew the bottom nut securing the air intake.
8. Using a 13mm socket wrench, unscrew top nut securing the air intake, and then remove it from the vehicle.

9. Unscrew the top nut securing the starter heat shield.
10. Using a 13mm socket wrench, unscrew the eyelet mounting nut and then remove it.

11. Using a 13mm socket wrench, unscrew the nut securing the ground wire, and then remove this wire from a hairpin (for better clarity stretching device drive chain The timing belt has been removed).

12. Using a 10mm wrench, unscrew the two nuts securing the coolant supply tube to the coolant pump, and then disconnect the tube. During reinstallation, replace the seal gasket for this connection with a new one.

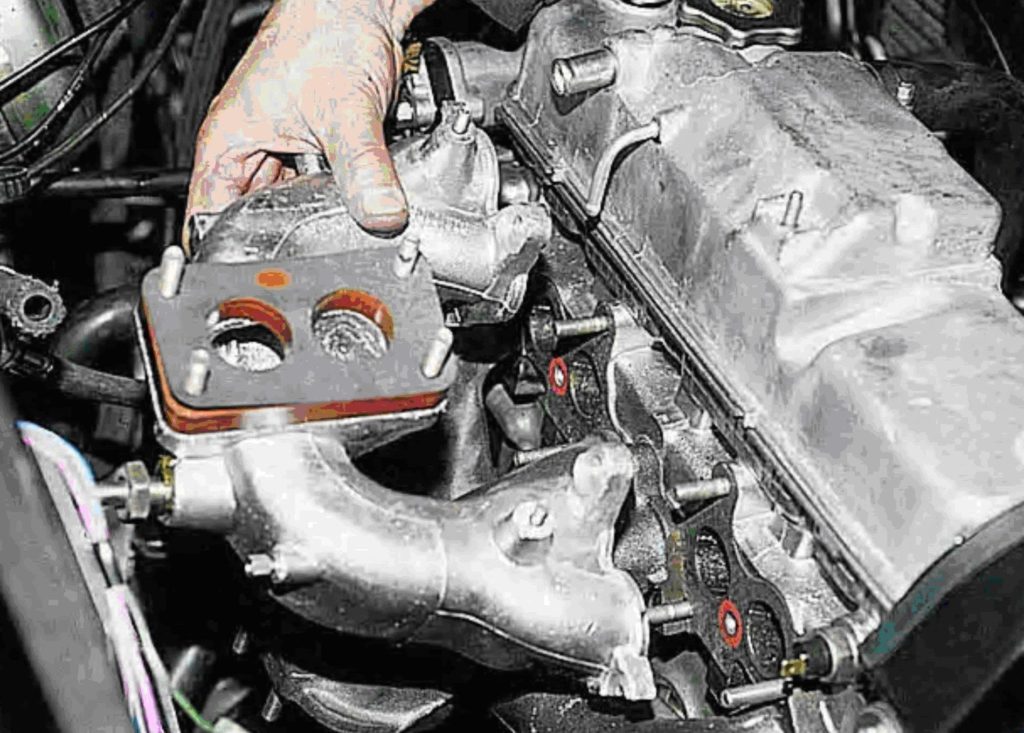
13. Using a 13mm socket wrench and extension, remove the seven nuts securing the intake manifold to the exhaust manifold. Please note that under the joint mounting nuts of the intake and exhaust manifolds there are washers that are slightly thicker than others (the attached photo shows the mounting points for the intake manifold and exhaust manifold).

14. Disconnect the intake manifold from Engine cylinder head, removing the first from the studs on the second. After this, move the collector to the side.

15. Remove the exhaust manifold from the engine head studs.

A gasket consisting of several layers is installed under the VAZ 2109 exhaust manifold. For various reasons (uneven tightening of nuts, aging), it fails and requires replacement. The first sign of burnout is the appearance of a characteristic noise. Yes, you can drive if you don’t spare your ears. But it is better to replace it in a timely manner, since ignition in the engine compartment is possible.
The gasket is made of pressed asbestos, which is reinforced with steel thread. The price of such a gasket, depending on the store and manufacturer, ranges from 50-200 rubles. The cost of replacement in car services is not less than 1000 rubles. And this does not take into account the cost of gaskets, nuts, and other components that may require replacement. Therefore, it will be much more effective to do the repairs yourself, saving a decent amount.
Before replacing the manifold gasket, it is necessary to understand how the process itself proceeds. You don't need special tools or the experience of a great 80th level mechanic. A standard set of tools that are found in every garage is sufficient. And you shouldn’t immediately blame the fact that a breakthrough has appeared in the gasket. Try tightening the nuts first. It is possible that they have weakened a little. But if it is not possible to get rid of the passage of gases, you need to start repairs. The work order can be briefly divided into several stages:
- removing the air filter;
- dismantling the air filter housing;
- removing the carburetor;
- withdrawal intake manifold;
- replacing the manifold gasket;
- assembly of units.
Once you have decided on the order, get to work. The simplest thing is to remove the air filter and its housing. First, unscrew the nut in the middle with a “10” wrench and unfasten the latches. Then, removing the cover, take out the filter element. Using a key “8”, unscrew the nuts from the studs and use a screwdriver to loosen the clamp of the pipe fitting to cylinder head cover. Then remove the air filter housing. And now about how to remove the manifold on a VAZ 2109 with your own hands.
Removing the carburetor and intake manifold

You need to have the following tool on hand:
- Flathead and Phillips screwdrivers.
- 8" socket or tubular wrench.
- Open-end or socket wrench set to “13”.
- Ratchet (if necessary).
To remove the VAZ 2109 manifold (carburetor), you must first dismantle the injection system. The disassembly process looks like this:
- Disconnect the hose that supplies antifreeze from the cooling system to the carburetor starter. To do this, loosen the clamps and carefully drain the liquid. Work must be carried out on a cold engine.
- Remove the exhaust pipe. To do this, unbend the fixing plate and unscrew the nuts with a “13” wrench. Using the same wrench, unscrew the nuts that secure the pipe to the bracket.
- Remove the throttle valve drive cable mounting bracket. Remove the spring and loosen the nut, disengaging the cable.
- Disable solenoid valve idle move.
- Disconnect the vacuum tube and carburetor heating hoses.
- Remove the crankcase ventilation pipe.
- Unscrew all four nuts that secure the carburetor body to the intake manifold.
- Carefully lift the carburetor body, being careful not to damage the studs.
The next step is to dismantle the intake manifold. You will need the same tools as in the previous step. The procedure consists of the following steps:
- Unscrew the two fastening nuts and bend the platform under the carburetor back.
- Remove the hoses that connect to the intake manifold.
- Unscrew all the nuts (there are 7 of them) that secure the manifold.
- Remove the intake manifold of the VAZ 2109, slightly rocking it to the sides.
Removing the exhaust manifold and replacing the gasket

The tools you will need are 13" wrenches of all types. The removal procedure consists of the following steps:
- If you have not yet removed the nuts that secure the pants, do so.
- Move the exhaust pipe to the side, unscrew the remaining nuts that secure the manifold.
- Carefully dismantle it, try to do it without jerking. If the studs are stuck to the nuts, it is necessary to use WD-40 pre-penetrating lubricant.
It also happens that the studs break off. If one of them is missing, the gasket will burn out very quickly and you will have to do all the work again. And it is possible that you will have to install a new exhaust manifold on the VAZ 2109, since the old one cannot be restored.
Well, that's all, now you can remove the old gasket. If it is burnt and strongly adheres to the metal, you can use a thin knife to remove it. But even better is to buy a solvent. With its help, you can painlessly remove the old gasket. Be careful not to damage the metal. If necessary, remove any remaining gasket using sandpaper. Install a new gasket and reassemble in reverse order. For convenience, coat the gasket and the studs on the cylinder head with a thin layer before installation. graphite grease. This will improve the tightness and prevent the gasket from sticking to the metal.
A short video about dismantling collectors on a VAZ 2109
You might be interested in:
The exhaust system of a VAZ-2114 car with an injection engine is not particularly complex, however, sometimes you have to spend a lot of time, and maybe money (if the work is done at a service station) to bring it to normal condition. Today we will look at the exhaust manifold of the VAZ-2114, with the features of its dismantling and installation.
When is it necessary to replace and remove the exhaust manifold on a VAZ-2114
Huge temperature changes are the main problem faced by the exhaust manifold and the gasket, for which it is removed. The collector itself is made of a special grade of cast iron; it can withstand high temperatures (up to 800-900 degrees), however, these are critical values beyond which the collector may warp or crack.
Exhaust manifold VAZ-2114
Its main task is to collect exhaust gases and their distribution into the exhaust pipe of the muffler.
Replacing or dismantling the VAZ-2114 exhaust manifold is necessary in the following cases:
- Mechanical damage to the collector.
- Warping and loss of tightness at the junction with the cylinder head.
- Burnout of the gasket between the head and the manifold.
- The appearance of cracks as a result of engine overheating.
- Replacing the collector with a device of a different configuration, adapted to a more severe operating mode.
In the event that we are not going to participate in high-speed races for the prize of the head of the regional traffic police, replacing or dismantling the collector may be necessary in a number of cases.
Tools and materials for dismantling
There are a number of symptoms that will indicate that you need to prepare to remove the exhaust manifold:
- increased noise level in the engine compartment, the engine produces a characteristic loud noise in any operating modes;
- exhaust gas breakthrough V engine compartment and sometimes to the salon;
- reduction in engine power due to a mismatch between the exhaust gas outlets in the cylinder head and the manifold.
Many people decide to replace the standard manifold with a “tuning” one, made of stainless steel and having a different configuration, thereby wanting to increase engine power and reduce the resistance that the standard manifold provides exhaust gases. As a rule, the most common cause dismantling the unit, the gasket burns out.

Exhaust manifold gasket
The manifold gasket on the VAZ-2114 is made of pressed reinforced asbestos and is designed to ensure a tight connection between the block head and the manifold flanges. Asbestos is used to correct the coefficient of thermal expansion of the aluminum alloy from which the head is cast and the cast iron from which the manifold is cast. On high speed and under prolonged loads the gasket may burn out. Then its replacement and dismantling of the collector are inevitable.
To dismantle the manifold, you will need a standard set of tools, a set of sockets with extensions, and WD-40 penetrating lubricant or its equivalent. In case of broken studs, a stud extractor, drill, drill bits and a set of taps will be useful. A day or two before dismantling the collector, it is worth moistening all the fasteners several times, this will significantly simplify the removal procedure.
Manifold dismantling procedure - step-by-step instructions
The dismantling process itself is not so complicated; access to some nuts is difficult, so it is advisable to carry out the work on a lift or on inspection hole. The algorithm of actions for the injection VAZ-2114 in this case looks like this:
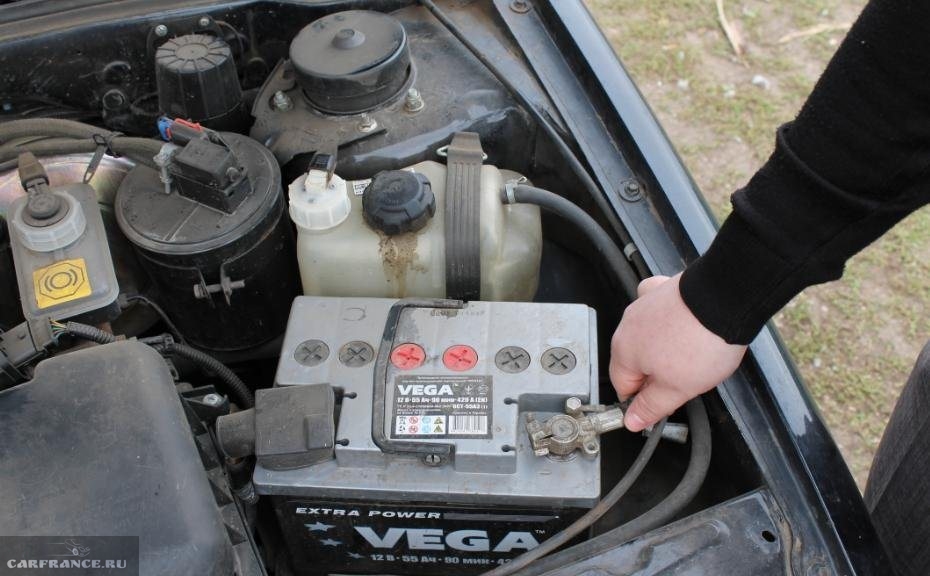
- Remove the negative terminal from the battery or turn off the mains switch.
Remove the terminal from the battery
- Drain the antifreeze from the system. This point should not be neglected, despite the fact that the factory does not oblige you to empty the cooling system of liquid.
Drain the coolant from the system
- Disconnect the fuel pipes.
Removing the fuel pipes
- We find the throttle position sensor, idle speed sensor and remove the wires from them.
Disabling the throttle position sensor
- Remove the crankcase ventilation hoses, the hose from vacuum booster brakes
Unscrew the pipes
- We dismantle the receiver, disconnect the injector wires and remove the fuel rail assembly.
- We get full access to the collector. We dismantle the thermally reflective screen.
Removing the thermal shield
- Unscrew the muffler exhaust pipe from the manifold.
Disconnect the muffler exhaust pipe from the manifold
- Unscrew the manifold mounting nuts from the studs in the block head.
Dismantling the exhaust manifold mountings
- We dismantle the collector.
Removing the exhaust manifold
Replacement of gaskets and installation of manifold
After dismantling the manifold, it is rarely possible to remove the gasket intact. She changes anyway, but on the mating plane on the head side and on the commutator side, parts of the destroyed gasket will definitely remain. They must be carefully removed.
Changing the manifold gasket
To do this, you can use a special spray that softens the gasket residues; you can carefully remove them with a blade. In this case, the plane must not be damaged, otherwise the tightness of the connection will be broken.
Also When installing new exhaust manifold gaskets, it is not recommended to use sealants. They can be different quality, can form particles during crimping that get into the crankcase, which is extremely undesirable.
Video about replacing the exhaust manifold gasket on a VAZ-2114
In custody
After installing new gaskets (they are different for an 8-valve engine and a 16-valve engine) and fixing the manifold, you should make sure that the unit does not come into contact with electrical wiring, hoses, or touch the stabilizer. Good luck to everyone!


The exhaust manifold is a unit that is responsible for ride quality, without which comfort is impossible. This is silence and the absence of exhaust smell under the hood, which can be drawn into the cabin through the hole cabin filter. Fixing a leak in the exhaust manifold of a VAZ 2114 is a necessary repair. Fortunately, it is not urgent; you can prepare in advance and choose a convenient moment.
Exhaust manifold for VAZ 2114
The key factor that causes 90% of exhaust manifold malfunctions on VAZ 2114 cars is heat and not the highest quality materials from which the parts are made. During operation, the steel repeatedly heats up and cools down, which leads to the appearance of cracks in the body. This is a common occurrence for VAZ cars older than 7-8 years.
Auto repair shops offer crack welding services using argon welding. However, for a number of reasons, this activity is useless for cars older than 7 years.
1) Just removing and installing the exhaust manifold will cost about 2.5 thousand rubles. Taking into account the work of the welder and other actions, the cost of repairs can be 4-5 thousand rubles. If you do the work yourself, purchase new part will cost less.
2) Welding, even argon welding, disrupts the structure of “tired” metal. A boiled part rarely lasts longer than a year, after which new holes appear. The older the car, the faster the problem returns, and the collector has to be removed again.
If the car is older than 8 years and there are problems with cracks in the manifold, it is better to remove the part and replace it with a new one.
Signs of trouble

Exhaust manifold gasket
One of the main signs of a leak in the system is a “sporty” growling sound when the engine speed increases. This could be a symptom of various problems. exhaust system. To check, it is better to take an assistant and go to a garage with a pit or to an overpass. Most often, you can determine by eye whether the problem lies in the muffler, resonator or exhaust.
Gasket wear may become apparent during planting. Open the hood and start the car - white or grayish smoke rising from the manifold during warm-up indicates a leak for this reason. VAZ car owners usually encounter this problem once every 3-4 years. When using low-quality spare parts and before. The solution may be to manufacture a custom-made steel gasket. It can last as long as the entire collector.
Service specialists, when attracting clients, like to tell scary stories about the explosion of the exhaust manifold on VAZ 2114 cars due to cracks. In reality this is nothing more than a myth. But real problems are no less serious, so you shouldn’t put off repairs.
A cracked exhaust manifold or worn gasket can cause your engine to run rough.
1) A lambda probe is installed in the exhaust manifold, which affects the operation of the injection system. Strong air suction disrupts the mass oxygen content in the exhaust, lambda incorrectly adjusts the quality of the mixture, causing tripping, uneven idling, loss of power, “black” candles.
2) Another function is crankcase ventilation. Impaired air circulation causes disturbances in the operation of the gas distribution mechanism, increased wear valves, the formation of carbon deposits on the pistons and other “joys”.
If increased noise and unpleasant odors during engine operation are combined with dirty work, the car needs urgent repairs.
Tools and necessary parts
To remove the exhaust manifold on a VAZ 2114 in order to replace the gasket or entire part, you will need the following tool:
- open-end and ring wrenches for 8, 10, 13, 17;
- wrench with heads 17, 19;
- screwdrivers, pliers.
It is also a good idea to have tools such as a Dremel, nut saw or nut pick on hand. As a rule, the fasteners on the exhaust system parts stick tightly.
A few days before your planned repair, begin treating accessible nuts with WD-40 or another penetrating lubricant. Repeat the operation 2-3 times. This will make the task of removing the manifold a little easier. .
The question often arises: is it worth using a sealant after removing and replacing the gasket? Experts believe that if you apply sealant to the gasket, it should only be high-quality silicone. A bad sealant can bring a lot of trouble to a VAZ 2114 engine: when it burns out, it turns into “pellets” that are pulled into the crankcase. And this is unnecessary contamination of the piston system.
Exhaust manifold removal procedure
Before removing the exhaust manifold yourself, think 7 times. Having this work done by a service center is not cheap, but the inaccessibility and difficulty of unscrewing some nuts can be a serious problem.
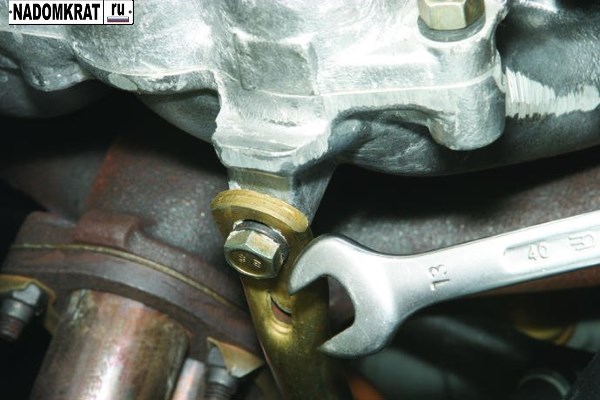
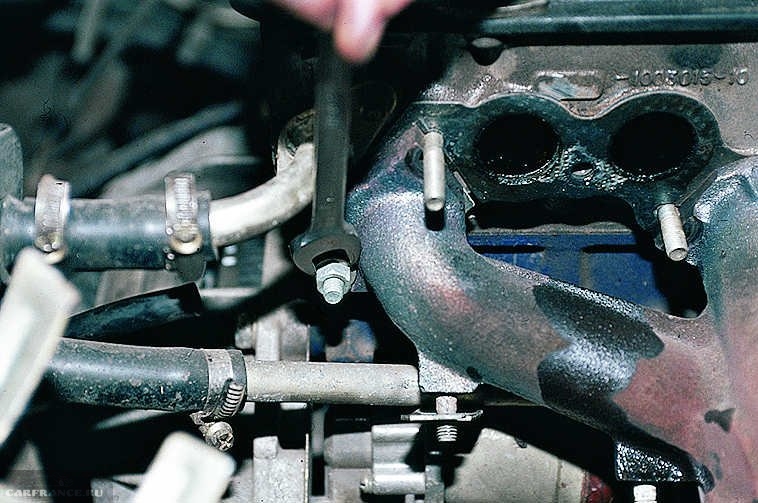
Unscrew the bolt securing the intake pipe
It is important to drain the coolant before removal, as antifreeze may enter the cylinders during the process. The sequence of actions for cars with an injector is as follows:
- Disconnect the battery, release the throttle cable from the throttle valve.
- Disconnect the fuel line pipes.
- Disconnect the wires from the TPS and idle speed control.
- Release the hoses crankcase ventilation, vacuum, brake booster.
- Remove the receiver, remove the injector block wires and remove the injector fuel rail.
- Remove the bracket and thermal shield.
- After this, you can disconnect the exhaust pipe, exhaust and intake manifolds from the manifold.
After disassembly, all gaskets are replaced with new ones. Please note when purchasing that the exhaust manifold gaskets for 8-valve and 16-valve VAZ 2114 are different. Select the parts carefully and you can avoid wasting time and money.
Burnout of the gasket under the exhaust manifold is a rather unpleasant and common malfunction on the VAZ 2109.
A product that has become unusable will allow exhaust gases from a running engine to pass under the hood, and the characteristic chattering sound when the engine is under load also does not greatly contribute to a comfortable ride. Replacing the manifold gasket on a VAZ 2109 will help avoid such problems.
The collector gasket is made from a specially compressed asbestos mixture reinforced with steel thread; it can be purchased at any spare parts store. The price of the product, depending on the manufacturer, varies from 50 to 200 rubles. For a VAZ 2109, replacing the intake manifold gasket at a car service center will cost approximately 1,500 rubles and more, not counting the cost of the gasket itself.
Preliminary work
Replacing the VAZ 2109 intake manifold gasket with your own hands is not very difficult and does not require specific knowledge or expensive tools - the required set of keys is usually present in the trunk of every car enthusiast.
But before replacing, you should try to tighten the fastening of the intake unit - if the gasket is not burned out, it is the loose fastening that may cause exhaust gases to get under the hood. If tightening the fastening does not help, it means that the gasket is completely burned out and needs to be replaced. Replacing the VAZ 2109 manifold gasket will require preliminary work for dismantling the air filter, removing the carburetor and the manifold itself. All of the above work is carried out exclusively on a cold engine.
Removing the air filter with housing
On injection engine car VAZ 2109 to remove the air filter, just unscrew the four self-tapping screws securing the cover of the filter element housing - for this you use a 10mm wrench or a ratchet. There will be a filter element under the cover. If the lid is difficult to lift, you can disconnect the sensor from the plug mass flow air.
On carburetor engine Under the hood there are three latches that can be easily opened. There is a screw in the middle of the metal cover, which can also be unscrewed by hand, after which the cover is removed. Under the cover there is a filter element that must be carefully removed. Subsequently, during reassembly, the filter element can be replaced - if the time has come or if the filter element is very dirty.
Removing the carburetor
After the air filter has been removed, you can begin to remove the carburetor. To remove the carburetor on a VAZ 2109, you will need the following tools:
- two screwdrivers - flat and Phillips;
- 13 open-end wrench;
- head at 8;
- ratchet.

Instructions for dismantling the carburetor will be as follows:
- The coolant supply hose to the carburetor starter is disconnected from the fitting by unscrewing the fastening clamps. The coolant itself is drained into a previously prepared container.
- The exhaust pipe coming from the exhaust manifold and from the cylinder block bracket is disconnected.
- Then the throttle cable bracket is disconnected. To do this, first remove one end of the spring from the throttle control rod, and then remove the entire spring, then loosen the nut on the bracket and remove the cable from its engagement.
- The EPHH screw sensor is disconnected from the power plug.
- Two hoses and a vacuum tube are disconnected from the carburetor heating unit.
- The crankcase ventilation hose is removed.
- Unscrew the 4 nuts securing the carburetor to the intake manifold.
- The carburetor is removed carefully and without jerking - by lifting it from the studs.
The work of removing the carburetor is completed. The presented photos and videos will help you clearly follow the process of removing the carburetor.

Removing the intake manifold
After the work of removing the air filter and dismantling the carburetor is completed, you can begin to remove the intake unit. To do this you will need the following set of tools:
- open-end wrench 13;
- head 13 - regular and deep;
- ratchet and crank;
- ratchet with 10mm head.
The work order will be as follows:
- The platform located under the carburetor is bent back - to do this, two fastening nuts are unscrewed.
- All hoses leading to the manifold are disconnected.
- Six mounting nuts are unscrewed from the intake manifold.
- The intake manifold is removed from the studs - to do this, it should be slightly rocked from side to side, as it can burn to the gasket.
Removing the exhaust manifold
Removing the VAZ 2109 exhaust manifold will require the following tools:
- wrenches 13 - open-end and cap;
- deep head at 13;
- ratchet.
Work order:
- The four nuts securing the exhaust pipe are unscrewed from the manifold.
- The “pants” are pulled off the studs and moved to the side, then the remaining three nuts securing the manifold are unscrewed.
- The exhaust manifold is carefully and without jerking removed from the studs.
When removing the collectors, a problem may arise such as sticking of the studs and nuts - since the metal is constantly heating and cooling, a souring process occurs.
To make work easier, the fastening studs can be filled with WD 40 liquid in advance, about a day before starting work. This will make it much easier to remove the manifold for subsequent gasket replacement.
If the pin breaks off when unscrewing, you just have to drill it out, and then cut a new thread and screw on a new pin.
Replacing the gasket
After preparatory work completed - dismantled air filter, carburetor and intake and exhaust manifold, you can begin the main work, for which all previous steps were done - directly to replacing the gasket itself.
The work order will look like this:
- We remove the old gasket - this can be difficult, since, most likely, it is tightly burnt to the cylinder head - in this case, you need to use a thin screwdriver or knife. To make the work easier, you can use special aerosol solvents in cans, sold in auto parts stores. It is also necessary to carefully remove carbon deposits from the mating surface of the block - you can use sandpaper for this.
- The new product is installed on the exhaust manifold, then all work is done in the reverse order. Replacing the intake manifold gasket on a VAZ 2109 is carried out in a similar way.
Replacement of the exhaust manifold gasket on the VAZ 2109 has been completed. Downpipe The muffler is secured with brass nuts, preferably new ones. And don't forget to fill in the coolant that was drained when dismantling the carburetor!
In order for the new gasket to last as long as possible before installation, it is recommended to cover the product with a layer of graphite lubricant on both sides - this will extend the service life of the material and increase the tightness, and also help avoid burning. It is also recommended to coat the cylinder head studs with a layer of graphite lubricant.
Good luck!