Hi all! The chain of gifts will never stop, so today I am offering you something interesting. A fascinating article awaits you on how to make a keychain with your own hands.
This is a necessary, but at the same time miniature gift for all occasions. I have prepared 25 master classes and simply original handicraft ideas that will help you make the very keychain you want.
First of all, advice: if you want to make a cool keychain, be sure to buy good fasteners (rings, laces, etc.). At the end of the article, I will tell you what is best to buy and where it is best to do it.
How to make a keychain with your own hands: 25 master classes and ideas
Soft keychain made of “Fluff” fabric
What do we need?
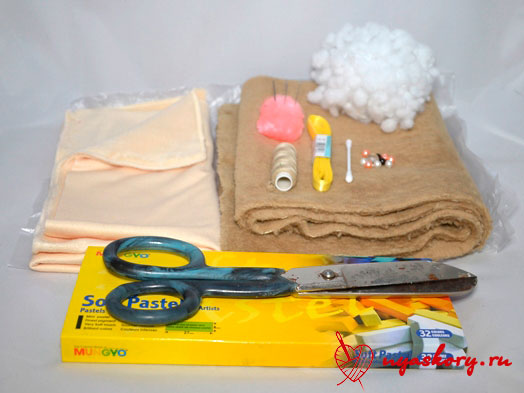
- velsoft (you can also use faux fur);
- fleece or minky fleece;
- satin ribbon for fastening;
- threads;
- pastel for painting the nose and cheeks (you can use acrylic paints);
- padding polyester for stuffing;
- cotton swab;
- scissors;
- needle;
- beads for eyes.
DIY keychain - sewing a bunny Cannon
You can make Cannon patterns yourself by looking at the final version of the toy. You can print the photo and trace the elements, increasing each by about a centimeter so that there are seam allowances.
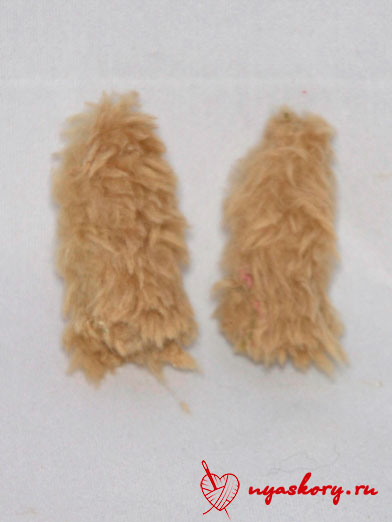
First, sew the ears, placing them right sides together. Turn them inside out.
Now take a pre-prepared piece of tape. Fold it in half and place it on one of the parts of your head approximately in the middle. Also attach the ears. To prevent them from moving out, you can attach them with a thread.
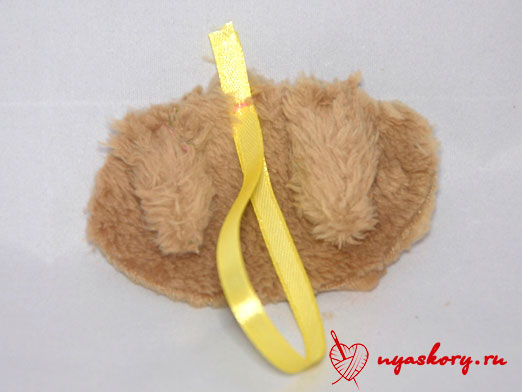
Now attach the second part of the head to our workpiece and sew it, leaving a hole for turning it inside out. Turn out the future keychain.
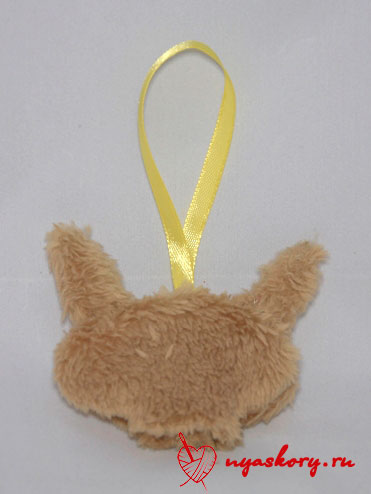
We stuff the blank Cannon. Stuff tightly, but in moderation. Sew the hole of the keychain with a blind stitch.

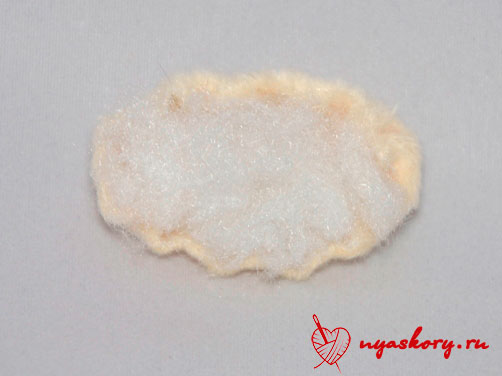
Take the muzzle part and go over it with a running stitch. Tighten the future face a little (but not much).

Lightly stuff the muzzle with padding polyester. Attach the face to the head with a hidden seam. While sewing, carefully hold the face so that it does not “run away”.
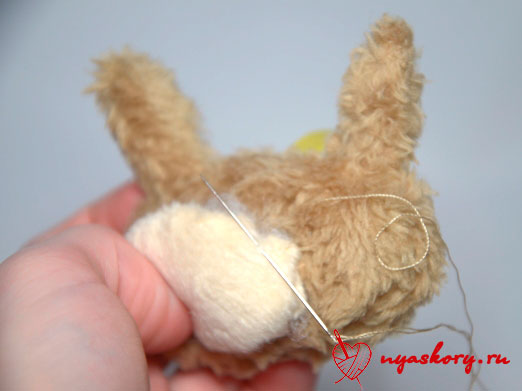
Now sew on the eyes and embroider a small nose on the bunny with black thread, making a few stitches between the two eyes.
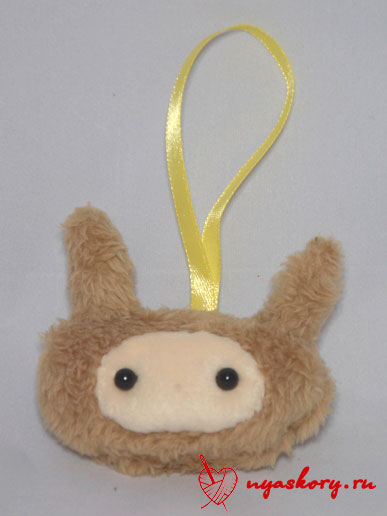

Take a cotton swab and lightly rub the desired color of pastel crayon. Then simply rub Fluffy's face in the cheek area with this cotton swab. You can also paint the area of the nose, but now with black pastel.
The keychain is ready

Other Keychain Ideas
It won’t be limited to just Fluff - as promised, here are 24 more cool ideas for making keychains.
Orange beaded
A fairly simple scheme, accessible even for beginners. You will need a thin fishing line and beads (monofilament will probably do).

Fur nigellas
For them you will need a circle of black fur with long pile, a little felt and the fastenings themselves.

Leather keychains for a bag
A very stylish and simple option, obtained by folding a rectangle with fringe at the ends into a tube. A piece of leather with a carbine is placed inside. By the way, any keychains of a simple shape from two parts can be made into leather ones.

Cute animals for keys
The completely simple forms of such seals allow you to endlessly fantasize with colors, fittings and materials. Yes, and you can use any fastenings here

Beads are in use!
You can make a very original accessory from wooden and plastic beads. You will need two beads, a ring for a keychain, knitting needles or sticks, paper tape, a brush, acrylic paints and an elastic cord. First, color the beads as you wish and leave them to dry on your knitting needles. Attach the elastic to the ring and thread the elastic through both beads and tie a knot at the bottom.

Fantasies on wood
All you need here is a wooden base and acrylic paints. And then only your artistic abilities and imagination.

Interesting keychains made of polymer clay
It’s just a fairy tale to make simple little cute things out of it. Cupcakes, animals, treats - whatever you want! There are as many as 6 ideas for you from this pliable material.


A great option for a gift for a guy for various holidays (including February 23) is two pieces of puzzles made of polymer clay. Roll out the pancake, cut out the puzzles, making holes for fastening, bake them and paint them.

Made from felt and wool
I want to show you some interesting ideas for making different animals (and not only using these materials).


Other materials
Something is just not used when they want to make beautiful and cool keychains for keys and more! Look, for example, at these seals - they are made of special beads that melt when ironed. You can find similar ones in departments for children's creativity.

Do you throw away wine corks? But in vain - they make excellent keychains. All you need is paint and fasteners. 
But even there you have to keep your eyes open. Just recently I successfully purchased some elements there for making keychains, I’m sharing the links:
Thread fastenings- perfect for soft accessories.
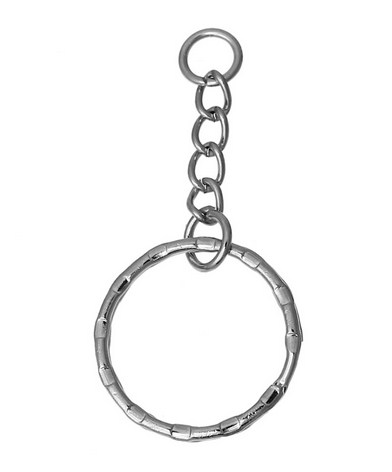
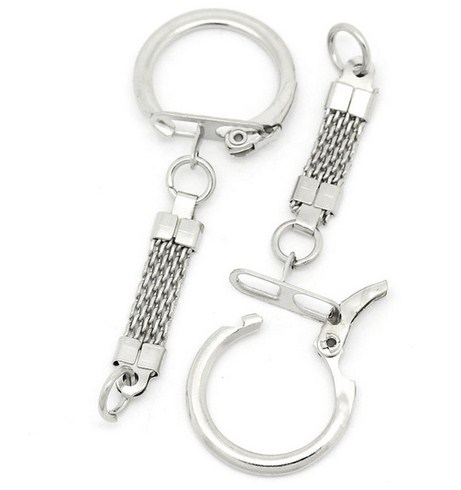
And finally small threaded loops for screwing into solid products (chains are attached to them).
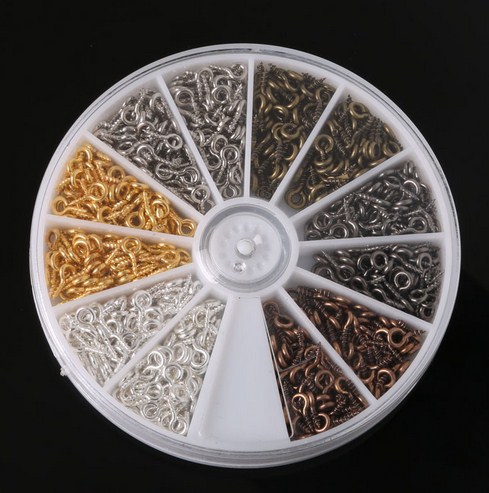
These are the most advantageous offers that I took advantage of myself - I can recommend
With this I say goodbye to you! Share your impressions and links to interesting material with your friends!
Sincerely, Anastasia Skoracheva
A great opportunity to please a girl or girl is to give her a cool keychain that no one else has. How to make a keychain for a backpack and what shape of keychain to choose? Not long ago, wool keychains came into fashion. Particularly interesting keychains are made by Japanese craftsmen. This original keychain can be used to decorate not only a backpack, but also a bag and a briefcase.

Let's try our hand at this work and make a keychain for a backpack with our own hands. Master classes will help you work with yarn and felt. In the absence of felt, you can take a suitable thick fabric; the hardware store sells inexpensive napkins - they can easily replace felt.

How to make a keychain for a backpack? Let's start with a cute, cute gray Rabbit made from a pom pom. For the Rabbit, made from wool, we need gray and white yarn, some black yarn for the eyes and pink yarn for the nose. First of all, for ease of work, we need a “working machine”, a piece of cardboard on which we will wind the yarn. If you don’t have a plastic machine like the one in the photo, it’s okay, you can make it yourself from thick cardboard.
We will need 2 pieces of thick cardboard 10/10 cm. Take a compass or a suitable mug with a diameter of 8 cm and draw it in a circle. Draw a hole inside with a diameter of 1.5-2 cm. The larger the diameter of your cardboard “donut”, the larger the pompom will be. We need 2 “donuts”. For convenience, cut the circles in the middle. Between the circles we must place a long thread or wire so that after we cut our pompom, it can be pulled together and tied. If you don't tighten the pompom, it will fall apart.

We wind the yarn onto double cardboard, then cut it in a circle with scissors. We remove the cardboards. The pompom is ready.

There is another option for creating a pompom, and it resembles our master class. You can make 2 of these cardboard blanks and wind yarn on them. Choose which option you like best.

To work you will need:
- Gray acrylic yarn, wool or acrylic with wool - 30 g, some black, pink and white yarn.
- Scissors large and small.
- Cardboard for the blank.
- Wire or strong thread for tightening the pompom.
- A thick needle, a toothpick, or a needle for felting wool.
- Carbine.

Cut out any of the two pompom blanks from cardboard. We should have 2 blanks. Place a small piece of thin wire between 2 cardboard blanks. After winding and cutting, we will use this wire to tighten the pompom. Next we will wind the yarn onto the first piece. We will wind it step by step in this order: 1, 2, 3, 4, 5, 6 - onto the first cardboard.

Scheme of work step by step.
As you can see, everything here is based on color. After we have made the first blank, we draw up the second one. We will wind only gray yarn onto the second piece.

Step 1: make a small white nose. Wind 12 times with white yarn just to the right of the middle of the cardboard. On the other side will be the Rabbit's chin.

Step 2: make a pink mouth for our Rabbit. Wrap the pink yarn evenly 10 times, spreading it evenly and not in a bun.

Step 3: wind 22 times with white yarn, completely covering the 1st and 2nd steps.


Step 5: Use black yarn to make eyes. We will not have them too close to each other, but at a distance. Wind black thread 18 times.


Step 6: again gray yarn, wind along the entire length 65 times with gray threads.

Next, turn the workpiece over, we will make rabbit ears. To do this, we insert our index finger and shake, grabbing our workpiece 13 times with gray and 13 times with pink yarn. The higher the distance, the larger the ears will be.
Then you need to decorate the second cardboard with one gray yarn!
That is, we should get 2 identical parts, 2 halves of the keychain. This can be seen in the work diagram at the top of the master class. Let's look at steps 6 and 7. We connect these 2 blanks, lay a thread or wire so that the pompom does not fall apart. Cut the circle. We should end up with a fluffy pom-pom with protruding “ears”.


We disassemble the middle into 3 parts, cut the pink nose short, and round the white muzzle.

Take a felting needle or a thick needle and work with the pink nose. You need to felt it using the felting technique.

All that remains is to felt the gray ears of our animal. This can also be done using the felting technique, after cutting off all excess with scissors.

While working with felting the ears, you can add gray or pink yarn.

That's all. The backpack keychain is ready. We attach the keychain to the carabiner with the same thin wire.
Details can be seen in the video. It is wordless, but very clear:
Fish - fabric keychain
How to make keychains for a backpack with your own hands? Look what a wonderful Keychain Fish is made from different scraps of fabric. You can make several fish and hang them on one carabiner. First we make the “fins”, lightly stuff them with padding polyester. Next, we sew the “fins” to the parts of the body. At the end, we sew both parts of the fish together, leaving 2 cm for turning inside out. Turning it inside out, stuff it with padding polyester and sew up the hole with a “blind” stitch. We attach a carabiner or a thick cord to the “fin”.

Name keychain
Hello, dear readers of master classes in the online store 7beads - accessories for jewelry!
Today I'll show you how to do it . In the master class we will have three ideas.
Nothing complicated to create keychain with name no, so the master class will be more of an overview rather than detailed.
Below I will indicate the necessary accessories, but also for an overview. The categories will be indicated. And the choice of beads, hats and other accessories will be of your choice.
So, let's start the master class: " how to make a personalized keychain with your own hands"
It will consist of three parts and as a result we will have three accessories.
Required accessories:
- made of plastic, glass, stone, etc.
First master class:

We will get such a beautiful personalized keychain, in a combination of black and turquoise beads with inserts of beads with silver letters.

First of all, we take a cord made of lavsan about 25 cm long. We string the beads in such an order that there is a symmetrical number of beads and caps along the edges of the name.

Next there will be an insert of two pendants that have holes along the edges like connectors. In our case, the pendant is a wing and a heart. We connect them using a double ring. All the necessary accessories are in our online store 7beads.

Now the pendants need to be connected in one row to the beads. We fold one end of the lavsan in half, thread the resulting loop through the hole in the heart, then you need to thread both ends of the lavsan into the same loop. Tighten tightly and make a couple of knots. We hide the short end of the lavsan in the nearest beads and cut off the tip.

In the same way, we attach a ring to the other end of the lavsan - the basis for a name keychain. Tighten and make a couple of knots. We put three beads on the free end of the lavsan, exactly the same and in the same order as the beads that are located at the edges of the name.

We connect new beads on the cord with pendants. To do this, we pull the end of the lavsan on which the beads are located into the loop that needs to be threaded through the hole in the wing. Tighten tightly and make a couple of knots.

We push the end of the lavsan through a couple of beads and caps. Tighten well and cut off the end of the cord.
Our first keychain with the name "Vladlena" for keys is ready!
Second master class:

In the second master class we will make such a cute and delicate personalized keychain with beads with the effect of cracked pink glass and an anchovy bead.

We take a pink lavsan cord about 20 cm long. Fold it in half, insert a loop through the base for the keychain, then pull the ends of the lavsan into the loop, make a couple of knots and tighten tightly.

At one end of the cord we put beads, hats and letters with the desired name. We tie several knots, cut off the lavsan and seal it with a lighter.
We do the same with the second cord. Don't forget to insert an anti-evil eye bead inside the hamsa bead.
The personalized keychain for “Alena” is ready!
Third master class:

And we will have a cute name keychain with 10mm plastic beads, with a clover pendant for good luck and an evil eye bead.

We will need a cord made of lavsan about 15 cm long. We put beads, caps and letters with the desired name on it. We insert crimps between the letters. They will perform a decorative function. The tip of the lavsan, which is located after the end of the name, is tied several times and sealed with a lighter. The second end of the cord remains free for now.

The second step is to secure the evil eye bead to the pin, cut off the excess tip of the pin with pliers and make a loop using pliers.
We attach the pendant to the extension chain on one side and the evil eye bead on the other using connecting rings.

We take the connecting ring and attach the first part to it, which consists of lavsan and beads. We tie the end of the cord a couple of times, cut it off and seal it with a lighter.
We attach the extension chain to the same connecting ring on one of its links.
All that remains is to put the finished part on the ring - the basis for the keychain.
Our personalized keychain with the name "Elina" is ready!

I hope you liked all three keychains. They were given to my wonderful friends who will always carry them with them... Positive wishes to everyone!)
Master Class "how to make a personalized keychain with your own hands" finished!
How to surprise your classmates and how to make a keychain for a backpack? Of course, cool keychains in the shape of a Cat or Cat! We have selected the most interesting options from a variety of keychains and pendants. Not only a backpack, but also a briefcase or bag can be decorated with these. Japanese keychains made of pom-poms in the shape of cats look very unusual.

A good idea is to make a keychain for your backpack with your own hands in the shape of a Red Cat. The work is not difficult, the main thing is to learn how to make fluffy pompoms. The Japanese make such crafts using special plastic rings, which can easily be replaced with two circles made of thick cardboard. In our master class, the keychain is made on a regular wide fork. But if you want the keychain to be larger, take and cut out 2 circles yourself. The diameter should be at least 7.5-8 cm, the hole inside should be 1.5 cm. How to make a pompom is well shown here:

Just remember to place the thread, fishing line, or wire between two cardboard circles before winding the yarn. This will make it easier for you to pull the pompom together after the cut.

To work you will need:
- Acrylic yarn or wool with acrylic – 20 g. white, 20 gr. beige, and 20 gr. Brown color.
- 2 buttons with a diameter of 6 mm.
- A piece of brown felt or leather for the ears and nose.
- Glue Moment.
- A thick needle to mark the mouth.
- Scissors.
- A fork at least 6 cm wide or 2 cardboard circles.
- Wire or monofilament for tightening the pompom.
- A carabiner or thick cord for attaching to a backpack.

Take a wide fork or 2 cardboard rings (whichever is convenient for you). We put a paper holder or just a clothespin on the end of the fork. Otherwise, all the yarn will slip off the fork. We start winding with white yarn! It will be .

The winding sequence is as follows: we wrap the fork with white yarn 25 times, without touching it, we wrap beige yarn next to it 15 times, we wrap brown yarn on the beige 15 times, and then beige 15 times. and finish 15 times with brown.

Then we take a thin wire or monofilament and insert it into the middle of the fork, remove the clothespin and pull the wire as tightly as possible, twisting it into a knot. We do not cut off the ends of the wire - we will attach them to the carabiner. Next we will cut our pompom.

We cut it and carefully trim the protruding threads with scissors and straighten the pompom. We cut the white yarn (the cat's face) with scissors, trying to give it the shape of a face.


All that remains is to attach the ends of the wire to the carabiner. The Red Cat keychain is ready. In the video you can see in more detail how to make a keychain for a backpack with your own hands:
We will make another wonderful cat from pompoms with our own hands from gray threads. In this master class we will use plastic circles, or cut out cardboard rings. This keychain will have a diameter of 7.5 cm.

To work you will need:
- Acrylic yarn or gray wool – 60-70 g, white – 20 g.
- Eyes (if you don’t have them ready-made, you can cut them out of felt).
- Pink nose and felt tongue.
- Scissors.
- Glue Moment.
- The needle is thick.
- Carabiner or thick cord.

I remind you that 2 pieces of cardboard must have a diameter of 7.5 cm. There must be a hole inside that is at least 1.5 cm in diameter. We mentally divide the cardboard template into 2 halves. Between the cardboards we place a thin wire to tie the pompom. We start winding with white yarn (cat's face). We wrap white yarn only on one half of the cardboard. We will have gray yarn on top.

Then we wrap gray yarn in a circle as much as is needed to make the keychain fluffy and elastic.

We cut along the edge of the workpiece that we have obtained.

We tie the ends of the wire, straighten the pompom, and cut off the protruding yarn. We design the muzzle: we cut the gray yarn a little with scissors so that the muzzle stands out more. Glue on the pink nose and tongue from felt. The ears can be felted from the same gray yarn or glued from felt. Make the mouth as in the previous master class. Glue the eyes.

You can see how to cut a face using the example of a bear made from a pompom:

Keychain made of fabric Cat - MK
How to make keychains for a backpack with your own hands? Another option for making a keychain pendant is using hand sewing. Here we will not need a sewing machine - all stitches are made by hand.


The pattern is very simple: one piece for the front and two identical pieces for the back. You can take any size.

To work you will need:
- Fabric – cotton or linen.
- Neck braid – 10 cm.
- 2 black beads for the eyes.
- Threads, scissors.
- Sintepon or cotton wool.
- Carabiner or thick cord.

Draw a pattern on paper. First, you need to draw a front pattern, bend it in half, and then trace this pattern, adding 0.5 cm to each back half for an allowance.

Cut it out and transfer it to the fabric. Trace with a pencil and cut out. The preparations are ready.

Next, using a pencil and a ruler, measuring 0.5 cm from the edge of ½ of the back, draw a line (we will sew the back along it). Having retreated 2 cm from the top ½ of the back, measure another 2.5 cm and mark with a pencil. We will not sew up these 2.5 cm (at the end of the work we will turn the product inside out through this hole).

Fold the 2 halves of the back with the right sides facing inward, sew the top 2 cm.

We also sew the lower part of the back. Iron the back seam. We sew a loop on the front side of the back, as in the photo:

From the inside of the front part we draw a seam line, departing from the edge 0.5-0.7 cm.

We place the front piece on top, front to front, and sew by hand using a “forward needle” seam.

They turned it right side out and stuffed it with padding polyester or cotton wool.

The loop should remain in the middle of the made keychain.

We stuff it as tightly as possible.

Draw with a pencil the nose, mustache, and place for the eyes.

We embroider with brown threads, sew on buttons or beads. Attach to a carabiner or cord.

Among you will surely find an option that will be of interest to you. Sewing keychains from felt is very simple - by hand, overcast or with a fine seam “forward with a needle”.


Keyrings are necessary for storing keys. Thanks to key fobs, we can be calm about the safety of our keys and be sure that they will not get lost somewhere in the house, since a bright key fob is visible better than a gray key. A beautiful and bright keychain can be purchased at your local store, or you can make it yourself. We suggest you try to create a beautiful keychain from wood right now.
You can find out how this is done by watching the video:
So, we will need:
- A wooden block (the author uses an old wooden kitchen spatula, you can also use a ruler);
- Any image or sketch printed on a printer;
- Transparent tape;
- Burning device.

First of all, we take our piece of wood (a spatula or ruler) and glue the sketch or sketches onto it with transparent tape.

Next, we take a burning device and begin to carefully burn along all the lines of the drawing. To simplify the work, it is recommended to print sketches in a colorless format so that the lines of the drawing are drawn more clearly. You must use the burning apparatus with extreme caution, as this tool is a fire hazard and can cause serious harm if used incorrectly.

When the sketches are burned out, you should carefully peel off the tape. The outlines of the future drawing or drawings will be visible, but they need to be given a final look. Again we take the burning device and apply the remaining parts of the design in a dotted manner. Working in dots is easier and safer, so it is recommended to apply drawings in this way.
When we give the drawings their final look, we need to saw the necessary pieces for our keychain or keychains.
In order for the picture to be preserved for as long as possible, it is recommended to coat the keychain with varnish.
Next, all that remains is to drill small holes to put the key rings through. As an alternative, you can use special ropes for pendants. If desired, the same technology can be used to create wooden pendants at home.
Finally, we can note the possibility of purchasing an old burning machine in the market. Considering the primitive design of the device, it can be made at home. We will consider this method in one of the future materials.