The ability to tie a rope loop can be useful in the most different situations– when traveling on a yacht, when towing a car, for lifting cargo, when creating a children's sports corner and in many other cases. The safety and effectiveness of your actions largely depends on the reliability of the tied loop.
You will need
Cable or rope.
Sponsored by P&G Articles on the topic "How to tie a loop from a cable" How to get a card for a Metro store How to put loops on a hare correctly How to braid a steel rope
Instructions
To tie the simplest loop, which is called an “oak” loop, fold the end of the cable in half and wrap it so that a ring is formed. Then thread the loop formed at the end into the ring and tighten. The disadvantage of this loop is that the knot becomes very tight when pulled and is very difficult to untie.
If you want to tie a loop that is strong but easy to untie, try making a Flemish knot. To do this, fold the cable in half and pass the end first in front of the cable and then behind it. As a result, you should get an eight. Thread the end through the bottom of the figure eight and tighten.
To tie the Honda knot that cowboys use North America used to create a lasso, tie a simple knot in the center, turning the end in the opposite direction and threading it through the resulting loop. Without tightening the resulting knot, return the end of the rope and thread it inside, then you can tighten it. Tie a simple knot at the end of the cable to prevent it from slipping out.
If you want to be able to adjust the size of the loop after the knot is tightened, make an Eskimo knot. Start it at a simple angle in the middle of the rope, then thread the end into the same sling it came from. To prevent the tip from slipping out, wrap it around the root end of the cable and tighten.
To tie loops that will not slip even when tying wet and synthetic ropes, try the following method. First, tie a simple knot and thread the end back, just like in the previous method. Let the tip come out of the loop and cross the root end with it. Now the tricky part: thread the end of the cable through the entire knot and tighten.
If you need to tie a loop in the center of the cable that can be pulled in different directions, try making a “riding” loop. Please note that it is tied without the ends of the cable, which is sometimes very convenient. Twist the cable at the selected location twice, but do not tighten it so that there is a hole in the center of the binding. Expand the resulting loop, throw it over the cable and thread it into the open hole with reverse side, pull out to the required length. Tighten the knot.
How simple
Other news on the topic: In order for the image of a business man to be completely complete, he needs additional accessory
. Choosing the tie that suits you best and reveals you is only half the battle. It is also very important to choose the appropriate knot and tie it. The same tie will look perfect
A modern man’s business suit cannot be imagined without an accessory such as a tie. Moreover, this is perhaps one of the few men's clothing items that they treat with special reverence. No wonder there are dozens, if not hundreds of ways to tie a tie. Is it possible Reliable tow rope
- one of the most necessary items in the trunk of every car. On the shelves of modern auto parts stores you can find many types of cables: nylon, polypropylene, steel, flat, braided ropes. Sponsored by P&G Articles on
There are many ways to tie hooks on a fishing rod, and with each of them you can form a fairly strong knot if done correctly. However, you need to remember that even the most carefully tied knot weakens the strength of the leash. This happens due to irreparable deformation
Any angler knows that fifty percent of fishing success depends on properly secured fishing rods. Today we will share tips on how to tie fishing rods correctly so that the fish does not break loose and swim away. Posting sponsor P&G Articles on the topic "How to tie fishing rods" How to equip a fishing rod How to make
Tying knots is a science, the basics of which should be mastered by both an avid jeeper and a lover of infrequent off-road forays. The ability to choose the right knot that corresponds to the situation, tie it correctly and quickly will not only allow you to easily get out of a difficult situation yourself, but also help a friend
In the arsenal of modern fans of “mixing dirt” there is always a cable - one or even several. Without this accessory, a decent jeeper will not leave the house, or rather, will not roll his “ all-terrain vehicle" Recently, Kevlar cables have become widespread - it was on them that we “knitted knots” in the preparation of this article. By the way, the method of tying the same knot practically does not depend on the material of the cable (exceptional cases will be discussed separately).
To begin with, a few basic provisions. Any node, in the language of strength of materials, is a stress concentrator, that is, it reduces the load capacity of the cable. Therefore, it is necessary to use such units that have less influence than others on the strength of the coupling. It is important to comply correct sequence operations. Often, “one wrong move” leads to the fact that a unit “comes into being” that is not the one the jeeper intended, and therefore with different properties, and therefore less suitable (or not at all suitable) for the given situation. For example, when making a “straight” joint, it is easy to make a mistake and end up with a “woman’s”, “mother-in-law” or “thief’s” connection design. The last three “spread apart” under load and will not allow you to fish out a stuck car from a deep puddle.

It is also useful to remember that some knots are conventionally classified as “unbreakable”. That is, after removing the load, it will take a lot of time, special devices, etc. to disconnect the ropes. If you decide to use such a bundle, say goodbye to the cable. Therefore, it is easier and, most importantly, cheaper to use “detachable” connections.
It's a loop...
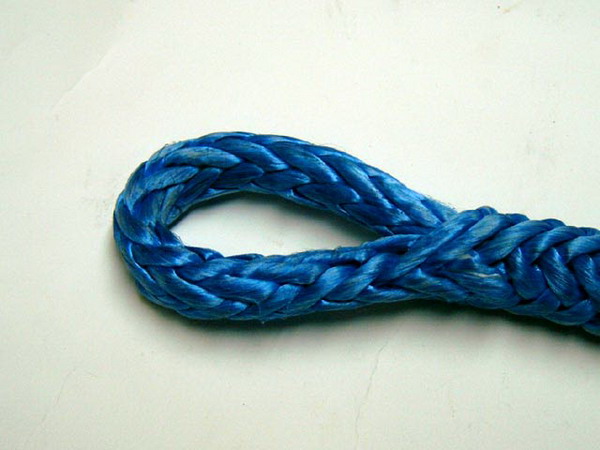
Often there is a need to make a loop at the end of the cable. One of the simplest and most common designs is the so-called. “Flemish” loop or “figure eight” (see photo). The material and shape of the rope do not matter - it can be built using both “synthetic” and steel rope, both on a tape and on a flat tow strap.

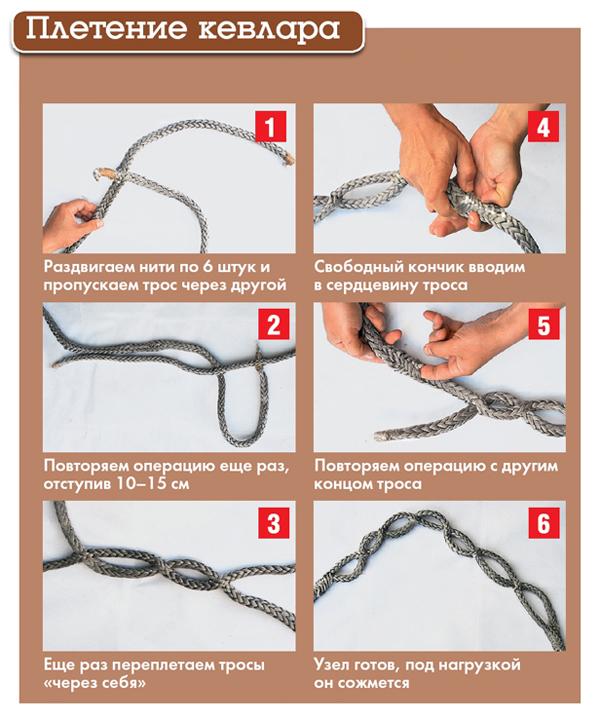
And if you have a Kevlar cable at hand, then the technique for creating the “ear” is somewhat different - it is precisely based on the ability of Kevlar to “tighten” under load. The effect is enhanced by the friction created by the surfaces of the 12 threads that make up the rope. To begin with, don’t forget to wrap the end of the rope with electrical tape or tape to avoid “fraying.” Then, measuring forty centimeters from the “tail”, we spread the threads in different directions, forming two groups of six pieces each. This operation can be performed using a screwdriver or even a pencil. We insert the end into the resulting “hole” (and not right through, but directly into the body of the cable), pull it 10 cm deep and pull it out so that the length of the loop is 10–15 cm. Then, to increase the strength of the connection, we repeat this operation several times with The only difference is that we no longer pull the “tail” inside the rope, but right through it. We carry out this iteration until the length of the end is reduced to 5 cm - we again tuck this section inside the rope.

Interestingly, an inexperienced “knot maker” can make a loop in 12–15 minutes. The experiment was carried out on our executive secretary (a sweet young girl).
For any occasion
Sometimes you have to connect two “threads” into one. There is no trick here - we use the same method as when making the eyelet. The difference is that the “tail” of the other is pulled inside one cable. The resulting connection is only slightly inferior in strength to a solid cable, and, in addition, the “doubling” section can be easily wound onto the winch drum. The “pairing” technology is illustrated in detail in this article. The time required for joining depends on the thickness of the samples - the larger the diameter of the rope, the longer the time required. For example, to weave two 12 mm cables, a novice “knot maker” will need about 25 minutes.
In competition conditions, such time expenditure is unacceptable, so you can use “ordinary” knots and not “weave” one cable into the body of another. Take note, we recommend the “counter eight” - it is successfully used on synthetic and steel cables, tapes and slings - or “grapevine”, which tightly - in the literal sense - connects two cables. It is almost impossible to untie the grapevine - you can only cut it.


If you need to cling to a tree without a hook or loop, we use a classic sea knot - a “noose”. To shorten the tow rope by several meters, we use a “monkey knot” - it will not tighten and will allow you to “shove” four meters of rope into one meter of knitting. True, to fix the knot you will need a shackle.


Knots, of course, are suitable not only for pulling cars out of a mud bath. Let’s imagine that during a break between special stages, one of the crew went “in the bushes” and accidentally fell into a gorge or a deep hole, and in order to save the poor fellow, you will have to lift him up a steep slope, so as not to damage the chest and internal organs . A non-tightening loop will help here - it can be made by tying a “gazebo” knot, also called a “bowline”. And if in the evening, after eating and relieving stress, the same “victim” begins to show aggression towards others, he can quickly be immobilized - since time immemorial, the “shackle knot” was invented for precisely this purpose. Photo attached.

Cables for preparing the material were provided by the online store OFF-ROAD-SHOP.RU and the company PROXODIMEC
text: Alexey MENSHENIN
photo: Maria GORSHKOVA
The advantages of synthetic (Kevlar) cable over metal are known to most jeepers. This is buoyancy and flexibility and safety for the hands. At the same time, synthetics are in no way inferior in strength to metal cables. It is important to replace the rollers with fairleads before using a synthetic cable to prevent the cable from biting in the corners between the rollers.
But how to braid a synthetic rope, how to splice it, is not always known to novice jeepers. Therefore, we bring to your attention an article by Andrey Forosenko, as well as video instructions.
Hook loop
The procedure for braiding synthetic cable, also known as “Kevlar,” seemed to me extremely simple to describe.
Nevertheless, questions arise: how to make a loop, how to stitch a broken cable.
Why did the question of braiding actually arise? Why not tie the cable in a knot?
Any rope, be it steel or synthetic, braided or twisted, loses up to 50% of its strength at the knot. In addition, the knot cannot be untied, much less wound onto the winch drum.

Before you begin any actions with “synthetics”, you need to cut it off and seal the end. In the place where the cut is supposed to be made, tightly wrap adhesive tape or tape. Using a sharp knife, using it like a file, we cut it in the middle of the wound tape, so that when cutting, both tails remain sealed (Fig. 1)
To simplify further work, the end can be additionally wrapped with tape in the floor of the ceiling, and the hanging edge can be twisted and melted. It turns out to be an arrow.
Unlike steel cable“synthetics” can be braided without unraveling the strands.
“Synthetics”, as a rule, have a 12-strand “well” weave. When moving opposite to the tension, the cable turns into a braid. The theory is simple - when the cable is tensioned, the end located inside will be clamped with a force proportional to the tension of the cable. Let's take advantage of this.
Before starting to embed the cable, we can thread it into a closed hook or loop of the bark protection sling. I do not recommend using a closed, that is, non-removable hook on Kevlar.
Unlike a detachable hook, which is closed by a cylindrical pin, a cast hook has irregularities in the loop that will chafe the cable. I also do not recommend using a thimble, since instead of protecting the cable under load, it can bend and damage it with its sharp edges. Even if the thimble does not damage the cable, it will most likely fall out during the first run.
At the point of bending (fastening the hook), the cable rarely breaks and wears out; it will break faster somewhere else.


At least 40 cm from the end, insert the sharp end inside the cable between the strands (Fig. 2,3). We also pull out the tip of the cable between the strands at a distance of 10-15 centimeters (Fig. 4). Now we stretch out the entire excess tail and form the right size loop. It is optimal to make a loop with a diameter of 3-5 cm. To increase friction and ensure maximum strength of the seal, we pass the end through the cable. You need to thread the cable through the center, so that there are six strands left on the sides (Fig. 6).


Now let’s thread the end into the core of the cable again (Fig. 7,8). If the end is long enough, you won’t be able to thread it all the way through at one time. You can make exits every 10-15 centimeters and repeat the operation. Once the tail is completely inside the cable, you can tighten the cable. The obtained result Fig. 9.
How to secure the cable to the drum.
The easiest way to do this is on the Come Up 9000 winch. The end to be secured must be tightly wrapped with electrical tape and tightened with a fixing screw.
In mechanical winches there is no need to invent anything at all - the cable is attached in the same way as a steel cable, in special clamps.
And for Warn winches you need to use an electrical terminal. The cable, like an electrical wire, is riveted inside the terminal and attached to the eyelet standard mount on the drum. To secure the cable, you need to use a screw with a spherical head; this will prevent it from being squeezed out by the cable under load and from damaging the cable on the sharp edges of a regular screw.
How to mend a broken synthetic cable.


We retreat from the ends 30-50 centimeters and first insert the first cable into the second (Fig. 10), then the second into the first (Fig. 11). It is enough to make two or three stitches (Fig. 12) and tuck the free ends, as in the case of braiding a loop, inside the cable (Fig. 13). The resulting “knot” has the strength of a cable (Fig. 14).


Andrey Forosenko November 2006.
We will also present to your attention a video tutorial on braiding a cable. The process here is slightly different from that described in the article.
For those who are just thinking about buying a winch, we recommend that you immediately purchase it with Kevlar (synthetic rope). They are quite rare, but our sponsor, who provided a prize for the off-road story competition, can help you purchase such a winch in America for a very modest reward.