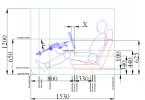
Today, such a direction as painting a car in camouflage is becoming increasingly popular in the field of car tuning. In this article, using the UAZ as an example, we will show how you can “disguise” a car with your own hands.
Necessary materials and tools
- aerosol paint in cans (4 cans of black, brown and green pigment), as well as vinyl film (depending on how the camouflage pattern will be applied to the car);
- varnish with a matte effect;
- sponge polish;
- solvent No. 469 (0.5 liters);
- gasoline (200 ml);
- special painting spatula (width 7 cm);
- clean flannel rags;
- halogen lamp with a power of 1 thousand watts;


- as many old newspapers as possible;
- paper masking tape (wide and narrow - 5 rolls each).
We prepare the car for painting with our own hands
The best time to paint a car is summer, because warm weather and lack of humidity are the most optimal conditions for painting. it is recommended to carry out in a garage or a clean spacious box. The main thing is to completely eliminate such a negative factor as dust, both in the air and on the surface, otherwise the camouflage pattern may not turn out as attractive as we would like.

Seal unpainted surfaces with newspaper. Click on the photo to enlarge.
We begin the preparation of the car by sealing all unpainted areas with old newspapers. We attach them to a wide masking tape. We completely cover the optics, glass, door frames and sealing gum. If, upon completion of all work, it turns out that the paint still got on one of these parts, carefully treat the stained area with a solvent.
Then, we degrease the surface of the machine with a lint-free cloth soaked in gasoline. It is not recommended to use a solvent for these purposes, as it acts too aggressively and can not only clean the surface, but also damage the factory paintwork.
When you try to paint such an area with paint from a spray can, the coating may stand up as a “fur coat”. If this nevertheless happened, we pick up a halogen lamp, heat the surface, and then completely remove the paint with a spatula. If this is not done, when the paint is reapplied, the "fur coat" may appear again.
We "mask" the car with the help of paints
You can answer the question of how to "camouflage" color in different ways. Camouflage on the car body is drawn by hand or using a stencil. The first method is, of course, preferable, because then the camouflage will look more natural. On the other hand, using a stencil will save time. Let's take a closer look at creating a drawing with your own hands.
The first paint color we have to work with is black. We will create the contours of the spots using a narrow masking tape 2 cm wide. It fits well and allows you to create smoother lines on the body. In addition, paper masking tape can be easily removed from the body without damaging the paintwork. You should pay special attention to the fact that the adhesive tape fits snugly to the surface, without forming folds and creases in which paint can accumulate, otherwise the contour may not turn out very neat.


The car will look more original if the spots are made large, capturing different elements of the body. A protective "screen" of newspapers is formed along the contour of the spots. It will not allow us to paint extra areas black. After that, we apply black paint from a spray can to all spots. You can start painting spots of a different color only after 3 hours, when the black spots are completely dry. Next, we have to paint some areas on the car body brown, and then green. We draw spots in the same way as before.
It is important that they overlap: this is the only way to make the camouflage whole. We apply each paint color in two layers to ensure a deep opaque color. This is especially true for the green color, since it is the lightest. When drawing spots, we move clockwise from the starboard side, while not forgetting about the roof and body pillars.

View of the car after painting. Click on the photo to enlarge.
When the camouflage painting is completed and the pigment of all three colors is completely dry, we remove all newspapers and adhesive tape and proceed to varnishing the car.
We suggest applying a matte effect varnish to the body. Today, matte varnishes of the “soft touch” type are very popular, which give the coating a velvety texture. The technique of working with such compositions is no different from conventional varnishing:
Immediately before application, a solvent and hardener are added to the varnish in the proportions indicated on the package. Often these parameters change from layer to layer: for the lower one - a more liquid and fluid composition, for the finish one - more dense and concentrated.
However, if you do not have too much experience in this area, it is better to strictly follow the manufacturer's instructions.
The varnish is applied in 2 - 3 layers and must be kept for some time to dry each. If, when touching the coating, the fingers still stick, but no longer lubricate the varnish, you can start applying the next layer.
We create camouflage on a car using vinyl film
When painting a car in camouflage, it is very convenient to use vinyl film. Of course, the total cost of painting will not change from this, but the process will go much faster. The general scheme for working with vinyl film is as follows:
- the film is pre-cut into large pieces, in which holes are made - these will be our spots.
- the prepared vinyl sheet is glued to the car, and those parts of the body that remain open are spray-painted black.
- We repeat the same procedure with brown and green. We glue the stencil film for brown spots so that it partially overlaps the black spots, and in the case of green, so that the spots overlap on black and brown. Remember to thoroughly dry the pigment of each color!
- when the entire body of the car is painted, all layers of the film are removed. If you are not satisfied with the clear contours of the spots, you can refine it with an airbrush.
Note to car owners
Painting the car in a “camouflage” color is original, it will definitely be noticeable from afar. However, it is important not to overdo it here: camouflage should occupy no more than 50% of the total area of the car body, otherwise you risk being fined by traffic police.
Every motorist wants his car to look unique and different from the gray mass of unremarkable cars. To this end, various changes are made to the appearance of the car. Someone wants the color of the car to play with all the shades of the rainbow. Someone prefers a different kind of matte coloring method. In all this variety of methods and techniques, camouflage painting deserves special attention. Such a specific solution is used, as a rule, by the owners of SUVs and all-wheel drive jeeps in order to emphasize the brutality of their car.
What is this type of painting, and what pitfalls does it prepare for all those who first decided to give their car an army style. Will try to understand this in more detail.
Types of car camouflage colors
Painting a car in camouflage has many varieties. Camouflage, as you know, is a method of camouflage characteristic of military equipment. So, depending on various external factors, various changes were made to it to make the car more stealthy.
It is customary to distinguish at least 5 types of camouflage. Each of them is strikingly different from each other, both in the method of application and in appearance.
Camouflage happens:
- urban;
- winter;
- sandy;
- pixelated;
- universal.
The first type of camouflage, as the name implies, is used for covert movement of vehicles in urban areas.
It has a number of distinctive features. So, it is characterized by more angular straight lines. The choice of colors is more limited to two or three shades. Among them: blue, white, gray.
The winter variety of camouflage is characterized by gray and blue blurry spots against a white background. In some cases, the use of several chopped corners and edges justifies itself.

White camouflage, from an aesthetic point of view, is not very popular. He is most often preferred by those who are not averse to hunting somewhere in the taiga forests in the winter.
In addition, there is also the so-called sand camouflage. Its second, no less popular, name is “desert storm”. In this type of color, pale yellow, brown and yellow shades can be traced. The method of its application has a number of nuances.

So, when applying layers, they resort to various methods of spraying. The final finishing by applying several layers of varnish completes the operation. It is worth noting that such camouflage, in the case of its civilian use, hardly justifies its name. It is used for aesthetic purposes only.
Those who like to play games often choose a pixel color for their car, it looks unusual and attracts the attention of others.
But it looks much more colorful. traditional look camouflage, made under the style of "Khaki". Dusty earthy tones give the car the features of a real military vehicle, skillfully hidden from enemies.

How to paint a car in camouflage
For competent application of camouflage, you can be guided by a previously worked out technique, which includes all the features of coating. Nevertheless, this procedure opens up a wide scope for the owner to imagine and implement the most extraordinary creative ideas.
One way or another, the painting technology presented by the method presented has a number of features. In order for camouflage to be performed according to all established canons and rules, certain requirements must be followed.
Namely:
- painting should be done in a ventilated area using personal protective equipment;
- initially applied base layer, which occupies most of the body element;
- gradually moving to smaller details;
- the base layer should be lighter than all the others. It is applied, as a rule, in 2-3 approaches;
- after its application, the paint should dry;
- the next stage is the imposition of a stencil and the application of masking elements of the 2nd layer;
- you should follow a pre-thought-out sequence of applying stains;
- spots should not merge with the first base layer;
- the stencil, for greater fixation, should be fixed with masking tape;
- it is necessary to use different variations, alternating with each other, colors;
- the borders of the spots are best made blurry, smoothly turning into each other;
- when using an airbrush, to apply spots, it is necessary to adjust the torch to the smallest spray sector;
- do not apply a large number of spots so as not to overlap the background layer;
- when using a matte finish, in the future, to protect it, several layers of varnish can be applied to it.
In addition, to give more specificity, leaves, branches and fragments of herbs can be used as a stencil. They, as a rule, are brought to the surface of the selected element and poured over from a can. It is not necessary to apply paint over the entire plane of the leaf or stem, it is enough to make its outline.
Methods for applying camouflage
With the introduction of more and more new methods of painting cars, it becomes possible to use a wide variety of methods for applying camouflage. This kind of service is available in many services and tuning studios involved in the decoration of cars. However, you will have to fork out a lot for such pleasure. Much cheaper to do it yourself.
At the moment, there are 3 ways to apply a camouflage coating:
- stencil drawing;
- without stencil;
- with vinyl wrap.
Each of the presented methods is fraught with a number of difficulties, especially for the uninitiated amateur.
Painting a car with and without a stencil
The most easily implemented of them is stencil. Even a person who is not versed in painting matters can cope with him. In this case, cigarette paper and newspapers were most often used in the past. These materials have both advantages and disadvantages.
Due to its thinness, a stencil made of such material can be torn, which creates a more natural, naturalistic effect. Paper, in this case, is glued to the intended part with adhesive tape, after which painting is carried out.
Over time, much more suitable materials appeared. For example, vinyl film.
Necessary drawings are cut out on vinyl rolls, applied to the corresponding body elements, and paint is applied.
Without a stencil method is much longer and requires a lot of strength and patience from its performer. It involves the application of a base layer, on which, subsequently, randomly located spots and geometric shapes are applied.

The contours of the figures are limited with masking tape. The configuration of the figures can be very different - it all depends on the imagination of the owner.
Car wrapping with vinyl film
A fairly common way to apply a camouflage coating on a car is to use a vinyl film. This approach does not require highly professional skills and abilities. It is enough to buy a film in the nearest store and go ahead.
Despite the ease of the presented method, nevertheless, to obtain the desired result, it is necessary to adhere to a certain sequence of actions:
- perform a full car wash with water;
- do not start applying the coating until the body is completely dry;
- dismantle all third-party elements;
- degrease the surface of the body;
- stick the film evenly on the selected body element.
This method has gained enviable popularity also due to the fact that the vinyl film is presented in the widest variety. In addition to traditional coloring, all kinds of camouflage are offered, some of which even copy the coloring of wild animals of the African prairies.
Once an attribute of military disguise, camouflage, due to its unusual design, has become widely used by owners of civilian vehicles. It is believed that it best emphasizes the character of the owner - a strong-willed, selfless person.
One way or another, a car with such a peculiar entourage will undoubtedly attract the attention of passers-by, and if necessary, it will certainly help to hide in the folds of the terrain from a potential enemy.
Camouflage-style paintwork adorns many cars today. Coloring of this type is becoming more and more popular and is no longer associated exclusively with the military or hunters.
It is impossible to paint in the factory, usually only a single-color paintwork is applied there, so many car owners are armed with the necessary shades of paint and try to do the painting work on their own.
Painting in camouflage can be done in different ways, so before starting work and buying paintwork materials, you need to carefully read them and choose the right color.
To apply camouflage on a car, you need to have a good imagination and the ability of a designer.. To make the drawing look organic, it is necessary to adhere to the rule of the golden section and evenly distribute the spots over the vehicle body. There are such painting options:
- Forest camouflage.
- Desert (shades of sand or brown, camouflage on this type of car has small and abstract spots).
- Winter version (the picture has a white-gray-black color scheme and the spots on the body are made larger).
- Hunting or military (all the spots are large, as if they pass into each other and at the same time have blurry edges).
Recently, digital camouflage has become more and more relevant - spots in this case have clear edges in the form of huge pixels. Typically, this design is used to decorate racing and sports cars.
Painting a car in camouflage
Despite the fashion, hunters or the military most often paint their vehicle in this color. Do-it-yourself UAZ painting in camouflage can be done with minimal time and labor costs, since such cars often have a khaki or grayish tint. Therefore, you do not need to carefully select shades to get the job done.

To perform the work, it is necessary to purchase the following materials and tools in advance:
- Newspapers and magazines to protect non-paintable surfaces.
- Masking tape of different widths in rolls.
- Aerosol paint of the desired shade in cans.
- Airbrush (if the work will not be done manually).
- Solvent.
- Clean rag.
- Primer and putty (if it is necessary to eliminate some defects on the body).
- Degreaser.
- Lacquer and polish for finishing.
It is recommended to apply camouflage on a car in a specially equipped room with a good ventilation system. This will not only avoid defects in the applied paintwork, but will also be useful in order for the applied layers of paint to dry as quickly as possible.
It is necessary to work in a protective suit and a respirator, since the fumes of paintwork materials are very toxic. It is also advisable to equip the room with good halogen lamps that provide illumination without glare. So you can better inspect the surface of the vehicle and apply paint.
The car must be thoroughly washed and dried, and the interior must be tightened with a film so that paint does not get inside during work. It is also necessary to protect the glass and optics of the vehicle with newspapers or old magazines and masking tape (if possible, it is better to dismantle the headlights altogether).
If the car does not have any chips and bumps on the surface, you can immediately treat it with a degreaser and start applying camouflage. If paint swelling or rust was found, these places must be cleaned to metal, treated with putty, sanded well and coated with a primer.
Do-it-yourself camouflage on a car
There are three ways to paint a car:
- Drawing drawings of leaves, reeds and a variety of grass (a plotter is used for work). This type is considered the most expensive, since it is very difficult to depict it.
- Camouflage with blurry edges.
- Camouflage with clear contours of spots.
How to paint in camouflage? All work, no matter what color and type of pattern needs to be applied, starts the same way - the vehicle is carefully prepared and washed away from dirt. Before starting work, it is imperative to choose the shade of paint that will be used to paint the upper layers.

It all depends solely on the imagination and wishes of the owner. It is necessary to prepare specially cut newspapers or self-adhesive film, if necessary, so that the pattern on the body is with clear boundaries. After treatment with a degreaser, you need to wait for the car to dry completely in a chaotic manner and, in accordance with fantasy, the film is applied to the body.
It is necessary to ensure that the pieces go to all parts of the body and at the same time do not form kinks. If you do not follow this rule, the paint may lie unevenly in places of fractures, and the entire vehicle body after painting will look inorganic. Then a layer of the selected paint is applied (it is better to start with dark shades).
Painting a car in camouflage is a lengthy and unhurried process. It is necessary to wait until the paint layer is completely dry and only after that the car is again pasted over with a film so that the spots overlap each other a little. Now you can apply a light shade of paint.
When all the colors have been applied and they have dried, you can remove the entire film. In order not to spoil the edges of the stains, the surface must first be slightly warmed up with a halogen lamp. This way the tape will come off on its own and won't damage the paintwork.
If you want to improve the camouflage a little, you can soften its contours using a black shadow border. To make the car's camouflage look more advantageous, some car owners cover the surface with a layer of varnish.
But most prefer to leave the car as it is, matte gives it an unusual appearance (in this case, for additional protection of the paintwork, it is recommended to apply a coat of varnish with a matte effect to the vehicle).
Painting methods
There are two methods that can be used to apply camouflage to the body.
Method 1. After the vehicle has been cleaned, a primer layer is applied to its body. The surface is pasted over with adhesive tape to prevent paint from flowing and the darkest shade of the selected ones is applied. You need to create spots from adhesive tape of a small width, it will be better to lie on the surface of the body.

Be sure to paint the roof of the car, otherwise the drawing will not look solid and complete. It is better to choose a quick-drying paint and after drying, the adhesive tape is removed from the body. Then the spots are arranged in a new way, while painting the body with a lighter paint and repeat the whole procedure again.
Then the tape is removed, at the request of the car owner, you can fix the pattern with varnish and polish it thoroughly.
Method 2. In this case, the car will need to be repainted. How to paint a car in camouflage? First, the vehicle is degreased and the surface is puttied. After it dries, the surface must be cleaned with sandpaper and blow off all the accumulated dust from the compressor.
Then the surface is primed and degreased, the body is ready for painting. Cut film, tape or newspapers are placed on the body in a chaotic manner. Then dark paint is applied and after it dries, the adhesive tape is removed.
The procedure must be repeated several times, apply another gray, brown or green color. The whole procedure does not take much time and as a result you can get a camouflage with clear spots.
If the owner wants the edges to be blurry, the surface of the body must be heated with a lamp and the edges will spread themselves. You can also use an airbrush for this purpose.
In order not to perform all the painting work, you can purchase a special film and paste over the body with it. Camouflage film on a car can be:
- Various textures and thicknesses.
- Have a glossy or matte finish.
- To be of different widths, while it is already ready for application to cars.
- It has different colors, so everyone can choose a pattern to their liking.
Its main advantage is the ease of removal - the old coating will not be damaged and you can change the color at any time.
Owners of off-road vehicles very often try to paint them in such a way as to blend in with the surrounding nature as much as possible. This is due to the fact that this color looks very appropriate for hunting, fishing and off-road travel. In urban conditions, a car painted in camouflage looks very stylish and attracts everyone's attention. Thus, camouflage in natural conditions masks the car, and in the city it serves as a means of attracting attention and helps to stand out from the crowd.
 Camouflage for a loaf
 UAZ cars are a very common and popular model of a domestic SUV.. They are often bought by hunters and fishermen, farmers and rural residents. In the old days, UAZ was one of the most popular vehicles in the army. Therefore, the owners of this brand quite often resort to camouflage painting of their vehicle.
UAZ painting in camouflage can be done by car service specialists. This will save you from unnecessary trouble, save time, but will require large financial costs.
If you want to avoid extra cash costs and like to tinker with your four-wheeled friend on your own, you can do this work yourself.
Painting of this kind is quite simple - you do not need to be a specialist and have any specific skills. Carefully read the technology and carefully follow the instructions - and you will perfectly be able to do everything yourself.
 Preparation and painting of UAZ
 Necessary materials
Get to work should be fully equipped, so do not forget to stock up on everything you need. In the process of work, you will need the following materials:
- a large number of old unnecessary newspapers;
- wide and narrow masking tape (5 skeins of each type);
- car enamel in aerosol cans: green, black and brown. Quantity - 4 cylinders of each type;
- half a liter of solvent 469;
- plenty of clean, dry flannel;
- 7 cm paint spatula;
- halogen lamp - "kilowatt";
- polishing agent and sponge;
- petrol.
After you stock up on everything you need, prepare the room. You will also need a well-ventilated dry garage free of dirt and dust. Work is best done in the summer to avoid temperature fluctuations.
 Preparing the machine for dyeing
 Preparing UAZ for painting
Every student knows that painting any surface is carried out after removing all dirt and dust. Therefore, the car must be carefully washed with detergent and dried. After that, you should seal with adhesive tape and old newspapers all the places on the car that we want to protect from paint. Headlights are best removed - it will be easier than sticking them with newspapers. We cover windows, doors and all rubber layers with newspapers and adhesive tape.
We degrease the entire surface of the car body. To do this, use a lint-free cloth soaked in gasoline. Experts advise not to use a solvent - it will corrode the main paint and you will get the so-called swollen fur coat.
If such a fur coat is nevertheless formed, we heat this area with a halogen and carefully remove the paint with a spatula. Otherwise, fresh paint will simply peel off in this place after a while.
 Primer and car painting
 Do-it-yourself UAZ painting
After the surface is prepared, we can begin the staining process. It is desirable that camouflage spots be of different sizes and shapes. Therefore, it is worth using not a stencil, but an adhesive tape. Let's take a step-by-step look at how the UAZ is painted in camouflage with your own hands:
- We form spots with the help of narrow adhesive tape - it is best suited for this purpose. We paste it according to the size of the planned spot, following the smoothness of the lines and the absence of creases. Paint will get into the creases, where it will leave narrow blots-scratches. If possible, the size of the spots should be large. You need to place them in such a way that they capture different parts of the body.
- We glue newspapers along the edges of the narrow adhesive tape, fixing them with a wide adhesive tape and forming smooth lines.
- We paint the spot with black paint. We are waiting for it to dry completely, after which we apply a second layer of black paint.
- After it dries, remove the tape and newspapers. We form brown spots. We do everything as in the previous paragraphs. Brown spots must be arranged so that they overlap. The paint, as in the previous case, is applied in 2 layers.
- We remove the tape and newspapers after the brown paint has dried and form spots for the green. He is the lightest and may need more than others. Each next layer is applied only after the previous one has completely dried.
We start painting on the right side of the machine and move clockwise. Remember the roof and hood - they also need painting.
The above colors are used if we are dealing with factory khaki coloring. If your car is gray, it is better to form camouflage from white, gray and black colors.
When working, we make sure that one primary color occupies at least 50% of the surface. Otherwise, you can not avoid trouble with the traffic police.
Coating the car
After finishing painting, it is necessary to cover the surface of the machine with a matte varnish. It will create a rough surface structure.
Next, the varnish is mixed with a solvent and a fixative. Consistency may vary depending on the layer. The first layers are usually more fluid, the last ones are thicker. All proportions when mixing should be maintained according to the instructions.
SUV owners very often try to paint them in such a way as to blend in with the surrounding nature as much as possible. This is due to the fact that this color looks very appropriate for hunting and fishing. In addition, in urban conditions, such a car looks very stylish. UAZ painting in camouflage can be done by car service specialists. This will save you from unnecessary trouble, save time, but will require large financial costs. However, you can do the procedure yourself.
When applying, it is important to understand why you need camouflage paint. Real disguise assumes that the car will work in difficult natural and weather conditions, mainly off-road. With such factors, it is necessary to approach this matter very carefully. Camouflage must be resistant to scratches, abrasion. The tape doesn't fit. But during urban operation, the car can be completely or partially glued in a khaki-type film.
It is necessary to paint the vehicle indoors, which is well ventilated. As a rule, any painting is carried out in the summer, so that dust does not settle on the body of the car, you will need a garage. We drive the car into the garage, wipe the dust from the car and seal the car windows with newspapers using 4 cm wide adhesive tape. It is better to remove the car's optics, if there is no time to mess with it, it must also be sealed.
Stains can be applied in two ways: staining and film. The first involves applying spots in a chaotic manner through a stencil. Before work, you need to arm yourself with polish, newspapers, construction tape, paint in spray cans. the figures must be overlapped, new spots must “run into” the old ones. This allows you to control the borders and creates a quality pattern. Particular attention should be paid to this, care should be taken when processing the main places. If light paint is superimposed on dark paint, then two coats must be applied. Otherwise, the dark will shine through. Between applying layers, it is recommended to pause for a couple of hours.
If you decide to use the film, then you must first cut it and decide on the image. The car is painted, then the car is pasted over. And this procedure is repeated several times. Then the film is simply torn off and camouflage is obtained. The film is glued randomly and overlapped. The optimal number of layers is three. Three layers of paint and two layers of film.
The final result will depend on how conscientiously and diligently you treat the work.