A walk-behind tractor is a universal professional mobile tool designed for agricultural work.
You can do a lot from a walk-behind tractor, even a snowmobile, the main thing is ingenuity. Such a structure will become a useful means of transportation not only in winter.
A snowmobile is an unusual winter vehicle. Excellent cross-country ability and maneuverability are its main features. By type, snowmobiles are workers, sports, tourist and mountain.
The process of converting a walk-behind tractor into a snowmobile is a complex process and not simple, but real.
There are many ways to convert a walk-behind tractor into a snowmobile, and the designs can be varied, both simple and complex. It all depends on what purpose the snowmobile is for.
But how to convert a walk-behind tractor into a snowmobile so that the assembly is as reliable as possible? This will be discussed in this article.
Turning a walk-behind tractor into a snowmobile

Let's start with a question. Why a walk-behind tractor? Everything is explained very easily. Autumn came and gradually all field work came to naught. Motoblock, like a bear, was sent into hibernation. It is clearly not needed until spring, but no. In winter, he, too, can faithfully serve the owner, facilitating his work. It will help in the delivery of firewood from the forest, water from the river, and simply facilitate movement on the snow cover. Will make it fast and comfortable.

Where do we start? From the engine. As a basic unit for our snowmobile, the Neva middle class walk-behind tractor, equipped with a rear drawbar and manual control, is perfect. Its engine, at a fairly low cost, is assembled from high-quality Japanese-made parts. In addition, it is equipped with forced air cooling, which will be very useful for a future snowmobile. As a result, we get a unit with a capacity of up to 7 hp.
To create a snowmobile yourself, you will need a pipe bender, a welding machine, an angle grinder, a power unit and a number of purchased spare parts that will be needed during the assembly process.


A snowmobile based on a walk-behind tractor: assembly
The assembly of a snowmobile based on a walk-behind tractor should be done in stages:
- To design a snowmobile, you should carefully approach its sketch and provide for its component parts.


The design features of the device will depend on the projected tasks. The mechanism itself will consist of a driven and a driving part. The driven part is shock absorbers, runners, and a steering column. The leader includes the frame, drive and engine. In order to correctly select the details of the snowmobile, it is better to make a mock-up (of cardboard, for example) of the projected snowmobile and it is better if it is in actual size.
You need to decide on the location and shape of all the components of the future unit, the assembly of which you are going to do with your own hands.
2. We make the frame ... It is necessary to initially complete the drawings, where you indicate all the dimensions of the frame. For convenience, you can use the typical drawing of the snowmobile presented above. For this, pipes can be used, preferably a 25x25 pipe, since it is more reliable than, for example, a water supply. Thanks to the pipe bender, we make the desired shape of the pipes, securing them with spot welding.

3. We weld the joints with an inseparable seam, to the resulting frame we weld the brackets for attaching the engine, seat and steering column. Old armchairs, for example, are useful as seating. A handlebar from a bicycle will come in handy.


4. As runners, we use two skis connected by hinges to the steering column. We use bolts as swivel sleeves. With constant lubrication, they will last a very long time. In addition, due to the position of the nozzles, you can change the clearance of the snowmobile. To relieve the load from the track, a support ski with tension rollers is installed.


5. Installation of the engine and gearbox is carried out on the driving part of the mechanism.

6. Determine the course of the future snowmobile. It can be wheeled or tracked. In the first case, due to the low weight of the chassis, maneuverability increases, but passability decreases, especially on loose snow. Therefore, it is advisable to complete the snowmobile wheels with chains. In the second case, on the contrary, the tracks increase the cross-country ability, but reduce the maneuverability.

7. Providing your unit with winter "shoes" is not so easy. Chains are used to reduce slip. Take a truck tube, deflate and put 5-6 chains on each wheel, then pump up again. As a result, you will get wheels adapted to winter conditions.

8. Another low-budget snowmobile wheel option.


9. As another option for winter wheels, you can use large-diameter tires from trucks and tractors, pre-cut with a jigsaw, as shown in the photo to increase traction with the road surface.

10. Make four steel hoops slightly smaller than the inflated tube of all the wheels of the snowmobile. In width, they should be 2-3 times larger than the corresponding wheel. Next, from the outside, weld on 7-8 plates with a thickness of 20 mm for better adhesion to the roadbed. Then lower the cameras, install the hoops and pump up again. It will turn out to be an inexpensive, but quite acceptable version of the wheel for a snowy road.

11. Tracks for a snowmobile can be made at home with your own hands. The material is a conveyor belt with bolted bars or pieces of pipe to increase traction.

The frame is made of a square tube 25x25x2, a caterpillar, an engine with a gearbox, a front suspension and a platform are installed on it.


The front axle is stationary, rigidly attached to the frame, the rear axle moves along the frame and guide, and the track tension is adjusted with a bolt.


The caterpillar is made of a conveyor belt, a water pipe with a diameter of 40 mm, with a wall thickness of 5 mm, is used as a track.


A support ski is installed in the middle to relieve the load from the track between the axles and tension rollers.


The drive shaft consists of a star from a motorcycle "Minsk", two stars from a snowmobile "Buran", tension drums.


Chain drive, gear ratio 1: 3, chain and sprockets from Minsk. Engine "Sadko" with a cylinder volume of 200 m3, 6.5 hp. with 1/2 gearbox and automatic clutch.


In the front suspension, skis are used from a children's Argamak snowmobile, reinforced with a 25x25x2 tube. The hinges are made using an M16 threaded connection. The steering is performed in the same way. The steering wheel was used from "Minsk".


As a result of this assembly, you get an excellent motorized vehicle with the number of one to two passengers and a small mass of cargo.
It is worth remembering that careless snowmobiling can be very dangerous and lead to injury and death, so you need to adhere to safety rules. It is not recommended to cross frozen water bodies with a snowmobile.
A snowmobile with an engine from a walk-behind tractor: another option
A reliable and powerful enough snowmobile comes with a monoblock engine. The Neva walk-behind tractor with a Japanese engine is perfect for assembling the structure.
In most cases, walk-behind tractors consist of 4-stroke single-cylinder air-cooled gasoline engines, but 2-stroke engines are also in demand, since they have a small mass, not a complex design, high maintainability, manual start, etc.
70 kilometers per hour - this speed can be squeezed out of an ordinary walk-behind tractor, however, only if you approach its assembly professionally.
You can make a snowmobile from a walk-behind tractor, like a racing car overcoming snow jams.

On such a unit, you can not only plow the land, but also go to the forest for firewood, to hunt, fish, or just ride with the breeze. For residents of long winters, the snowmobile will be an indispensable vehicle.
Not a lot of fuel is consumed, about 2 liters per hour.
In most cases, snowmobiles are made according to the scheme "2 skis in front and 1 track in the back." This design is optimally stable.

Homemade snowmobiles from a walk-behind tractor in the photo


Another do-it-yourself snowmobile from a walk-behind tractor in brief
1. Take the main components of the snowmobile.
2. Install the engine on the tracked engine.

3. We attach 2 rods to the caterpillar engine, which are attached to the crossbeam with skis and a rudder.
4-5. We install the front pillar and the seat between the rods.

6. We attach the caterpillar propeller to the beam with controlled skis and rudder.
7. We take bolts and pins and collect all the details of the future unit.
8. The snowmobile is ready.

The uniqueness of the snowmobile lies in its ability to drive in places where ordinary cars only dream of doing it.
Snowmobile from a walk-behind tractor video
Snowmobile video 2
Video number 3 about a snowmobile with your own hands (a walk-behind tractor (Bison) on tracks!
Selected for you:
Instructions
First, sketch out the intended design. In this case, provide for two component parts of the device: the slave and the master. The first should consist of runners, steering column, etc. The second part should contain the power plant, frame, drive and driver's seat. However, if necessary, you can change the design, more adapting it to the performance of the intended tasks.
Identify parts and assemblies of the snowmobile that you cannot make yourself. Purchase them and roughly estimate the location of the units, the dimensions of the structure and its individual parts. Approaching the layout professionally, make a plaza - a life-size model of a snowmobile from plywood or thick cardboard. Make mock-ups of all purchased parts, a mock frame and assemble a plaza from this. After that, determine the size and location of the parts that you intend to make yourself.

Self-fabrication of the frame presupposes the obligatory presence of a pipe bender, welding equipment and appropriate skills. If all this is not there, order the manufacture of a frame in the nearest workshop according to a previously drawn drawing. To make the frame yourself, start by choosing the necessary pipes. Prefer piping removed from motorcycle frames to plumbing. Special frame pipes are generally more durable.

Bend the pipes as needed. Assemble the frame before using spot welding. Pre-fit the frame and snowmobile attachments. This will avoid design errors. The final welding should be carried out with a single seam, preferably without gaps or other imperfections. Weld on the brackets for the engine, runners, wheel drive, seat, steering column and other parts.

Make the runners in the form of two wide skis. Weld the steering column and secure the runners to it with the swivel brackets. A more complex option involves the use of shock absorbers in the ski suspension. If the design of the snowmobile provides for widely spaced front skis, then lever from "Ural" are more suitable as shock absorbers. Directly on the handlebars, attach the controls from any motorcycle model.

Attach the engine and gearbox to the second part of the snowmobile. Take them too from any light motorcycle. Use self-made low pressure tires for the rear wheel (or wheels). They can be made from suitable rims and air tubes for car tires. When inflated, they will be good low pressure wheels. For movement on loose snow, snow trailers are required, located along all the circumference of the wheel (wheels).
If the design of the snowmobile has a single rear wheel, follow the motorcycle model for the rear suspension. To do this, in addition to the frame, weld the rear swingarm and attach it to the frame through the hinge. Using motorcycle shock absorbers, make the swingarm suspension. Consider and install a chain drive from the engine to the rear wheel. After adjusting the drive, install the rear wheel.
If you wish to install two rear wheels, attach a short drive axle to the rear of the frame. For this purpose, find the rear axle from the cargo scooter "Ant" or shorten the axle yourself from the car. With soft low pressure wheels, the need for rear suspension is partly eliminated. The use of motorcycle shock absorbers makes the task technically very difficult. Automotive shock absorbers will not soften the suspension as they are designed to carry much more weight than a snowmobile.
Many agricultural owners know firsthand what a walk-behind tractor is. It is used to cultivate a small land area. Most often it works in the warm season, but not everyone is aware that it is possible to convert the candy bar into an all-terrain vehicle. Everyone can make such a vehicle with their own hands. With a small amount of money, the device even turns into a snowmobile or ATV.
DIY snowmobile from a walk-behind tractor
Homemade vehicles from a walk-behind tractor have a wide variety. Most often, craftsmen convert it into a miniature tractor. The only difference is the high level of comfort compared to the original version. When creating, it is necessary to take into account several important details: shifts in the center of gravity, an increase in the front axle and the installation of a new differential. Now there are whole sets on sale that allow you to increase the functional features of the candy bar.
For those who want to travel on snowy roads, there is also an optimal solution. It is quite simple to create a snowmobile with your own hands. The most difficult task is the development and installation of a chassis on four wheels. A feature of such a device can be considered the minimum pressure on the surface. It is best to make special devices for coupling with the ground. To do this, they are made in accordance with the wheels of the walk-behind tractor.
For heavyweight owners, things are much easier. The structure of the vehicle remains virtually unchanged. Here it will only be necessary to fix the lugs on the wheel surfaces.
Homemade all-terrain vehicle from a walk-behind tractor

It is necessary to decide on the capacity and carrying capacity of the all-terrain vehicle. It is best to prepare drawings in which it is necessary to indicate in advance the location of units with nodes. Experts recommend that you supply the engine with one that uses a forced cooling system. These include air and water cooled motors. Its power must be selected at your discretion.
For many, it is not clear which type of engine to choose - gasoline or diesel. Here it is necessary to be guided by personal preferences, since both have their own disadvantages and advantages. The undercarriage must be independent and floating. To make it, you need to think over everything, but if successful, ride comfort will be ensured.
First you need to choose the type of base. For such purposes, the frame of motorcycles Izh, Ural or Dnepr is perfect. I would like to pay special attention to the Izh-based base, since it has good handling. To have a floating suspension, we need to connect the side members with a strut with a bushing and a strut. The suspension will then allow the vehicle to run smoothly.

As for the wheels, it's best to use a truck camera. For fastening, a metal hub is most often used. Cameras of KamAZ vehicles are very popular in the production of all-terrain vehicles. Installation of units is one of the most laborious processes in the manufacture of an all-terrain vehicle from a walk-behind tractor. This tap occurs after the suspension is installed. In parallel, it is necessary to connect and adjust the brakes, clutch and exhaust system.
Once the all-terrain vehicle has been assembled, it is necessary to test it. If there are any malfunctions, then they must be eliminated immediately.
Do-it-yourself swamp vehicle from a walk-behind tractor: important details
To make a swamp rover, you will need everything the same. The only difference is the need to use low pressure wheels. They provide good off-road maneuverability, and also allow the vehicle to move through obstacles without any problems. When manufacturing, weight must be taken into account, as too heavy a swamp vehicle will experience problems when driving.
Some people design a crawler-based swamp vehicle. Of course, this option is ideal for driving on mud or soft surfaces, but it is more difficult to design.
Tracked all-terrain vehicle from a walk-behind tractor: design features

Track units are most commonly found in rural areas. To make it yourself, you do not need to completely change the chassis. You need to purchase a large truck wheel of a size that can easily be fixed and held between the front and rear wheels of the walk-behind tractor.
First you need to remove the side part of the new one. Due to its thickness, it will be difficult to do this. Next, we pull the resulting rubber "caterpillar" onto the walk-behind tractor. If the rubber tire slips while testing the vehicle, it is best to find the optimal size. This option is the most affordable and the easiest to manufacture. The service life of such "tracks" depends on the operating conditions.
Of course, it is possible to completely upgrade and replace the chassis, but it will cost a lot, and it takes a lot of effort. True, there is one but - the grip will be better.
With the beginning of winter, especially snowy, there are problems with movement. Few people know that a snowmobile can be constructed from improvised means as an alternative means of transportation in winter conditions.
At the same time, there is no need for serious expenses. Moreover, in the presence of a large amount of snow on the car you will not go far, but the snowmobile will allow you to move in such conditions without any problems.

The assembly of any structure begins with the development of drawings. All the necessary units can be placed on them, after which you can proceed to the practical implementation of the idea. Therefore, at this stage, you should decide on which brand of chainsaw is suitable for the implementation of the plan.
Choosing a chainsaw
In retail outlets, you can find several models of chainsaws. The most popular of them are the Druzhba chainsaw, the Ural chainsaw and the Shtil chainsaw. Before choosing, you should think carefully, comparing their technical characteristics.
Chainsaw "Friendship"

This is the simplest chainsaw that can be used as a snowmobile engine. The result is an elementary construction without anything superfluous.
The only drawback is its high weight and relatively low power. In addition, there are no parts on the structure for securing the safety covers. In addition, this design is outdated in all respects.
Specifications:
- Power - 1 kW;
- Weight - 12 kg;
- Engine (two-stroke);
- Bus length - 45 cm;
- Fuel (gasoline).
Chainsaw "Ural"

This is a specialized model that has more reliability, power and less weight in relation to power. This is an environmentally friendly unit that can work in extreme conditions.
If you decide to use the Ural chainsaw, then this is a good choice. Its technical characteristics are fully consistent with those stated.
Specifications.
- Power - 3.68 kW;
- Weight - 11.7 kg;
- Engine (gasoline two-stroke);
- Overall dimensions - 46x88x46 cm;
Chainsaw "Calm"

It is also suitable for making a snowmobile with your own hands. This is an environmentally friendly device, absolutely harmless to humans. The main advantage of the chainsaw is its low weight and noiseless operation, in comparison with the Ural chainsaw, and even more so when compared with the Druzhba chainsaw.
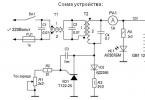
Diy scheme for making a snowmobile from a Ural chainsaw

Schemes for assembling a snowmobile from the Ural chainsaw: 1 - steering wheel; 2 - fuel tank (from the Druzhba chainsaw; 3 - power unit (from the Ural chainsaw); 4 - steering ski rack bushing (tube with a diameter of 30-2 pcs.); 5 - steering ski (2 pcs.); 6 - the drive cogwheel of the caterpillar (nylon, sheet s15, 2 pcs.); 7 - caterpillar (from the Buran snowmobile, shortened); 8 - frame; 9 - support roller (from potato sorting, 18 pcs.); 10 - brace backrest limiter (pipe ½); 11 - track tensioner (2 pcs.); 12 - track tension gear (nylon, sheet s15, 2 pcs.); 13 - bearing No. 80204 in the housing (4 pcs.); 14 - box-trunk, bottom-plywood s4, sides board s20); 15 - seat (cover-plywood s4, foam rubber, leatherette); 16 - 1st stage of the chain transmission; 17 - 2nd stage of the chain transmission; 18 - backrest-limiter of the seat (pipe ½ inch); 19 - driven sprocket of the 1st chain drive (large sprocket of the creeper, intermediate shaft); z = 38; 20 - leading sprocket of the 2nd stage of the chain drive (small sprocket of the creeper), z10; 21 - driven sprocket of the 2nd degree of the chain drive (drive sprocket of the drive shaft of the track), z18; 22 - leading sprocket of the 1st stage of the chain drive (sprocket of the gearbox output shaft), z12; 23 - steering knuckle lever; 24 - steering rod (2 pcs.); 25 - steering shaft with bipod; 26 - front axle beam (pipe with a diameter of 30); 27 - the drive shaft of the caterpillar; 28 - track tension axle.
Without creating a diagram and a drawing, it is unlikely that it will be possible to connect together the main structural units, such as:
- Engine;
- Transmission;
- Skis and tracks.
To simplify the design process, you should take the track from the Buran all-terrain vehicle. If a children's version is being designed, then skis will be enough.
Racks

Steering ski: 1 - runner (nylon, sheet s20, from a children's snow scooter); 2 - spring (normally stretched, from the rear shock absorber of the moped); 3 - support spring bearing; 4 - undercut (dural corner 20x20); 5 - spring cover (corner 35x35); 6 - fastening the spring to the cover (M8 bolt with washer); 7 - support arm (pipe 30x30); 8 - spring for fastening the rack - forks to the ski lever (steel, sheet s2); 9 - spring for attaching the support arm to the ski (steel, sheet s2); 10 - axles (bolt М8, 2 pcs.); 11 - steering knuckle rack (bicycle steering rack with crown and part of the fork); 12 - steering arm (steel, sheet s4); 13 - mounting the steering arm (type M16); 14 - fastening the spring center and the lever spring to the ski (M5 countersunk head bolt, 7 pcs.); 15 - lever sleeve (steel pipe with a diameter of 30 mm); 16 - sleeve bearing (nylon bushing, 2 pcs.); 17 - rack bushing (steel pipe with a diameter of 30 mm). In the top view, the parts 11, 12, 13 of the steering knuckle are conventionally not shown.
Snowmobile stands can be made of 3x3 cm corners. They are connected to each other with steel jumpers. As a result, there is a relatively small portal. To create a platform, you need to take a sheet with a thickness of 2 mm and connect it to the portal and the middle of the right side of the vehicle elements. This platform will serve as a place for attaching the chainsaw gearbox and the chain drive shaft.
A small space should be formed on the rear portal section and in the middle of the snowmobile for the seat structure.
The front of the frame and the front axle crosshead are connected by means of a beam. An ordinary water pipe with a diameter of 1.5 cm acts as a beam. At the end of this pipe, the sleeves of steering skis are attached by welding, and a stand is installed in the center. The strut will support the motor subframe.
Particular attention should be paid to the attachment points of the uprights. For greater reliability, the attachment points are reinforced with steel gussets, 2 mm thick. This approach will strengthen the vehicle and make it more reliable and durable.
Caterpillar

Snowmobile frame with tracked unit: 1 - the rear part of the spar (steel sheet s2, with flanges, 2 pcs.); 2 - tensioner (4 pcs.); 3 - rear portal (corner 30x30); 4 - the middle part of the spar (corner 50x63, 2 pcs.); 5 - bracket-fork for installing the axle of the support rollers (steel sheet s2, 10 pcs.); 6 - middle portal (corner 30x30); 7 - a platform for attaching the gearbox of the power unit and the intermediate shaft-creeper (steel sheet s2); 8 - kerchiefs (steel sheet s2, 4 pcs.); 9 - front portal (corner 30x30); 10 - the front part of the spar (steel sheet s2 with flanges); 11 - the axis of the tension gears; 12 - track tension cogwheel (2 pcs.); 13 - axle of track rollers (steel, circle 10, 5 pcs.); 14 - axle fastening (M10 nut and spring washer, 20 pcs.); 15 - spacer sleeve (duralumin pipe); 16 - skating rink (18 pcs.); 17 - bearing assembly (4 pcs.); 18 - drive cogwheel of the caterpillar (2 pcs.); 19 - the drive shaft of the caterpillar; 20 - drive sprocket of the drive shaft (driven sprocket of the 2nd degree of the chain drive), z = 18; 21 - steering ski steering knuckle bushing (tube with a diameter of 30 mm, 2 pcs.); 22 - front axle beam (pipe with a diameter of 30 mm); 23 - kerchiefs, 4 pcs .; 24 - sub-engine rack (pipe with a diameter of 30 mm); 25 - roller band (rubber ring, 18 pcs.).
To assemble a mini-version of a snowmobile, you can take tracks from the old Buran and modify it, shortening it by almost a whole meter. Gear wheels can be made from a sheet of nylon, 1.5 cm thick.
Drive shaft

Track drive shaft (idler shaft is the same, only item 4, replaced by item 1): 1 - left (along the way) tip (steel, cylinder 22); 2 - shaft (steel pipe 0.28x20; 3 - flange for attaching the gear wheel to the shaft (steel sheet s4, 2 pcs.); 4 - right (along the way) shaft tip (steel, cylinder 29); 5 - caterpillar drive gear (2 pcs.); 6 - frame side member, 2 pcs.); 7 - bearing housing cover (steel, 2 pcs.); 8 - bearing 80204 (2 pcs.); 9 - bearing housing (steel, 2 pcs.); 10 - drive shaft sprocket; 11 - fastening the sprocket to the shaft (M12 nut with wide and spring washers); 12 - key (steel 20); 13 - seal (felt, 2 pcs.); 14 - fastening the bearing housing to the spar (bolt M6, with a grover 4 sets); 15 - fastening the bearing housing to the side member (bolt M6 with a spring washer, 4 sets).
The drive shaft is made of a steel pipe with a diameter of 1.4 cm. Special flanges are attached to the shaft, to which gear wheels are attached. At the end of the drive shaft, by means of welding, trunnion tips are mounted. The pins must provide space for the bearings.
Engine

This unit is considered the most important snowmobile mechanism. Compared to other structural elements, such as a bar or chain, the engine must function properly and the snowmobile will not even move without it. Therefore, the long-term performance of the device will depend on the reliable and trouble-free operation of the engine. If you want to install an engine from an imported chainsaw, you can purchase a used "Calm".
Another important structural element, on which the trouble-free operation of the snowmobile depends, is the gearbox.
Asterisks

Immediately striking is the fact that the right hand piece has a keyway for mounting and securing the chain sprocket. This is the track shaft sprocket, which is securely fastened with a nut. To make the attachment possible, a corresponding thread is cut on the tip.
The end of the tension shaft has the same overall dimensions, and the fastening of the structural elements is carried out in the same way as the fastening of the track shaft sprocket.
The sprocket with the highest gear ratio (number of teeth) must be in the first gear stage. The engine of the Ural chainsaw has 38 teeth.
Steering

On a homemade device, you can install a handlebar of any design, and even from a bicycle. In this case, it is very important to bring manual control of engine speed to the steering wheel. In order not to bother too much, it is better to use a steering wheel from a moped, scooter, etc., where the engine power control mechanism is already provided. This will make the structure more reliable and easier to operate.
Brake system
Usually, such a vehicle does not have a braking system, and it is not necessary, since a snowmobile does not develop high speeds, especially a homemade one. Although, if you seriously approach this problem, you can build a primitive braking device.

Immediately it is worth noting that a self-made design, whatever it may be, is unlikely to be able to register (legalize) with the relevant authorities. And therefore:
- According to the law, a homemade snowmobile does not belong to the category of vehicles. Therefore, its further application, as well as responsibility for the consequences, rest solely with the person who made it. It is better if it will be operated somewhere in the outback and not caught the eye of the relevant services.
- A snowmobile and a floating all-terrain vehicle are completely different vehicles, although they have certain similarities.
- Since the engine has a low power, it is not advisable to transport cargo with this vehicle. Better to move around on it alone.
- For movement at night, lighting (headlights) can be installed on the snowmobile. This will increase the functionality of the device and comfort when moving.
Conclusion

Due to the fact that most people do not have the skills to make any structures on their own, they find that it is rather difficult to assemble a snowmobile with their own hands. And if it is possible to build something similar to a snowmobile, then it is unlikely to go, and if it does, it will stop very soon. And it will not look like a snowmobile at all, but a pile of spare parts assembled together. Fortunately, this is not the case, and with the proper approach and level of imagination, you can assemble a similar structure from improvised means, which are at least a dime a dozen in any garage. And if you have at least some experience with these spare and improvised materials, then the task is simplified altogether. Here the principle of desire already begins to operate and if it does not exist, then it is unlikely that it will be possible to collect anything at all, let alone a snowmobile.
The fact that the problem is urgent in our time is not just a statement, but a belief based on the problems of today. To our great regret, the state does not go to meet the broad strata of consumers, but has taken a course towards the production of only expensive equipment intended for sale to the consumer with money.
DIY snowmobile - Video
Those who like to go fishing often in winter often face the problem of cross-country ability. After all, it is not always possible, even in an off-road vehicle, to drive directly to the river bank, and even more so to the very place of fishing. The way out of this situation is a tracked snowmobile. However, the price of such equipment in stores is sometimes not affordable, and therefore there is a need to make such a device with your own hands. In today's article we will look at how it is done on tracks and what you need to have for this.
Caterpillar
The first step is to start with the most difficult piece of snowmobile construction - the track. Along with the motor, it is the main driving element of all equipment. In order to do it, you first need to draw up drawings of homemade snowmobiles on tracks (like in our second photo).

This way you will know the exact sequence of the work performed and will not forget about any small detail. And now how to make a caterpillar in practice. To do this, we need to take a plastic pipe (about 40 millimeters in diameter) and 2 strips. The number of pieces of strips depends on how long your caterpillar will be. Working with these parts, or rather, their processing is easily done on a circular or (grinder). In this case, you need to cut through the part one wall at a time. This is necessary to ensure the accuracy of the work performed. How to connect the conveyor belt to the cut pipe halves? To do this, we need two, while the diameter of their thread should be about 6 millimeters. If you combine this value of the elements with the manufactured structure, the step between the lugs at the exit will be 93 millimeters.

When "baiting" parts of the pipes with their cut side outward, be sure to maintain a step distance between them. If the displacement is 3 millimeters or more, this will lead to inconsistent operation of the teeth of the drive gear and the belt itself, which will cause overshoot in the snowmobile. And this already leads to a loss of control. This discrepancy can lead to the fact that the belt can simply slide off the rollers.
It is also important to observe the dimension of the caterpillar. How long it will be depends directly on the power of the engine on which the homemade snowmobile will work. On the tracks, it is necessary to calculate the nominal pressure of all equipment on its plane. Thus, the curb weight of the snowmobile relative to the roadway should be no more than 0.4 kg / cm 2.

How to drill the tape?
Homemade tracked snowmobiles work fine on belts drilled with a conventional drill. However, in order for the device to work as long as possible, you need to re-sharpen the drill to work with rubber in advance. You should first purchase a tool designed for processing wooden surfaces. Never use metal drills.

Other chassis parts
The rest of the units will be easier. For example, assemblies such as axles and rubber wheels, Buranov sprockets and protected bearings can be purchased at any specialized store. By the way, it is better to buy inflatable wheels. This technique will be softer on the go. The axle can be taken from a simple garden cart (biaxial). If necessary, you can cut it off or, conversely, expand it to the appropriate values of the technique. If you are unable to purchase a drive shaft from a store, you can try making one on a lathe. When making your own shaft, make sure that it fits the bearings well in size.
Homemade snowmobile on tracks: frame
We will have it perform the main load-bearing function and hold all the parts, including the engine, in one whole. By the way, as a motor, you can use a power plant from a motorcycle along with a gearbox. But back to the frame. We will make it from a steel section with a diameter of 25x25 millimeters. In this case, it must be welded in such a way that it has two longitudinal and three transverse beams. The presence of these parts on the frame will significantly strengthen its structure.

We finish the work
Finally, on how to install on a homemade snowmobile on tracks. During the assembly of the snowmobile, here you need to make two swivel sleeves. This will be your steering gear. How it's done? Weld a 1/3-inch female plumbing socket to the front beam and screw the male threaded nipples into them. The branch pipes already have track racks and welded bipods for the tie rod. By the way, you can use skis from an ordinary children's car "Argamak". But before that, first prepare them for installation: attach the angles for attaching the swivel stand and cut the metal. This will greatly improve the handling and handling of the snowmobile at high speed.