Any self-respecting car owner tries to constantly keep his car clean. However, over time, it loses its properties. Various road dust eats into the varnish layer, microcracks are formed. All this noticeably spoils the appearance of the car. Scratches caused by inaccurate parking do not greatly decorate the car. But how to restore the previous appearance of the paintwork? Polishing scratches on the body will help. What it is and how to do it yourself - we will consider in today's article.
Views
There are several types of polishes in total:
Instruments
Is it possible to polish the car body from scratches with your own hands? Experts say that if you have an angle grinder and a set of felt nozzles, you can qualitatively restore the paint. However, it is not recommended to grind the abrasive by hand - the efforts of the hand will differ, which is why the layer is removed unevenly.
Preparation
Initially, the car needs to be prepared for polishing. This requires the entire body to be washed. It is advisable to use a pressure washer. Moreover, the entire body is cleaned, even if the scratches on it are polished locally. Next, you should degrease the surface area. For this, the "Antisilicon" solvent is suitable.

If this is the lower part of the body, it is worth excluding bituminous spots. It is very difficult to clean them, even with anti-silicone. Therefore, we use a specialized solvent. It is called that - bitumen stain cleaner. It is necessary to spray the composition on the surface and after a while wipe it off with a dry cloth.
Application of polish
So, the surface is thoroughly washed and degreased. Now we start polishing the scratches on the car body. To do this, take an angle grinder in our hands and install a felt wheel on it.
Note! If the felt disc is not new and has darkening, it should be replaced. Otherwise, the dirt accumulated on the felt wheel will work like an abrasive - not evenly remove the paint layer, but scratch it. If the element has fallen on the asphalt at least once, it cannot be reused. Even after thorough cleaning, fine dust particles will remain on it.


Repeat the procedure over and over again, periodically checking the condition of the circle. The felt will darken with use. If there is serious contamination, it should be replaced. It is not worth washing - this is a disposable, consumable material. And washing will not give the desired effect.
Finish polishing
At the final stage, it is required to re-treat the surface with polish. However, not abrasive, but waxy. With its composition, it will close large "pores" (chips and cracks) that the abrasive polish did not remove.

It should be noted that the restoration paste is able to remove only those scratches that have not penetrated to the base enamel. Apply wax polish on a new felt disc or by hand. It is important to prepare a clean, dry cloth. The paste is not so grainy, therefore, a run-up in the application efforts is allowed.
Conclusion
So, we found out how to polish scratches on the body. You can restore the previous shine of the car and save it from chips yourself. However, for a high-quality effect, you should use a sander. Why is the felt nozzle for a grinder or drill not suitable? The point is that these instruments have different turns. In the course of work, you can easily overheat the paintwork. This will not have the best effect on his condition. Therefore, we use only a specialized machine and only at minimum speed.
Almost none of the motorists can do without one or another damage to the appearance of the car during its operation. Cars get into accidents, are exposed to natural disasters, and receive various “everyday” damages. Especially in large cities with high traffic intensity. Quite often, the paint on the car is simply scratched. Someone takes this calmly, and some drivers perceive the damage as nothing more than a personal tragedy and try at any cost to restore the appearance of the body paintwork.
Removing scratches from your car yourself will cost you significantly less than repairing from a professional, but the end result will be slightly worse. How much worse depends primarily on your efforts and the availability of minimal knowledge in this area, which will be discussed below.
Please note the following before starting refurbishment work.
- Before you start doing anything with scratches, you need to visually evaluate them. It is necessary to conduct an assessment on a well-washed car, well, or at least on a damaged body part washed from dust and dirt.
- Oftentimes, paint from someone else's car is mistaken for catastrophic scratches. Try rubbing off the paint with white spirit. Most likely, after this, the damage will no longer be so terrible.
- The vast majority of modern cars are painted using a two-component technology, in which a colorless transparent varnish is applied on top of a base color layer. There is still a widespread belief on the Internet that only metallic paints are varnished. This is no longer the case.

- If the scratches are shallow and only the top layer of varnish is damaged, then they can be removed with a light abrasive polishing. It is very easy to believe how successful polishing will be at removing scratches. In the place of scratches, without strong pressure, run your fingernail in a direction perpendicular to the damage. If the nail does not cling to the pronounced grooves of scratches, then all this will be polished almost without a trace. Another way to check is to use a generous amount of water to wet the scratches. If, after wetting, they cease to be visible, then this is a good sign indicating an excellent polishing result.
- Professionals use a special power tool for polishing. Buying it to remove multiple scratches is not economically viable. Fortunately, you can do without it. At auto retailers, ask for a fine abrasive paste polish to remove scratches. You may be offered a pigmented polish to match the body color of your car. The pigment will help fill in and hide deeper scratches. This is useful, but there is no extreme need to choose a polish by color. Sooner or later, the pigment will wash out of the scratches.

- Before polishing the damaged area with the purchased product, make sure that the surface to be treated and the adjacent areas are free of dust, sand and dirt. Only start polishing in a clean garage or outdoors in calm weather. Apply a small amount of polish to a soft cloth and begin to work on the damaged area using light pressure in a circular motion. Avoid rubbing one area too long to avoid rubbing off the entire layer of varnish. It is important to strike a reasonable balance between masking scratches and the thickness of the remaining varnish coat. After finishing abrasive polishing, apply a protective wax polish to the area.
- In cases where you are less fortunate and the paint has enough deep scratches, you can no longer do without repair tinting. You can, of course, use various wax crayons to remove scratches, but the effect of their use is short-lived and after a while you will have to perform this operation over and over again. Therefore, it is better to purchase a base paint with varnish and do everything once and for a long time. Now the majority of imported cars are supplied by car manufacturers with repair kits consisting of two small bottles, one of which contains the paint itself, and the other contains colorless varnish. Your task is to select a repair kit that matches the paint of your car based on the code or color of the paint.
- After purchasing the paint, you can start painting over deep scratches. To do this, again rinse the repair site, and carry out the operations themselves in a clean, dust-free place. Degrease the scratches where the paint will be applied with alcohol. If the scratches are too deep, then it is advisable to fill them in advance with a primer that will not shrink during drying. Otherwise, you will need to apply several coats of paint and varnish so that after drying there is no deep depression at the scratch. With a thin brush with a soft squirrel bristle, carefully paint over the scratch and allow the paint to dry as indicated on the bottle. Try not to go beyond the boundaries of the scratch.
- After the paint has dried, apply a layer of varnish on the scratch in the same way, only it is necessary to apply varnish with a slight overlap on the main layer of the car's paintwork. Let the varnish dry and use the vehicle as directed.
- After at least a month, when the varnish is completely cured, carefully polish it with a mild abrasive polish. This completes the process of removing scratches on the machine.
How to remove deep scratches
In this case, a wax crayon will not help, so do not spend money on it. But filling the scratch with paint will help. The sequence of work is identical to that described above, but with some nuances.
Preparatory work is mandatory. It is also necessary to degrease the place of damage. The paint is also applied with a brush after preliminary pasting of the damaged area.
But in this case, the paint is applied in two layers, while each layer must dry out. After applying and drying the paint, the damaged area is varnished. Then the surface is polished.
More difficult is the operation to remove the scratch if it is very deep and has reached the metal. To complete the work, you will need a few more materials and tools:
- Anticorrosive primer;
- The soil is ordinary;
- Acrylic paint;
- Small brush;
- Degreaser;
- Colorless varnish;
- Polish.
Before performing work, the car must be washed and dried. Then the place of damage is treated with a degreaser.
After that, you can proceed directly to repairing the damage. Since the scratch has reached the metal, an anti-corrosion primer must be applied first. This must be done, since when damaged, the metal began to interact with air. If you do not do this, but immediately apply ordinary primer, then it is possible that in the future a metal corrosion process will begin at this place, which will lead to the appearance of rust and a more complex restoration process of the body.
After the anti-corrosion primer has dried, a normal primer is applied to it. This should be done if only because the application of the primer will level the surface, and it will not differ. If not applied, the scratch site may appear as the thickness of the layer will vary.
Then a layer of paint is already applied, and it must be applied in several layers, with breaks for drying each layer. The final step will be to apply a layer of varnish and polish the surface.

In the near future, accounting promises to create regenerative paints for cars that will independently repair scratches on the car body. But until we have lived to see this wonderful time, there is nothing left to do but to polish and tint paint defects on our own using traditional methods.
Therefore, chips, scratches and many other damages are not inevitable. What to do? Do I need to contact a specialist in a car service to repaint damaged parts? Are you willing to pay a decent price to paint chipped parts? Or you
Of course, everything depends on the nature of the damage and the depth of the scratch or chip, but in most cases, each driver can independently remove many scratches and other defects without having to repaint the damaged body elements. Yes, each of you, spending a little time, will be able to make chips, scratches almost invisible.
How to determine if it is possible to independently remove a chip or scratch on the body?

Before you start removing scratches,. The fact is that there is a scratch to a scratch. It all depends on the depth of damage to the paintwork.
For example, if you see a thin white coating on a scratch or chip, then most likely the scratch has not damaged the base coat of the paintwork.
But if the depth of the scratch reached the metal, then it can become a more serious problem for self-elimination of the defect. Remember that if the damage to the body has damaged the paintwork to the metal, then a complete painting of the body element is necessary, with preliminary surface preparation and professional drying.
Polishing scratches on the body

Minor body scratches, i.e. those that have not damaged the layer of paintwork to the metal, as a rule, can be polished with the help of special agents. Here's what you need to do:
Step 1

Before proceeding with the removal of the scratch, it is necessary to remove the dirt from the surface of the body. Next, you need to polish the defective body element with a car polishing agent.
In order not to touch the undamaged parts of the body, it is advisable to seal them with masking tape or tape, leaving only the defective element.
Apply a small amount of polish to the damaged area. Next, use a terry cloth (a terry towel may work) or a microfiber cloth (microfiber) to polish the surface. You can also purchase a special tool (for example, as in the photo).
Step 2

Apply polish evenly to the body, then use a dry cloth to further polish. After that, check if there is an effect. Repeat the entire process if necessary. Do everything slowly and smoothly. Check constantly to see if the scratch disappears. If after your actions the scratch does not disappear, and there are no external signs that polishing helps, stop polishing the body.
Pencil for removing scratches from a car body

Step 1

Clean the scratch with a solvent to degrease and remove foreign chemical elements from the surface. When applying paint to the body with the scratch remover, be careful not to apply a chemical coat to intact areas of the paintwork.
It is worth noting that by using a pencil, you will nevertheless touch some of the undamaged area of the paintwork. Don't worry, this is normal. True, we advise you to still minimize the ingress of paint from a pencil on normal body elements.
Step 2

After applying the product from the pencil, allow time (at least 24 hours) for the product to dry. Next, you need to clean up the scratch with a rubber sponge or fine sandpaper. Remember to strip slowly and smoothly. Stop periodically and check the result of your actions. Remember that all actions must make progress for the better.
Step 3

Next, apply the polish to the damaged surface and use a microfiber cloth, terry towel or special tool to polish the surface. The polish will restore the shine of the cleaned body surface.
Step 4

Most likely, after the first application of the pencil, then cleaning and polishing the scratch, you will see the remaining damaged areas. If this happens, repeat the process again, applying even more paint with the pencil.
Your task is with the help of a pencil, cleaning and polishing to completely fill the scratch with paint, leveling it with the rest of the undamaged surface. If the scratch is not deep and has not damaged the layer that reveals the metal, then using this procedure you will independently be able to remove the damage to the paintwork.
Removing a scratch with automotive spray paint

If the scratch is deep enough, then it will not work to remove it with a special pencil. In this case it is necessary to use a spray paint can. To do this, purchase a special paint in a bottle, which is designed to remove defects on the body. Attention! paint should be only automobile!
Here's how to use a can of paint to repair damage to a car's paintwork:
Step 1

Degrease the surface of the damaged area of the body with solvent. Take a piece of plain paper and cut a round hole in the center (if the defect on the body is round). If the damage to the paint on the machine has a different shape, then cut a hole on the paper that matches the shape of the defect in the paintwork as much as possible. In this way, you will protect undamaged body parts from the paint applied.
Step 2

Keep a piece of paper a few centimeters away from the defect and start spraying paint from a spray can through the hole you cut out. If the applied paint starts to drip down, it means that you have applied too much of it. In this case, stop and let the paint dry.
Step 3

Your task is to level the defective surface on a level with the intact paintwork of the car. Usually you won't be able to level the surface the first time. Therefore, it is necessary to repeat the whole process over again. Attention! It is necessary to start reapplying paint and cleaning no earlier than 24 hours after the first application of paint from a can. Remember to completely dry the first coat before re-applying paint.
Step 4

Polish the treated surface with a special agent that is sold in car dealerships. We advise you to choose not cheap products and only promoted brands. Otherwise, you not only run the risk of wasting money, but also worsen the body defect.
We advise you to pay attention to the polishing kits that are available for sale at auto dealerships (sold in specialized car paint stores). The kit usually includes paint, polish, sandpaper and special sponges or rags.
Scratches on the body of a vehicle are a big grief for any driver. The main problem is that small scratches and chips not only spoil the appearance of the car, but also cause corrosion and more severe damage to the paintwork. If the integrity of the surface is not restored in time, the removal of scratches on the car body without painting will become impossible and the car will have to be repainted in whole or in part.
To remove minor scratches on your own, it is enough to polish the car with restoring pastes or liquids. Consider why such damage appears on the car body, as well as the structure of the paintwork.
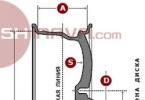
LKP structure
The standard coating consists of several layers: metal, phosphate, primer, base enamel, varnish and a finishing coat of polish. If the damage is insignificant and the depth of the crack reaches only the phosphate layer or primer, then a similar problem can be solved using car polish.
If the damage is more serious and the scratch has reached the steel sheet, then a number of measures will be required to restore the structure (conventional polishing compounds will be "powerless"). If you just tinted the damage, then corrosion will still develop and affect more and more areas of the body. Therefore, before using any "magic" means, be sure to check the nature of the damage.

The answer to the question "Why do you need polishing?" obvious - to restore the structure of the paintwork and prevent the formation of new cracks.
It is also worth considering in which situations you can prevent the formation of scratches on the car.
When you need to polish your car
The owner of the car is not always the culprit for the appearance of scratches. Even if you have been behind the wheel for a long time, this will not protect you from other road users with insufficient driving skills. Damage can occur from branches, fine gravel, and more. Regardless of the reasons for the appearance of chips, restorative polishing of the car body is recommended in the following situations:
- New car. If you have purchased a new car, then you should not rely on the factory coating, it is better to periodically polish the car. In addition, protective polishing of the car body will protect the vehicle from sticking dirt.
- Used car. Used car paintwork needs careful processing. However, unlike new cars, used models need to be coated not only with reducing agents, but also to purchase a product such as protective car polish.
- When the color changes unevenly. If spots began to appear on the paintwork, and the tone of the body became uneven, then this indicates that poor-quality paint was used when painting the car. You also need to get rid of stains and scuffs in a timely manner using car polish.
- Lack of gloss. "Age" ATS and cars "survived" handicraft painting often lose their luster. Almost all car polish kits come with all-purpose products that bring a "fresh" look to the car, so they will help you quickly deal with paint haze.

If we talk about polishing a car body with your own hands, then to complete it you will not need to master complex work technologies or purchase expensive equipment. The main thing is to choose a good restorative or protective agent.
Today, car body polish is available in two types:
- Abrasives (regenerating polish). Such polishing compounds are used for cars older than 3 years, on the body of which a large number of small and deep scratches have formed. It should be borne in mind that such a deep polishing of the body requires specialized equipment. Pastes of this type completely remove the varnish layer, therefore, after this treatment, the paintwork must be covered with an additional protective layer. If you choose a composition with a large number of abrasive particles, then you should give preference to polishes with a "color enrichment" effect.
- Mixtures with a lean amount of grinding particles (protective polish). Such compositions allow you to remove scratches on the car body without removing the top layer of paintwork. Protective pastes are recommended for new and freshly painted cars to remove minor scratches without painting and give the body a shine.
Important! It is possible to deeply polish the car body no more than 2-3 times during the entire period of operation of the vehicle.

If we talk about the form of release of polishing compounds, then most often the following types of scratch removers are on sale:
- Pasty. This type of polish is easy to apply on vertical surfaces, which effectively treats all body parts of the car. The composition of the pasty polish contains special components that give the paintwork shade more saturation. This scratch remover is the most expensive.
- Liquid. Products with a liquid consistency are recommended for use on the roof, hood or trunk. The composition will simply drain from the side parts of the body. However, liquid polishes contain a minimum number of abrasive particles, so they "remove" paintwork to the least extent. Also, fluids are suitable for torpedoes.
- Aerosol. Sprays are easy to use and fairly low cost. However, they are the least effective. The thing is that the liquid bottle contains the components necessary for spraying, because of this, the volume of polishing agents is much lower.

A high-quality paste-type scratch remover lasts up to 6 months. If you observe the correct storage conditions and use the polishing liquid 2 times a year (before spring and winter), then you can keep the paintwork of the car for a long time.
Car polish
In order to determine which polish for the body and interior of the car is best, consider three popular products that have been repeatedly tested by car owners and received the highest ratings.
Wurth Profi
This German program will allow you to repair scratches on a car using a polishing machine. It should be noted right away that this paste is of an abrasive type, therefore, it is not recommended to work without equipment.
To polish with this compound, it is best to purchase three types of paste:
- rough (article 893153);
- medium (893154);
- small (893155).
You will also need three buffing wheels to work. The manufacturer has thought of a system by which it is very easy to select a disc for a specific polishing paste.
- black (fur) is used for aggressive processing with an appropriate paste;
- yellow (foam rubber) is also suitable for coarse polish, but it is not so hard, so a medium paste is applied to it;
- blue (foam rubber) for medium and fine polish.
According to the instructions, removing scratches on a car using Wurth Profi begins with a rough treatment. Gradually the circles change and the surface is "grinded" until all minor scratches from the body have disappeared.

Thanks to this restoration, the surface will be resistant to chemicals and sunlight.
If you want to polish without touching up and there are no deep scratches on the car, then you can exclude processing with a coarse abrasive compound.
ZM
The best tool among domestic polishes is considered to be the "brainchild" of the ZM company, developed according to modern American technologies. The main advantage of these compounds is the ability to polish a car with your own hands, both with and without a polishing machine.
Among the range of pastes for getting rid of the car body from scratches, it is worth highlighting the following bases:
- Coarse paste (abrasive type) for removing deep scratches from the car body (item 09374).
- Medium abrasive for removing scratches that have not reached metal (09375).
- Car polish (do it yourself without a machine) without abrasive particles (09376).
- Protective paste for high gloss (09377).

ZM also offers a line of polishing wheels for each compound:
- Item no. 01927 - for coarse processing with item no. 09374 paste.
- 09550 - for pastes 09374 and 09375.
- 09378 - for polish 09376.
- 05729 is used when processing with composition 09377.
Body compound
Body Compound Scratch Remover is another effective paste that quickly "revives" paintwork. Compared to professional counterparts, no equipment is required to use this polish. In addition, manual body polishing does not require the selection of several components, costing from 500 rubles each. The composition of the product contains mild abrasives, thanks to which, after filling the cracks, you do not have to worry about the painting material.

Pastes of this brand are suitable for all coatings, therefore they are also used for car interiors, plastic elements of the dashboard and much more.
The only downside to Body Compound is that this gentle abrasive is only suitable for minor injuries. In terms of its durability, it is not inferior to analogues.
Also, for polishing the car body, you can purchase the means "Bravo", R-M, Sonax, SIA and Meguiars. These pastes have also worked well among car owners.
Before you remove scratches on a car with your own hands, regardless of the selected paste or spray, carefully read the instructions and take into account some general recommendations.
What to look for when self-polishing a car
Do-it-yourself car polishing should be carried out in strict accordance with the instructions for the protective liquid. Before removing scratches, you need to prepare everything:
- Since polishing scratches on a car is a responsible process, the first step is to wash and dry the entire car.
- We remove bitumen, insect "corpses", plant buds, branches and other debris.
- We check previously tinted areas for corrosion under the paint.
- Degrease the surfaces.
- If you are handling the interior, it is better to seal up all the holes in the dashboard so that no liquid gets there.

- If, after degreasing, stains remain on the surface, then do-it-yourself body polishing is performed only after processing with clay. How to remove stubborn clay stains? It's very simple - moisten the surface, apply a special clay and start wiping the body with light pressure.
After that, matting, grinding and polishing of scratches on the car body is performed.
In custody
If you are still thinking whether you need polishing for your PBX, then it all depends on your frugality. If you want to preserve the "original" look of your favorite "swallow" as long as possible, then it is better to purchase a polish. If you consider that do-it-yourself car body polishing is not done so often, and modern pastes are notable for an affordable price, then why not once again please your iron horse.
Almost none of the motorists can do without one or another damage to the appearance of the car during its operation. Cars get into accidents, are exposed to natural disasters, and receive various “everyday” damages. Especially in large cities with high traffic intensity. Quite often, the paint on the car is simply scratched. Someone takes this calmly, and some drivers perceive the damage as nothing more than a personal tragedy and try at any cost to restore the appearance of the body paintwork.
Algorithm for removing scratches on a carThere are two main ways to restore a scratched car paintwork:
- Contacting professionals who are engaged in the repair painting of cars and provide related services.
- Self-removal of scratches in a garage.
When repairing from professionals, you will receive a high quality of work, but you will have to pay an impressive amount for it, often artificially overstated. In addition, not all of the craftsmen are engaged in local repairs, and more often than not they try to convince the client to repaint the entire body part, citing various reasons.
Self-repair will cost you significantly less, but the end result will be slightly worse. How much worse depends primarily on your efforts and the availability of minimal knowledge in this area, which will be discussed below.
Please note the following before starting refurbishment work.
- Before you start doing anything with scratches, you need to visually evaluate them. It is necessary to conduct an assessment on a well-washed car, well, or at least on a damaged body part washed from dust and dirt.
- Oftentimes, paint from someone else's car is mistaken for catastrophic scratches. Try rubbing off the paint with white spirit. Most likely, after this, the damage will no longer be so terrible.
- The vast majority of modern cars are painted using a two-component technology, in which a colorless transparent varnish is applied on top of a base color layer. There is still a widespread belief on the Internet that only metallic paints are varnished. This is no longer the case.

- If the scratches are shallow and only the top layer of varnish is damaged, then they can be removed with a light abrasive polishing. It is very easy to believe how successful polishing will be at removing scratches. In the place of scratches, without strong pressure, run your fingernail in a direction perpendicular to the damage. If the nail does not cling to the pronounced grooves of scratches, then all this will be polished almost without a trace. Another way to check is to use a generous amount of water to wet the scratches. If, after wetting, they cease to be visible, then this is a good sign indicating an excellent polishing result.
- Professionals use a special power tool for polishing. Buying it to remove multiple scratches is not economically viable. Fortunately, you can do without it. At auto retailers, ask for a fine abrasive paste polish to remove scratches. You may be offered a pigmented polish to match the body color of your car. The pigment will help fill in and hide deeper scratches. This is useful, but there is no extreme need to choose a polish by color. Sooner or later, the pigment will wash out of the scratches.
- Before polishing the damaged area with the purchased product, make sure that the surface to be treated and the adjacent areas are free of dust, sand and dirt. Only start polishing in a clean garage or outdoors in calm weather. Apply a small amount of polish to a soft cloth and begin to work on the damaged area using light pressure in a circular motion. Avoid rubbing one area too long to avoid rubbing off the entire layer of varnish. It is important to strike a reasonable balance between masking scratches and the thickness of the remaining varnish coat. After finishing abrasive polishing, apply a protective wax polish to the area.
- In cases where you are less fortunate and the paint has enough deep scratches, you can no longer do without repair tinting. You can, of course, use various wax crayons to remove scratches, but the effect of their use is short-lived and after a while you will have to perform this operation over and over again. Therefore, it is better to purchase a base paint with varnish and do everything once and for a long time. Now the majority of imported cars are supplied by car manufacturers with repair kits consisting of two small bottles, one of which contains the paint itself, and the other contains colorless varnish. Your task is to select a repair kit that matches the paint of your car based on the code or color of the paint.
- After purchasing the paint, you can start painting over deep scratches. To do this, again rinse the repair site, and carry out the operations themselves in a clean, dust-free place. Degrease the scratches where the paint will be applied with alcohol. If the scratches are too deep, then it is advisable to fill them in advance with a primer that will not shrink during drying. Otherwise, you will need to apply several coats of paint and varnish so that after drying there is no deep depression at the scratch. With a thin brush with a soft squirrel bristle, carefully paint over the scratch and allow the paint to dry as indicated on the bottle. Try not to go beyond the boundaries of the scratch.
- After the paint has dried, apply a layer of varnish on the scratch in the same way, only it is necessary to apply varnish with a slight overlap on the main layer of the car's paintwork. Let the varnish dry and use the vehicle as directed.
- After at least a month, when the varnish is completely cured, carefully polish it with a mild abrasive polish. This completes the process of removing scratches on the machine.