The roadbed on which the vehicle is operated is far from always of high quality. Coupled with the fact that automakers rarely pay enough attention to high-quality door soundproofing, frequent trips from poor surfaces lead to loosening of the body, trunk, hood and door fasteners. The driver learns about the presence of problems only in the second year of operation of the car, if it was originally purchased new. It is the doors that make themselves felt in the first place. How is the sound insulation of car doors carried out, and what materials are needed for this?

Soundproofing functions of doors
Soundproofing work should be carried out immediately after purchasing a car, even if it is new. The improvements will be as follows:
- a significant increase in driving comfort and a decrease in the risk of accidents, while extraneous noises irritate the driver and make the trip unsafe;
- the acoustic capabilities of the cabin are increased, the sound quality is increased, vibration and rattling are eliminated while driving;
- heat losses are reduced, which leads to a long-term preservation of the required air temperature even when the engine is off.
Choice of materials
The key purpose of vibration damping materials is to reduce structure-borne noise caused by vibration of metal parts of the vehicle (suspension elements, transmission, engine). When choosing a specific material, it is necessary to focus on the mechanical loss factor. It should be as high as possible. Due to the adhesive base, the materials under consideration are quickly mounted and have additional sealing properties for anti-corrosion protection of metal body elements. The basis for the manufacture of the materials presented below is mastic or bitumen, it is possible to add aluminum foil, but there are also options without it.
- Bimastas are presented in two layers - bituminous and mastic. The thickness is 2 - 4 mm, the outer cover can be made of aluminum, paper or fabric.
- Visomat is a vibration-absorbing material based on bitumen, made on an adhesive basis. Vibration absorption is ensured by the combination of bitumen and foamed polymer. The MP series is distinguished by the presence of a foil coating.
- Vibroplast is characterized by high rates of elasticity and flexibility. The structure is represented by aluminum foil, polymer and self-adhesive backing.
Sound-absorbing and sound-insulating materials, in turn, isolate sounds, are made on the basis of polyethylene. Refers to the category of additional materials used after vibration isolators.
Technologically correct performance of noise insulation works in the door area requires the preparation of the following materials and tools:
- noise and vibration isolators;
- stitching roller;
- solvent;
- scissors or construction knife;
- construction or household hair dryer;
- Screwdriver Set.
The preparatory stage requires the following work:
- The door is disassembled open. The cladding must be removed in a well-lit room, the process is monotonous and long. Try not to damage the fasteners and remember the disassembly process. The glass lifter mechanism does not need to be dismantled.
- The second preparatory stage requires the removal of factory insulation and corrosion protection.
- At the final stage, the clean metal obtained after dismantling must be degreased.

Phased noise isolation depending on the degree
Do-it-yourself step-by-step soundproofing of car doors directly depends on the degree of sound insulation that needs to be achieved.
Minimum noise insulation
This is a budget option and is not suitable for improving acoustics, but noise is reduced. Door processing is minimal and involves gluing vibration-absorbing material to the outer door panel in a continuous layer or at least 70%. The use of a 2 mm vibration damper is allowed. To reflect the noise, it is also necessary to process the inner panel of the door card; for this, you can use a noise-insulating material. Additionally, this measure will serve as protection against moisture and dust.
Flat places of the door card can be trimmed.
Average noise isolation
The optimum balance between quality and price can be achieved with medium sound insulation. In this case, there are more special materials, and the installation principle is somewhat different. Noise from the road side is significantly reduced, and acoustics can be installed in the door, from which it will be possible to get a good return. The procedure here will be as follows:
- The first layer is a 2mm vibration absorber. In the area opposite the speaker, you can use a 3mm thickness and add an acoustic lens. Soundproofing material can be glued on top, but this step is optional.
- Use a rigid vibration absorber to clean the outer panel and close all technological openings.
- Thin vibration absorber (2 mm) is suitable for processing door cards.
- A 5 or 10 mm sound absorber is used to finish the entire inner surface.

Maximum noise isolation
The considered level of sound insulation will be appropriate, if necessary, to mount a powerful speaker system with midbass in the doorways. Doors should be carefully prepared for such speakers. The main goal in this case will not be to suppress external noise, although such processing will cope with this function perfectly. Features of installing such insulation:
- Vibration-damping material 3 mm thick should be used as the first layer for processing the external panel. You should not choose a material of greater thickness, otherwise the doors will become too heavy.
- Use a soundproofing material with a layer of waterproof glue as the second layer.
- Prepare adhesive-backed aluminum foil to process the holes in the inner panel. Roll a rigid vibration-damping material 2 - 3 mm thick on top of the foil.
- Four- or five-millimeter soundproofing material will be the finishing layer.
- Don't forget to craft the door card. First, glue the wavy sound absorber (10 - 15 mm), and on top of it a vibration isolation 2 mm thick.
Extreme noise isolation
The key purpose of this level of sound insulation is represented by the preparation of the car before the competition in sound pressure or loudness of the front acoustics. For processing the door in this case, it is necessary to use the thickest materials in order to ensure the greatest efficiency. The likelihood of overweighting the doors is too high, but this risk is no longer taken into account with such tuning. The steps for installing such insulation will be as follows:
- At the first stage, the door is reinforced by means of aluminum strips glued onto the outer panel at small intervals. Also, the role of a reinforcing material can be played by strips of rigid vibration-insulating material.
- At the next stage, it is necessary to roll vibration-absorbing material 4 mm thick between the gaps.
- The next layer is represented by a sound absorber or soundproofing material based on latex film or waterproof glue. Do not forget to close the technological windows with aluminum sheets or polyester resin. The upper layer will be represented by vibration isolation with a thickness of 3-4 mm.
- Pieces of vibration isolation are also used to process the door card, but the sound absorber must first be glued on. Its thickness should be as large as possible. The area covered by the sound absorber directly depends on the number of speakers installed in the door. Since there can be several midbasses, the door card is fixed on the iron part of the door by means of through bolts and only then the speaker system is mounted.
A significant amount of external noise enters the passenger compartment through the doors. It was after soundproofing car doors there is a noticeable reduction in external noise. In addition, it is always possible to completely "flush" the doors with your own hands. There are no supernatural complications here.
Before soundproofing - disassembling the door
The first stage is a complete disassembly of the door, namely, the removal of the outer skin. This stage is the most difficult, but not the most difficult. It is necessary to remember (or better write down) which screw or screw was in which hole in order to thereby facilitate the reassembly of the door. The mechanism for opening and closing the door, as well as the window regulator device can be left on, because putting them back is extremely difficult. These units will not interfere with self-soundproofing of doors.
The second step is to clean the metal of the door from the factory soundproofing and the door wall closest to the outside - from the factory anti-corrosion treatment. It is important that the surface is clean and free of grease - White Spirit will help with this. The main thing is not to scratch the paint in order to avoid corrosion.
Getting started on soundproofing the door
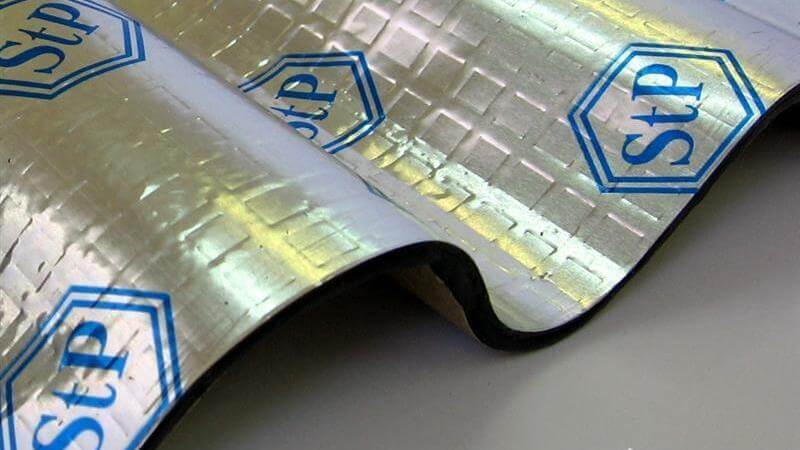
Next, the inner side of the door (side to the road) should be pasted over with vibration damping material. Vibroplast Gold is best suited, while you need to try to glue the maximum area that the technical holes in the door will allow. It is not very convenient to crawl there, so in order not to scratch your hands on the sharp edges of the technical holes, it is better to work with cotton gloves. The door reinforcement does not need to be pasted over. Nowadays, Aero and AeroPlus from STP are increasingly used for vibration isolation of door metal. They are lighter than Vibroplast Gold, which will have a positive effect on the resource of the door hinges. A high KMP will make the door "wooden" on a knock, the doors will close like a car of a higher class with a pleasant sound "chpok" instead of "bdzyn". In addition, the new Aero line has an extended temperature range, which is especially important for the cold season.
Opposite the speaker, it is recommended to stick a Bitoplast circle in order for the speaker to play better and the sound waves reflected from the door do not act on it. It is not necessary to glue the entire surface with Bitoplast, because this material absorbs moisture, and dissolving dampness inside the door is the first step towards corrosion. The second layer on top of vibration isolation used to be pasted over with Splan for silence, since the usual Accent could not cope with the moisture that appears in the door during the rain. In addition, on some Splen cars, 8 mm did not withstand the operating conditions and corny peeled off due to non-waterproof glue. A new generation material is now available - Accent Premium, which is absolutely not afraid of water: the outside is covered with a black film, and a moisture-resistant green adhesive layer is used on the back. Therefore, the inner part of the door can be safely pasted over with Premium Accent.
For music lovers, the use of any material (except for vibration isolation) inside the door is undesirable, as it will cause unpleasant echoes to appear and the quality of the music will deteriorate.

If the sound quality of acoustics is not important, then the entire inner surface of the door should be glued with Accent Premium or Splan on a mastic basis. It should be glued in as large pieces as possible, ideally - in one piece. It will become quieter.
Vibration isolation of all door openings
We pass to the inner side of the door - closest to the salon. There are two possibilities here.
If the car is preparing for the installation of powerful acoustics, and a juicy game is expected from the midbasses installed in the doors, then it is necessary to close the technological opening in the door with a dense and solid material. Depending on the size of the holes, sheet aluminum or dense fiberglass can be used for this, which is then pasted over with a powerful vibration damper, for example, Bimast Bomb Premium or Visomat. This is important to improve the sound quality of the music - something like a tight, closed box should come out of the door. At the same time, it is important to check the operability of the door opening mechanism and the window regulator - so that nothing interferes. The use of Bimast when sealing technological windows can significantly increase the mass of the door, you have to choose: either hinges or music.

If the sound quality of the acoustics is not important, then the technological windows are closed with waterproofing: it is important that moisture does not enter the cabin. The STP Aero is suitable for this: lightweight and tear-resistant. It is not worth glueing too much Vibration isolation, because the door mass increases and the hinges may not withstand heavy loads.
There is also a compromise option applicable for noise insulation of civil car doors: we close the technological holes with STP VIEK foil, and then roll Aero Plus over it. Thus, we obtain sufficient rigidity for medium power acoustics, excellent waterproofing and low weight gain.

Then you should paste over this door surface with Accent or Accent Premium material, in extreme cases - Bitoplast 10 mm, making the necessary slots for all mechanisms. An area close to 100% should be pasted over, leaving space for wires (if an electric window lifter is installed) and a speaker.
Soundproofing door trim
With the door finished, let's move on to its sheathing. It is recommended to glue a few pieces of vibration damper on the surface of the sheathing (STP Aero or Vibroplast Silver is enough) to reduce the vibrations of the sheathing. Particular attention should be paid to the joints in the plastic. Then the entire surface of the sheathing is pasted over with Biplast 10K material with a margin of several centimeters at the edges. After cutting the bitoplast along the contour of the skin, it will act as an anti-creak - all the knocks of the skin on the door itself will disappear. Another option is also possible: in the places where the door trim adheres to the metal of the door, Madeleine strips are glued to the trim along its perimeter, and the inside of the trim is filled with Biplast.
On this do-it-yourself car door soundproofing finished, you can start installing the skin back. On different cars, the door is disassembled in different ways, but the principle is the same everywhere. When soundproofing doors, it is better to completely abandon the Spleen, because inside the door there are only minuses from it (the sound quality of acoustics deteriorates, it can fall off from moisture), and outside (between the layers of Bitoplast) it can interfere with reassembly.
As a result, the "noise" of the doors in the car will become noticeably quieter, and the doors will close more easily due to the increase in mass.
The main purpose of noise insulation is to get rid of the noise that occurs when the car is moving in the cabin. Any car, even a new one, passes a certain amount of noise from engine operation, wheel rolling, noise from wind and sound flow created by associated and oncoming vehicles.
Factory insulation for most cars does little to cope with this task. The only exception can be recognized as models of the premium sector. The cheaper the car, the weaker its protection against extraneous noise. This is due to the fact that the installation of high-quality sound insulation is quite expensive, and in economy class it can be up to 10%. Fighting for the buyer, the manufacturer reduces production costs and, first of all, noise insulation.
The older the car, the more noise enters its interior from the side, and unnecessary squeaks and rattles appear inside, which irritate the driver and passengers. Excessive noise in the passenger compartment causes the driver to get tired quickly and reduce road safety.
The only way out to solve the problem with increased noise is install additional noise insulation in the car.
Car soundproofing in service
The fastest and easiest way to get rid of extraneous noise in the cabin is to make a car soundproofing in a car service from experienced specialists.
But this method has one significant drawback - the cost of the work performed. The second problem is the choice of the car service itself, many promise to do it efficiently and on time, but not many implement it in practice.
The best way to choose a workshop is reviews of familiar car owners who have performed soundproofing of the car on this service. Reviews on the Internet do not matter, because in order to attract potential customers, managers independently write praises on the sites.
Before starting work, you should visit the service and ask the master how and with what materials the work will be performed. It is good if noise insulation works are carried out in the workshop, it will be possible to assess the level of skill of the specialists and their attitude to the work being carried out. With the availability of funds and quality service, this is the best option for car soundproofing.
How to properly glue sound insulation in a car, video:
Do-it-yourself car soundproofing
For people who like to do everything on their own or do not have enough funds to perform work in a quality service, you can do the soundproofing of a car with your own hands. This method is convenient in that the work can be done slowly and in parts. To carry out the work, you do not need special skills and complex equipment.
This will require:
- Soundproofing material;
- Thinner or white spirit;
- Scissors and a stationery knife for cutting;
- Industrial dryer;
- Gas cartridge with a burner;
- Roller roller;
- A set of locksmith tools.
High-quality car sound insulation largely depends on the selected material. The industry offers a large selection of these materials, and it is quite easy to get lost in them. We will tell you how and what material is better for soundproofing a car.
The main property of any soundproofing material for soundproofing is lack of hygroscopicity. Therefore, when choosing a material, we pay special attention to this, since the accumulated moisture leads to metal corrosion.

Noise insulation materials for cars
Car soundproofing materials can be divided into the following types:
- Bituminous shale;
- Polyurethane;
- Felt;
- Liquid insulation of the car.
Vibroplast
Main material for noise protection of doors, floor, interior, trunk lid and bonnet. It is a polymer, bitumen-shale composition with an adhesive layer to facilitate application to protected surfaces.
Aluminum foil was applied to the top layer by extruded duplication. To facilitate cutting, the surface of the foil has a pattern in the form of squares measuring 5 × 5 centimeters. The adhesive layer is protected with a special foil.
The material does not accumulate and does not absorb moisture, is not subject to decomposition from external factors, when applied correctly, protects the metal from corrosion, has the properties of a sealant.
The material is easily applied to the surface, following its contours. There are several types of bitoplast, the differences are the fillers used and the layer thickness. The main disadvantage of this material is its weight.
With a thickness of 2 millimeters, the weight of one square meter will be 3 kilograms, and a material with a layer of 4.5 mm already weighs 6 kilos.
The thicker the layer, the better the vibration and noise insulation characteristics of the vibroplast. But it takes 8 to 10 square meters to process a car, so the weight of the car will increase depending on the thickness of the material used.
Splen
This material is widely used due to its excellent noise insulation characteristics. The material additionally possesses good thermal insulation properties, does not absorb moisture, is light in weight and is easy to install thanks to a special adhesive layer.
In operation, it can withstand temperatures ranging from -45 to 64ºC, wear-resistant. It is used to protect the most noisy areas in the car: wheel arches, tunnels, doors, side pillars and other elements at your discretion.

Depending on the purpose, the splen is 2, 4 and 8 millimeters thick. The last number in the marking indicates its thickness, for example, Spleen 3004 has a thickness of 4 mm.
Thanks to a special adhesive layer, the sound insulation of the car interior is quite simple, it follows all the contours of the surface, and excess and folds are easily cut off with scissors in place. The material is lightweight and does not reduce the vehicle's payload.

Felt
Widely used material for sound insulation. Possesses high rates of sound absorption, has a low cost. In addition to sound absorption, synthetic and natural felts have high thermal insulation properties and can be used in any temperature range.
A limitation in the use of felts was its ability to accumulate moisture. Felt has a porous system that absorbs moisture and condensation well.
It is practically impossible to dry the felt during operation, therefore it should be used only in those places where there is no possibility of moisture access to it.
The use of felt insulation under the carpets leads to rapid corrosion damage to the underside of the vehicle. Having accumulated moisture, the material not only significantly loses its sound-absorbing characteristics, but also becomes an ideal environment for the development of mold and mildew. Damp felt leads to constant fogging of the glass, the appearance of an unpleasant odor in the car interior.
The second main drawback of this soundproofing means is the complexity of installation, the adhesive coating applied to the felt adheres very poorly and often comes off the surface. Considering the above, it is better to limit the use of felt for soundproofing a car.

Liquid insulation.
Correct soundproofing of the car must be carried out in a comprehensive manner both inside the car and outside. Outside, the underbody and wheel arches, which are the main suppliers of noise to the interior, should be treated with noise-absorbing mastics.
Treatment of external elements of the car with mastics not only reduces the noise level, but also protects metal elements from corrosion.
Modern manufacturers offer a large selection of liquid noise insulation: bitumen-shale and rubber-bitumen mastics, two-component and foaming compositions.
Liquid soundproofing should be applied to clean, grease-free surfaces. In some cases, the application of a soundproofing coating will require a primer for better adhesion.
Liquid formulations fill all joints well and provide additional protection against noise penetration. Liquid formulations are applied to surfaces using a spray gun or brush. When working with formulations, it should be borne in mind that most of them have a long drying time, up to several days.

Preparatory work
Soundproofing work should be carried out in the warm season or in a heated and well-ventilated area.
Car processing can be carried out as a whole or in small elements. For example, at the initial stage, you can process the bottom and wheel arches of a car with liquid noise insulation, then the trunk and doors.
The most time-consuming work is to protect the interior elements of the vehicle interior: floor, roof and pillars.
Before making noise insulation with your own hands, the car should be washed, this way the paintwork is protected from damage, and it is more pleasant to work with a clean car. When treating the bottom, the car should be installed on a lift, inspection pit or overpass.
It is best to start work with a lack of experience with simple and even surfaces. The luggage compartment and trunk lid are well suited for testing your strengths. We prepare noise-insulating materials for cars, equipment and tools and set ourselves up for a long and painstaking process to reduce the noise level in the car.

Execution of works
Underbody and wheel arches processing
These works will insignificantly reduce the noise level in the car, but it is better to carry out them first of all for additional protection of the car from corrosion. Before starting work, the surfaces to be treated are thoroughly washed using car shampoos.
Particular attention should be paid to hidden cavities, the moisture escaping from them will not allow high-quality application of soundproofing materials.
The surfaces are inspected and all corrosive deposits and rust are removed using abrasive materials or a rust converter. The surface is degreased and mastic is applied using a spray gun or an ordinary brush.

The outer surfaces of the car should be treated with soundproofing compounds in 2-3 layers, with intervals between layers of 2-4 hours.
Soundproofing the wheel arches of a car with your own hands, as well as the underside of a car, is a simple process, especially if you use a lift. In this case, all four wheels are unscrewed, otherwise you will have to unscrew each wheel separately with hanging the car with a jack.
After the work, you can assess the quality, the cabin should become a little quieter, especially in the area of the wheel arches.
Do-it-yourself soundproofing of wheel arches of a car, video:
Trunk and trunk lid.
Before starting work, take everything out of the trunk and remove the inner lining. We remove all debris and dust; for this work, you can use a household vacuum cleaner. We inspect the surfaces, if rust is found, we clean it or treat it with a rust converter, primer.
Degrease surfaces with white spirit and apply the vibroplast cut out on the templates. Vibration and noise insulation materials should be applied to each other as accurately as possible, without leaving gaps. For a better fit, heat the material with a construction hair dryer and roll it in with a special roller.
The main sources of noise entering the vehicle interior are the wheel arches and the spare wheel well and should be protected as carefully as possible.
After the vibroplast is completely laid, a splen is applied to it with an adhesive layer. Before gluing this insulating material, the protective film covering the adhesive layer must be removed from it. Excess spleen is cut off with a clerical knife.
we observe the quality of work, and if everything went well, we proceed to processing the following elements of the car.

Do-it-yourself car door soundproofing
There are many opinions on how to properly make soundproofing of car doors, but everyone recognizes that it is through these elements that a significant part of the noise penetrates into the cabin and it is very difficult to carry out work there.
To carry out work, remove the door trim, dismantle the built-in speakers ( in the presence of), if possible, dismantle the electrical equipment and wiring as much as possible. We remove debris, dust and degrease.
It is not possible to completely process the inner surfaces of the door with vibroplast due to the inconvenience of the design. Therefore, we coat the untreated fate with any mastic. On top of the vibroplast we glue the spleen.
It should be noted that after the work has been carried out, therefore, it is not worth using heavily heavy materials.
We glue the outer surface of the door using a thin splen or bitoplast. We also glue the inner side of the door trim using a thin splen or bitoplast. After processing all the doors, the sound insulation of the car will significantly improve.
Video on how to glue doors:
Interior roof and floor
Do-it-yourself gluing a car with noise insulation inside the cabin is not as difficult as dismantling the trim elements. Therefore, work on the processing of the roof and floor should be carried out at the same time.
It is better not to touch the front panel yourself or entrust it to specialists. It is better to start work from the roof, gradually going down. For processing the roof, you can use a thin vibroplast, splenitis on which you can stick felt.
For the processing of car struts, splen or vibroplast is used. To protect the floor, a vibroplast is used, on top of which a splen is applied. If the factory floor soundproofing is made of felt, then it is better to replace it with synthetic materials.
When processing the salon, you should pay attention to the following nuances:
- When processing the roof, you should not use a very thick vibroplast, the center of gravity will shift and the car will lose in handling.
- Insulating materials that are too thick can create problems with the installation of the floor covering.
With the right work, the sound insulation in the car will significantly improve, and traveling on it will be a real pleasure.
After the noise insulation works, the sound of the speakers will significantly improve, and the noise of the road will not interfere with normal conversation in the cabin.
Whether it is worth making a car soundproofing, how and what materials to use for soundproofing depends only on the car owner, his financial capabilities and skills.
The vehicle contributes to increased comfort, as this insulation prevents the penetration of noise from the outside into the passenger compartment. It will not be possible to completely protect the car from sound penetration, but sound insulation can drown out a small and medium-strength sound.
Soundproofing treatment of any car is reduced to applying noise-absorbing layers to certain parts of the car body. Such processing can be conditionally subdivided into three zones - the front of the car, the interior, the rear.
Processing the front of the car comes down to soundproofing the engine compartment and the front wheel arches. At the rear, soundproofing is applied to the walls, floor and trunk lid from the inside.
Most of all, it is subject to sound insulation. It applies insulating layers to the floor, the wall adjacent to the engine compartment, the ceiling and doors. If the car is made in the body as a hatchback, then the soundproofing of the interior is combined with the processing of the rear.
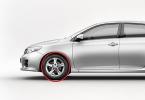
Why do soundproofing of car doors
It is worth noting that automakers do not always pay attention to decent sound insulation, or simply save on it. And if a fairly high-quality material with good sound-absorbing properties can be laid on the floor, then on the doors of a car the processing is often very weak, although the sound penetrates through them very well.
Do-it-yourself soundproofing of car doors is a completely feasible operation if you know the sequence of actions and choose the right materials.

Soundproofing the doors makes the music in the car much better
One of the main factors that affect the complexity of the work is the presence or absence of elements in the doors. If there are no speakers, then it will be easier to process the door, and less material will be spent.
The presence of speakers in the doors will complicate the work somewhat, but the end result of the work on soundproofing the doors will lead to an improvement in sound.

Methods for soundproofing car doors
It should be noted that do-it-yourself soundproofing of doors will lead to another positive factor - due to the increase in the mass of the door due to the applied layers, they will close more easily and quieterly. But here it is important not to overdo it. A large number of soundproofing layers can lead to an excessive increase in mass, which can cause doors to sink or come off altogether.
Necessary materials
To complete the work, not so much is required:

Preparatory work
Next, let's look at the sequence of actions. The first step is to remove the door card. This must be done carefully so as not to damage it, as well as the elements of its fastening. If there are lifting handles, they must be removed from the shaft; the door opening handle can be left alone.
If there is factory soundproofing on the door, it will need to be removed from the door, and the speaker will also need to be dismantled, if any.

Before starting work, it is necessary to remove from the car door all elements that may interfere with the installation of noise insulation
Any car door consists of two walls - the inner one, which is closer to the passenger compartment, and the outer one. Often, car manufacturers apply anti-corrosion treatment to the outer wall, which will also have to be removed, for which you can use white spirit and rags. At the same time, it is necessary to remove the anti-corrosion treatment carefully so as not to damage the walls. After removing the treatment, the door will need to dry well.
This completes the preparatory work and you can start gluing the insulating layers.
Soundproofing car door frame
If a speaker is mounted on the outer wall in the door, a circle of anti-creak material can be glued in the area of its location, which will have a positive effect on the sound in the future. But the entire surface of the outer wall should not be pasted over with this material, since it absorbs moisture well, which can lead to corrosion.
Video: Noise and vibration isolation of the car - part 1 - "Doors"
Next, we move on to the inner wall. On this wall, you also need to stick a layer of vibration isolation. Moreover, it will need to be pasted over on both sides. On the inside, the one closer to the outer wall, pieces of vibration isolation are glued to all accessible surfaces, but it is important to ensure that in the future they do not interfere with the operation of the door opening mechanism and glass lifting. After the sticker, it is better to immediately check their performance; if necessary, you can lubricate these mechanisms.

It is necessary to paste over the door from the inside
After processing the inner side of the wall, you can proceed to pasting the outer one, the one that goes to the salon. This side can be pasted over, together with the technological holes. After pasting, you will need to cut holes for the speaker, handles for opening the door and lifting the windows, as well as, if necessary, carry out all the necessary wiring.

Soundproofing the outside of the door
Then a noise-insulating layer is glued to the applied vibration isolation layer. It should cover the surface of the vibration isolation layer, after which the necessary holes should be cut in this layer as well. At this stage, it will be necessary to once again check the operability of all door mechanisms, and also install the speaker if it is attached to the door wall, and not to the card. After the soundproofing layer is glued, an almost closed space is formed inside the door between the walls, which will significantly improve the sound of the speaker system.
Video: Instructions for soundproofing car doors
Further work is done with the door card itself. It will first need to be glued to the vibration-insulating material, cut into thin strips. It is better to do this along the contour, as well as stick several stripes on the inside of the card. If it consists of two parts, both need to be glued. Stripping this layer will prevent the card from vibrating.
Then the entire surface of the card is pasted over with anti-creak material, with a small margin around the edges. After that, you can attach the card to the door. But before that, it is better to replace all fasteners with new ones, and also use self-tapping screws, but only in places where they will not be noticeable. This must be done because the old elements may not withstand the load and the card will move away from the door.
After fastening the card, the protruding parts of the anti-creak material must be cut off. Since trimming is done after the card is attached, this material will work for its intended purpose, that is, it will not allow the card to touch and creak on the door.
Next, you can check the fastening of all external elements on the card and, if necessary, glue them. This completes all the door soundproofing work. Soundproofing works with the rest of the car doors are carried out identically.
NOISE INSULATION OF CAR DOORS ACCORDING TO THE "PREMIUM" OPTION IN THE "ANTI-NOISE" STUDIO
WHY DOOR NOISE INSULATION IS NECESSARY AND WHAT DOES IT GIVE YOU?
Correct soundproofing of car doors is the first point of the program for stage-by-stage soundproofing of the passenger compartment. This is due to the fact that the total area of all doors is large enough and is the largest among all other body elements. And the metal of the doors and roof of the car is the thinnest and devoid of stiffeners. This thin metal not only resonates during the operation of acoustics, vibrates from the impact of oncoming air currents at speed, vibrates along with the rest of the car body from road irregularities. It also freely passes the noise from passing cars and other noise from outside into the cabin. After all, it is much easier for a sound wave to pass through the thin metal of the door and the same thin plastic sheathing than through the more massive glass of the car!
Full-fledged and high-quality vibration and noise-insulating door processing allows you to really reduce the noise level in the car! You will cease to clearly hear the noise of cars standing nearby in a traffic jam or passing cars, the cabin will become much more comfortable and cozy, because by closing the soundproofed door you are truly reliably separated from the outside world in the cabin of your car.
In addition, as pleasant "bonuses" you will receive a significant improvement in the sound of the acoustics (even the standard one), because the door will become more rigid and there will be much fewer holes in it, and the sound of the acoustics will not freely go out through the outer metal of the door.
That is why soundproofing car doors is the most important stage in our work!
PRICE: RUB 10,000-15,000 for 4 doors
TIME: 2-3 hours
NUMBER OF LAYERS: 3-4 layers
WEIGHT: 1.3-1.8 kg per door
HOW DO WE DO NOISE INSULATION OF DOORS?
Obviously, for soundproofing the doors, it is necessary to disassemble them. To disassemble the door, first of all, its plastic sheathing is dismantled. As a rule, there are several pieces of standard factory "sound insulation" on the skin.
However, these pieces, which are scarce in area and thickness, are not always enough to protect the interior from noise, and the door trim from bounce and squeaks. In addition, the skins are sometimes made of such thin plastic that they rattle and resonate even at a low volume of the audio system. In this case, we apply small pieces of vibration isolator STP Silver to flat areas of plastic. This material, due to its weight and ductility, will significantly reduce the resonant frequency of thin plastic. You can use STP AERO, and any other vibration isolator with a thickness of 2-3 mm.

Since the free space under the cladding is usually sufficient for the application of materials of considerable thickness. The only requirement is that the material should not be rigid, so as not to push the trim away from the metal of the door in the places where they fit snugly. Therefore, we apply a soft and viscous sound absorber Biplast Premium, 20 mm thick, to the entire cladding area. The material is self-adhesive, embossed, soft, airy and effective over a wide frequency range. We leave holes for fasteners, wiring plugs and speaker.

Now we can put the trim aside and go directly to the soundproofing of the door itself ... And here the nuances begin. After all, the design of the doors of different cars can differ significantly. Here are the most common layouts ...
The easiest to disassemble is the door structure with holes in the inner metal, through which there is access to the outer metal of the doors. This door design is common on Toyota, Suzuki, Subaru, Chevrolet, BMW and many, many others. A door with the specified design is easier to disassemble, but more difficult to glue, because through the holes with their not always convenient location and sharp metal edges, full access to the volume of the door is sometimes possible. The holes are usually covered with factory-made polyethylene. It serves primarily as a steam and moisture insulation of the passenger compartment, because moisture is very common inside the doors. This can be seen even in the photo.
We remove the polyethylene, dismantle the speaker of the audio system and gain access to the volume of the door ...
/LexusLX570_3.jpg)
It is through these holes that materials are applied to the outer metal of doors of such a design. However, along with this arrangement, another car door scheme is often found. Often, disassembling the door, you can see not the film and large "windows" under it, but a plastic shield that completely blocks access to the inside of the door. This design is found on Mazda, Kia, Hyundai, Jeep and many others.

This shield may also not be plastic, but metal. This door design is found on many Mercedes, Volkswagen, Volvo, Ford and the already mentioned Kia cars (recently, Kia's transition to plastic shields has been obvious). Sometimes this metal part is even riveted to the metal of the door with rivets, but these are quite rare cases (for example, Skoda Octavia A5 and some Mercedes cars).

In this case, you need to dismantle the glass or hang it in the opening, and then remove the shield, gaining access to the volume of the door. Disassembly, of course, takes some time and requires skills and preparation, but all this pays off with the convenience of gluing and the ability to apply the material to the maximum area, carefully and aesthetically!

For maximum clarity, it is on the example of such a door that we will show the technology of applying our materials to the outer metal, because the gluing scheme is the same for doors of any design. To begin with, the metal is degreased and dried. This is a prerequisite for proper sound insulation, and it is this that ensures reliable adhesion of materials and the durability of doors and a car body, because when materials are applied to a dirty and non-greased surface, air cavities will inevitably remain under the material, which will subsequently lead to the formation of condensation and corrosion in them. We degrease the metal with a special anti-silicone (for example, Body 770 or Novol 780). So, on a clean, degreased and dried surface, we apply the first layer. Its task is to damp the vibrations of the thin metal of the door. Therefore, the first layer on the door is a light and effective vibration isolator STP AERO. With a thickness of only 2 mm, it has a mechanical loss coefficient KMP = 0.33, and the StP Aero material is effective in a wide temperature range, from -10 C to +30 C. Aero, like any other vibration isolator, must be carefully rolled hard to the metal surface roller, only then it will work as efficiently as possible. There is no need to apply material to door amplifiers, double metal and other elements with a low resonant frequency (hard and “dull” to knock). There is no need to glue the drainage holes at the bottom of the door, it is better to step back a few centimeters from the edges of the door to avoid overlaps, moisture ingress and delamination of materials. The optimum area of coverage of a thin-walled element with vibration-insulating material is 70%. More is possible, but the effect of this will no longer significantly increase.

Now you can move on to applying the second layer. There is usually enough space in the volume of the door, so even a material of considerable thickness can be applied there. Therefore, it would be wrong to neglect this layer. However, there are also limitations. As mentioned above, moisture often gets into the volume of the door: during rain and washing, water flows through the slots of the side windows, moisture from the warm and saturated air quickly condenses on the cold metal. And that is why the soundproofing material for the second layer must have a moisture-resistant adhesive layer and not absorb water. After numerous experiments, the following material was developed: this is the STP Accent Premium 10 mm thick sound absorber. The material has a moisture-resistant sealant instead of an adhesive layer, and also has a closed-cell structure that does not allow it to absorb moisture. The question arises, how can a closed-cell material work for sound absorption, because in this case it works as a sound insulator ?! However, everything is pretty simple. StP Accent Premium is needle punched, which reveals part of the cells on the surface of this material. Subsequently, the front surface is covered with a film that prevents moisture from entering the open cells, but does not interfere with sound waves entering these cells. So, apply the second layer to the outer metal of the doors.

Now that two full layers of effective materials are applied to the outer metal of the doors, we put in place a plastic or metal shield and fix the glass. If the shield is plastic, it is usually made of thick and massive material, has many ribs and bends, and it is on it that the guides, the window motor and other parts and assemblies are fixed. All this gives it additional rigidity, which means that it does not need vibration isolation. If the shield is metal, it is not only impractical to glue 100% of the shield surface, but it is also harmful. After all, then the technological holes for removing the glass, all the wiring and fasteners of the shield itself are closed. Thus, if you later have to disassemble the door for repair (problems with locks, power windows, body repair, glass replacement, etc.), then you may encounter problems. Therefore, it is enough to apply a vibration isolator to the flat areas of the shield and close all existing through holes with the same material.

If the door has a design with "windows", and not a shield, then we replace the standard plastic film with a vibration isolator, closing all openings with it. In this case, if access to the door is required, it will be necessary to slightly warm up the vibration isolator and remove it in the desired place on the door.

Now we can replace the plastic door trim that we had processed earlier, and after the final assembly and checking the functionality of all circuits (lighting, power windows, locking locks, etc.), the sound insulation of the doors is over!
In the following articles, we will tell you about the sound insulation of other elements of your car using our technology!
You can learn more about our technology of car noise insulation from the videos shot in the studios. ANTI-NOISE!
If you have any questions - just call the nearest studio ANTI-NOISE! Contacts of all our studios can be found in the corresponding section of our website -. We will be happy to help you!