Consumables include, among other things, the VAZ 2110 cabin filter, which, according to the manufacturer's recommendation, should be changed every 15 thousand km traveled by the car. This is, shall we say, the maximum mileage that it can handle. Although in fact, it requires more frequent replacement.
If you have a "dozen" of the earliest release, then it is quite possible that you will not find this part on it - at first they were not installed on some models at all. First there were old-style filters that stand upright.
Since the fall of 2003, modified ones have appeared, which have received the name of a new model - they are horizontal.
Functional purpose
Their direct purpose is to keep pollen of flowering plants (which is especially important for allergy sufferers) and microorganisms, without letting in various harmful substances into the salon.
A conventional cabin air filter does the “mechanical” job of trapping microparticles in dust. But with odors and bacteria, coal is better "cut".
The car enthusiast should not forget that the installation of a new filter is a prerequisite if the old one is already clogged, although the notorious 15 thousand km has not yet been covered.
For allergy sufferers, for example, it is best to change it annually before the intensive flowering of plants begins.
Air intake for circulation inside the cabin is made half a meter from the road, where the concentration of harmful substances is highest. Therefore, a filter that is not replaced in time can lead not to the absorption of this “harmfulness”, but, on the contrary, to its release into the cabin, where everyone who is in it breathes, and then is surprised by summer colds, “outbreaks” of allergies and other troubles. And guilty of this is a penny detail that they forgot to change in time.
When to change?
Consider in which cases it becomes necessary to replace the VAZ 2110 cabin filter:
- Interruptions in the operation of ventilation;
- Unpleasant odor during ventilation operation;
- Slow cooling of the passenger compartment in summer;
- Bad (weak, slow) heating of the air in the passenger compartment in winter;
- Fogging of the glasses, or even the appearance of plaque on the glass from the inside (this is already when it is completely clogged).
What to choose?
If you do not know for sure whether you have an old or new filter installed, you can first see how it stands (we have already emphasized: the old one is vertical, the new one is horizontal). Then go shopping.
Moreover, installation is possible, regardless of the sample, ordinary or coal, the main thing is that the dimensions are suitable. It is believed that a charcoal air filter is more suitable for city driving.
For rural areas, the usual is enough - there are fewer harmful gas emissions, and it will cope with mechanical pollution.
Replacing the old filter
To replace the old-style filter with your own hands, it is enough to remove the frill. There, 2 nuts and heels of self-tapping screws are used for fastening. Having unscrewed them, you need to pry the clips with a flat screwdriver, and take the frill to the side.
You do not need to unscrew anything else. You will see a vertical filter inside the heater; to remove it, just turn it towards you.
Before installing a new one, it is advisable to vacuum the compartment.
A small do-it-yourself revision is possible so that replacing the VAZ 2110 cabin filter takes 5 minutes.
For this you need:
- Mark in what position (relative to the casing) the filter is located;
- Cut a hole in the casing itself, into which he can freely enter;
- Make an overlay on the casing and fix it with two self-tapping screws. After that, it will be possible to make a replacement just by unscrewing these screws. Thus, the installation will take you literally a couple of minutes in the future.
Replacing a new filter
Many people think that the new filter is less successful than the old one. The fact is that now not only the filter protects the cabin from dust, but it also needs to be protected from dirt and moisture.
The manufacturer did not take this into account, therefore, an independent revision is required so that the part can perform its direct functions.
The removal itself is also more tedious: after the frill, you still need to unscrew 4 self-tapping screws with a Phillips screwdriver, then remove the cover, then the filter itself.
Replacing with a new one is not too different, but installation requires more care, since you need to take into account the direction of air movement indicated on the label.
To simplify the do-it-yourself replacement process, it is advised to borrow a frill from Priora. Self-improvement of the frill (which was mentioned above) can also help.
Refinement
Actually, revision is required due to non-tightness. That is, the cabin air filter itself is capable of working normally, but the problem is that the connection itself is leaking, like many other things, what a sin to conceal.
Any VAZ is rightfully considered a treasure for a skilled craftsman. There are a lot of things that need to be completed with their own hands, but the scope for imagination is unlimited, plus the price framework for parts, various consumables allow you to experiment.
In this case, you need to take care of eliminating the cracks where the filter is being installed. Gaps can be eliminated with the help of materials at hand such as foam rubber, rubber, etc.
If you are using filters that are not made of a special material that protects against moisture (they are more expensive), then take care of self-protection. A removable cap can be made, for example, from a plastic bottle (this revision concerns exactly the horizontal view).
Protection of the VAZ 2110 air filter from dirt and large debris
In order for the car engine to work stably with maximum performance, it needs a high-quality fuel mixture. One of the most important devices involved in its formation is an air filter - an indispensable element of any engine, be it gasoline or diesel. It is he who provides the carburetor or injector with air, cleaning it from moisture and dust.
In this article we will talk about what a VAZ-2110 air filter is, and also consider the process of installing it.
Why do you need a filter
Both gasoline and diesel engines can work fine without an air filtration device, but how long will it last? The smallest particles of dust, dirt and moisture, if they get into the engine cylinders, will eventually begin to destroy the rubbing parts.
In addition, the fuel mixture, which will include moisture and various debris, not only will not provide sufficient power, but will also cause the quick failure of the carburetor, injector, injectors, etc.
Where is and what is the air filter element
The VAZ-2110 air filter is located in the engine compartment of the car. Depending on the type of engine, its body may have a different look. In carburetor engines, it is made of metal and has a round shape. The VAZ-2110 air filter (injector) is placed in a rectangular plastic case.
The very same filter element also has a different shape: for the carburetor - round, for the injector - rectangular. It is made of a special porous material compressed into an accordion.
The filter housing for injection models is connected to the engine by means of a corrugation. This is a kind of air duct through which already cleaned air enters the device, where a fuel mixture is formed. The corrugation of the VAZ-2110 air filter is a thick corrugated rubber hose. On carburetor models, the filter element housing is mounted directly on the carburetor.

When to replace the filter
Naturally, the filter element someday becomes unusable and needs to be replaced. For VAZ-2110 cars, the manufacturer strongly recommends replacing it after every 20 thousand km of run. If the machine is operated in conditions of increased pollution, it is better to carry out this procedure after 10 thousand km, when the engine oil is changed and
It also happens that the VAZ-2110 air filter becomes unsuitable for further work and much earlier. In carburetor engines, for example, it can be bombarded with oil if they fail and cease to cope with their task. In addition, the filter can suffer from mechanical damage, the ingress of fuel or water on it. In these cases, it must be replaced immediately.
Features of choice
Choosing an air filter VAZ-2110 today does not present any problem. To do this, you do not even need to take it with you to the store or to the market. It is enough to tell the seller the model of the car and the type or injection), and he will offer you a choice of several products from different manufacturers.
Immediately, we will indicate that the best option would be the original filter element produced by AvtoVAZ, but you can also purchase and install worthy analogs, such as Bosch, Mann or Filtron.

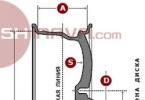
Air filter VAZ-2110: dimensions
In case you come across an incompetent seller, it will not be superfluous to know the filter sizes for different types of motors.
For carbureted engine (round):
- height - 62 mm;
- outer diameter - 232 mm;
- inner diameter - 182 mm.
For injection engine (rectangular):
- width - 213 mm;
- length - 213 mm;
- height - 58-60 mm.
Zero resistance filter element
There is another type of filter element for injection motors - a filter with zero air resistance. This is a kind of tuning element designed to improve air intake. element here practically does not resist the incoming air. This significantly increases the power and throttle response of the engine. But this tuning has three drawbacks:
- the price of a “zero” is significantly higher than that of a conventional filter;
- high fuel consumption;
- the need for replacement after every 5-7 thousand run.

Installation of the VAZ-2110 filter (injection engine)
Now let's figure out how to install the air filter yourself, what is required for this.
Instruments:
- Phillips screwdriver;
- key for 10;
- a damp cloth or sponge to remove dust;
- new filter.
We install the car on a flat surface, open the hood, disconnect the negative terminal from the battery, find the housing of the filter element and the corrugation going to the engine in the engine compartment.
At the back of the body there is a VAZ-2110 air filter branch pipe, on which a corrugation is put on. There is a connector on it. Disconnect this connector. We loosen the clamp on the branch pipe and disconnect the corrugation.
Use a Phillips screwdriver to unscrew the 4 screws securing the filter housing cover, remove it and set it aside. We remove our spent filter element.
With a damp cloth or sponge, we wipe the inner surface of the case and lid, removing dirt and dust. We put in place a new filter. We install the housing cover, tighten the screws, connect the corrugation, connect the sensor connector. We put the mass terminal on the battery, start the engine, check its operation.

Installing the VAZ-2110 air filter (carburetor)
In cars with a carburetor engine, the procedure for replacing the filter element is much easier. Of the tools and funds, only 10 and a rag will be needed here.
We install the car on a flat surface, raise the hood, find the filter housing. It has several spring latches that secure the cover. We snap them off and unscrew the nut on the central stud of the cover with a 10 key. Lift the cover, take out the old filter element, discard it. We remove dirt and dust from the inner surface of the case with a rag.
Installing a new filter. We close the housing cover, tighten the nut, fix it with latches.
DIY installation of a zero resistance filter
The installation process of the "zero" is also quite simple and can be done independently. This requires a set of keys and a Phillips screwdriver.

Under the hood we find the VAZ-2110 air filter housing. Disconnect the ground terminal on the battery. Disconnect the DMRV connector. Release the clamp screw with a screwdriver and remove the corrugation going to the engine.
Using a 10 wrench (better with an end wrench), unscrew the nuts securing the mass air flow sensor to the filter housing. Dismantle the filter housing and remove it.
Use a Phillips screwdriver to unscrew the screw securing the ground wire to the cylinder head. Under this screw we install the mounting bracket that comes with the filter. We mount the sensor to the bracket using a 10 bolt. The connection must be sufficiently rigid, otherwise the mass air flow sensor will fail due to vibration.
We attach a corrugation to the back of the sensor and fix it by clamping the clamp. On the front of the DMRV we put on the filter itself and press its pipe with a clamp. We connect the sensor connector, connect the terminal.

- Change the air filter on time, because both the stability of the engine and the fuel consumption depend on its condition.
- Inspect the filter element for its condition at least twice a month.
- In cars with a carburetor engine, pay attention to the cleanliness of the filter housing. If oil or a whitish emulsion appears in it, then it's time to clean the breather or change the oil scraper rings. In this case, the filter must be replaced.
- Do not buy cheap filter elements of dubious origin. It is better to contact a specialized store, where you will not only find a suitable model, but also advise on its correct installation.
- You shouldn't install "zero" just like that. If you are not a racer or street racer, limit yourself to simple filter element models.
One of the most important elements of a modern car is the engine air filter. High technologies used in the production of motors for cars have made them very vulnerable to various external factors. A poor quality air filter can damage the engine. That is why you should not treat replacing the air filter as an optional operation.
A dirty filter can spontaneously eject accumulated dirt and dust into the engine, which can cause malfunction not only of the piston sleeve group of your engine, but also of its fuel system.
Foreign small particles, entering the combustion chamber, at least lead to the formation of carbon deposits, and can also cause mechanical damage on the inner surfaces of both the piston and the liner.
Also, for the efficient operation of the engine, there must be a sufficient amount of atmospheric air in the combustion chamber. It must continuously and in large volumes enter the sleeve-piston system. So, only when one liter of gasoline is burned, about 15 thousand liters of air flow passes through the average engine. Try to calculate how much air passes through the engine of your VAZ 2110 during daily trips?
Volzhsky Automobile Plant recommends regularly replacing the engine air filter, timing this procedure to routine maintenance. However, the life of the air filter may vary depending on the operating conditions of your vehicle. It is advisable to regularly check the condition of your air filter and replace it if necessary. This procedure looks simple enough and does not require specialized equipment or advanced technical skills.
Also, VAZ experts believe that when replacing the filter element, you will have to cut and replace its rubber supports with new ones.
Instructions for replacing the air filter on the VAZ 2110
In order to start the procedure for replacing the filter element on the VAZ 2110, you first need to disconnect the terminals from the battery of your car.

As a rule, on a VAZ 2110, the air filter is replaced after a certain period of time. Replacing the air filter with a VAZ 2110 can be easily done with your own hands, especially since there is nothing complicated in this matter.
Air filter is responsible for engine cleanliness

Atmospheric air, which takes part in the formation of the fuel-air mixture, contains a large amount of mechanical impurities. An air filter is used to prevent dust and dirt from entering the engine.
The procedure for replacing the air filter VAZ 2110, as in other car brands, is not complicated, but very necessary. This does not require special skills.
Since when it is heavily contaminated, fuel consumption will increase, and the normal filling of the cylinders with the working mixture will be disrupted. plays an important role in the intake system, because this element acts as a barrier for dust and debris entering the car's intake.
From there, they go to the salon and to the department for the formation of a hot mixture for the engine.
Filter types
The filter is quite simple in design. As a rule, filter elements for VAZ 2110 injection vehicles have a square shape.
The square has a gill-like structure. Matter, paper, foam rubber or felt acts as a direct filter.
Note. In addition to the usual ones, there are also a variety of "sports" air filters. The manufacturers assure that they practically do not create air resistance and are capable of giving an increase in engine power.
In practice, the gain turns out to be within the margin of error, while the price is up to 10 times higher than the price of a standard filter.

So:
- The filter element is installed at the front of the engine compartment and is secured to rubber mounts.
- Outside air is drawn in through the air intake pipe located below the filter housing.
- Then the air passes through the filter element of the filter, the throttle pipe and the hose of the inlet pipe.
- The air after the throttle pipe goes into the channels of the receiver and the intake pipe, and then into the cylinder head and cylinders.

The air filter of almost any car needs to be replaced every 10-15 thousand kilometers. But everything directly depends on the conditions in which the car is operated, as well as on air pollution.
If the car is used on very dusty and dirty roads, for example, on country roads, gravel or dirt roads, etc., then it is better to change the filter every 5 thousand kilometers, because in this case the filter clogs up much faster and stronger.
Note. When buying an air filter, you should pay attention to the specified operating conditions, this will allow you to extend the life and use the part to the maximum.
Reasons for replacement

So:
- The main reason for replacing the air filter is if it is dirty.... At first, it can cause additional fuel consumption, it is also difficult to start a cold engine, because the engine does not have enough oxygen, therefore, an increased amount of fuel is added to the manifold automatically.
Due to heavy contamination of the filter element, it becomes unusable, which is also called the MAF sensor. - If the car becomes stuffy due to lack of traction, if there are malfunctions in the engine or the speed starts to "float", then, most likely, the replacement of the air engine is required.
- Quite often, the air filter is replaced as part of a service package. Together with it, the fuel and oil filters are also replaced.
Note. The fact is that the operation in the car is balanced, and the replacement of one element can affect the operation of other filters. With the simultaneous replacement, the system, as it were, goes to the "zero point" and the engine is much easier to re-adjust to work.
Replacement process
To carry out the work, you will need the following tools and materials:
- Figured screwdriver;
- Wrench for "10";
- Unnecessary clean rags or sponge for cleaning the case;
- New air filter;
- Rubber feet.
The filter is replaced in the following sequence:
- Before you start replacing the air filter, you need to turn off the engine and put the car on the handbrake (parking brake); for greater safety, engage reverse or first gear.
- Then the hood opens and first of all the negative terminal is disconnected from the battery, in order to avoid accidental shorting.
- From below, using a screwdriver or a finger, the plastic latch is squeezed out, then the connector with the wire from the air sensor is disconnected.
Note. It is not necessary to remove the mass air flow sensor, because the length of the wire that goes to the mass air flow sensor is enough to take the branch pipe to the side. But if it interferes, then it is better to remove it for a while.
- After that, the clamp is loosened, which fixes the hose of the crankcase ventilation system and the air intake hose to the throttle valve. Disconnect the wiring harness from the MAF sensor.
- Using a "10" spanner with an extension, the bolt that fixes the air intake to the body panel is unscrewed.
- Then, rubber bushings of the filter support are squeezed out of the hole of the upper frame: two are for the front fixing of the filter from the hole in the body panel and one is for the rear fixation from the holes of the bracket, which is attached to the shelf of the battery.
- Then the front part of the filter rises, the rear support of the filter is squeezed out of the hole, then the filter is removed from the car, the corrugation is previously disconnected from the filter housing.
- After that, the non-elastic or torn rubber supports of the filter are replaced, and the old supports are cut off with a knife. Using a curly screwdriver, the screws are unscrewed and the top cover opens.
In this case, you need to be very careful so as not to harm the air line. - The filter element is removed, then it is imperative to clean the lower part of the housing using a damp cloth or sponge so that old dirt does not get into the collector.
- A new air filter VAZ 2110 16 valves is printed, a video review of the process of which can be viewed here, and is installed in place in the reverse order (for convenience, you can remove the battery).
In this case, the rubber mounts are fixed in the holes, pre-lubricated with a small amount of oil. After that, the edges are straightened with a screwdriver.
- Before installing the filter, a foam seal is glued, as in the photo below. The installation of the filter element should be carried out inside with foam rubber.
The cover is then secured with four screws. Then the operation of the filter is checked.

Some important points after replacement
After changing the filter, the fan will start producing fresh air streams. The windows will stop fogging up and it will be easier and fresher to breathe in the cabin.
The filter gets dirty very quickly, which affects the condition of the vehicle. It can also adversely affect the health of the driver if this element is not replaced in time.
Draft may decrease in the machine, and error messages may appear on the dashboard. If the edges of the filter do not fit into the slots of the cover, they must be carefully trimmed using a utility knife.
Note. When installing a new filter element, you should pay attention to the fact that the filter pleats were located along the arrows marked inside the filter housing.
All steps to replace the air filter can be done in just 15-20 minutes with your own hands:
- In the event that there is no time to replace the filters, you can blow out the old ones, but this will require a powerful compressor to help remove contamination. But it is still better to change this element on time, especially since it takes a little time.
A few bolts are unscrewed, the protection casing is removed, the inner cavity is cleaned and a new filter is installed and the casing is closed. - During reassembly, care must be taken to ensure that the sealing gum fits well in its place, otherwise dust particles can enter the power supply systems (injector), which can lead to a decent and expensive car repair.
Note. For greater tightness of the housing cover to the rubber seal of the filter, the bolts should be tightened evenly, crosswise is recommended so that the cover does not twist.
If the car is mainly operated in the city, then the filter will not have to be replaced so often, and in principle, you can drive up to 20 thousand kilometers. However, such runs will not lead to anything good for the village.
In which case, the DMRV will be the first to suffer, which costs pretty well. Therefore, it is better to spend 100 rubles and buy a new filter and not worry than to pay 1500-2000 rubles for a new sensor in the future.
Null filter

Replacing the filter in a timely manner helps to extend the engine life, reduce fuel consumption and avoid power loss.
Note. In addition to conventional filters, zero resistance filters can be installed.
When choosing an air filter for a car, you should think about what is better to install - a regular filter or zero resistance (zero resistance)? To solve this issue, first of all, you need to decide, you need to determine what it is for and get acquainted with the pros and cons of filters.
The factory filter and zero filter differ in resistance to air ingress, attachments and appearance. Manufacturers of this type of filter elements claim that the use of a zero filter allows you to increase the power, as well as the torque of the vehicle engine.
This is necessarily reflected in the dynamics of acceleration of the car, expressed in better engine performance in the middle and at the top. Such filters are of 2 types: conical and box-type.
Note. Such filters are considered the 1st of the most affordable modifications to the car engine. In the domestic market, there is a large selection of such filter elements at reasonable prices, so almost everyone can buy a filter.
When installing zero, you need to remember some rules:
- The zero point changes more often than a conventional filter, while its cost is much higher;
- If you don't want to change the zero, then you can buy special means for washing and impregnation, which are also sold at fairly decent prices.
The main task of such a filter is to better fill the cylinders with fresh charge, that is, to ensure the supply of large portions of air. And in order for the fuel-air mixture to burn better, more fuel is required.
Therefore, the use of a zero filter leads to increased fuel consumption.
Installing a zero resistance filter
Setting the zero is done a little differently than setting a regular filter:
- First, the MAF sensor connector is disconnected at the air pipe;
- Then, using a screwdriver, the clamp is loosened and the air pipe is removed;
- After that, using a “10” spanner, two bolts are unscrewed, fixing the sensor body, and the body is removed.
- Next, the fasteners are removed, and the body of the filter element is removed.
- Then the screws are unscrewed, and the mass is disconnected from the cylinder head.
- The bracket fixing the zero resistance filter is screwed onto the same place, not forgetting to install the ground wires back.
- The bolt of the sensor housing is screwed to the installed bracket.
- Then a new filter is connected to the plastic housing of the sensor.
Note. All connections must be rigid, otherwise the MAF sensor may break from vibration.
Zero resistance filters are not very expensive, on average, their cost varies between 500-700 rubles. And if you do everything as required by the instructions, you can save a lot on replacement.
After all, as you know, the price of these services in service centers is quite high.