“No one is insured against road accidents” - these words can often be heard from different people. Most common cause there is a lack of keeping distance, especially in big cities. This factor influences damage rear bumper VAZ-2114. The article will tell you how to dismantle a part for repair or replacement.
Video about removing the rear bumper on a VAZ-2114 with your own hands
Figure 33 - Front door accessibility. Before Replacement or Repair Before replacing or repairing the front door, the following items must be pre-assembled. Disconnect the battery; Remove the door supports and lining; Remove the glass; Remove the key cylinder; Remove the car from the glass; Remove the lock; Remove the outer handle; Remove the inner trim from the rear view mirror; Remove the outside rear view mirror; Remove eyelashes; Remove the guide from the glass; Remove the crimp; Remove the plastic door membrane; Remove the door opening limiter; Remove the front door.
The video will show detailed instructions about removing the rear bumper, and will also give some recommendations on the process.
We shoot with our own hands
Factory rear bumper VAZ-2114
Before you begin directly to work, you should understand that without constructive knowledge of the car, you cannot begin the process. You can always entrust the matter to car service professionals who will do everything efficiently and quickly. But, as practice shows, most car enthusiasts begin to repair their “iron horse” themselves.
If we decide to repair front door, the necessary accessories must be disassembled depending on the size and location of the damage. Figure 34 - Marketing back door. Attaching the part The rear door is attached to the body using hinges and screws. Figure 35 details the connection of this part to the rest of the body.
Limiter mounting screw. Figure 35 - Attaching the rear door to the body. Accessibility In Figure 36 we see access gaps in the door frame, as well as areas with different access to the repairman. Figure 36 - Rear door accessibility. Preliminary Operations for Replacement or Repair The following items are preassembled for replacement or repair of the rear door.
Tool
So, first you need to collect all the necessary tools. Of course, it is best to have a lift that will simplify the work, but if you don’t have one, then 2 jacks will do. As with any repair, you will need a set of wrenches and sockets, as well as WD-40 and a wire brush.
Process
Well, everything is assembled, and you can proceed directly to the process of dismantling the product from the car. Let's look at how the process is carried out at home:
Disconnect the battery; Remove the trim from the inner handle; Remove the armrests; Remove the door trim; Remove the membrane; Remove glass; Remove the handle internal door; Remove the lock; Remove the handle; Remove the car from the glass; Remove eyelashes; Remove the guide from the glass; Disconnect and remove the wiring; Remove bushings, fasteners and strips; Remove the rubber door plug; Remove the limiter; Remove the rear door.
If repairs are being made to the rear door, the necessary accessories must be disassembled depending on the size and location of the damage. The manufacturer produces the threshold as a complete replacement element. Figure 37. Commercialization of the threshold. Figure 38 details the connection of this part to the rest of the body.

On the one hand, the process of dismantling the rear buffer may seem quite complicated, but if you get serious about the removal/installation, then in a week you can go to a car service center to work.
Product selection

Figure 38 - Connection of the window sill to the body. Preliminary operations for replacement or repair To replace or repair the threshold, the following elements are pre-assembled. Disconnect the battery; Remove a frame from a column; Take off front wheel; Remove front dirt; Take off front light; Remove the front fender; Take off front bumper; Remove the front door stopper bolt; Remove the front door; Remove the door trim; Remove the rear door stopper bolt; Remove the rear door; Remove the rear door trim; Remove the rear seat belt; Removes the height adjuster from the rear seat belt; Remove the height adjuster from the front seat belt; Remove the threshold.
Standard rear bumper
The choice of rear bumper for the VAZ-2114 is small: original or tuning version. Both options can be purchased at an auto store. But, some car owners repair their cars on their own after an accident. old part to the tuning version.
2114-2803015-01 – original article number for the rear buffer of the VAZ-2114. It is produced at the AvtoVAZ plant in black form. Painting is already taking place at the car service center. Using this number, you can find possible tuning analogues. Cost starts from 4000 rubles .
If a window sill is repaired, it will be necessary to disassemble one or another element mentioned above, depending on the size and location of the damage. Figure 39 - Rear elements. Figure 40 - Backside Marketing. Figure 41 - Attaching the rear to the body.
Accessibility Access to the repairman is zero along almost the entire length of the side, being easy only in the contour close to the flashlight body. Figure 42 - Rear Accessibility. Before Replacement or Repair Before replacing the rear side, the following items must be removed first.

Tuned rear bumper installed on a car
conclusions
Removing the rear bumper from a VAZ-2114 is quite simple and any beginner whose hands grow from the right place can handle this task. After this, you can send the buffer for repair, painting or other work, or replace it altogether.
Disconnect the battery; Take off rear wheel; Remove the truss lining; Remove carpeting from the floor and sides; Remove the rear bumper; Remove the rear mudguard; Remove the bumper support; Take off back light; Remove the rear door; Remove the rear door trim; Remove the rear seat belt; Remove the breathing ribs; Take off rear window; Remove coverings and interior decoration; Remove the electrical wiring; Remove the clamps and plugs; Remove the filling nozzle; Remove the locking pin; Remove the rear window; Remove the back side.
To repair any part of the rear side, previous elements will be removed as necessary depending on the size and location of the damage. Figure 43 - Back panel marketing. Assembling the part Figure 44 shows in detail the welding points connecting this part to the body. 8 points at the lighthouse.
Removing the rear bumper is shown using the example of a VAZ-2114 car. For a VAZ-2113 car, removal is carried out in a similar way.
NOTE
On a VAZ-2115 car, the rear license plate and its light bulb are attached directly to the rear bumper trim, so before removing the rear bumper of this car, lift the carpet upholstery in the trunk, disconnect the wiring harness block for the rear license plate light, unscrew the nut and remove the “negative” light from the stud » light bulb wire.
Figure 44 - Attaching the rear panel to the chassis. Accessibility Access for rear panel repairs is zero for most of its extension and easy access otherwise. Figure 45 - Rear panel accessibility. Preliminary Operations for Replacement or Repair The following items are preassembled for replacement or repair of the rear panel.
Disconnect the battery; Remove the weight lining from the barrel; Remove the trim from the trunk; Remove the rear panel trim; Remove the locking pin from the back cover; Remove the side lining; Remove the rear light; Remove the rear bumper; Remove the breathing ribs; Remove the electrical installation; Remove spare parts and accessories; Locks and latches; Remove the back panel.
You will need: a “10” wrench, “10” and “13” socket heads, an extension, a wrench, a Phillips-blade screwdriver.
1. Unscrew the two nuts securing the left side bracket of the bumper trim to the body.
2. Similarly, unscrew the nuts securing the right bracket for the bumper trim to the body.
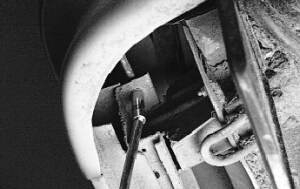
3. Holding the nut, remove the bolt securing the left part of the cladding to the bumper beam.
In case of repair, the necessary items mentioned above must be disassembled depending on the size and location of the damage. It is supplied as an original part by the manufacturer and its hinges can be obtained separately. Figure 46 - Attaching the back cover to the body.
The piece is attached using two screw-on hinges to its structure and body, according to the figure. Figure 47 - Attaching the back cover to the body. Accessibility It has regions with easy access. However, access in the reinforcement area of the structure is zero.
4. Similarly, remove the bolt securing the right part of the cladding to the beam.
5. Remove the bolt securing the lower part of the bumper trim to the beam...

6. ...and remove the lining.
Figure 48 - Rear cover accessibility. Before Replacement or Repair Before replacing the back cover, you must first disassemble the following items. Disconnect the battery; Remove the lid lock; Remove the drum and secure it; Remove the bumper cover from the bag; Remove clamps and clips; Retractable hinges; Remove the back cover; Remove icons.
In case of repair of this part, the previously described elements that are necessary based on the size and location of the damage are disassembled. In many cases it is necessary to disassemble them to gain access when repairing body parts. It still has a fixation on 3 pillows: the central one, fixing the exchange for the totality; one of the motors attached to the wheel housing, and one of the fixed gearboxes to the stringer. Preliminary Operations for Replacement or Repair To replace an assembly, you must first remove the following.
![]()
NOTE
When removing the rear bumper trim on a VAZ-2115 car, do the following.
1. Remove two screws and license plate.
2. Unscrew the two nuts of the right and left lower fastenings of the bumper trim.
3. Holding the nuts, remove the two bolts securing the bumper trim to the beam and remove the trim.
Additional Assembly Tasks Fill the vehicle with coolant. Charge the air conditioning system. Bleeding brake system; Check and, if necessary, add to the tank hydraulic system steering; Check for leaks, dry or damaged hoses and replace them if necessary; Check the correct functioning of the electrical part; Installation check. The assembly is secured to the body by two lower pad pins and two fixed screws on the front upper cross member, with the assembly being held together by screws.
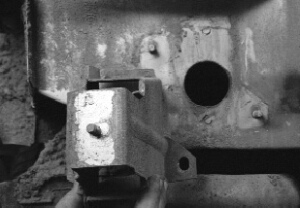
7. Unscrew the two nuts securing the bumper beam to the brackets...

8. ...and remove the rear bumper beam.

9. Unscrew the three nuts securing the left rear bumper beam bracket to the body...
Disconnect the battery; Empty the air conditioning circuit; Draining the cooling circuit; Remove the bumper; Remove protective cover crankcase; Disconnect the electric fan; Disconnect the air conditioning pipe; Release the top and bottom fittings; Remove the radiator, condenser and fan.
Additional Assembly Tasks Fill the vehicle with coolant; Charge the air conditioning system; Check for leaks, dry or damaged hoses and replace them if necessary; Check the correct functioning of the electrical part; Installation check.
![]()
10. ...and remove the bracket.
11. Similarly, remove the right bracket securing the rear bumper beam to the body.
12. Install the removed rear bumper parts in the reverse order of removal.
Anyone who owns a car knows well that it needs a lot of care and attention to proper operation and ensuring maximum driver safety on the road. Therefore, it is necessary to constantly maintain maintenance so as not to find unpleasant surprises. If the actions to be performed are very demanding, it is necessary to contact a competent person, and if they are easy enough, they can be done independently. One of the most common is replacing the bumper.
First, you need to work as comfortably as possible. Next, open the boot and remove the two plastic fasteners that secure the bumper, using a screwdriver to loosen the plastic screws located under the fasteners. At this point, remove the four plastic rivets and four plastic plugs using a flat head screwdriver.