Many motorists who are wondering how to remove the front bumper on a VAZ 2114 should study the information below as carefully as possible.
The front bumper is a particularly important part of the bodywork. If it is in poor condition, then the appearance of the car will leave a lot to be desired. However, this body element is not only a decorative part of the car. The bumper has a number of different functions to protect the engine as well as the driver. In the event of a collision, the bumper must absorb a significant portion of the impact force.
It also extinguishes any negative impacts that may appear during a head-on collision with another car or any object.
Another feature of the VAZ 2114 front bumper is the special design of the bumper edge. He plays the role of a kind of spoiler. This means that the bumper significantly increases all of the key downforce metrics when driving at very high speeds.
Why you may need to remove and replace the bumper with a new one
There are a wide variety of reasons why a front bumper may need to be removed, but some are more common. It is because of them that car owners have to seek professional help or solve the problem on their own.
What are these reasons?
- Damage to the bumper that could have occurred during an accident. Very often, after a head-on collision, the integrity of the structure is violated so much that an urgent replacement is required.
- Engine repair is another reason to remove the bumper. Many of the components in the engine compartment can only be accessed by removing the bumper.
- Sometimes car owners do tune the front of their car though. Removing the bumper is indispensable here.
- Installation of new light elements.
- Installation of mesh, as well as various decorative overlays.
When the bumper is still broken, there are only two options to solve the problem:
- Replace the old bumper with a new one.
- Try to restore a workable old bumper by all available means.
Removing and replacing the old bumper with a new one. How to remove a bumper on a VAZ 2114
In order to start the withdrawal process, you need to acquire a whole range of auxiliary tools.
Among them:
- Screwdrivers.
- Lift.
- Cross screwdriver.
- 10 to 8 box spanner. Alternatively, use an open-end wrench.
- The head has a collar of 13 mm.
Additional Information. Replacing the bumper of a VAZ 2114 is a simple procedure. In order to complete it, it may take 60 minutes, but if a person does not understand anything about replacing body elements, then you will have to spend much more time. In any case, the car enthusiast will save on the services of masters from service centers. It is recommended to perform this procedure on your own, since not every technician is responsible enough to replace body elements.
How to remove the front bumper of a VAZ 2114 in order to install a new one
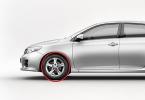
- At the first stage, you will need to open the protection, which is located on the front wheels. To do this, you will have to remove 3 screws. The easiest way to do this is to use a screwdriver.
- Now you need to remove the protection to the side and open access to the inside.

- A 10 mm wrench is required to unscrew the 2 fastening nuts inside.
- In the same way, you need to dismantle from the side where the second wheel is located.
- After that, you can remove the license plate. Some are afraid to perform this procedure because of the likelihood of damage to the sign. In order to avoid any damage, you should unscrew a few screws, which are located under the number, and then remove 2 more screws located in the windows.

- Now the turn has come to remove the front end. It takes a little effort. After that, it remains to put a new bumper. Installing a VAZ 2114 bumper will not cause difficulties if the motorist has managed to remove the old bumper.
This can be done if you follow the entire procedure described in the reverse order, however, it is recommended to check the condition of the amplifier before installing a new front bumper.
This component must be in good working order. If this is not the case, then the car enthusiast will need to replace the amplifier before installing a new bumper.
In order to carry out this procedure as quickly as possible, it is necessary to dismantle several fastening nuts immediately after removing the bumper. This can be done with a 13 mm head. All shims must remain on the studs, and all brackets that are located on the side must be unscrewed. They can be used when installing a new bumper.
When this is done, you can start adjusting the new amplifier to the desired height. Then you need to set the gaps between the headlights, the amplifier itself and the wing. This can be done using slots.

After that, the assembly of the entire structure should begin.
Features of the work
New versions of the car have some differences. They are in contact with the bumper reinforcement. Under the headlights, as well as the grille, it has teeth. They are put on with special cuts. As a result, in order to remove the bumper without any damage, you will also need to remove the headlights along with the grille. This is very inconvenient, but you cannot do without it.
If you still need to replace the bumper with a new one, then you should very carefully choose the model of the new bumper. In no case should you buy metal bumpers. They pose a serious threat to the driver during an accident. Better to give preference to bumpers made of plastic.
We must not forget about the color. It must perfectly match the color of the entire body, otherwise the car with multi-colored elements will look just awful.
Advice. Some car enthusiasts are trying to save money on buying a new bumper and buy an unpainted bumper. It does cost a little less, but finding the right paint for this body element can be extremely difficult.
Useful video
Interesting information on this issue is presented in the video below:
Output
Fastening the front bumper of the VAZ 2114 will not be difficult if you act strictly according to the instructions presented. Installing a completely new bumper will restore the original look of the car, as well as increase the level of safety while driving.
Some motorists were faced with the fact that they had to change the front bumper for the VAZ-2114. This could be due to the fact that its structure was destroyed or the structure itself was altered. Of course, I had to go to a car service, where they took a lot of money for such a simple process. This article tells you how to change the front bumper with your own hands
Video on how to remove the front bumper on the VAZ-2114
The video will tell you about the process of replacing the front bumper of the VAZ-2114, and also tell about some of the nuances and subtleties of the process.
Bumper replacement process
Front bumper device diagram
The front bumper of the car has a protective function, which is the first to absorb any possible impact. Recently, the trend of automakers is that it should be decorative and aerodynamic. In that case, what should take the blow?
For this, a special metal amplifier was developed, which precisely fulfills this role.
Before starting the replacement process, you need to decide on the tools. Which one is required: a screwdriver with sets of nozzles or a set of screwdrivers, open-end and spanner wrenches for 8 and 10, a ratchet with a head for 13, a new bumper.
So, when the motorist has collected everything, you can proceed directly to the process.
Step by step process
Consider the step-by-step process of replacing the front bumper of the VAZ-2114:
- We install the car so that you can freely get to the bottom to perform operations. A pit or lift is ideal.
- We unscrew the bolts securing the radiator grill.

Radiator grille bolt pattern
- We remove the number, there are two bolts under it. There will be two bolts under the license plate that attach the bumper to the amplifier. They also need to be dismantled.
- We unscrew the screws securing the wheel arch liners (protective arches of the front wheels).
- Using a 10 key, unscrew the two side bumper mounting nuts.

Dismantle the side mounts of the front bumper
- Pull the bumper forward and dismantle it.
- Installation is carried out upside-down.
Part selection for VAZ-2114 (article)

General view of the original front bumper
2113-2803015 - original catalog number of the front bumper manufactured by AvtoVAZ. There are no analogues of this part, so there are no options other than a factory purchase. The average cost of a product is 6000-7000 rubles.
Reasons for removing the front bumper
There are several reasons why the front bumper will need to be removed. So, let's consider the main ones:
- Deformation, destruction or damage due to an accident.
- Dismantling in order to remove or repair elements that are under the protective element. This can be an amplifier, a headlight, a radiator frame or a side member extension, as well as other reasons.
- Dismantling a part for painting or refurbishment.
- Other reasons.
Tuning

One of the options for tuning the front bumper
The dismantling of the front bumper is repeatedly required to improve performance, in other words, tuning. This is a fairly common practice, especially in the territory of the neighboring CIS countries.
Thus, the protective element can undergo a complete modernization, and sometimes completely change completely. There are a lot of tuning options, and each motorist independently chooses the design and modification option.

A minor revision of the bumper - installing the lip. Looks stylish and fits over a standard bumper
But, the only thing that remains unchanged in this case is the fasteners. Therefore, no matter how you change the appearance, the installation of the element is carried out as it was removed, only in the reverse order.
conclusions
Removing and installing the front bumper on the VAZ-2114 is easy enough and even a novice motorist can handle this process, the main thing is that there is a desire and hands grow from the right place. Well, and if the process described in the article seemed quite complicated, then you need to contact a car service, where everything will be done for an immodest fee.
Most owners of cars of the Lada Samara 2 family are wondering how to remove the front bumper on a VAZ 2114/2113/2115 on their own. For drivers who are well versed in technology, removing and replacing a part is straightforward. If the bumper is damaged, they do not go to specialized auto repair shops or service stations, they do such repair work with their own hands.
This review is designed for novice car enthusiasts who want to understand the mechanics of a car, save money and carry out minor work on repairing their car on their own.
The bumper VAZ is an energy-absorbing device in the form of a bar, located in the front and rear parts of the Lada Samara 2 car. This important safety element is a must.
The body kits have 2 functions:
- Decorative. The car looks more refined. As a styling for the VAZ 2114, the manufacturer developed blown body elements. They look aesthetically pleasing and at the same time increase downforce when driving at high speeds, which improves safety.
- Protective. The bumper protects the car from light shocks, damage, protects the reinforcing beam, body and other parts.
VAZ 2113/2114/2115 models are equipped with 2 bumpers:
- in front of him;
- back.
Body kits are made of 2 types of plastic material:
- thermoplastic;
- thermosetting.
Thermoplastic plastic lends itself easily to softening; during repairs, it combines into a homogeneous structure. Reactoplastics cannot be repaired by welding.
The material mark is located on the inside of the body element.
During the operation of the machine, various collisions, collisions with obstacles with the subsequent deformation of the body kit can occur. Replacing the front bumper of the VAZ 2115 in this case is mandatory.

If you leave the damaged part, then with a possible next impact, all the energy will be directed to the car body, as a result of which many mechanisms will fail:
- radiator, its grille;
- fan;
- wheel arches.
For minor damage, such as scratches, small cracks, body kits can be glued, putty and painted.
The reasons for removing this part are as follows:
- deformation of an element as a result of collision, impact;
- repair of the engine, reinforcing beam, replacement of the radiator;
- installation of a protective mesh, decorative cover;
- replacement of headlights, installation of optics.
The rear body kit of the VAZ 2114 differs from the front by the absence of holes for the registration number of the car.
The reasons for repairing and replacing the rear bumper of the VAZ 2114 are the same as for the front element:
- violation of integrity;
- body deformation;
- chips, cracks.
When choosing a body part, the car owner must adhere to the following recommendations and rules:
- Thickness. Thicker material increases quality and protection.
- Colour. Painted body kit is matched to the color of the car, unpainted - for overhaul of the body with a full individual painting of the car.
- Compatibility. All elements must be correct in size. It is better to choose with holes for fog lights, especially for the VAZ 2114.
- Manufacturer. There are brands of different manufacturers on the market, but for VAZ 2113-2115 it is recommended to buy a domestic new bumper.
- Price. The cost of Russian bumpers is lower, and the quality is higher than that of foreign ones.
Front bumper

Replacing the front bumper of a VAZ 2114 with your own hands takes a little time. If it is necessary to replace the radiator or grille, then the procedure takes longer.
Removing the body kit for all VAZ 2113-2115 models is carried out in the same way.
Tool
To replace the body kit, you will need the following tools:
- screwdriwer set;
- open end wrenches 8 and 10 mm;
- ratchet head 13 mm with a wrench.
Step-by-step withdrawal
To remove the front bumper of the VAZ 2114, they put the car on a viewing hole or lift.
The algorithm for dismantling the body kit is as follows:
- Before doing any work, the electrician associated with the license plate and fog lights must be turned off.
- Treatment of bolts and fastening nuts from rust, as well as for better untwisting, is carried out with VD-40 aerosol.
- Detach the front wheel arches.
- Unscrew the fender liner fixing plate with a 10 mm wrench.

- Remove 3 self-tapping screws that are attached to the body kit.
- With a key of 8, remove 6 self-tapping screws for attaching the fender liner to the front fender.

- Pull back the fender liner.
- Remove the grille and headlights.

- Using a 10 mm wrench, unscrew the 2 nuts securing the left side of the bumper.
- Pull slightly to the side so that the studs come out of the body bracket.

- Unscrew the right side of the bumper in the same way.
- Use a Phillips screwdriver to remove the screws under the license plate and unscrew the 2 screws below. Detach the license plate.

- Remove the bumper.
If the amplifier is damaged, it is replaced. Using a 13 mm head, unscrew 2 nuts on each side. During installation, the amplifier is adjusted using shims.
Installation
Before installing a damaged body kit, it must be repaired and painted.
Installation of the front bumper on the VAZ 2114 is carried out in the reverse order to dismantling.
Remember this rule: when we install the bumper in place, it is necessary to check all the gaps between the amplifier, fender, body, headlights, grilles and only then attach.

In a VAZ 2114 car, as in other models 2113 and 2115, it is not difficult to remove the rear bumper, but outside help will be useful.
The amplifier is removed along with the body kit to check the condition.
Dismantling
The rear bumper for VAZ 2115, 2114 and 2113 is attached to the rear beam using brackets.
To remove the rear bumper of the VAZ 2114, you must perform the following steps:
- Remove the rear wheel arch liners.
- They clean dirt, grease, oil with a metal brush, and inject VD-40 aerosol during operation.

- Using a 10 mm socket head with a knob, unscrew the 4 bolts on which the bumper is to be attached, 2 bolts on each side.
- Unscrew the 3 nuts of the bracket for attaching the reinforcement beam using a 13 mm wrench.

- A beam with a bumper is subject to dismantling.
- Unscrew the screws, disconnect the beam.
The damaged bumper is ready to be repaired or replaced.
We mount in place
After the rear body kit is repaired or replaced, it must be put in place. All procedures for installing the rear bumper on a VAZ are performed in the reverse order of removal.
The bumper is attached carefully so as not to damage it. The structural elements must be installed correctly, without changes in the clearances between the parts.
When performing the work, be careful, follow the recommendations and you will be able to complete the procedure without special skills and knowledge.