One of the common causes of air conditioning failure in a car is a malfunctioning electromagnet, which is responsible for attracting the pressure plate to the rotating pulley, as a result of which the compressor engages and the system usually starts.
Changing the compressor clutch at home using available tools is certainly possible. To do this, you need to approach the matter correctly and prepare everything necessary materials in advance.
How to remove the clutch from the compressor
Algorithm step by step execution tasks:
1. It is necessary to remove the engine protection to provide additional space and obtain a plastic boot.
2. Remove the poly V-belt. To do this, you need to move the tension roller away with a key, fix it and freely remove the belt.
3. Remove the generator by disconnecting all wires in advance.
5. If there is still refrigerant in the system, then the hoses from the compressor do not need to be disconnected; if the system is empty, then for greater convenience it is better to remove the hoses, while making sure that no dust or dirt gets into them.
6. Next you will need a key to bleed the shock absorbers. If you come up with a brilliant idea - to use a key from an angle grinder, then drive it away immediately, these keys are “not up to the task” - they bend quickly. Insert a wrench into the holes to prevent the pressure disk from turning, then use a ratchet wrench to unscrew the nut.
7. Using two screwdrivers, carefully pry the disk off from both sides; do not make any special efforts, otherwise you may bend it.
8. Using special tool, you need to remove the retaining rings (if you don’t have them, a screwdriver will do). First remove the small retaining ring, then use a bearing puller to remove the pulley itself; removing it is quite easy. If you manage to do this, then the coupling will be removed.
What you need to know
Removal and installation of the compressor clutch must be carried out by two people, since no one will be able to unscrew the compressor clutch nut without anyone’s help. Of course, the coupling must be reassembled in reverse order. Experience has shown that installation will take a little longer than removal.
Despite the fact that the procedure as a whole seems simple, it is better to entrust this work to professionals. The fact is that specialists, as a rule, have everything necessary tools and devices designed for such work. The strategy of manufacturers today is such that, wanting not to leave numerous service enterprises without work, the manufacturer tries to make almost every component and mechanism unique. In short, soon every nut will need its own wrench.
(805.54 kilobytes) Number of downloads: 3975
My engine is 1.6, 110 hp, NFU, 2005
Remove: belt additional equipment, tension roller, broaching roller, air conditioner clutch.
I used the keys:
- ratchet with heads for 13, 10 and 16!!!.
- a key from an angle grinder or a Soviet bicycle key for a handlebar with an extension pipe.
- a circlip remover (platypus type) or an awl, a screwdriver and a lot of patience.
- bearing puller (large, price 300-400 rub.)
To replace only the belt and rollers, there is no need to lift the car and remove the wheel; everything is done in a regular garage or on the street near a store.
To remove the air conditioner clutch, it is advisable to lift the car, remove right wheel and remove half of the locker (4 bugs).
The belt can be removed in 5 minutes. Everything is very simple, there are no difficulties, anyone can do it.
We take a ratchet with a head of 13 (maybe someone has a 16) and a bolt (nail, hairpin, stick) with a diameter of 3 mm and a length of 3-5 cm.
Place the key on the tension roller and turn it ~30 degrees counterclockwise.
With the other hand, insert a bolt (nail, hairpin, stick) into the hole on the roller platform (there is a similar hole on the engine where the bolt will go).
The belt is free, the roller is fixed.
(IMG:http://s019.radikal.ru/i617/1204/d3/0ecf21886781.jpg)
Now you can shoot videos.
The tension roller platform is secured with three bolts (1 on top and 2 on bottom). Take the ratchet with the head at 10 and unscrew it.
(IMG:http://i032.radikal.ru/1204/f4/b57c1a73298e.jpg)
(IMG:http://s002.radikal.ru/i199/1204/61/2441b26a5ad0.jpg)
The broaching roller is secured with one bolt (in the center). I have it covered with a plastic cover.
Here's the catch:
- it will require head at 16.
Here are all the rollers (including the timing belt under the casing):
(IMG:http://s47.radikal.ru/i116/1204/e4/035e3dbebafd.jpg)
Removing the belt and rollers took less than 30 minutes.
Now the air conditioning clutch.
We climb into the wheel arch, and with the locker removed, we see the air conditioner in front of us:
(IMG:http://s019.radikal.ru/i643/1204/bd/57f439e5b112.jpg)
We take the grinder key or, as in my case, I’ll adapt it:
(IMG:http://s019.radikal.ru/i632/1204/6e/c706e9e6205e.jpg)
(IMG:http://s019.radikal.ru/i604/1204/d7/051ad6e5b7e8.jpg)
We put it in the holes on the coupling and unscrew the nut with a ratchet with the head set to 13
(IMG:http://s019.radikal.ru/i602/1204/7f/84039f40982d.jpg)
(IMG:http://s019.radikal.ru/i627/1204/7c/6e2800ab8fa3.jpg)
(IMG:http://s019.radikal.ru/i616/1204/68/f1f965eb7385.jpg)
The first clutch plate (with the triangle and holes) sits on the teeth. Place the same head at 13 in the center and tap a little, then remove it towards you. Do not overdo it with inserting screwdrivers, chisels, etc. into the gap between the plate and the coupling itself, bend the triangle and the rings of this “shock absorber”. You need to remove the center, and not pull off the edges with a thicker screwdriver. DO NOT HIT ANYTHING WITH A HAMMER!!!
(IMG:http://s019.radikal.ru/i637/1204/36/e62406c75f17.jpg)
The second retaining ring is located even deeper. (it is closed with a ring made of foam rubber or something similar). No need to remove it!!! It secures the rubberized cork. Remove the ring, get a plug in the eye and be left without freon evil
Remove the coupling and bearing.
Now I’ll make a reservation. In my case, the A/C clutch bearing was so badly damaged that it suffered severe overheating, melted its plastic cage and lost half of the balls.
To remove the coupling, I had to remove the air conditioner (I removed it completely, then filled it with freon).
As they wrote in other forums, the coupling can be removed by hand, but not always... ogo
We take a bearing puller, place it on the coupling, and press it out.
(IMG:http://s019.radikal.ru/i611/1204/e8/c478f2253cc0.jpg)
(IMG:http://s43.radikal.ru/i099/1204/87/a48d0f98294a.jpg)
We removed the coupling, turn it over, take a chisel, a hammer and knock down the protrusions that fix the bearing. :Gigakach_01:
Then, using the same bearing puller or any other old bearing, 50-55mm in diameter with a hammer, press out the bearing.
(IMG:http://s61.radikal.ru/i174/1204/00/8b344e5007ed.jpg)
Let's take it new bearing...
(IMG:http://s019.radikal.ru/i604/1204/d8/29f4a8ef108c.jpg)
Lubricate the seating area and the bearing itself with oil (from the engine) and press it into the coupling using a wooden block and a hammer.
We take a smoke break and are glad that the work is almost finished.
(IMG:http://s019.radikal.ru/i639/1204/32/9f34ebfa4852.jpg)
My winding (electromagnet) is pretty fried, but it’s still working.
To remove it you need to remove the large retaining ring (photo below)
(IMG:http://s019.radikal.ru/i604/1204/15/9b0f3440a5aa.jpg)
The condo is secured with three bolts. Head at 13.
(IMG:http://s019.radikal.ru/i634/1204/73/910f7c67c9fc.jpg)
Who needs a sticker on a kondeya:
(IMG:http://s019.radikal.ru/i602/1204/14/42b16e7edab7.jpg)
Everything is ready, let's start assembling in reverse order:
- put the coupling in place
- install the retaining ring
- forget the puck
- put the first disk with a triangle
- tighten the nut
- put the air conditioner back in place if it was removed
- put on a belt
- release the tension roller
- install a locker
- put the wheel on and lower the car
Good day to all!
The car is on the slipway, the engine has been removed and disassembled, and it’s time to start troubleshooting and repairing the units while the fate of the engine is being decided. Today I am writing about a not complicated, but very nasty and in some sense dangerous problem - wear of the air conditioner compressor clutch bearing. Let me remind you that all the information in my bulletin board for Prima (and also applies to many Renoshkas with the same or similar engine) with Renault engine F9Q, so I can’t say how it’s done on other machines. The air conditioning compressor on this engine is driven by a serpentine drive belt. auxiliary units from crankshaft. This pulley constantly rotates when the engine is running, and the compressor is connected as needed using electromagnetic coupling. This is done in most machines that have Delphi (Harrison Thermal System) compressors. Over time, after about 80 - 120 kilometers, the bearing dies, which is accompanied by increased wear belt, metallic clanging from the compressor and the final chord - smoke from under the hood in especially critical cases when the bearing jams.
Since my air conditioner does not work, just in case, I pressed the spool valves and unscrewed it from the pipes. The holes were plugged. Another lyrical digression. The main problem with these compressors is drying out and wear of the shaft seal. To delay this sad moment, the manufacturer recommends periodically turning on the air conditioner several times during the cold season, i.e. sometimes use so that the oil seal does not dry out and is lubricated. If oil is leaking from under the oil seal, then the compressor must be repaired as quickly as possible, otherwise pockets of corrosion will form on the shaft under the oil seal, which means that the unit is practically unrepairable (as I have, for example, although I have a few ideas on this matter).
We begin disassembling the compressor by removing the spring-loaded disk; in fact, this is a component of the clutch. Under the influence of an electromagnet, this disk is attracted to the pulley and begins to rotate with it. I saw pullers online, but the option in the photo below suited me better... because there is no point in fencing a garden where there is already a fence...
Fixing the compressor drive disk

We insert a mounting tool or a screwdriver between the bolts, which is more convenient, and use a T30 wrench to unscrew the fixing screw
The disc sits on splines, but it came off quite easily from this compressor. By the way, there were two adjusting washers under the disk, which I almost lost. Next, remove the stopper that secures the drive pulley and remove the pulley. There can be many surprises here, more on them below.

Drive pulley (inside view, already with new bearing)

Traces of manual intervention from the previous owner are visible
Due to the fact that someone’s crooked hands had already climbed here, I had to use a Russian key - a chisel and a housing from under some kind of Soviet... compressor))). By the way, due to the fact that the pulley is specially shaped for a magnet, the bearing had to be knocked out only with the help of such a mandrel, so as not to split the pulley. The rest is the classic pressing stages.
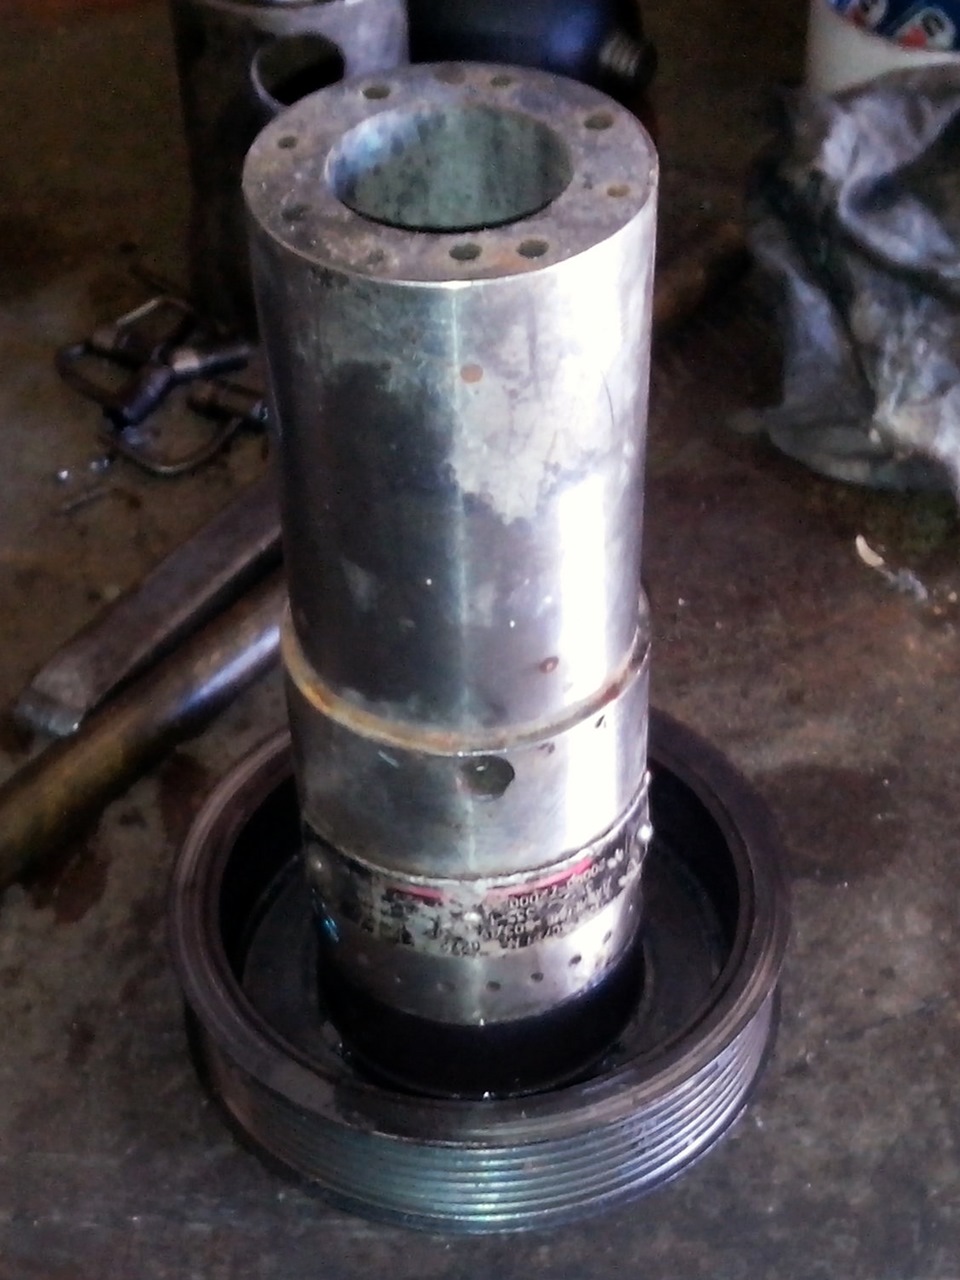
The housing of a Soviet compressor as a mandrel for removing a bearing. Its inner diameter is slightly larger than the bearing.
Having pulled out the bearing (original, NTN company), I went to the store, where from the offered assortment (including the original one, which I was dissuaded from because of its dark origin... paradox), I chose a bearing from NSK, marking 35BD219T12DDUCG21. The old one was spinning very poorly , which at first put me in a stupor (in the sense of “how did it even work?”). By the way, according to Nissan catalogs, the compressor is only available assembled, in some places you can order it for spare parts. But in general, it’s more expensive. I pressed the bearing in, tried it in place, and then I discovered another problem... and I understood how it worked... and I cursed for the umpteenth time. I’ve been working on the car quite emotionally lately.))) The bearing with its inner diameter rotated on the aluminum shaft-housing of the compressor and burned out. diametrically located points of approximately 0.1 mm from the edge, plus its inner ring broke the seat, forming a groove on one side about 0.5 mm deep (just in the direction of tension of the V-ribbed belt). I had to grind off this obscenity and put a steel washer on it.
Air conditioners are designed to provide people with comfort in offices, living spaces, and cars. But sometimes these generally reliable devices can fail. Then dismantling is required. Let's see how to remove the air conditioner in an apartment and in a car.
When is it necessary to dismantle a car air conditioner?
The first thing to fail is the condenser or radiator. On some car models, this heat exchanger is so “durable” that it is not able to work even for one season. This element is constantly exposed to water, dirt, and reagents from the roads.
Violation of tightness
Depressurization occurs for many reasons, not only due to corrosion. Thus, as the rubber rings and gaskets wear out, the tightness of the system is compromised. Hoses can also cause leaks. The seals in the compressor often leak.
Mechanical breakdowns
Most often, the nodes jam, and then the system depressurizes. Compressors may fail due to insufficient cooling condenser or due to a non-working fan. Jams even when high blood pressure in the system due to freon overheating. In this case, there is nothing left to do but remove the air conditioner, replace the jammed parts and install it in place.
Other faults
Among the reasons why it is necessary to remove the split system are breakdowns in the electrical part, obstruction problems high pressure, breakdowns electronic unit. What to do in this case?
We dismantle the car air conditioner correctly
Before removing the Priora air conditioner, you need to know what this system is. Thus, AvtoVAZ installs the most primitive air conditioners in Priora. The unit consists of a condenser, a compressor, and lines.
On AvtoVAZ cars the most frequent malfunction The air conditioning system breaks down. First, the clutch bearing is destroyed, and then the clutch itself. Among the most probable causes failure of the coupling can be called incorrect tension drive belt, disc slippage. After the bearings come out of position, play forms on the pulley, which leads to abrasion of the coupling winding. Sometimes the part may jam. The problem can be solved by replacement. Let's see how to remove the air conditioning compressor on a Priora.
Let's get started
So, first the car is de-energized. To do this, simply remove the negative terminal from the battery. Then you need to bleed the freon from the system. For this purpose, there is a special valve on the lid. After this, remove the engine mudguard. Next, remove the auxiliary equipment belts.
Then disconnect the connector from the compressor clutch. Unscrew the fastening bolt of the high pressure flange to the compressor and remove it. The pipeline is also being dismantled low pressure. The compressor is attached to the engine and is held in place by three bolts; these are also unscrewed. It is better to remove the compressor from below.
How to remove a Priora generator with air conditioning
This car often has problems with the generator, but removing it is not so easy - you need to disassemble half the car and bleed the freon from the air conditioner.  Let's see how to dismantle the generator yourself. Unlike the Prior without air conditioning, remove the generator in in this case needed from below. The car is driven into a pit or onto a lift. Then remove the engine protection and loosen the drive belt tension roller. Next, unscrew the top bolt that holds the generator.
Now you need to move down, under the car. Here they remove the bolts that secure the air conditioning compressor, which is very annoying. Next, carefully remove the belt going to the compressor and generator.
To remove the last knot, it is pulled off its seat and lead towards the battery. This way you can gain access to the topmost bolt that holds the air conditioner in place. After unscrewing the last bolt, you can hang the compressor, this is enough for work. It will not fall, and the tubes that go to it are sufficiently rigid. After this, unscrew the bolts holding the generator. Disconnect its terminals and pull the unit down.
How to remove an air conditioner condenser
On every car this part and the place where it is installed has its own characteristics. Fasteners may also differ. Some air conditioner heat exchangers are installed in front of the radiator of the cooling system, others are installed behind it. Let's see how to remove the air conditioner radiator from a car.  Often, condensers are removed from the bottom of the machine - this makes it much more convenient to work and you don’t have to disassemble half of the machine. First, remove the engine protection, radiator grille, and (if necessary) front bumper. Next, all that remains is to unscrew the fasteners and release the condenser.
Removing the coupling
The clutch or pulley is most often removed to replace the bearing. The malfunction will manifest itself in the form of a characteristic whistle from engine compartment. The coupling will also have some play. Let's see how to remove the A/C clutch and replace the bearing.
Dismantling tool set
For dismantling work, you will need a standard set of motorist tools, as well as a jack and a set of Torx screwdrivers. You also need to prepare a chisel for making notches on the coupling. Finally, a new bearing is needed to replace it.
Instructions for removing the coupling
First of all, install the jack under the front right wheel, tear off wheel bolts, lift the wheel. Then the bolts are completely unscrewed and the disc is removed. Next, use an 8mm wrench and a screwdriver to dismantle the fasteners of the mudguard and boot. After this you will have access to tension roller generator, it should also be unscrewed. Using a 8mm head, unscrew the fastening bolt holding the coupling and remove its top cover. 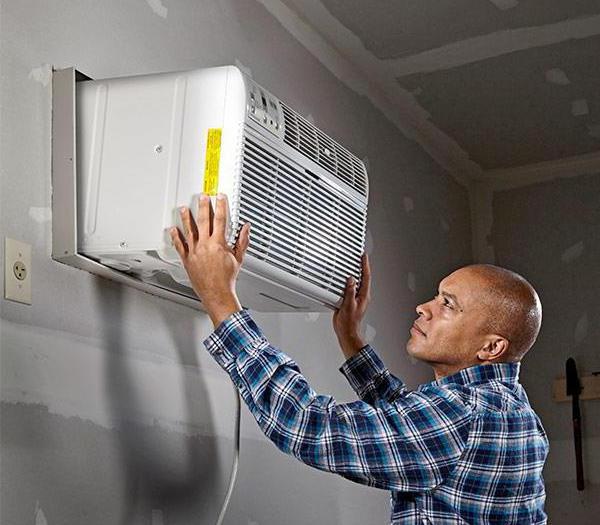 Then remove the retaining ring that holds the pulley in place. drive shaft compressor, and remove everything along with the bearing. Sometimes the bearing needs to be knocked out. Replacement of the bearing and installation of the coupling is carried out in the reverse order.
Split systems
Home air conditioners are dismantled not only because of breakdowns. 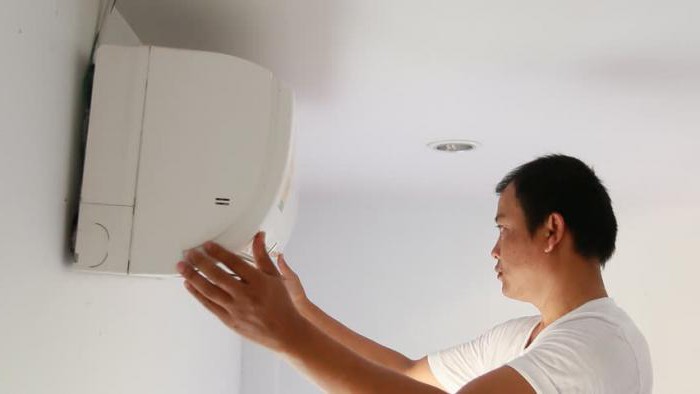 They are often removed to move to another apartment or office during renovations. A split system is significantly different from a car's air conditioner, and you need to know how to remove the air conditioner correctly.
Removing the wall system
Removing small wall-mounted air conditioners is not difficult, especially if you have a kit standard tools. So, you will need two Swedish wrenches, a pipe cutter, a pressure gauge, an indicator screwdriver, wrenches and hexagons. It is also advisable to have a pressure gauge station available to conserve freon. Let's see how to remove the internal one.
The first step is to pump out the freon. It's better to pump it out external unit. To do this, connect a pressure gauge to the gas valve. Next they dismantle sidebar and tighten the supercharger valve with a hexagon. Within a minute, all the freon will flow into the external unit, and the pressure in the line will drop. Then the valve is tightened and the device is turned off. After this, use a pipe cutter to cut the tubes - you need to maintain 15-20 cm from the fitting. The tubes are rolled and the outer part is removed from the brackets. 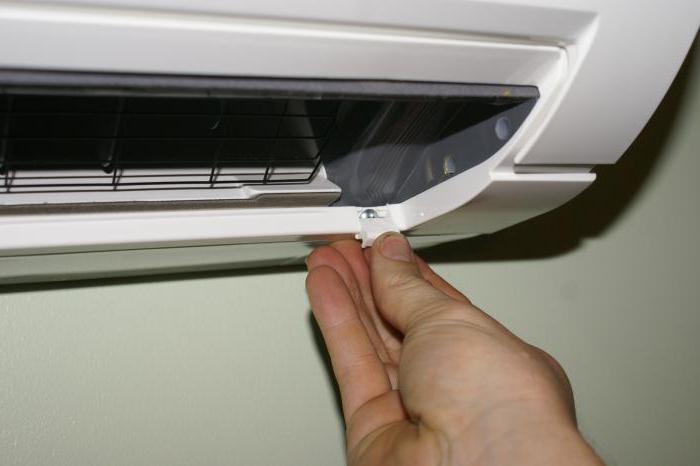 Next we begin dismantling indoor unit. Let's see how to remove the air conditioner from the wall - it's not difficult. Open the cover of the device, unscrew the fasteners holding the module, remove the line, roll the ends of the tubes, turn off electric wires. All that remains is to remove the block from the plate on which it is held. Before removing the air conditioner completely from the wall, carefully remove the fasteners of the pipeline and plastic casing.
Removing a duct split system
Execute self-dismantling Such equipment is already more complicated - these units have significant weight. But besides this, you will have to remove their air ducts. To dismantle such air conditioners, you need the same set of tools as in the case of a split system.  The first step will be to disassemble the air ducts. To do this, remove the grille and remove the air ducts. This is done by disconnecting them from the internal part of the system. The flexible air duct is secured with clamps. In the case of metal ones, unscrew the screws. Before removing the air conditioner, you must remember to pump out the freon into the external unit.
Removal is carried out according to the same principle as when dismantling a home split system. Next, loosen the evaporator nuts, remove the freon line and remove the electrical wires. The drainage hose is also turned off. At this stage, the process of dismantling the unit has been successfully completed. Then you can take any action related to repairing the air conditioner, or replace it entirely with a new one.
Conclusion
This way you can dismantle the air conditioners. Having experience working with tools, all operations can be easily done with your own hands. We also note that now there are many craftsmen offering services for dismantling split systems. For private houses, the price of the service is about two and a half thousand rubles. For residents of multi-storey buildings - from three and above (depending on the specific floor). At the same time, specialists have all necessary set for work with the air conditioning system. This can save you a lot of time, and you don't have to worry about learning how the system works.