Begin:
- Remove the ground from the battery (using the “10” key).
- Then unscrew the bolt securing the starter from above (using a “13” wrench).
After this, you begin to work inside the car:
- Remove the handles from the transfer case levers by turning them and pulling them up.
- The casing of the boxes (both transfer case and gearbox) must be removed. To do this you will have to remove six screws.
- By turning the casing, it can be removed.
- Remove the casing and cover from the lever transfer case(removing three screws).
- Remove the connectors from the blocking sensor. Do not pull on the wire itself so as not to tear it off.
- The cover on the slide can be removed by unscrewing two self-tapping screws.
- Then turn on reverse gear. To remove the lever itself, you will have to hook the locking sleeve with a screwdriver. When removing plastic and rubber parts of the lever, do not break the collet.
The main stage of work is directly removing the box. Watch the video - removing the gearbox on a Chevrolet Niva.
If protection is installed under the crankcase, it must be removed. This also applies to the soundproof casing.
- It is advisable to mark the flanges of the shafts and boxes. This will allow the parts to be positioned correctly during installation.
- The bolt on the flange may be tight. Then you can help with a chisel, which is inserted between the flange and the bolt itself. A couple of hits should be enough.
- From the transfer case, disconnect the rear cardan shaft. Stuck flanges are “treated” again with a chisel.
- Remove the front driveshaft.
- Disconnect the speedometer cable. When removing the oil deflector washer, be careful. Move the cable to the side.
- If the car has a speed sensor, its connector must be disconnected.
- Then unscrew the fastening of the elastic coupling onto the flange of the input shaft of the box.
- The bolts are pulled out when the flange is in a strictly defined position.
- To remove the transfer case, unscrew the four nuts (using a 13mm wrench).
- After removing the cotter pin, remove the spring and fasteners on the clutch cylinder.
- Move the starter closer to the radiator, after loosening its fasteners.
- Remove the bolt holding the clamp from the muffler pipe. For greater convenience, you may also have to remove the muffler bracket (with the same “13” key).
- Loosen the bolts on the gearbox housing (using a 10mm wrench) and the nuts on the traverses.
- The box is attached to the engine with 19mm bolts. There is no need to remove the bottom bolt on the left completely yet, just loosen it. The rest will have to be removed using an extension cord. Now remove all bolts.
- Carefully remove the box and disconnect it from the motor. Already holding it in your hands, move it back, right up to the stop of the scenes. The box should not be left hanging on the shaft.
Installation is carried out in reverse order.
We carry out the work on an inspection ditch or a lift.
Disconnect the negative wire from battery.
Remove the transfer case from intermediate shaft(See Removing the transfer case).
Disconnect the wires from the headlight switch reverse(see Replacing the reverse light switch Niva 2131).
Having unscrewed the bolts securing the clutch working cylinder to the VAZ 2121 clutch housing (see Removing the hydraulic clutch working cylinder), we move the cylinder forward without disconnecting the hydraulic drive.
Inside, use a Phillips screwdriver to unscrew the two screws securing the plastic cover of the gear shift lever.
Having removed the handle from the lever rod,...
 ...remove the cover from rubber boot.
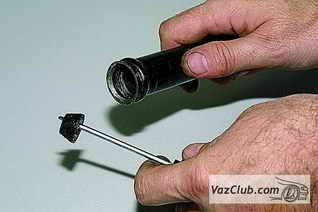
The operations for removing the lever rod are shown on the dismantled gearbox for clarity.
By pressing the lever rod down...
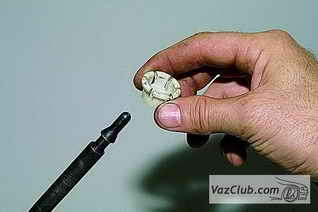
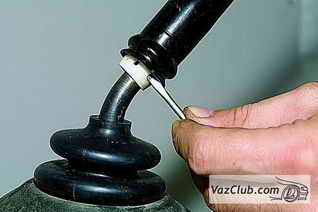 ... use a screwdriver to pry up the petals of the locking sleeve...
 ...and remove them from the annular groove of the rod.
 We remove the gear shift lever rod of the VAZ 2131.
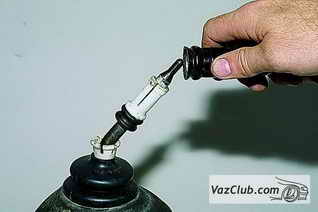
 Using a screwdriver, we open the petals of the spacer bushing...
 ...and remove it from the lever.
 Remove the elastic rubber from the lever...
 ...and the locking bushing.
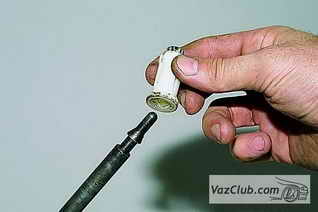
 Using a screwdriver, we remove another elastic bushing from the hole in the lever rod...
 ...and a stubborn pillow.
We unscrew the bolts securing the starter to the clutch housing (see Removing the starter).
On a VAZ-21214 car, by unscrewing the upper starter mounting bolt, we release the lower end of the rear support bracket of the intake pipe of the VAZ 2121 engine.
![]() Use a 13mm socket to unscrew the fastening bolt. top end support bracket to the intake pipe...
Use a 13mm socket to unscrew the fastening bolt. top end support bracket to the intake pipe...
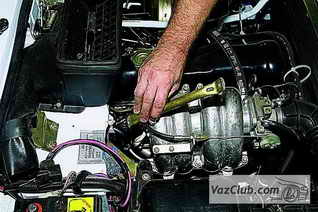 ...and remove the bracket.
 We dismantle the front driveshaft (see Removal cardan shaft).
 Using a 10mm wrench, unscrew the four bolts securing the VAZ 2121 clutch housing cover.
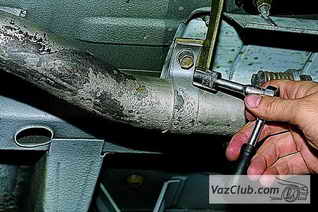 Using a 13mm socket, unscrew the bolt securing the exhaust pipe clamp to the bracket.
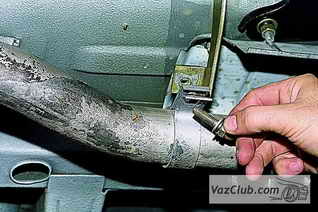 We take out the bolt.
 Using a 13mm spanner, unscrew the two nuts securing the bracket to the Niva 2121 gearbox.
 We take out the “mortgage” bolt.
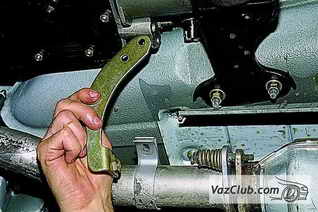 Remove the bracket.
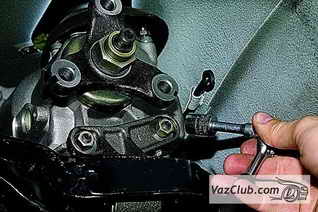
 Head "19" with universal joint and use an extension to unscrew the four bolts securing the VAZ 2121 gearbox to the cylinder block.
 Using a 13mm socket, unscrew the two nuts securing the gearbox support bracket (third support power unit).
 Using a 13mm socket, unscrew the four nuts securing the cross member. rear suspension VAZ 2131 power unit to the body.
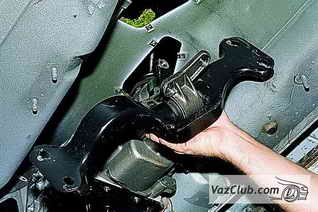 Remove the cross member with support.
 Move the gearbox back and remove it.
When removing or installing the gearbox, do not support input shaft boxes on the clutch units so as not to damage them.
Install the gearbox in reverse order.
Before installation, apply a thin layer of CV joint-4 lubricant to the splined end of the input shaft. After installing the Niva 2131 box, we adjust freewheel clutch release fork pusher Niva 2121 (see Adjusting the clutch release drive).
 Before installing the rod on the gear shift lever, insert the pad and bushings into the hole of the rod.
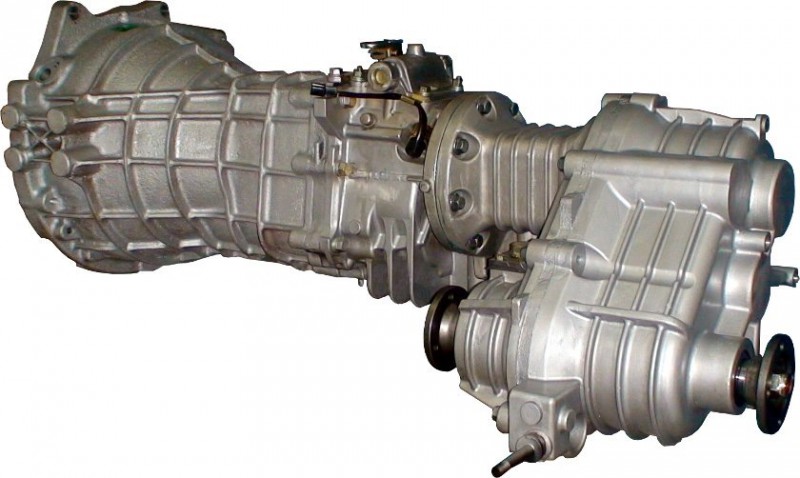
Gearbox VAZ 2121, Niva 2131
- - Box design
- - Changing the oil in the box
- - Input shaft seal
- - Replacing the oil seal secondary shaft
- - Installing and removing the gearbox
- - Input shaft bearing
- - Assembling and disassembling the gearbox
- - Peculiarities intermediate shaft
- - Removing and installing the intermediate shaft
- - Disassembly and assembly of the intermediate shaft
Units and transmission device VAZ 2121, VAZ 2131
Maintenance and operation of the Niva 2121 box. Repair instructions for the cardan, axle and wheel drive Niva 2131.
We carry out the work on an inspection ditch or a lift.
Disconnect the negative cable from the battery.
Remove the transfer case with the intermediate shaft (see Removing the transfer case).
Disconnect the wires from the reversing light switch (see Replacing the reversing light switch Niva 2131).
Having unscrewed the bolts securing the clutch working cylinder to the VAZ 2121 clutch housing (see Removing the hydraulic clutch working cylinder), we move the cylinder forward without disconnecting the hydraulic drive.
Inside, use a Phillips screwdriver to unscrew the two screws securing the plastic cover of the gear shift lever.
Having removed the handle from the lever rod,...
...remove the cover with the rubber boot.
The operations for removing the lever rod are shown on the dismantled gearbox for clarity.
By pressing the lever rod down...
... use a screwdriver to pry up the petals of the locking sleeve...
...and remove them from the annular groove of the rod.
We remove the gear shift lever rod of the VAZ 2131.
Using a screwdriver, we open the petals of the spacer bushing...
...and remove it from the lever.
Remove the elastic rubber from the lever...
...and the locking bushing.
Using a screwdriver, we remove another elastic bushing from the hole in the lever rod...
...and a stubborn pillow.
We unscrew the bolts securing the starter to the clutch housing (see Removing the starter).
On a VAZ-21214 car, by unscrewing the upper starter mounting bolt, we release the lower end of the rear support bracket of the intake pipe of the VAZ 2121 engine.
![]() Using a 13mm socket, unscrew the bolt securing the upper end of the support bracket to the intake pipe...
Using a 13mm socket, unscrew the bolt securing the upper end of the support bracket to the intake pipe...
...and remove the bracket.
We dismantle the front driveshaft (see Removing the driveshaft).
Using a 10mm wrench, unscrew the four bolts securing the VAZ 2121 clutch housing cover.
Using a 13mm socket, unscrew the bolt securing the exhaust pipe clamp to the bracket.
We take out the bolt.
Using a 13mm spanner, unscrew the two nuts securing the bracket to the Niva 2121 gearbox.
We take out the “mortgage” bolt.
Remove the bracket.
Using a 19mm socket with a universal joint and an extension, unscrew the four bolts securing the VAZ 2121 gearbox to the cylinder block.
Using a 13mm socket, unscrew the two nuts securing the gearbox support bracket (the third support of the power unit).
Using the “13” head, unscrew the four nuts securing the cross member of the rear suspension of the VAZ 2131 power unit to the body.
Remove the cross member with support.
Move the gearbox back and remove it.
When removing or installing the gearbox, do not rest the input shaft of the gearbox on the clutch units so as not to damage them.
Install the gearbox in reverse order.
Before installation, apply a thin layer of CV joint-4 lubricant to the splined end of the input shaft. After installing the Niva 2131 box, we adjust the free play of the Niva 2121 clutch release fork pusher (see Adjusting the clutch release drive).
Before installing the rod on the gear shift lever, insert the pad and bushings into the hole of the rod.
Gearbox VAZ 2121, Niva 2131
- - Box design
- - Changing the oil in the box
- - Input shaft seal
- - Replacement of the secondary shaft oil seal
- - Installing and removing the gearbox
- - Input shaft bearing
- - Assembling and disassembling the gearbox
- - Features of the intermediate shaft
- - Removing and installing the intermediate shaft
- - Disassembly and assembly of the intermediate shaft
Units and transmission device VAZ 2121, VAZ 2131
Maintenance and operation of the Niva 2121 box. Repair instructions for the cardan, axle and wheel drive Niva 2131.
Every car, sooner or later, may face the need to repair its transmission. And this article will help those who want to dismantle the box with their own hands, but are not ready to pay money for it at a service station. Below we will look at how the Niva Chevrolet gearbox is removed and what is needed for this.
Step-by-step instruction
There can be many reasons why you need to remove the transmission of a Niva Chevrolet car. One way or another, they are related to the repair of the gearbox. In particular, this could be:
- the appearance of new noises and third-party sounds;
- there were problems with shifting the gearshift lever;
- speeds are turned off randomly or turned on with difficulty;
- transmission fluid has leaked through the seals;
- there was a need to replace the clutch mechanism or other parts.
Remember that the process of dismantling the transmission in a Chevrolet Niva car is quite a difficult task. Therefore, before you begin the procedure for dismantling the box, you must make sure that this really requires it. For example, if the malfunctions are caused by an insufficient level of transmission fluid, then it will be enough to simply top it up rather than dismantle the unit.
What will you need?
To do everything as quickly and correctly as possible, prepare all the tools that you may need in the process of removing the unit:
- wrench set to “10”;
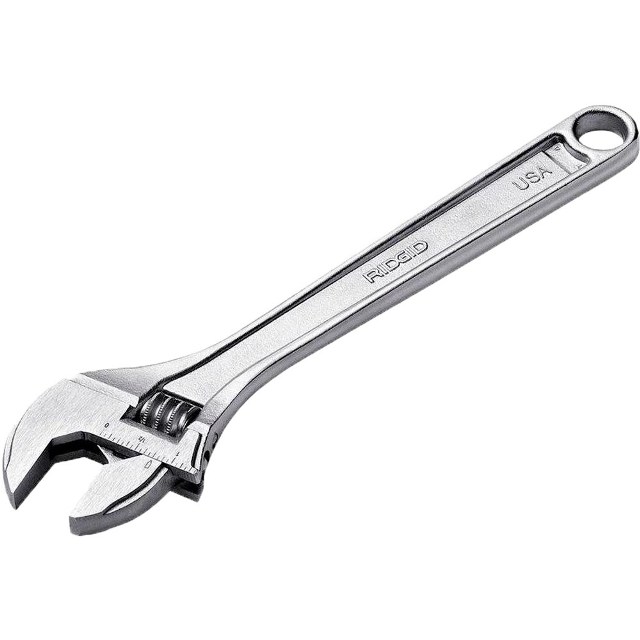
- wrench to “13”;
- hex key set to “12”;
- old container for collecting transmission oil.
- screwdriver;
- pliers.

Step by step instructions
If you have prepared all the tools, then you can begin the process of dismantling the Niva Chevrolet gearbox.
It will also be a huge plus if you have an assistant working with you: without the help of another person, removing the gearbox will be very difficult.
So let's get started:
- First you need to drive the Chevrolet Niva into a garage with a pit or onto an overpass.
- Then open the hood and disconnect the battery.
- Go underneath your car and find the cover. drain hole. Place a container under the hole to collect the liquid. Unscrew the drain cap and wait a while until all the waste liquid is completely drained.
- Perform cleaning drain plug from dirt, install it in place.
- When transmission oil glass, you need to remove the driveshaft. Also dismantle the intermediate shaft.
- Now disconnect the wires from the reverse light switch.
- Get inside the car. Take a screwdriver and use it to pry off the gear selector cover. Slide the cover up for greater convenience.
- Next, unscrew the handle from the gearshift lever and remove it along with the protective cover.
- After this, you will need to unscrew the nut securing the gearshift support plate.
- Now you need to remove the rear gearbox support.
- Having done this, unscrew the clamp screw securing the gearshift rod.
- Next, remove the three screws that secure the base plate bracket. Having done this, you can dismantle the gear change device drive.
- Then, using the appropriate wrench, you will need to remove the screws that secure the clutch housing shield. Set the bolts aside to avoid losing them.
- Now you need to unscrew several screws that secure the clutch slave cylinder to the crankcase. The cylinder itself must be removed, but do not disconnect the pipe from it. Make sure the clutch cylinder hangs on the pipe.
- Next, to remove the transmission of a Niva Chevrolet, you will need to unscrew the three screws that secure the starter. Also put them aside so as not to lose them.
- Now you need to dismantle the stabilizer device lateral stability. If you think that you cannot carry out this work yourself, we recommend that you seek help from specialists at a service station.
- Then you need to dismantle exhaust pipe.
- Take a wrench and remove the four bolts that secure the clutch housing to the vehicle engine.
- Here you will need the help of another person. Ask an assistant to support back power unit so that it does not fall.
- Now you can remove the Niva Chevrolet gearbox along with the clutch housing. Please note: under no circumstances should the end of the input shaft rest on the clutch spring petals. If the springs are deformed, the pressure plate will have to be replaced.
This completes the procedure for dismantling the Niva Chevrolet gearbox. Having done everything renovation work, for which you removed the gearbox, install the unit, repeating the steps in reverse order. Also don't forget to fill in transmission fluid into the unit.
The main malfunctions that require removal of the gearbox from the vehicle are: - increased (compared to usual) noise; - difficult gear shifting; - spontaneous shutdown or unclear gear shifting; - oil leakage through seals and gaskets. In addition, the gearbox must be removed to replace the clutch, front bearing transmission input shaft, flywheel and rear oil seal crankshaft engine. The work of removing and installing the gearbox is very labor-intensive, so first make sure that its malfunctions are not caused by other reasons ( insufficient level oils, defects in the clutch drive, loosening of the box and its covers, etc.).
You will need: keys “10”, “13”, hexagon “12”, screwdriver, pliers.
1. Place the vehicle on a viewing ditch or lift.
2. Disconnect the negative cable from the battery.
3. Drain the oil from the gearbox (see “Changing the oil in the gearbox”).
4. Remove the front driveshaft (see “Removing and installing the driveshaft”).
5. Remove intermediate shaft(See “Removing and installing the intermediate shaft”).
|
|
|
|
|
|
|
11. Unscrew the nut pinch bolt clamp for fastening the gear shift rod. |
|
|
|
|
|
|
17. Remove the exhaust pipe (see “Replacing the exhaust pipe”). 18. Remove the four bolts securing the clutch housing to the engine. Have an assistant hold the rear of the gearbox. |
|
|
20. Install the gearbox in the reverse order of removal. 21. Fill the gearbox with oil. Before installing the gearbox, apply a thin layer of LSC-15 or Litol-24 lubricant to the splined part of the input shaft. |
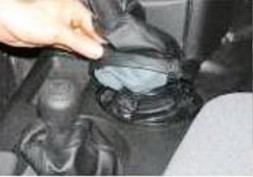 7. From inside the passenger compartment, use a screwdriver to pry up the gear shift lever cover.
 8. Unscrew the handle from the lever and remove it along with the cover.
 9. Unscrew the nut securing the gear shift mechanism support plate.
 10. Remove the rear power unit mount (see “Replacing the power unit suspension mounts”).
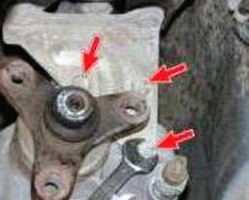 12. Remove the three bolts securing the support plate bracket and remove the gear shift drive.
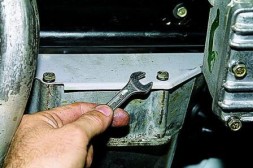 13. Remove the bolts securing the clutch housing shield.
 14. Remove the two bolts securing the clutch slave cylinder to the clutch housing and remove the cylinder without disconnecting it from the hose (the cylinder remains hanging on the hose).
 15. Remove the three starter mounting bolts (the third bolt is not visible in the photo).
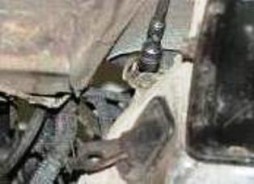 16. Remove the anti-roll bar (see “Removing and installing the anti-roll bar”).
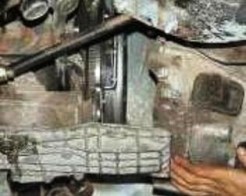 19. Remove the gearbox assembly with the clutch housing. Do not rest the end of the input shaft on the clutch pressure spring petals to avoid deforming them.
22. Check and, if necessary, adjust the gear shift control drive.