Life time car battery largely depends on the generator. It is he who keeps the battery in working condition, charging it with electricity. The slightest malfunction in its operation can damage the battery.
How does the battery charge in a VAZ 2107?
To understand how the process of charging the “seven” battery occurs, you need to know the principle of operation of the generator and understand the connection diagram of these devices.
Design, drive and characteristics of the VAZ 2107 generator
A car generator set is used to provide electricity on-board network machine, as well as for recharging the battery when the power unit is running. Structurally, it consists of the following main elements:
The unit is driven by a belt from a pulley crankshaft.
Throughout its history, the “Seven” was equipped with two types of generating sets: 372.3701 and 9412.3701. They have the same design and operating principle, except that in unit 9412.3701 the fan blades are located inside the housing, and the rectifier module is located outside.
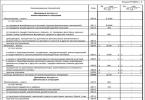
Table: main technical characteristics of VAZ 2107 generator sets
The performance of these devices differs greatly in terms of the amount of current produced and power output. Generator 9412.3701 is more productive. It is used in injection “sevens”, where the on-board network is supplemented electronic system engine control.
How does the VAZ 2107 generator set and the generator circuit work?
Without delving into the theory of electrical engineering, the generator functions as follows. When the key is turned in the ignition switch, the current from the battery through the relay and charge warning lamp is supplied to the exciting stator winding. At the same time, the crankshaft begins to rotate the rotor. During rotation of the armature, an electromagnetic field is formed in the phase windings, which induces an alternating current. Since all electrical appliances on the on-board network are designed for D.C., the design of the installation includes a semiconductor rectifier module. The amount of voltage produced by the generator varies depending on the crankshaft speed. To stabilize it, a special regulator is used, smoothing out surges and dips and supplying the machine’s on-board network with a voltage as close as possible to the nominal one.
Thus, when the engine is running, the generator converts the crankshaft torque into direct current of 55 or 80 A (depending on the type of device) and a voltage of 13.9–14.5 V, necessary for operation electrical appliances and charging the battery. Current is supplied to the positive terminal of the battery through terminal “30” and a separate wire, and the “ground” of the installation is connected to the negative terminal of the battery.
Video: how the generator works
No charging: signs and reasons
If the voltage from the generator for some reason stops supplying battery, it will be discharged in a few days. And in case full exit If the battery installation fails, you will have to provide the entire on-board network, including the ignition system, yourself. So she can work for no more than an hour.
Signs of no charge
Symptoms that the alternator is not charging the battery include:
- A constantly burning or intermittently turning on warning light on dashboard;
- rapid battery discharge;
- reduction in the performance of individual electrical devices on the machine's on-board network.
Signal lamp
There is a special lamp on the dashboard of the “Seven” that indicates that the battery is not charging. If the generator circuit is operating in normal mode, the lamp lights only when the ignition is on until operation starts power unit. It should go out after the engine starts.. If it continues to light, most likely the battery is not charging.
It also happens that warning lamp turns on periodically. This is a sign that voltage is either not supplied to the battery at all, or is supplied inconsistently.
Battery drains quickly
If the generator or its circuit malfunctions, the battery will not receive the voltage necessary to charge it. In addition, she will have to power part of the car’s electrical equipment, consuming her own electricity. In such a situation, the battery will quickly run out. You will be able to understand this when difficulties arise in the process of starting the engine. Receiving insufficient energy, the starter will sluggishly turn the crankshaft flywheel or only “click” the traction relay.
Reduced electrical performance
Some electrical appliances will also help you understand that the generator is not operating normally. If you suspect a malfunction in the operation of the generator set, you can, for example, start the engine, turn on the headlights (if they have ordinary lamps incandescent or halogen) and see how they shine. If the generator malfunctions, their brightness will be an order of magnitude lower, because the lamps are also designed for a certain rated current. A decrease in performance may also be observed at the heater fan. It will spin the blades noticeably worse. When it is turned on, the light from the headlights will be even weaker.
Reasons for lack of charging
There are few reasons for the battery not charging. These include:
- violation of the integrity (break) of the drive belt;
- belt loosening;
- break in the wiring electrical circuit generator or severe oxidation of the connecting terminals;
- rectifier malfunctions;
- voltage regulator failure;
- a break in the generator windings or a short circuit.
Belt break
Although the belt is designed for 50 thousand km, it can break even after several days of use. Especially if there are defects in the pulleys of the device itself, the crankshaft or the pump. In itself, a break in the generator drive belt is not dangerous for the engine, but only if this malfunction is detected immediately. And the point here is not so much the lack of charging, but the pump stopping. If it stops working, the engine will instantly overheat. And this is already fraught with burnout of the cylinder head gasket with all the ensuing consequences. So in case of sunburn warning light or other symptoms of alternator malfunction, the first thing to do is check whether the drive belt is intact. To do this, you need to stop the engine, open the hood and perform a visual inspection of the generator set drive.
Loosening the belt
The drive belt must have a certain tension. When the tension is weakened, it will slip on the crankshaft pulley, not providing the number of rotations of the generator rotor that is necessary to generate current with the necessary parameters. A sign of a loose belt is a characteristic whistle, which most often occurs when air humidity increases. When the belt slips, the warning light usually does not come on, but in some cases it may turn on for a while or blink.
Open circuit and terminal oxidation
The battery will not charge even if the integrity of the wires in the generator connection circuit is damaged. The battery charging circuit is quite simple: just one wire connects the positive terminal of the battery to terminal “30” of the generator set. It is through this that the voltage is supplied. The battery negative is connected to ground, to which the generator housing and the corresponding winding terminals are also connected. You just need to check for contact between the indicated points in the circuit.
Oxidation of the battery terminals, as well as their unreliable connection to the wire tips, can also significantly affect the current supply. You can check the condition of the terminals visually, but you cannot determine how the current flows by eye. It is better to once again clean and retighten all wire connections on the battery and generator.
Failure of the rectifier module
If the rectifier breaks down, no current will flow from the generator to the battery. The block itself is a board with six silicon diodes (3 positive and 3 negative). If at least one of them burns out, the rectifier will need to be replaced, since it cannot be repaired.
Regulator failure
A stabilizer malfunction is characterized by a change in the characteristics of the current supplied to the battery. In other words, the charging voltage is supplied to the battery, but it is higher or lower than required. The regulator also cannot be repaired and must be replaced if it fails.
Malfunction of phase windings
If a break occurs in the windings, the generator stops performing its tasks. When an interturn short circuit occurs, the installation may behave differently. Typically, a sign of such a breakdown is a characteristic burning smell and a hum during operation. These two faults can only be diagnosed after removing the device from the car. Repairing a generator in the event of a break or short circuit involves replacing the burnt winding or stator assembly.
Diagnostics and repair work
If you suspect that the battery is not charging, you need to perform a series of diagnostic and repair work in this order:
- Stop the car, turn off the engine.
- Raise the hood and check integrity drive belt. If it is intact, check its tension by pressing with a screwdriver or other tool on the belt branch in the middle between the generator and crankshaft pulleys. The deflection in this place should be 12–17 mm.
- If the deflection is greater than the specified value, tighten the belt. To do this, use a 17 mm wrench (for units type 9412.3701, a 13 mm wrench) to unscrew the nut that secures the generator to the tension bracket. Use a screwdriver (pry bar) to move the generator away from the cylinder block. Tighten the nut and re-measure the belt tension.
- Connect one probe of the car tester. set to the continuity or resistance measurement mode, to the positive terminal of the battery, and the second to contact “30” of the generator. If the device does not beep, replace the wire. Next, check the ground by connecting the tester probes to the negative terminal of the battery and the generator housing. If there is no contact, check all the negative connections of the battery to the body and engine. Clean and lubricate contacting surfaces (wire lugs, bolts, washers, nuts) anti-corrosion agent(WD-40 or similar). It is also worth checking the condition of the battery terminals and the reliability of their connection to the wires. In any case, it is better to remove the wires, clean their tips and battery terminals with fine sandpaper and treat them with WD-40.
- Using a multimeter (voltmeter), measure the voltage at the battery terminals. The device should show 11.7–12.6 V. Then start the engine and repeat the measurements. When the generator is working, the voltage at the terminals should be 13.9–14.5 V.
If the voltage is lower, the cause must be sought in the rectifier, stabilizer or generator windings. In any case, further diagnostics require dismantling the generator.
Video: tensioning the alternator belt
Dismantling the generator
To remove generator set, necessary:
- Open the hood, disconnect the wires from the battery.
- Using a 17 mm wrench (for units type 9412.3701 a 13 mm wrench), completely unscrew the nut securing the device to the adjusting bracket.
- Move the generator towards the cylinder block.
- Remove the drive belt.
- Disconnect the terminal block from the device.
- Remove the protective cap from terminal “30” and use a 10 mm wrench to unscrew the nut securing the wire terminals. Disconnect the wires and take them to the side.
- Using a 13 mm wrench, unscrew the nut securing the unit housing to the bracket on the cylinder block. Remove the bolt from the bracket.
- Remove the generator by lowering it under the car.
Video: removing the generator
Checking the rectifier module, stabilizer and windings
To diagnose the rectifier, regulator and windings, you will need a multimeter and two pieces of wire with clamps. To check, you need to carry out the following work:
- Switch the multimeter to resistance measurement mode.
- Connect the positive probe of the device to terminal “30” of the device, and the negative probe to its “ground”. The resistance between these points may vary, but if it is close to zero, the windings may be shorted to ground or one of the rectifier diodes may be broken.
- Check the positive diodes of the rectifier for breakdown. To do this, connect the positive probe to terminal “30”, and the negative probe to any of the bolts that secure the rectifier. If the resistance value tends to zero, a breakdown is evident.
- Check negative diodes. To do this, the positive probe of the device must be connected to one of the rectifier fixing bolts, and the negative probe to the device body. Here, too, the resistance should not be close to zero.
- Check whether the rotor winding is shorted to the housing. Attach the tester probes to the rotor slip ring and the generator housing. If current passes between them, the armature needs to be replaced.
- Remove the voltage regulator by unscrewing two screws with a Phillips screwdriver.
- Remove the device complete with brush assembly from the generator housing.
- Assess the condition of the brushes and their mobility. They must be intact, move freely in the brush holders and protrude from them by at least 5 mm.
- Connect the wire from the positive terminal of the battery to terminal “B” of the regulator, and connect the wire from the negative terminal of the battery to terminal “A”. Switch the multimeter to voltmeter mode and measure the voltage on the regulator brushes. If there is no voltage, the regulator is faulty and must be replaced.
Generator repair
If problems are detected with the rectifier module or windings, the faulty part must be replaced. To do this you will need:
- Use a screwdriver to secure the generator impeller by resting one of the blades against it.
- Using a socket or 19 mm socket wrench, unscrew the pulley fixing nut.
- Remove the pulley elements from the device shaft.
- Using a Phillips screwdriver, unscrew the four bolts securing the front and rear covers. Remove the connecting pins.
- Leaning the front cover of the unit against a wooden or plastic block, lightly hit the shaft with a rubber hammer or mallet to knock the cover off the stator.
- Remove the front cover and the bushing located under it.
- Place the back cover of the generator in a vice (you can use two bars) and carefully knock the rotor out of it.
- Using an 8 mm socket, unscrew the three nuts that secure the rectifier module and winding terminals. Remove the bolts and windings from the housing.
- Using a 10 mm socket, unscrew the generator output nut “30” and remove the washer. Remove the rectifier module.
- Replace faulty parts with new ones. Reassemble the generator in reverse order.
Video: repair of VAZ 2107 generator
A few more words about the voltage regulator
Finally, it should be added that in cars such as the VAZ 2107, it is necessary to check the voltage supplied from the generator to the battery with a voltmeter at least once a month. We discussed how to do this above. The fact is that automotive device, showing the battery charge level, very often lies, showing us the norm, while the voltage at the battery terminals during engine operation is lower or higher than it. And here the danger is not so much the lack of charging as the so-called overcharging. It occurs when the voltage regulator malfunctions and is characterized by the supply of voltage to the battery, the value of which is greater than prescribed.
I personally had to deal with similar problem. It all started with the fact that comparatively new battery stopped holding charge. When using the car every day, it started without problems. But as soon as the car sat for a week, the starter made it clear with its clattering that it would not work without the “lighting” wires. A visit to an auto electrician showed that the outermost “bank” of the battery was swollen. This means that the electrodes in it are short-circuited. Why did they suddenly close if everything was in order? After starting the engine, the electrician measured the voltage at the battery terminals. The voltmeter showed 17.2 V, which is unacceptable for this battery model. At the same time, the device on the panel faithfully gave out the “norm”. Checking the voltage regulator confirmed the auto electrician's diagnosis. It was faulty. Replacing the device took no more than half an hour. And the repairs, it would seem, didn’t cost much. The battery, of course, had to be replaced, since with the onset of cold weather it began to discharge even faster.
About six months later, I accidentally noticed that the car’s headlights began to shine noticeably brighter. Then one of the headlights burned out. A week later, another one burned down. Without waiting for the battery to swell again, I decided to carry out diagnostics and repairs myself. Armed with a multimeter, I went to the garage. The measurement results again showed that the voltage regulator had failed. This time the generator produced 15.6 V. I no longer went to the electrician. I removed the generator myself, replaced the regulator and installed everything in place. The control voltage measurement showed 14.2 V. After that incident, I regularly measure the voltage twice a week. More than a year has passed and everything is back to normal.
Unfortunately, the VAZ 2107 cannot be called reliable car. But it still has one advantage - simplicity of design. Therefore, it is not at all necessary to contact specialists if minor malfunctions occur.
Good day, dear reader. In this article, I will tell you as simply as possible about the operating principle of the VAZ 2109 - 2114 generator and about the reasons why the generator does not charge. To to the common man, who did not study electrical engineering, everything was clear, I will not go deep into the physics of what is happening and use scientific terms, but I will explain everything, as they say, “on the fingers.” So, let's begin!
The operating principle of the VAZ 2109 - 2114 generator.
In order to understand why on the VAZ 2109 - 2114 the generator gives little charge or does not charge at all, you need to understand how it works and know the principle of its operation.
The generator consists of five main parts shown in the figure below: armature - 5, stator - 6, relay-regulator paired with brushes - 10, diode bridge- 9, body - 3.7.
The operating principle is as follows:
- from battery to diode bridge (9) there is a positive wire and a diode bridge (9) connected to ground through the housing (3,7) generator
- voltage across diode bridge (9) served to the stator (6) generator and a magnetic field appears in the stator
- when the car starts, the engine, using a belt drive, turns the rotor (5) generator
- in the rotor (5) , rotating in the magnetic field of the generator (6) current appears
- current is removed from the rotor by brushes (10) and through a relay - regulator (10) is supplied to the car battery.
Failure to comply with any of the points leads to a malfunction of the VAZ 2109 - 2114 generator.
Reasons why the VAZ 2109 - 2114 generator does not charge.
To find the reason why the VAZ 2109 2114 generator does not work or does not charge well, you need to check for serviceability each of the points above that describe the operation of the generator.
Point one: the diode bridge does not receive positive voltage from the battery.
The cause of the malfunction in this case may be the wire itself or its connection to the diode bridge or battery. Try cleaning the connection terminals, and if that doesn’t help, test the wire.
Poor contact with the negative wire is not considered, since in this case the engine would not start at all.
Point two: diode bridge and generator stator.
After checking the diode bridge, if it is working properly, we ring the stator winding. To do this, select the continuity mode on the multimeter and apply the probes to the first and second contacts of the stator, and then to the first and third.

Point three: VAZ 2109 - 2114 alternator belt.
On the carburetor version of the VAZ there was a thin V-belt, and on injection models There is a wide belt with veins, but the principle of operation does not change. Charging may not proceed well due to belt slippage. This malfunction is manifested by a strong belt whistle. The belt may also start to whistle when you turn on energy consumers such as headlights, heated glass, stove fan, etc. If you hear the belt whistling, try to replace it at soon because This is one of the reasons why the VAZ 2109 -2114 generator does not charge well.
Point four: generator armature VAZ 2109 -2114.
There should be no breaks in the armature, as well as in the stator. Test it by placing the multimeter probes on the brush tracks.

If the anchor does not ring, it should be replaced.
Point five: brushes with a relay-controller.
The brushes of the VAZ 2109 -2114 generator wear off over time on the armature tracks. If their length is less than 5 millimeters, then they are not able to press tightly against the anchor, thereby not charging the vase battery.

But it happens that the relay-regulator fails before the brushes are worn out. To check it you will need:
- 12 volt light bulb
- car battery
- two 1.5 volt batteries
- several wires
We connect the light bulb and battery to the relay regulator as shown in the figure below. In this case, the lamp should be on.

Now we add two batteries to the circuit, as in the figure below. The light should not be on now.

If the light comes on in both cases - the relay - the regulator needs to be changed.
Now you know all the main reasons for the malfunction of the VAZ 2109 - 2114 generator. If you have questions, leave them in the comments!
Greetings to all motorists! Unfortunately, modern car the thing is not trouble-free, and periodically throws up surprises. One of them is that charging in progress to the battery. Sometimes this problem is easily solved, but sometimes the help of specialists is required. But before treating the consequences, you need to find the cause. So let's look at them.
Reasons why the battery stops charging
There are several reasons why the battery is not charging:
- stretching or breakage of the generator belt;
- oxidation of battery terminals;
- oxidation or breakage of generator wires;
- problems with the generator.
Let's take a closer look at how to diagnose and, if possible, eliminate these causes. Although, sometimes the problem may be in the battery itself. Therefore, when the charge lamp on the dashboard is on, and a visual inspection did not help to find the fault, you can use the method of elimination.
To do this, you will need to find a working battery and replace it with yours. In this case, the size of the batteries does not matter. If the charge goes on, then the problem is in the battery, if not, most likely there is a problem with the generator.
The battery may stop charging for various reasons. But most often this is sulfation of the plates, which occurs after deep discharges
, well, or from old age. By the way, in advanced cases, electrolyte replacement may be required. In general, to combat sulfation there are several methods based on cyclic charging and discharging of the battery using a charger.

Often the reason for the lack of charge is oxidation of the terminals. This is very easy to determine. You need to open the hood and look at the current output contacts. If they are covered with a strong mushy coating, it means that the terminals have oxidized.
This usually happens when cracks appear on the battery case in the area of the positive and negative terminals. Electrolyte vapors come out of them, come into contact with lead and oxidize, forming an unpleasant coating.
The issue is resolved in several stages:
- the terminals are thoroughly cleaned;
- the cause of oxidation is determined and eliminated;
- The terminals are dressed and a special anti-oxidation compound is applied to them.
Most often, oxidation problems occur in inexpensive batteries, as well as in cases where the battery is often removed from the vehicle. Simply when removing the terminals from the battery terminals, they can be loosened.
When oxide appears, one more point needs to be taken into account - The electrolyte level in the banks may have dropped below level. Therefore, you should check it and, if necessary, raise it. At the same time, remember that you need to top up the battery with distilled water.

If with belt problem– the generator will not charge. Therefore, when visual inspection, it is advisable to examine it carefully. Even if the belt is intact, it does not mean that it is in order.
Typical problems:
- belt break;
- loosening the tension;
- microcracks;
- pollution.
If the belt breaks, everything is clear - it needs to be changed. But, as stated above, he could simply stretch out. Therefore, we check its tension, and at the same time its cleanliness. If it is wet or covered in oil, when the pulleys rotate, the belt may slip. As a result, the light on the dashboard is on, and the generator does not work.
Problems in the on-board circuit
Along the way, you need to check the integrity of all wiring. Sometimes problems can lie precisely in the flight chain. We start from the generator:
- all connections must be well tightened;
- There should be no oxide and especially soot.
You should immediately remove the brushes from the generator. Their development is another common problem. Not allowed:
- different output, i.e. when one is longer than the other;
- The brush size is less than 5-7 mm.
In addition, you need to check the weight on the body. Poor contact in this place is another reason why the battery charge lamp may light up.
Generator malfunction

A car generator can throw up surprises from time to time. Unfortunately, brush wear is not the only reason why the charge check light may be on.
Possible malfunctions:
- damage to the regulator relay;
- problems with the diode bridge;
- broken stator winding.
Determining that something is wrong with the generator is quite simple. For this you will need a multimeter. In this case, you can immediately determine how charged the battery is. If the reading with the engine off is 12.6-12.7V, this indicates a full charge. 12.2-12.4 – charging about 50%. Less than 11.7 – the battery is completely discharged.
Methods for checking the generator:
- when the engine is started, the voltage at the battery contacts should be about 14.7V. If it is very different, there is a problem with the generator;
- If you remove the terminal from the battery while the engine is running, it should continue to work. Otherwise, there is a malfunction with the generator;
- When the car is running, there is a clearly noticeable lack of energy.
To accurately diagnose and cure generator malfunctions, you need to have at least minimal knowledge of electrical engineering. If they are not there, it makes sense for you to seek advice from a specialist - you will definitely save time.
So, the problem of lack of charging can be either the most trivial, which can be easily fixed with your own hands, or more serious. To eliminate malfunctions arising from improper operation, you need to follow two rules.
Firstly, periodically charge the battery, and secondly, monitor its external condition. And don’t forget to carry a spare alternator belt and brushes with you.
That's all, I hope the article was useful.
There are two energy sources in a car. Battery and generator. Moreover, the generator is the main one, since it is able to charge the battery while driving. In the most extreme, desperate cases, battery energy can be used. According to various estimates, in the most optimistic case, you can drive about 100 km on a flat road on a battery. In this case, the headlights should not be turned on, the heater should not be turned off, and, preferably, the ambient temperature should be low and the speed should be constant so that the radiator fan does not turn on. And the battery will be fully charged. Only in this case all the energy will go into the “spark”.
If the VAZ 2107 engine (injector) is running and there is no battery charge, there may be many reasons.
Let's start with the generator. On a VAZ 2107 (carburetor), there is a generator alternating current(model 372.3701), an AC rectifier is built into the design. This is a synchronous three-phase motor.
The reasons why the battery is not charging can be common, regardless of whether you have a carburetor or an injector. Let's consider the reasons when the generator is to blame, that is, there is no voltage at its terminals. This can happen because the rectifier bridges (diode), the winding and many other reasons have burned out.
The VAZ 2107 (injector) is equipped with a figure-eight generator 5142.3771. Its difference from a conventional generator on a VAZ 2107 is that it produces a higher current, not 55 A, but about 80-90 A per hour, since the injector requires more electricity, it is more modern and has a higher power density. The figure shows a generator producing a rectified current of 80 A at a voltage of 14 V.
Attention! Before claiming that charging has disappeared specifically in the VAZ 2107 generator, check:
- If there is incoming voltage at the generator, this does not yet prove that it is the generator that is damaged and there is no outgoing current. After all, diodes supply current to the excitation winding of the generator. In this case, the battery charge lamp will light up on the dashboard.
- It is also worth measuring the voltage in the network with a tester. If it is below 12 V, then most likely there is a short circuit somewhere, and in this case the wiring may heat up intensely.
- You should check the generator belt, or rather, its tension. If it is loosely tensioned, then instead of driving the generator rotor, the belt slides along it itself, since there is no contact.
- The generator charging relay has failed. We need to talk about this separately.
The charging relay on the VAZ 2107 (injector) is located in the same housing with the brush mechanism, and its task is to stabilize the output voltage. Several years ago there were relays that were stamped into printed circuit board, and were located under the instrument panel and were non-separable. In the figure, the relay is indicated by an arrow. In everyday life, due to its characteristic shape, it is called a “tablet”.
Now, with the development of microelectronics, the printed circuit board is successfully replaced by a semiconductor relay. The sizes have become smaller, and there are no problems with installation.
How to check if the charging relay is working?
For this:
- open the hood;
- start the engine;
- Using a voltmeter, we measure the voltage at the battery terminals, which, of course, is the output from the generator. If the voltage is higher than 14.8 V or less than 13.2 V, fluctuates beyond these limits - the charging relay is faulty.
What reasons can cause the charging relay to fail?
Only two, not counting severe damage to the generator housing:
- “planned” wear of brushes, which are graphite electrodes. In this case, the contact is gradually broken and disappears completely. As a result, no current is supplied to the excitation winding of the generator, and it does not work;
- A short circuit has occurred in the electrical circuit itself, while there is an output current on the generator and battery, but it is higher than 14.8 V.
The charging relay is located on the generator, on its back cover, and, no matter what shape and color the “tablet” is, a yellow wire comes out of the generator body to it. The relay is located so that it can be replaced without removing the generator. But for convenience, the pictures show work on a removed generator.
How to replace the charging relay?

If after taking these measures there is no effect, you need to look for the cause in the generator, we’ll talk about this next time. At the same time, remember that if you are removing a generator, then either you have decent knowledge in electrical engineering, or you have someone to give it to. There is no third option, especially if you have an injector.
In conclusion, let me tell you about several other reasons for the lack of charging or imitation, and also give advice:
- If you have a VAZ 2107 injector, then it is strictly not recommended to reset the battery terminal for various “checks” while the engine is running, and especially to allow strangers near the hood for this purpose. This is very harmful to electronic “brains”.
- It is advisable for those who like to “light up” to be able to say a firm “no” if you have a VAZ 2107 injector.
- On dashboard The connectors are not soldered to the board, but riveted. That's why some cars are in the cold for now cold interior, there is no contact with the charging lamp. It lights up, simulating a lack of current from the generator. After the interior has warmed up, contact is restored and the lamp goes out.
- The next reason for those who like to go to the car wash in the cold. When water gets into the relay and brush assembly and freezes there, there is no charging. The solution is to heat it with any powerful hairdryer.
Sooner or later, the VAZ-2114 generator will stop providing the necessary charging, which will create a lot of troubles and problems. It’s just that at one point the car may not start because this unit has not been properly charged. This article tells you how to find and fix a problem in the form of fully charged generator
Video about the reasons for the lack of charging on the battery
The video will tell you how to disassemble and repair a car generator, and also tell you about some of the subtleties and nuances.
Generator device
Before identifying generator malfunctions, it is necessary to have some understanding of its design and structure. So, let's look at what main parts it consists of.
On models of the VAZ 2113-2114-2115 family, a generator marked 37.3701 is installed.
VAZ generator device
Generator 37.3701: 1 – side cover slip rings; 2 – rectifier block; 3 – rectifier block valve; 4 – screw for fastening the rectifier unit; 5 – contact ring; 6 – rear ball bearing; 7 – capacitor; 8 – rotor shaft; 9 – output “30” of the generator; 10 – output “61” of the generator; 11 – voltage regulator; 12 – terminal “B” of the voltage regulator; 13 – brush; 14 – stud securing the generator to the tension bar; 15 – pulley with fan; 16 – rotor pole piece; 17 – spacer sleeve; 18 – front ball bearing; 19 – drive side cover; 20 – rotor winding; 21 – stator; 22 – stator winding; 23 – rotor pole piece; 24 – buffer sleeve; 25 – bushing; 26 – clamping sleeve
Now, let's look at the design of the generator in a disassembled state.

Generator disassembly diagram
Generator parts 37.3701: 1 – capacitor; 2 – voltage regulator assembled with brush holder; 3 – terminal block for additional diodes; 4 – insulating bushings; 5 – rectifier block; 6 – contact bolt; 7 – stator; 8 – rotor; 9 – spacer sleeve; 10 – inner bearing mounting washer; 11 – drive side cover; 12 – pulley; 13 – outer bearing mounting washer; 14 - pinch bolt; 15 – front rotor ball bearing; 16 – bushing; 17 – cover from the side of the slip rings; 18 – buffer sleeve; 19 – clamping sleeve.
Why the generator does not charge (main reasons)
If the generator has stopped providing adequate charge to the battery, as well as in the on-board network, when the engines are running, there are only two reasons for this. Let's look at which ones exactly.
Device overload

Additional equipment draws energy. This is what generator overload looks like
This effect is often caused by connecting additional lighting and other devices with high energy requirements. In this case, the factory generator cannot cope with its task and begins to lose efficiency, and ultimately may fail.
Battery and alternator mismatch

Battery and alternator mismatch
When installing additional equipment, many car enthusiasts make an irreparable mistake and install on their “ iron horse» Battery more power, without increasing the generator power. Failure of power characteristics between nodes leads to the fact that the generator cannot provide proper charging of the battery, which subsequently reduces the performance of the first one.
troubleshooting
To find the problem you will have to delve into the electrical part of the car. There is nothing complicated here, but you will have to work hard and learn some design features auto electricians. Let's consider what reasons can serve bad charging and what you should pay special attention to:
- Weak contact connections.
- Breaks in part of the winding.
- Short circuit on the rotor.
- Mechanical failures.
- Stator short circuit.
What to do if there is no required voltage (solution methods for VAZ-2114)
Basically, the methods for solving the problem are banal - . But, due to high cost parts, most motorists try to repair the unit. So let's consider possible options solving the problem of incomplete charging or lack of charging on the generator side.
Weak contact connections

Damage contact group leads to charging problems
If the contacts are loose, this may be due to contamination or corrosion. To eliminate problems, you need to clean them with a sharp object or a special solution. Suitable for lubricating and protecting external contacts copper paste . The internal contact connection is quite difficult to protect, so they are simply cleaned and installed in the seat.
Breaks in part of the winding

Measurement to detect problems with the winding
Breaks in the winding are usually treated by replacing the winding. As practice shows, it is not cost-effective to rewind this unit, so motorists are looking for an alternative, which is a supported part.
Short circuit on the rotor

Diagnostic operations on the rotor
A short circuit in the on-board network that ends on the rotor can be treated by replacing the faulty part, but most motorists still agree that the generator will have to be replaced.
Mechanical breakdowns

Generator shaft deformation is one of the mechanical failures
Mechanical failure usually cannot be repaired and the damaged part is replaced with a new one. This is considered the most the best option resolving the issue. In terms of price, it may seem a little expensive, but cheaper than replacing the entire generator.
Stator short circuit

Diagnostic operations for rotor performance
Stator short circuit can also be treated by replacing the part or installing a new generator on the car. This is necessary so that the effect does not recur and the stator does not have to be changed again. When choosing new spare part We recommend that you read the material: ““.
Video about troubleshooting in a situation where the generator does not charge
conclusions
Finding and eliminating the reasons why the generator on a VAZ-2114 has stopped charging is not as easy as it seems at first glance, but it’s still possible to do it yourself. Not every motorist can fix problems on their own, so it is recommended to contact a car service that can fix the problems.