Engines are used in many areas of technology. In order for the motor rotor to rotate, a rotating magnetic field must be present. In conventional DC motors, this rotation is carried out mechanically by means of brushes sliding over a manifold. This creates sparks and, in addition, due to the friction and wear of the brushes, these motors require constant maintenance.
Thanks to the development of technology, it has become possible to generate a rotating magnetic field electronically, which has been embodied in brushless direct current motors (BDCM).
Device and principle of operation
The main elements of the BDPT are:
- rotor on which permanent magnets are attached;
- stator on which the windings are installed;
- electronic controller.
By design, such an engine can be of two types:
with an internal rotor (inrunner)

outrunner
In the first case, the rotor rotates inside the stator, and in the second, the rotor rotates around the stator.
Inrunner type motor used in the case when it is necessary to obtain high rotational speed. This motor has a simpler standard design that allows a fixed stator to be used to mount the motor.
Outrunner engine suitable for high torque at low rpm. In this case, the motor is mounted using a fixed axle.
Inrunner type motor- high revs, low torque. Outrunner engine- low revs, high torque.
The number of poles in the DC motor can be different. Some of the characteristics of the motor can be judged by the number of poles. For example, a motor with a 2-pole rotor has a higher speed and lower torque. Motors with an increased number of poles have a higher torque, but a lower number of revolutions. By changing the number of rotor poles, you can change the speed of the engine. Thus, by changing the design of the engine, the manufacturer can select the necessary engine parameters in terms of torque and speed.
Office of the BDPT

Speed regulator, appearance
To control the brushless motor, use special controller - motor shaft speed regulator direct current. Its task is to generate and supply the required voltage to the right winding at the right time. In the controller for devices powered from a 220 V network, an inverter circuit is most often used, in which current is converted at a frequency of 50 Hz, first into direct current, and then into signals with pulse width modulation (PWM). Powerful electronic switches on bipolar transistors or other power elements are used to supply the supply voltage to the stator windings.
The power and speed of the engine is adjusted by changing the duty cycle of the pulses, and, consequently, by the effective value of the voltage supplied to the stator windings of the engine.

Schematic diagram of the speed controller. K1-K6 - keys D1-D3 - rotor position sensors (Hall sensors)
An important issue is the timely connection of electronic keys to each winding. To ensure this the controller must determine the position of the rotor and its speed... To obtain such information, optical or magnetic sensors can be used (for example, Hall sensors), as well as reverse magnetic fields.
More common use Hall sensors, which react to the presence of a magnetic field... The sensors are placed on the stator so that the rotor's magnetic field acts on them. In some cases, the sensors are installed in devices that allow changing the position of the sensors and, accordingly, adjusting the timing.
Rotor speed controllers are very sensitive to the strength of the current passing through it. If you pick up a rechargeable battery with a higher output amperage, the regulator will burn out! Choose the right combination of characteristics!
Advantages and disadvantages
Compared to conventional engines, BDPTs have the following advantages:
- high efficiency;
- high performance;
- the ability to change the speed;
- no sparking brushes;
- low noise, both in audio and high-frequency ranges;
- reliability;
- ability to withstand torque overload;
- excellent ratio of size and power.
The brushless motor is highly efficient. It can reach 93-95%.
The high reliability of the mechanical part of the detection unit is explained by the fact that it uses ball bearings and does not have brushes. The demagnetization of permanent magnets is rather slow, especially if they are made using rare earth elements. When used in a current protection controller, the service life of this unit is quite long. Actually the service life of the BCD motor can be determined by the service life of the ball bearings.
The disadvantages of BDPT are the complexity of the control system and high cost.
Application
The areas of BDTP application are as follows:
- creating models;
- medicine;
- automotive industry;
- Oil and gas industry;
- Appliances;
- military equipment.
 Usage DB for aircraft models gives a significant advantage in terms of power and dimensions. Comparison of the conventional brushed engine of the Speed-400 type and the BDTP of the same class Astro Flight 020 shows that the engine of the first type has an efficiency of 40-60%. The efficiency of the second engine under the same conditions can reach 95%. Thus, the use of the OBD makes it possible to almost double the power of the power section of the model or its flight time.
Due to the low noise and lack of heating during operation, BDPTs are widely used in medicine, especially in dentistry.
In cars, such engines are used in window lifters, electric wipers, headlight washers and electric seat-lift controls.
Lack of collector and sparking of brushes allows you to use the database as elements of locking devices in the oil and gas industry.
As an example of using the OBD in household appliances, we can mention the LG direct drum washing machine. This company uses an Outrunner type BJTP. There are 12 magnets on the rotor of the motor, and 36 inductors on the stator, which are wound with a wire with a diameter of 1 mm on cores made of magnetic conductive steel. The coils are connected in series, 12 pieces per phase. The resistance of each phase is 12 ohms. A Hall sensor is used as a rotor position sensor. The motor rotor is attached to the washing machine tank.
 This engine is widely used in hard drives for computers, which makes them compact, in CD and DVD drives and cooling systems for microelectronic devices and more.
In addition to small and medium-sized DBs, large DBPTs are increasingly used in the heavy-duty industry, the ship and military industries.
Large-capacity OBDs are designed for the US Navy. For example, Powertec has developed a 220 kW BDTP with a speed of 2000 rpm. The engine torque reaches 1080 Nm.
In addition to these areas, DBs are used in projects of machine tools, presses, lines for processing plastics, as well as in wind power and the use of tidal wave energy.
Specifications
Main characteristics of the engine:
- rated power;
- maximum power;
- maximum current;
- maximum operating voltage;
- maximum speed(or Kv coefficient);
- winding resistance;
- lead angle;
- operating mode;
- overall weight characteristics engine.
The main indicator of the engine is its rated power, that is, the power generated by the engine during a long time of its operation.
 Maximum power- This is the power that the engine can give over a short period of time without collapsing. For example, for the Astro Flight 020 brushless motor mentioned above, it is 250 watts.
Maximum current... For Astro Flight 020 it is 25 A.
Maximum operating voltage- the voltage that the motor windings can withstand. The Astro Flight 020 is set to an operating voltage range of 6 to 12 V.
Maximum engine speed... Sometimes the Kv coefficient is indicated in the passport - the number of engine revolutions per volt. For Astro Flight 020 Kv = 2567 rpm. In this case, the maximum speed can be determined by multiplying this factor by the maximum operating voltage.
Usually winding resistance for motors, it is tenths or thousandths of Ohm. For Astro Flight 020, R = 0.07 ohms. This resistance affects the efficiency of the BDPT.
Lead angle represents the advance of switching the voltages on the windings. It is associated with the inductive nature of the winding resistance.
The operating mode can be long-term or short-term. In long-term operation, the engine can run for a long time. In this case, the heat generated by it is completely dissipated and it does not overheat. In this mode, motors operate, for example, in fans, conveyors or escalators. Short-time mode is used for devices such as an elevator, electric shaver. In these cases, the engine runs for a short time and then cools down for a long time.
The engine passport lists its dimensions and weight. In addition, for example, for engines intended for aircraft models, the landing dimensions and shaft diameter are given. In particular, the following specifications are given for the Astro Flight 020 engine:
- the length is 1.75 ";
- the diameter is 0.98 ";
- the shaft diameter is 1/8 ”;
- weight is 2.5 ounces.
Conclusions:
- In simulation, in various technical products, in industry and in defense technology, BDPTs are used, in which a rotating magnetic field is generated by an electronic circuit.
- By their design, BDPTs can be with an internal (inrunner) and external (outrunner) rotor location.
- Compared to other motors, BDPT have a number of advantages, the main of which are the absence of brushes and arcing, high efficiency and high reliability.
One of the reasons why designers are interested in brushless electric motors is the need for high-speed motors with small dimensions. Moreover, these motors have very precise positioning. The design has a movable rotor and a fixed stator. There is one permanent magnet on the rotor or several located in a certain sequence. On the stator there are coils that create a magnetic field.
One more feature should be noted - brushless electric motors can have an anchor located both inside and on the outside. Consequently, the two types of construction can have specific applications in different fields. When the anchor is located inside, it turns out to achieve a very high rotation speed, therefore, such motors work very well in the design of cooling systems. In the event that an external rotor drive is installed, very precise positioning can be achieved as well as high overload resistance. Very often, such motors are used in robotics, medical equipment, and frequency-controlled machine tools.
How motors work
In order to set in motion the rotor of a brushless DC motor, a special microcontroller must be used. It cannot be started in the same way as a synchronous or asynchronous machine. With the help of a microcontroller, it turns out to turn on the motor windings so that the direction of the magnetic field vectors on the stator and armature is orthogonal.

In other words, with the help of a driver, it turns out to regulate which acts on the rotor of a brushless motor. To move the armature, it is necessary to carry out the correct commutation in the stator windings. Unfortunately, smooth rotation control is not possible. But you can very quickly increase the rotor of the electric motor.
Differences between brushed and brushless motors
The main difference is that there is no winding on the rotor on brushless motors for models. In the case of collector motors, there are windings on their rotors. But permanent magnets are installed on the stationary part of the engine. In addition, a collector of a special design is installed on the rotor, to which the graphite brushes are connected. With their help, voltage is supplied to the rotor winding. The principle of operation of a brushless electric motor is also significantly different.
How the collector machine works
To start the collector motor, you will need to apply voltage to the excitation winding, which is located directly on the armature. In this case, a constant magnetic field is formed, which interacts with the magnets on the stator, as a result of which the armature and the collector attached to it rotate. In this case, power is supplied to the next winding, the cycle is repeated.

The rotor speed depends directly on how intense the magnetic field is, and the latter characteristic depends directly on the magnitude of the voltage. Therefore, in order to increase or decrease the speed, it is necessary to change the supply voltage.
To implement reverse, you only need to change the polarity of the motor connection. For such control, you do not need to use special microcontrollers; you can change the speed using a conventional variable resistor.
Features of brushless machines
But control of a brushless electric motor is impossible without the use of special controllers. Based on this, we can conclude that motors of this type cannot be used as a generator. For efficient control, the position of the rotor can be monitored using multiple Hall sensors. With the help of such simple devices, it is possible to significantly improve the characteristics, but the cost of the electric motor will increase several times.
Brushless motors start

It makes no sense to make microcontrollers on your own, a much better option would be to buy a ready-made, albeit Chinese one. But you must adhere to the following recommendations when choosing:
- Observe the maximum permissible amperage. This parameter will definitely come in handy for various types of drive operation. The characteristic is often indicated by manufacturers directly in the name of the model. Very rarely, the values are indicated, typical for peak modes, in which the microcontroller cannot work for a long time.
- For continuous operation, the maximum supply voltage must also be taken into account.
- Be sure to consider the resistance of all internal microcontroller circuits.
- It is imperative to take into account the maximum number of revolutions that is typical for the operation of this microcontroller. Please note that it will not be able to increase the maximum speed, as the limitation is made at the software level.
- Cheap models of microcontroller devices have pulses in the range of 7 ... 8 kHz. Expensive copies can be reprogrammed, and this parameter is increased by 2-4 times.
Try to select microcontrollers in all respects, as they affect the power that an electric motor can develop.
How is it managed
The electronic control unit allows the commutation of the drive windings. To determine the moment of switching with the help of the driver, the position of the rotor is monitored by a Hall sensor installed on the drive.

In the event that there are no such devices, it is necessary to read the reverse voltage. It is generated in the stator coils that are not currently connected. The controller is a hardware and software complex, it allows you to track all changes and set the switching order as accurately as possible.
Three-phase brushless motors
A lot of brushless electric motors for aircraft models are powered by direct current. But there are also three-phase instances in which converters are installed. They make it possible to make three-phase pulses from a constant voltage.

The work takes place as follows:
- Coil "A" receives pulses with a positive value. To coil "B" - with a negative value. As a result, the anchor will begin to move. The sensors fix the offset and a signal is sent to the controller for the next commutation.
- Coil "A" is disconnected, and a positive pulse is applied to the winding "C". The commutation of the "B" winding does not undergo any changes.
- Coil "C" receives a positive impulse, and negative impulse goes to "A".
- Then the pair "A" and "B" comes into operation. They are supplied with positive negative pulse values, respectively.
- Then the positive impulse is again fed to the "B" coil, and the negative impulse to "C".
- At the last stage, coil "A" is turned on, to which a positive pulse is received, and a negative one goes to C.
And after that, the whole cycle is repeated.
Benefits of using

It is difficult to make a brushless electric motor with your own hands, and it is almost impossible to implement microcontroller control. Therefore, it is best to use ready-made industrial designs. But be sure to consider the advantages that the drive receives when using brushless motors:
- Significantly longer resource than collector machines.
- High level of efficiency.
- The power is higher than that of the brushed motors.
- The rotation speed is gaining much faster.
- No sparks are generated during operation, so they can be used in environments with a high fire hazard.
- Very easy operation of the drive.
- When working, you do not need to use additional components for cooling.
Among the disadvantages, one can single out a very high cost, if we also take into account the price of the controller. Even briefly turning on such an electric motor to check its operability will not work. In addition, repairing such motors is much more difficult due to their design features.
The operation of a brushless electric motor is based on electric drives that create a rotating magnetic field. Currently, there are several types of devices with different characteristics. With the development of technologies and the use of new materials characterized by a high coercive force and a sufficient level of magnetic saturation, it became possible to obtain a strong magnetic field and, as a consequence, valve structures of a new type, in which there is no winding on the rotor elements or a starter. The widespread adoption of semiconductor-type switches with high power and reasonable cost has accelerated the development of such designs, facilitated implementation, and eliminated many of the complexities of switching.
Principle of operation
Increased reliability, reduced cost and easier manufacturing are ensured by the absence of mechanical switching elements, rotor windings and permanent magnets. At the same time, an increase in efficiency is possible due to a decrease in friction losses in the collector system. The brushless motor can operate on AC or continuous current. The latter option is distinguished by a noticeable similarity with its characteristic feature is the formation of a magnetic rotating field and the use of a pulsed current. It is based on an electronic switch, which increases the complexity of the design.
Calculation of position
The generation of pulses occurs in the control system after a signal reflecting the position of the rotor. The degree of voltage and supply directly depends on the speed of rotation of the motor. A sensor in the starter detects the position of the rotor and provides an electrical signal. Together with the magnetic poles passing next to the sensor, the signal amplitude changes. There are also sensorless positioning techniques such as current flow points and transducers. PWM input terminals provide variable voltage retention and power control.
For a rotor with fixed magnets, no current is required, so there is no loss in the rotor winding. The brushless screwdriver motor features low inertia with no windings and no mechanized manifold. Thus, it became possible to use at high speeds without arcing and electromagnetic noise. High currents and easier heat dissipation are achieved by placing heating circuits on the stator. It is also worth noting the presence of an electronic built-in unit on some models.

Magnetic elements
The arrangement of the magnets can be different according to the dimensions of the motor, for example, at the poles or across the entire rotor. The creation of high-quality magnets with higher power is possible thanks to the use of neodymium in combination with boron and iron. Despite the high operating rates, the brushless motor for the permanent magnet screwdriver has some disadvantages, including the loss of magnetic characteristics at high temperatures. But they are more efficient and less lossy than machines with windings.
The pulses of the inverter determine the mechanism. With a constant supply frequency, the motor runs at a constant speed in an open system. Accordingly, the rotation speed changes depending on the level of the supply frequency.

Specifications
It operates in the set modes and has the functionality of a brush analogue, the speed of which depends on the applied voltage. The mechanism has many advantages:
- no changes in magnetization and current leakage;
- correspondence of the speed of rotation and the torque itself;
- the speed is not limited to affecting the collector and the rotor electrical winding;
- no need for a commutator and excitation winding;
- the magnets used are lightweight and compact;
- high torque;
- energy saturation and efficiency.

Usage
Direct current with permanent magnets is found mainly in devices with a power within 5 kW. In more powerful equipment, their use is irrational. It is also worth noting that magnets in motors of this type are particularly sensitive to high temperatures and strong fields. Induction and brush options are free from such disadvantages. Engines are actively used in car drives due to the absence of friction in the manifold. Among the features, it is necessary to highlight the uniformity of torque and current, which ensures a decrease in acoustic noise.
A bit of history:
The main problem with all engines is overheating. The rotor rotated inside some stator, and therefore the heat from overheating did not go anywhere. People came up with a brilliant idea: to rotate not the rotor, but the stator, which would be cooled by air during rotation. When such an engine was created, it became widely used in aviation and shipbuilding, and therefore it was called the Valve Motor. 
Soon, an electric analogue of the valve motor was created. They called it a brushless motor because it had no collectors (brushes). 
Brushless electric motors came to us relatively recently, in the last 10-15 years old... Unlike collector motors, they are powered by three-phase alternating current. Brushless motors operate efficiently over a wider rpm range and have more high efficiency... At the same time, the design of the engine is relatively simpler, it does not have a brush assembly that constantly rubs against the rotor and creates sparks. We can say that brushless motors practically do not wear out. The cost of brushless motors is slightly higher than brushed ones. This is due to the fact that all brushless motors are equipped with bearings and, as a rule, are of better quality.


Tests have shown:
Thrust with screw 8x6 = 754 grams,
Rotation speed = 11550 rpm,
Power consumption = 9 watt(without screw) , 101 watt(with screw),

Power and efficiency
Power can be calculated in this way:
1) Power in mechanics is calculated using the following formula: N = F * v where F is force and v is speed. But since the screw is in a static state, then there is no movement, except for the rotational one. If this motor is installed on an aircraft model, then it would be possible to measure the speed (it is equal to 12 m / s) and calculate the net power:
N useful = 7.54 * 12 = 90.48 watts
2) The efficiency of an electric motor is found by the following formula: Efficiency = N useful / N expended * 100%, where N costs = 101 watts
Efficiency = 90.48 / 101 * 100% = 90%
On average, the efficiency of brushless motors is real and fluctuates around 90% (the highest efficiency achieved by this type of motors is 99.68%
)
Engine characteristics:
Voltage: 11.1 volts
Turnover: 11550 rpm
Maximum amperage: 15A
Power: 200 watt
Traction: 754 grams (screw 8x6)

Conclusion:
The price of any thing depends on the scale of its production. Brushless motor manufacturers are multiplying like mushrooms after rain. Therefore, I would like to believe that in the near future the price of controllers and brushless motors will fall, as it fell on radio control equipment ... The possibilities of microelectronics are expanding every day, the size and weight of controllers are gradually decreasing. It can be assumed that in the near future, controllers will begin to be built directly into motors! Maybe we will live to see this day ...
Distinctive features:
- General information about BLDC motor
- Uses a power stage controller
- Sample program code
Introduction
This application note describes how to implement a brushless DC motor controller (BLDC motor) using position sensors based on the AT90PWM3 AVR microcontroller.
The high-performance AVR microcontroller core, which contains the power stage controller, allows the implementation of a high-speed brushless DC motor control device.
This document briefly describes the principle of operation of a brushless DC motor and details the touch mode control of the BLDC motor, and also describes the schematic diagram of the ATAVRMC100 reference design upon which this application note is based.
A software implementation with a software-implemented control loop based on a PID controller is also discussed. To control the switching process, it is assumed that only position sensors based on the Hall effect are used.
Operating principle
The fields of application of BLDC motors are constantly increasing, which is associated with a number of their advantages:
- The absence of a manifold assembly, which simplifies or even eliminates maintenance.
- Generates lower levels of acoustic and electrical noise compared to general-purpose brushed DC motors.
- Ability to work in hazardous environments (with flammable products).
- Good ratio of weight and size characteristics and power ...
Motors of this type are characterized by a small inertia of the rotor, because the windings are located on the stator. The commutation is electronically controlled. The switching moments are determined either by information from position sensors, or by measuring the back emf generated by the windings.
When controlled using sensors, the BLDC motor usually consists of three main parts: stator, rotor and Hall sensors.
The stator of a classic three-phase BLDC motor contains three windings. In many motors, the windings are divided into several sections to reduce the torque ripple.
Figure 1 shows the stator equivalent circuit diagram. It consists of three windings, each of which contains three elements connected in series: inductance, resistance and reverse emf.
Figure 1. Electrical circuit of the stator equivalent (three phases, three windings)
The BLDC motor rotor consists of an even number of permanent magnets. The number of magnetic poles in the rotor also affects the pitch size and torque ripple. The larger the number of poles, the smaller the rotation step size and the smaller the torque ripple. Permanent magnets with 1..5 pole pairs can be used. In some cases, the number of pole pairs increases to 8 (Figure 2).

Figure 2. Stator and rotor of a three-phase, three-winding BLDC motor
The windings are permanently installed and the magnet rotates. The BLDC motor rotor is characterized by a lighter weight relative to the rotor of a conventional universal DC motor, in which the windings are located on the rotor.
Hall Sensor
Three Hall sensors are built into the motor housing to assess the position of the rotor. The sensors are mounted at an angle of 120 ° to each other. With these sensors it is possible to carry out 6 different switchings.
Phase switching depends on the state of the Hall sensors.
The supply of supply voltages to the windings changes after changing the states of the outputs of the Hall sensors. When synchronized commutation is performed correctly, the torque remains approximately constant and high.
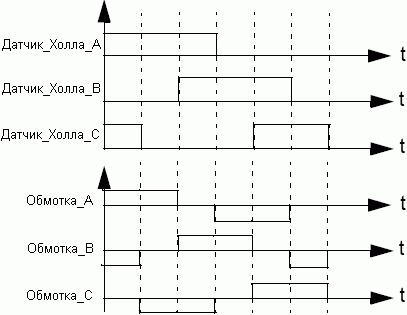
Figure 3. Signals from Hall sensors during rotation
Phase switching
In order to simplify the description of the operation of a three-phase BLDC motor, we will consider only its version with three windings. As shown earlier, the phase switching depends on the output values of the Hall sensors. When the voltage is correctly applied to the motor windings, a magnetic field is created and rotation is initiated. The most common and simplest switching control method used to control BLDC motors is an on-off circuit where the winding is either conducting or not. Only two windings can be energized at a time, while the third remains disconnected. Connecting the windings to the power rails causes an electric current to flow. This method is called trapezoidal switching or block switching.
A power cascade consisting of 3 half-bridges is used to control the BLDC motor. The power stage diagram is shown in Figure 4.

Figure 4. Power stage
According to the read values of the Hall sensors, it is determined which keys should be closed.
Table 1. Switching keys clockwise
For motors with multiple fields, the electrical rotation does not match the mechanical rotation. For example, in a four-pole BLDC motor, four electrical rotation cycles correspond to one mechanical rotation.
The power and speed of the engine depends on the strength of the magnetic field. The speed and torque of the motor can be controlled by changing the current through the windings. The most common way to control the current through the windings is to control the average current. For this, pulse width modulation (PWM) is used, the duty cycle of which determines the average value of the voltage across the windings, and, therefore, the average value of the current and, as a result, the speed. The speed can be adjusted from 20 to 60 kHz.
The rotating field of a three-phase, three-winding BLDC motor is shown in Figure 5.
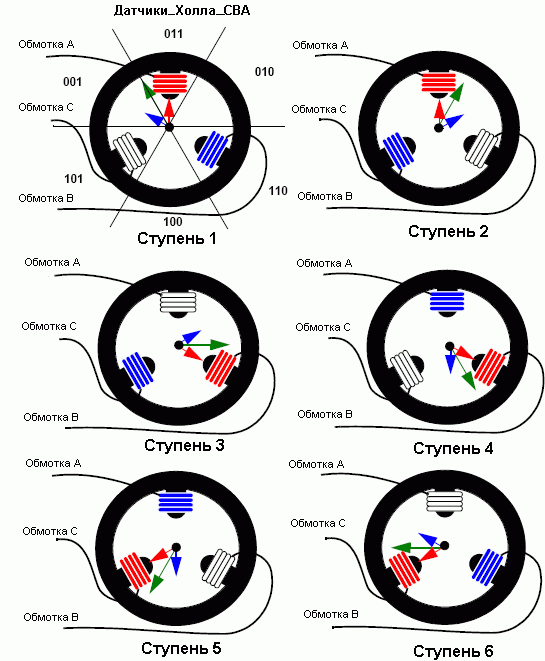
Figure 5. Switching stages and rotating field
The switching process creates a rotating field. At stage 1, phase A is connected to the positive power bus with the SW1 key, phase B is connected to the common one with the SW4 key, and phase C remains unconnected. Phases A and B create two magnetic flux vectors (shown by red and blue arrows, respectively), and the sum of these two vectors gives the stator magnetic flux vector (green arrow). The rotor then tries to follow the magnetic flux. As soon as the rotor reaches a certain position in which the state of the Hall sensors changes from "010" to "011", the motor windings are switched accordingly: phase B remains unpowered, and phase C is connected to common. This leads to the generation of a new stator flux vector (stage 2).
If we follow the switching scheme shown in Figure 3 and Table 1, we get six different magnetic flux vectors corresponding to six switching stages. Six stages correspond to one rotor revolution.
Starter kit ATAVRMC100
The schematic diagram is shown in Figures 21, 22, 23 and 24 at the end of the document.
The program contains a speed control loop using a PID controller. Such a regulator consists of three links, each of which is characterized by its own transmission coefficient: Kp, Ki and Kd.
Кп is the transmission factor of the proportional link, Ki is the transmission factor of the integrating link and Kd is the transmission factor of the differentiating link. The deviation of the set speed from the actual one (in Figure 6 is called the "error signal") is processed by each of the links. The result of these operations is added and fed to the engine to obtain the required speed (see Figure 6).

Figure 6. Block diagram of the PID controller
The coefficient Kp affects the duration of the transient process, the coefficient Ki allows suppressing static errors, and Kd is used, in particular, to stabilize the position (see the description of the control loop in the archive with the software for changing the coefficients).
Hardware Description
As shown in Figure 7, the microcontroller contains 3 power stage controllers (PSCs). Each PSC can be thought of as a Pulse Width Modulator (PWM) with two outputs. In order to avoid the occurrence of through current, the PSC supports the ability to control the non-overlapping delay of the power switches (see the AT90PWM3 documentation for a more detailed study of the PSC operation, as well as Figure 9).
The alarm input (Over_Current, overcurrent) is linked to PSCIN. The alarm input allows the microcontroller to disable all PSC outputs.

Figure 7. Hardware implementation
To measure current, you can use two differential channels with a programmable amplifier stage (Ku = 5, 10, 20 or 40). After selecting the gain, it is necessary to select the value of the shunt resistor for the most complete coverage of the conversion range.
The Over_Current signal is generated by an external comparator. The comparator threshold voltage can be adjusted using an internal DAC.
Phase switching must be carried out in accordance with the value at the outputs of the Hall sensors. DH_A, DH_B and DH_C are connected to the inputs of external interrupt sources or to three internal comparators. Comparators generate the same type of interrupts as external interrupts. Figure 8 shows how the I / O ports in the starter set are used.
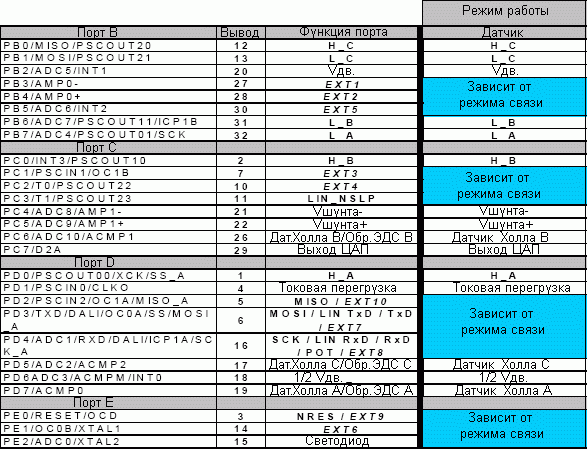
Figure 8. Using the I / O ports of the microcontroller (SO32 package)
VMOT (Vdv.) And VMOT_Half (1/2 Vdv.) Are implemented, but not used. They can be used to obtain information about the supply voltage of the motor.
Outputs H_x and L_x are used to control the power bridge. As stated above, they depend on the power stage controller (PSC), which generates the PWM signals. In this application, it is recommended to use center-aligned mode (see Figure 9) when the OCR0RA register is used to synchronize the ADC conversion trigger to measure current.

Figure 9. Oscillograms of the PSCn0 and PSCn1 signals in the center-aligned mode
- Time incl. 0 = 2 * OCRnSA * 1 / Fclkpsc
- Time incl. 1 = 2 * (OCRnRB - OCRnSB + 1) * 1 / Fclkpsc
- PSC period = 2 * (OCRnRB + 1) * 1 / Fclkpsc
Non-overlap pause between PSCn0 and PSCn1:
- | OCRnSB - OCRnSA | * 1 / Fclkpsc
The PSC block is clocked by the CLKPSC signals.
One of two methods can be used to feed PWM signals to the power stage. The first is to apply PWM signals to the upper and lower parts of the power stage, and the second is to apply PWM signals to the upper parts only.
Description of the software
Atmel has developed libraries to control BLDC motors. The first step in using them is configuring and initializing the microcontroller.
Microcontroller configuration and initialization
To do this, use the mc_init_motor () function. It calls the initialization functions of the hardware and software, and also initializes all motor parameters (direction of rotation, speed and stop of the motor).
Software implementation structure
After the configuration and initialization of the microcontroller, the engine can be started. Only a few functions are needed to control the motor. All functions are defined in mc_lib.h:
Void mc_motor_run (void) - Used to start the engine. The stabilization loop function is called to set the PWM duty cycle. The first switching phase is then carried out. Bool mc_motor_is_running (void) - Determination of the motor state. If "1", then the engine is running, if "0", then the engine is stopped. void mc_motor_stop (void) - Used to stop the motor. void mc_set_motor_speed (U8 speed) - Setting the speed set by the user. U8 mc_get_motor_speed (void) - Returns the user-specified speed. void mc_set_motor_direction (U8 direction) - Setting the direction of rotation "CW" (clockwise) or "CCW" (counterclockwise). U8 mc_get_motor_direction (void) - Returns the current direction of rotation of the motor. U8 mc_set_motor_measured_speed (U8 measured_speed) - Stores the measured speed in the measured_speed variable. U8 mc_get_motor_measured_speed (void) - Returns the measured speed. void mc_set_Close_Loop (void) void mc_set_Open_Loop (void) - Configuration of the stabilization loop: closed loop or open (see Figure 13).
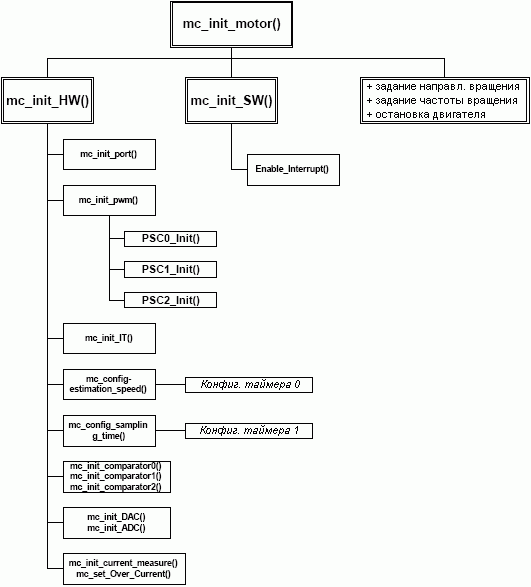
Figure 10. AT90PWM3 Configuration
Figure 11. Software structure
Figure 11 shows the four variables mc_run_stop (start / stop), mc_direction (direction), mc_cmd_speed (target speed), and mc_measured_speed (measured speed). They are basic programmatic variables that can be accessed through the previously described UDFs.
The software implementation can be viewed as a black box with the name "Motor control" (Figure 12) and several inputs (mc_run_stop, mc_direction, mc_cmd_speed, mc_measured_speed) and outputs (all control signals of the power bridge).
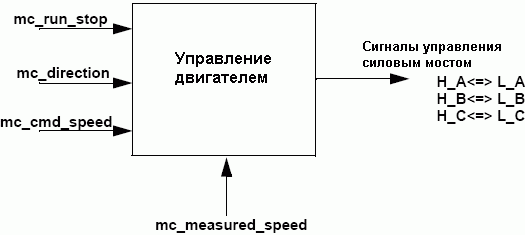
Figure 12. Main program variables
Most of the functions are available in mc_drv.h. Only a few of them depend on the type of engine. Functions can be divided into four main classes:
- Hardware initialization void mc_init_HW (void); Hardware initialization is completely done in this function. This is where the ports, interrupts, timers, and the power stage controller are initialized.
- Phase switching functions U8 mc_get_hall (void); Reading the state of the Hall sensors corresponding to six switching stages (HS_001, HS_010, HS_011, HS_100, HS_101, HS_110).
Interrupt void mc_hall_a (void); _interrupt void mc_hall_b (void); _interrupt void mc_hall_c (void); These functions are performed if an external interruption is detected (changing the output of the Hall sensors). They allow phase switching and speed calculation.
Void mc_duty_cycle (U8 level); This function sets the PWM duty cycle according to the PSC configuration.
Void mc_switch_commutation (U8 position); Phase commutation is performed in accordance with the value at the outputs of the Hall sensors and only if the user starts the engine.
- Conversion time configuration void mc_config_sampling_period (void); Initialize timer 1 to generate an interrupt every 250 μs. _interrupt void launch_sampling_period (void); After activating the 250 µs interrupt, sets the flag. It can be used to control conversion times.
- Speed estimation void mc_config_time_estimation_speed (void); Timer 0 configuration to perform speed calculation function.
Void mc_estimation_speed (void); This function calculates the engine speed based on the principle of measuring the pulse repetition rate of the Hall sensor.
Interrupt void ovfl_timer (void); When an interrupt occurs, an 8-bit variable is incremented to implement a 16-bit timer using an 8-bit timer.
- Measuring current _interrupt void ADC_EOC (void); The ADC_EOC function is executed immediately after the amplifier conversion is complete to set a flag that can be used by the user.
Void mc_init_current_measure (void); This function initializes amplifier 1 to measure current.
U8 mc_get_current (void); Reading the current value if the conversion is complete.
Bool mc_conversion_is_finished (void); Indicates the completion of the conversion.
Void mc_ack_EOC (void); Clears the conversion complete flag.
- Overload detection void mc_set_Over_Current (U8 Level); Sets the overload detection threshold. The threshold is the DAC output connected to an external comparator.
Void mc_init_SW (void); Used to initialize software. Allows all interrupts.
Void mc_init_port (void); Initialization of the I / O port by specifying through the DDRx registers which pins function as an input and which as an output, as well as indicating at which inputs the pull-up resistors must be turned on (through the PORTx register).
Void mc_init_pwm (void); This function starts the PLL and resets all PSC registers.
Void mc_init_IT (void); Modify this function to enable or disable interrupt types.
Void PSC0_Init (unsigned int dt0, unsigned int ot0, unsigned int dt1, unsigned int ot1); void PSC1_Init (unsigned int dt0, unsigned int ot0, unsigned int dt1, unsigned int ot1); void PSC2_Init (unsigned int dt0, unsigned int ot0, unsigned int dt1, unsigned int ot1); PSCx_Init allows the user to select the configuration of the power stage controller (PSC) of the microcontroller.
The stabilization loop is selected using two functions: open loop (mc_set_Open_Loop ()) or closed loop (mc_set_Close_Loop ()). Figure 13 shows a software-implemented stabilization loop.

Figure 13. Stabilization loop
Closed loop is a speed control loop based on a PID controller.
As shown earlier, the Kp factor is used to stabilize the motor response time. First, set Ki and Kd equal to 0. To obtain the required motor response time, it is necessary to select the Kp value.
- If the response time is too short, then increase the Kp.
- If the response time is fast, but not stable, then reduce the Kp.

Figure 14. Configuring Kp
The Ki parameter is used to suppress the static error. Leave the Kp factor unchanged and set the Ki parameter.
- If the error is different from zero, then increase Ki.
- If the suppression of the error was preceded by an oscillatory process, then reduce Ki.
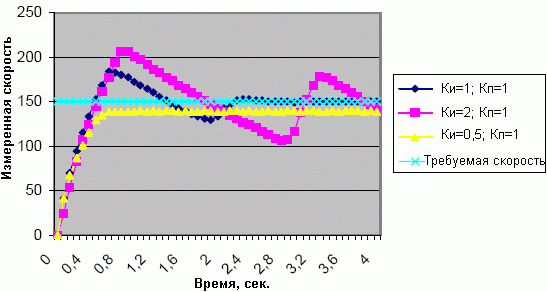
Figure 15. Configuring Ki
Figures 14 and 15 show examples of choosing the correct controller parameters Kp = 1, Ki = 0.5 and Kd = 0.
Setting the Kd parameter:
- If the performance is slow, then increase the CD.
- In case of instability, CD must be reduced.
Another important parameter is the conversion time. It must be chosen in relation to the response time of the system. The conversion time should be at least half the response time of the system (according to the Kotelnikov rule).
There are two functions (discussed above) for configuring the conversion time.
Their result is displayed in the global variable g_tick, which is set every 250 μs. With the help of this variable it is possible to adjust the conversion time.
CPU and memory usage
All measurements are performed at a generator frequency of 8 MHz. They also depend on the type of motor (number of pole pairs). With a 5-pole motor, the signal frequency at the output of the Hall sensor is 5 times lower than the engine speed.
All results shown in Figure 16 were obtained using a three-phase BLDC motor with five pole pairs and a maximum speed of 14,000 rpm.
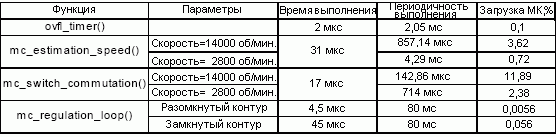
Figure 16. Using the speed of the microcontroller
In the worst case, the microcontroller load level is about 18% with a conversion time of 80 ms and a rotational speed of 14,000 rpm.
The first evaluation can be done for a faster motor and with the addition of a constant current function. The execution time of the mc_regulation_loop () function is between 45 and 55 µs (it is necessary to take into account the ADC conversion time of about 7 µs). For the evaluation, an BLDC motor was selected with a current response time of about 2-3 ms, five pole pairs and a maximum speed of about 2-3 ms.
The maximum engine speed is about 50,000 rpm. If the rotor uses 5 pole pairs, the resulting frequency at the output of the Hall sensors will be (50,000 rpm / 60) * 5 = 4167 Hz. The mc_estimation_speed () function runs on every rising edge of Hall sensor A, i.e. every 240 μs with a runtime of 31 μs.
The mc_switch_commutation () function depends on the operation of the Hall sensors. It is performed when the edges occur at the output of one of the three Hall sensors (rising or falling edges), thus, six interrupts are generated at the output of the Hall sensor in one pulse period, and the resulting frequency of the function call is 240/6 μs = 40 μs.
Finally, the conversion time of the stabilization loop should be at least half the response time of the motor (about 1 ms).
The results are shown in Figure 17.

Figure 17. Estimation of the microcontroller load
In this case, the load level of the microcontroller is about 61%.
All measurements were performed using the same software. Communication resources are not used (UART, LIN ...).
Under these conditions, the following amount of memory is used:
- 3175 bytes of program memory (38.7% of total flash memory).
- 285 bytes of data memory (55.7% of total static RAM).
Configuring and Using the ATAVRMC100
Figure 18 shows a complete diagram of the various operating modes of the ATAVRMC100 starter kit.
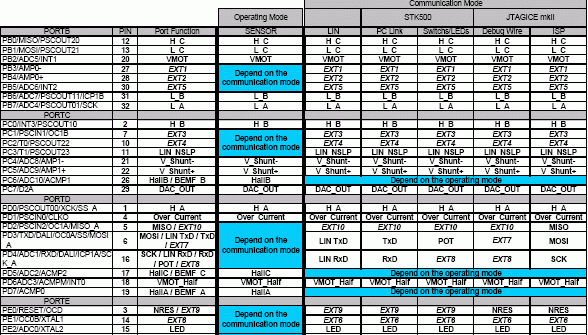
Figure 18. Assignment of I / O ports of the microcontroller and communication modes
Working hours
Two different operating modes are supported. Set jumpers JP1, JP2 and JP3 as shown in Figure 19 to select one of these modes. This application note uses only the sensor mode. For a complete description of the hardware, see the ATAVRMC100 user manual.

Figure 19. Selecting a control mode using sensors
Figure 19 shows the initial jumper settings that are consistent with the use of the software associated with this application note.
The software supplied with the ATAVRMC100 board supports two modes of operation:
- starting the engine at maximum speed without external components.
- motor speed regulation with one external potentiometer.
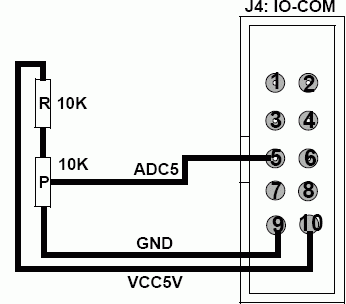
Figure 20. Potentiometer connection
Conclusion
This application note provides a hardware and software solution for a brushless DC motor control device using sensors. In addition to this document, the complete source code is available for download.
The software library includes functions for starting and controlling the speed of any BLDC motor with built-in sensors.
The schematic diagram contains the minimum of external components required to control an BLDC motor with built-in sensors.
The capabilities of the CPU and memory of the AT90PWM3 microcontroller will allow the developer to expand the functionality of this solution.

Figure 21. Basic electrical diagram (part 1)
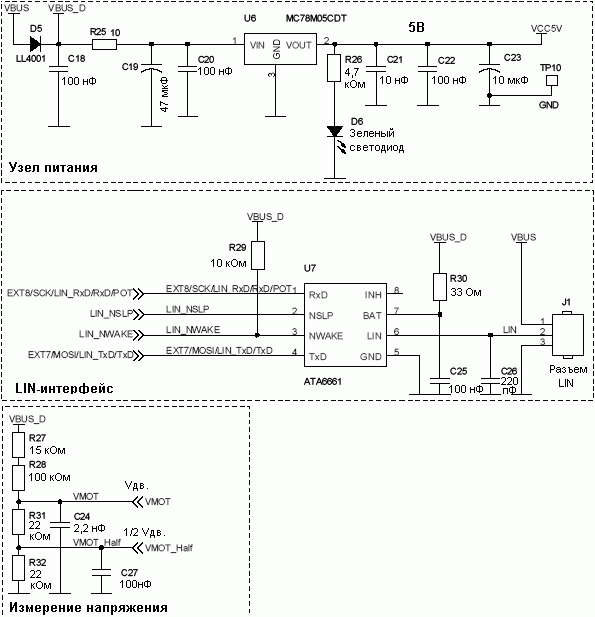
Figure 22. Basic electrical diagram (part 2)

Figure 23. Basic electrical diagram (part 3)
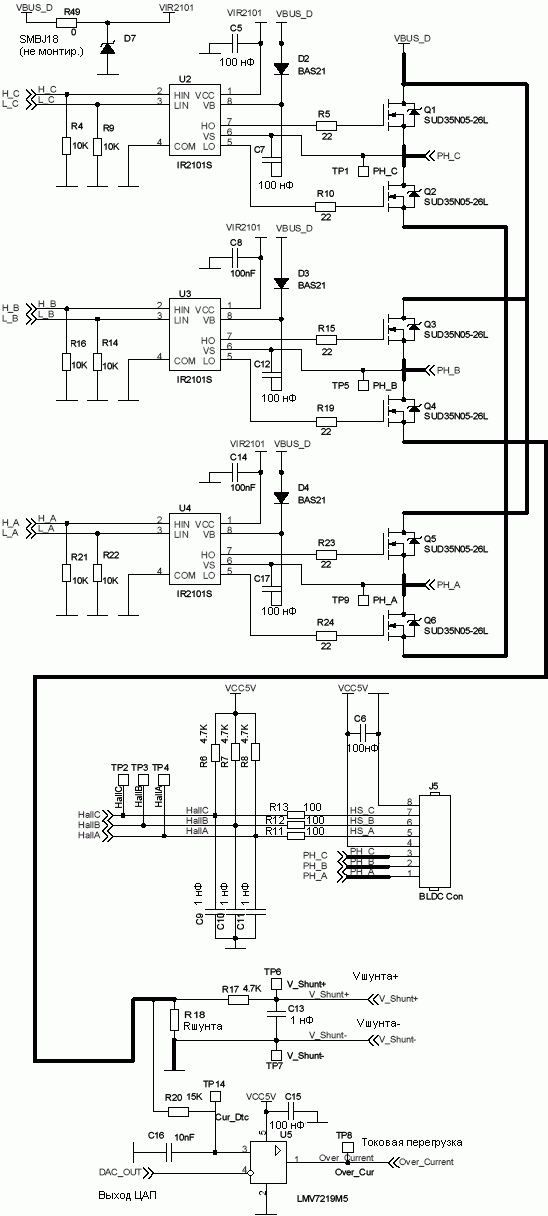
Figure 24. Basic electrical diagram (part 4)
Documentation:
Fantastic renovation of apartments and renovation of cottages for a lot of money.