At the very beginning, I had the idea to use a part of a conventional "Buranovskaya" caterpillar as a caterpillar engine (photo 1). But I couldn’t find the old track from the Buran snowmobile, I didn’t buy a new one - it’s expensive to buy a whole track for the sake of one quarter of the track.
I had to contact a specialized company and buy a rubber track from them, and even a plastic ski.
In the previously thought out and verified design of the scooter and at the same time the snowmobile, the main thing was that the scooter in warm weather should remain a scooter and only become an additional snowmobile in winter. That is, the very process of converting a scooter into a snowmobile and back should be very simple - remove the ski and tracks and put the wheels back.
In a shop selling snowmobiles I bought a leading sprocket again from Buran. I also had to buy wheels from a children's scooter, and two wheels with bearings from a garden cart.
In the transmission of a scooter, the gear ratio provides for driving on asphalt at a speed of 40 to 60 kilometers per hour.
See also: Do-it-yourself snowmobile - option 1 and Option 2 (mini)
I solved the problem with the caterpillar sliding off the wheel and its possible slipping as follows: I made hooks from ordinary plastic pipes for installing the water supply with my own hands. In the subsequent assembly, they will go into the tracks of the scooter-snowmobile. They can be seen in photo # 3.
I made a kind of bandage of the required length from a metal strip. Then he marked on it equal distances corresponding to the step on the caterpillar and fixed on them the hooks previously made from plastic pipes. To attach the hooks to the metal, I took M6 bolts. (Photo # 4). Then he fixed the tire on the wheel with the same M6 bolts. The result can be seen in photo # 5.
As a driven sprocket, the following design was made - the drive sprocket from Buran was fastened with M8 bolts to the bearing wheels from the garden trolley, which I mentioned above. I used an M10 threaded pin as an axle / The structure can be seen in photo no. 10.
The frame was made from metal pipes and corners (Photo No. 7)
As I mentioned above, I had to buy a plastic ski for a winter scooter - making it with my own hands would take too much time and effort, and it is not expensive. In principle, if you wish, you can, of course, do without buying it, but just make a wooden one with your own hands, and it is imperative to equip it with a metal skate so that the scooter, moving through the snow, is better controlled.
The body of a scooter made of plastic in the cold becomes very fragile, in addition, its design is equipped with pockets into which snow is stuffed, which contributes to an increase in the weight of a snowmobile scooter, and therefore a drop in power when driving.
In principle, making a casing for installation on a track with your own hands is not so difficult, the main thing is to make a template for fiberglass (matrix).
We turn it over and put it on a large sheet - it will be the wall of the template. Then we fix the plastic corners with hot glue along the perimeter of the side wall.
Now we start assembling the template (matrix), for which we fix the panel, the bottom and the prepared sidewall with glue. We close the joints with plasticine. The template for making the casing is ready.
After 24 hours, disassemble the template, cut off the excess fiberglass, paint it and the cover for the homemade snowmobile scooter is ready.
The main work has been done - it remains only to put everything together and a homemade scooter-snowmobile made with your own hands is ready.
 The idea itself was read from motorcycle magazines. In them, I saw that there was an opportunity to buy a tracked engine and convert an ordinary motorcycle into a kind of homemade snowmobile. And since there is an opportunity to convert a motorcycle into a snowmobile with your own hands, then why not try to do this with a scooter.
At the very beginning, I had the idea to use a part of a conventional "Buranovskaya" caterpillar as a caterpillar engine (photo 1). But I couldn’t find the old track from the Buran snowmobile, I didn’t buy a new one - it’s expensive to buy a whole track for the sake of one quarter of the track.
I had to contact a specialized company and buy a rubber track from them, and even a plastic ski.
In the previously thought out and verified design of the scooter and at the same time the snowmobile, the main thing was that the scooter in warm weather should remain a scooter and only become an additional snowmobile in winter. That is, the very process of converting a scooter into a snowmobile and back should be very simple - remove the ski and tracks and put the wheels back.
I have neither a milling machine nor a lathe, so I used all the components and parts either ready-made, store-bought, or those that you can do with your own hands and with ordinary tools and.
In a shop selling snowmobiles I bought a leading sprocket again from Buran. I also had to buy wheels from a children's scooter, and two wheels with bearings from a garden cart.
Now the power of the scooter is a snowmobile.
In the transmission of a scooter, the gear ratio provides for driving on asphalt at a speed of 40 to 60 kilometers per hour.
It is quite clear that when driving on a snowy road, the load on the engine immediately increases, and it may well be that its power will not be enough. In addition, it is dangerous to "fly" on snow and ice at such a speed. Therefore, the gear ratio had to be changed, replacing the drive wheel of the scooter with a wheel with a smaller size, from a kart.
To make such changes to the design, I cut a drum (with splines) for the drive shaft from the unusable moped wheel rim. And I drilled holes in it that will help fix a smaller disc in it. The result is shown in photo # 2.
I solved the problem with the sliding of the caterpillar from the wheel and its possible slipping as follows: I made it with my own hands from ordinary plastic pipes for the hook. In the subsequent assembly, they will go into the tracks of the scooter-snowmobile. They can be seen in photo # 3.
Since it is very difficult to find a tire with a circumference suitable for the number of steps on the track, I had to do the following.
I made a kind of bandage of the required length from a metal strip. Then he marked on it equal distances corresponding to the step on the caterpillar and fixed on them the hooks previously made from plastic pipes. To attach the hooks to the metal, I took M6 bolts. (Photo # 4). Then he fixed the tire on the wheel with the same M6 bolts. The result can be seen in photo # 5.
Thus, with my own hands I made a kind of soft sprocket, which will be the leading sprocket for a homemade snowmobile scooter.
As a driven sprocket, the following design was made - the drive sprocket from Buran was fastened with M8 bolts to the bearing wheels from the garden trolley, which I mentioned above. I used an M10 threaded pin as an axle / The structure can be seen in photo # 10.
Snowmobile scooter frame.
The frame was made from metal pipes and corners (Photo # 7)
The frame is made with arbitrary dimensions - it all depends on the length and width of the caterpillar you choose and what size your scooter is.
As I mentioned above, I had to buy a plastic ski for a winter scooter - making it with my own hands would take too much time and effort, and it is not expensive. In principle, if you wish, you can, of course, do without buying it, but just make a wooden one with your own hands, and it is imperative to equip it with a metal skate so that the scooter, moving through the snow, is better controlled.
I attached the ski to the moped fork using a homemade stand (photo 17-18), for greater safety, the left and right sides of the forks work independently (i.e., they have two degrees of freedom of movement). With this design, our homemade snowmobile can turn in any direction and the ski will not rise, but will remain the whole plane on the surface of the snow.
The body of a scooter made of plastic in the cold becomes very fragile, in addition, its design is equipped with pockets into which snow is stuffed, which contributes to an increase in the weight of a snowmobile scooter, and therefore a drop in power when driving.
For winter, the casing was made minimal. It will be located only above the track, but a large area is needed in order to have somewhere to put your feet in overall winter shoes, and for decoration I wanted to make a shield for installing it on the snowmobile fork, which is easily equipped with a windshield for movement over a long distance or in the wind and snow.
In principle, making a casing for installation on a track with your own hands is not so difficult, the main thing is to make a template for fiberglass (matrix).
For this, polycarbonate, which is increasingly used for, or plexiglass or the like. materials (if only they were comparable in size), first cut out the sidewall (Photo # 19)
We turn it over and put it on a large sheet - it will be the wall of the template. Then we fix the plastic corners with hot glue along the perimeter of the side wall.
Next we need a strip of flexible plastic. Its dimensions must correspond to the dimensions of the casing to be produced.
Now we start assembling the template (matrix), for which we fix the panel, the bottom and the prepared sidewall with glue. We close the joints with plasticine. The template for making the casing is ready.
Now cut the fiberglass, and coat the pieces of fiberglass with epoxy over the template.
After 24 hours, disassemble the template, cut off the excess fiberglass, paint it and the cover for the homemade snowmobile scooter is ready.
The platform for the feet was made in the same way, with one exception - silver was added to the epoxy for decorative purposes.
The main work has been done - it remains only to put everything together and a homemade scooter-snowmobile made with your own hands is ready.
DIY snowmobile scooter - photo to article
Of course, our self-made snowmobile scooter is unsuitable for driving in very deep snow, the power and track width in it is still not the same - it will "bury itself" - keep this in mind if you assemble your own version of the snowmobile-scooter with your own hands.
But on the road or in the snow with a depth of up to 15 centimeters, such a homemade "winter" scooter goes very confidently and can even tow a small load behind it.
In the spring, it is easy to make an all-terrain vehicle from a snowmobile converted from a scooter, for which you remove the ski and put the wheel on.

Homemade snowmobile from a scooter - photo
 1 PC. handmade felt homemade fabric flowers craft feltro…
14.08 RUB
Free shipping★★ ★★ ★★ ★★ ★★ (4.80) | Orders (268)
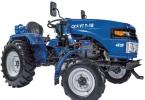
Is it possible to make a simple winter moped that could become not only entertainment, but also an assistant for those who live in villages and towns. "Such a moped could also be used when clearing snow," writes Slava Polkova from the Pskov region, "after all, after a snowfall, you rake debris near your house for hours."
Indeed, why not? After all, a good help is the two horsepower contained in the cylinder of a moped engine. If you make a tractor with such a motor, then it will help you not only to remove snow from the paths with a simple plow, but also to take it out on a sled to the place designated for that.
So, a winter moped. You will need the following purchased components and assemblies: an engine of the B-50 type (or Sh-58 - Sh-62) with the necessary equipment: a carburetor, an air filter, an ignition coil; front fork from "Verkhovyna", "Riga" or "Karpaty"; rear pendulum fork from any moped; a shock absorber from a motorcycle "Minsk" or "Voskhod", as well as a plastic canister with a capacity of about two liters and a fuel cock with a sump. In addition - a steering wheel with a carburetor throttle grip and clutch and brake control levers. Well. of course, a pair of wheels - for example, from a mini-mokik made in Riga or a motor scooter. For the frame, select steel (preferably seamless) pipes of various diameters. Understandably, stock up on a welding machine.
Take a look at the picture. As you can see, the "winter" moped is not too different from the usual one, except that instead of a wheel, a ski is installed in front (which, however, with the arrival of summer, can be easily replaced with a wheel). And further. The rear wheel, equipped with snow chains, is fixed in a swinging fork, not with two lateral forks, as on serial mopeds, but with a central shock absorber from the motorcycle.
If you are not going to completely copy our moped, I can recommend a completely universal way of designing and manufacturing two-wheeled vehicles.
To begin with, cut out the silhouettes of all available purchased components and assemblies from thick cardboard - an engine with clearly marked mounting assemblies, a front fork, a fuel tank, an exhaust pipe and a muffler, a rear swinging fork, a shock absorber, a rear wheel. Now lay out the silhouettes on a large sheet of paper or plywood and find the only possible position for them that will suggest your design flair, design taste and common sense. Do not forget that the driver is also included in the quality ("Component" in the "person - vehicle" system. That is, it makes sense to cut out the articulated silhouette model from thick cardboard in accordance with your anthropometric dimensions - it will help to avoid mistakes in the layout of the car ...
So, the silhouettes took their place on the plaza. Fix them on it (say with a couple of small studs) and trace with a colored pencil. Now you can draw a frame that will unite all the units into a whole. It will be based on two pipes - spinal (longitudinal) and vertical. The first one mounts the steering column, upper engine mount, and seatpost. The second is the rear engine mount and swingarm axle. To create a frame with an optimal configuration, combining all these elements, means making it as simple as possible, with minimum dimensions and, accordingly, weight. But at the same time the most durable and tough.
Having determined the configuration and arrangement of the frame elements by the selection method, draw it on the plaza drawing (take a pencil of a different color). Next, you should draw the mounting assemblies for installing the engine, brackets for fixing the shock absorber, the position of the saddle cushion - and the full-size plas-drawing of the moped is basically ready.
Let's move on to the second stage - the manufacture of the moped frame, and then to the assembly of the car. First, pipes are fitted directly according to the drawing - spinal and vertical. Then they are stuck together with several welding "points". Also adjust the reinforcing “gussets”, engine mounts, steering column, swingarm mounts. Having carefully checked the compliance of the frame with the drawing-plaza, as well as its symmetry relative to the longitudinal plane, weld all the joints sequentially with a step-by-step control of the fidelity of the frame to the drawing. This will then avoid distortions of the entire structure.
At the welded frame, the seams are cleaned with a file, the pipes are sanded, after which the metal is primed and painted in two or three layers with air-dried alkyd auto enamel.
The front steerable ski of the winter moped is wooden. Of course, the best will come from a piece of mountain, but you can glue it from several layers of plywood, and then edging the sole with a thin steel sheet.
The snow chain is assembled from links of a suitable steel chain. You can, of course, just wrap the wheel with such a chain, but a more reliable option is a composite bandage like an automobile chain from separate elements.
Please note that the winter moped does not have footrests. The fact is that the driver has to help himself with his feet while driving to maintain balance, so it is best to put on miniature plastic skis or, in extreme cases, make "skiers" from scraps of children's skis. Their length is no more than 400 mm. Note that the moped has a brake only on the rear wheel with a manual drive.
To work in tandem with a moped, make two towing devices - a "snow plow" and a cargo sled. The first is for clearing paths. It consists of two boards connected in the form of the letter A with a section of 30X300 mm and a length of about a meter, with a lintel approximately in the middle of this letter A. Of course, only freshly fallen snow can be removed with such a "plow". The cargo sled is a regular plywood box installed through spacers on two children's skis.
Of course, carry out all work on cleaning and transporting snow in first gear. If the engine starts to "sneeze", you will have to install an oversized sprocket on the rear wheel. That's all.
Yes, when switching to the summer version of the moped, standard footpegs and, preferably, a foot brake are installed on it.
The numbers in the figure show:
1 - rear pendulum ayka, 2 - seat cushion, 3 - fuel tank (from a plastic canister of a suitable size and volume), 4 - reinforcing scarf (steel sheet 2.5 mm thick), 5 - seat base (box made of sheet duralumin) , 6 - the backbone tube of the frame (steel tube with a diameter of 36 2.5 mm), 7 - the steering wheel (from the monik "Karpaty"), 8 - reinforcing kerchief (steel sheet 2.5 mm thick), 9 - front vipka (from mopeds such as "Riga", "Karpaty" or "Verkhovyna"), 10 - rubber brace-shock absorber, 11 - bracket (pipes - 22X2 mm in diameter, supports - 2.5 mm thick stock, kerchief - 3.5 mm thick steel) ... 12 - wad (glued from plywood blanks, sole - steel sheet 0.8 mm thick), 13 - engine (type V-50 or Ш 58 - Ш-62), 14 - vertical frame tube (steel tube with a diameter of 36X2.5 mm ), 15 - rear engine mounting bracket (steel sheet 2.5 mm thick), 16 - shock absorber (from motorcycles like "Minsk" or "Voskhod"), 17 - snow chain, 18 - rear wheel.
3. SLAVE, engineer
Transport, which can be used in both winter and summer without any problems, but not a car. What is it? Well? This scooter is familiar to us, but with minimal additional cash and resource investments, it turns into a snowmobile, but what about in summer? back to the scooter. Hard? Not at all, especially considering that the idea of such a transformation has been hovering for a long time.
In principle, you can turn anything into necessary, the main thing? a wish. And since there is enough desire, then turning a scooter into a snowmobile should not be a problem, especially since the rework process? it is just removing the wheels and putting skis with a caterpillar in their place. Now you are convinced that you can do everything with your own hands?
You will need the following:

In general, a caterpillar (or mover)? this is the most important element of the future snowmobile, since the ride quality depends on it. Alternatively, you can make it from a car tire with your own hands. And since it is a vicious circle, the possibility of rupture is minimal.
So the process is as follows:
- cut with a boot knife from the bead cover;
- cut along the plastic pipe (in the ratio of diameter? thickness? 40 to 5mm)? these are lugs. They must match the width of the tire. Attach them to the drive blade every 5 x 7cm using M6 bolts.
Is the propulsion device made from a conveyor belt in the same way? with the only difference that the ends of the tape must be superimposed on each other about 3 × 5 cm, fixing with the same bolts.
 If there is neither one nor the other, the craftsmen suggest using V-belts, and they need to be fastened in width with lugs, because on the inside there are already cavities for gears. Or you can even buy a ready-made copy, for example, a caterpillar from "Buran", but in monetary terms it is a very expensive pleasure.
Regardless of the option chosen, the track width directly affects the cross-country ability of the future snowmobile, but worse? controllability. For example, the factory width of the canvases? 15, 20 and 24 inches in standard, wide and extra wide ratios.
We start rework
So what's the main goal? to use the scooter for its intended purpose in the summer and as a snowmobile in the winter, minimal changes will be required to the design. Namely? remove the wheels and put the ski in place of the front one, in place of the rear one? mover.
 We fasten the ski with our own hands using a rack, in which the left and right sides work separately, independently of each other (or, in other words, a frame from the corners on top, and a rod from below). This type of construction is extremely safe, because, firstly, it helps the ski stay on the snow surface. Secondly, the scooter-snowmobile will not spontaneously go to the side, it will not become uncontrollable on the ice, and the wear of the ski when moving on the asphalt is minimal. Plus a rod? he, in terms of function, the ridge must be not straight, but semicircular, so that the steering wheel freely turns in different directions both on snow and on ice.
We continue to make a vehicle with our own hands, and it's the turn of the caterpillar, which stands in place of the rear wheel.
So, you need a driven sprocket from a snowmobile "Buran", two wheels, small, with roller bearings, a wheel with a diameter like a moped. So, we cut out the splines with the brake drum from the wheel of the moped and, having drilled a hole in it, insert a smaller disc there. To prevent the mover from sliding off the resulting wheel, we make similar hooks with our own hands from those plastic water pipes that were used for the caterpillar.
 We take the roofing metal and make a bandage out of it with our own hands, for which we attach the hooks at a distance to the wood grouse bolts, taking into account the location of the holes on the caterpillar. That is, by fixing the bandage on a moped wheel with hooks, we get a leading sprocket for the propeller.
Now you need to connect the Buranov star with two roller wheels with M8 bolts, and a hairpin (M10 thread) will be used as the axis. As a frame for a caterpillar, a square tube and metal corners are suitable. It is difficult to name any specific dimensions, since in this matter it is necessary to proceed from the brand of the scooter itself and from the dimensions of the caterpillar.
Practical information
DIY a snowmobile from any scooter? it's a simple matter, there would be a desire. The approximate speed of the latter? 40-60 km / h. Considering the weight of the finished converted unit and the weight of the passenger? the speed of the snowmobile will be in the range of 20–45 km / h. And this is taking into account the use of the native engine. Its advantages include the fact that it is quiet, has a variable speed gearbox, forced cooling, light weight, electric ignition, consumes little fuel, does not vibrate. In general, a real find for homemade products.
 The only thing that can significantly reduce the power of the unit and increase the weight of the entire structure? these are the snow-clogged pockets that are in the scooter's design. To prevent this from happening, you can make a casing with your own hands, which will close the upper part of the caterpillar:
- we take polycarbonate, organic glass, any other plastic;
- from the taken sheet we cut out the sidewalls of the future casing;
- we fasten them using hot glue and plastic corners;
- we take flexible and thin, if possible, plastic and cut out a strip, the width of which is equal to the width of the casing;
- we collect everything in the corners and coat the joints of the parts with plasticine;
- now we cut out the pieces corresponding to the casing from the fiberglass, coat them with resin, and then put them tightly on the structure;
- after a day everything will dry up, and you can trim the resulting protective casing as needed.
With your own hands, as you could see, it turned out to turn an ordinary scooter into a snowmobile. Minimum investment of time, effort, money? that is what distinguishes such a design from others. And, by the way, this power unit is quite capable of dragging along a sled with children, and a loaded cart.
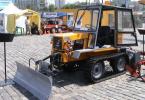
This summer of 2016 it was time to convert my Chinese scooter () into something more suitable for my long-distance fishing trips to the Chusovaya River area. The trip in early June () spoiled my nerves a little and prompted me to accelerate the development of a more suitable vehicle for driving on any roads and even in places where there are none at all ...
Within a month I assembled my all-terrain vehicle, although so far it is impossible to call it in the full sense an all-terrain vehicle due to the drive only to the rear wheel.
But there is still a lot of time ahead and perhaps front-wheel drive will also appear. Initially, such a possibility was included in the design.


The scooter frame is taken as a basis, the engine is moved forward. Added homemade rear swingarm, front fork half converted to fit a wide and large wheel. The rubber was used from the UAZ car, the disks were also converted from the UAZ ones. Homemade hubs with 203 bearings. Wheels without rubber look like this:


Sprockets and a chain from the IZH motorcycle.
Further design improvements are in progress. Variants of lightening the mass of the resulting ATV are being worked out and, for a start, made a regrover (). I cut the tread on the tires, which at the same time lightened the ATV by more than 3 kilograms. Now we need to cut the rubber on the sidewalls of the tire.
The real first test for MOMM-7215 was a fishing trip to the Chusovaya River, which was successful, apart from a couple of small overlays. More details about this trip can be found on the page -
The trip revealed the following:
Pros:
1. The use of large wheels at low pressure increased the permeability by an order of magnitude, and also significantly smooth out the unevenness of the road.
Minuses:
1. Again, the wheels have reduced ATV handling, which seems to be affected by a lever-type front fork and reduced tire pressure. This is especially evident on hard large irregularities such as broken ruts, large stones (on a flat road, there are no control problems). In the future, it may be necessary to try to replace it with a telescopic fork. Refusal of shock absorbers (as is used on many two-wheeled ATVs) is strongly discouraged.
2. The significant weight of the wheel assembly requires at least balancing, because at a speed of about 50 km / h, an unbalanced wheel begins to be reflected on the ATV. We also need to continue looking for ways to lighten the weight of the wheel assembly. There are options ...
January 5, 2018. The winter turned out to be with little snow and I decided to check again the capabilities of my ATV on a knurled track. What came of this can be seen in the following video:
To be continued…