A considerable number of offers on the ATV market for young drivers allows today to choose a modification with different characteristics and for any wallet. If you are not ready to spend an impressive amount on the purchase of an ATV, you have a creative streak, minimal technical knowledge and some special skills, you can make an ATV for your child with your own hands. Of course, you need some tools as well.
There are many interesting ideas for ATVs on the internet, maybe you have your own ideas. Their implementation will surely bring you great joy of creativity and allow you to get an original ATV with minimal financial costs.
How to make an ATV for a child with your own hands
A children's ATV can be made independently from old motor vehicles and additional spare parts. The main thing is that the vehicle you have made is safe - after all, we are talking about children! If you plan to use new parts, then choose only high-quality ones, and used materials need the most critical assessment. This especially applies to fasteners: bolts, screws, etc.
What is required to create a children's all-terrain vehicle?
First of all, decide on the look and size of your unique ATV. You can make an off-road unit for a child of any complexity - it all depends on your knowledge and skills. If you don't want to spend months building an electric ATV, stick with a simpler design - in the future, as your child gets older, it can be improved.

The basis of any vehicle is a frame. Do-it-yourself drawing of the frame of a children's ATV is necessary in order to maintain the dimensional accuracy of all structural elements. Surely you can make the drawing yourself. If you envisage the possibility of strengthening and upgrading your ATV in the future, then the frame should have a good margin of safety in the suspension. For the frame, you can use it as a square profile of a suitable size (for example, 25x25mm), a ¾ inch pipe or a ready-made structure from a donor model - it all depends on your desire, imagination and capabilities. If the frame is made by yourself, pay attention to the quality of the welds.
Wheels, brakes and steering systems, shock absorbers are the next step in assembling an ATV for a child. Wheels most craftsmen recommend choosing new ones - for example, you can take wheels for go-karting or even for a garden wheelbarrow of 320 mm diameter. If you are making an ATV for an older child, he will probably want to ride it off-road - then choose wheels with wide tread and buy stamped discs (albeit the simplest ones). This will increase the safety of the ATV and allow your child to tackle tough obstacles.

A two-wheel drive for a children's ATV from an electric motor of sufficient power through a gearbox (homemade or ready-made) is a good solution. The throttle button on the handlebars will delight your young driver and make the children's ATV look like a real one. The steering system is an important element to keep the little driver safe and to ensure that he can easily steer his box.
DIY electric ATV: engine and battery
The battery and engine for a homemade ATV are chosen based on the capabilities and needs of the driver. So, you can use a pair of motors from the Volga or a screwdriver, take an electric motor from a donor vehicle (for example, an electric scooter) or use your own idea. The main thing is for the electric motor to provide sufficient speed for the child - the smallest will have enough and 5-8 km / h, older children will need more speed, which means that the engine is more powerful.
As for the battery, it is important to install it in such a way that there is no need to disassemble the entire structure for recharging. A battery from a donor scooter, uninterruptible power supply, or whatever you can find will do.
When all the main components are assembled, it is time to take care of the appearance of the ATV - after all, aesthetics are extremely important for the baby. Ideally, you can use body kit elements from an old non-working model of a children's ATV, but your imagination can tell you other original ideas.

Work on assembling the ATV will not only allow you to get a unique transport for little money. It will bring pleasure not only to adults, but also to children, since making a children's ATV with your own hands is an exciting, very interesting and useful activity for every man.
Editor
"Children's ATVs"
New posts:
Children's electric ATV El-Sport Junior ATV 500W 36V / 12Ah
| Speed: | 25 km / h |
| Power: | 500 W |
| Power reserve: | 20 km | 60 Kg |
| The weight: | 40 kg |
| Wheel diameter: | 13" |
| Battery: | |
| Charging time: | 6-8 hours |
| Suspension: | Front and rear spring |
| Drive unit: | Chain |
| Brakes: | Disk |
| Dimensions: | 1020 × 660 × 650 |
| Colour: | Green, black and white |
| Additionally: | Wheelbase 13x5-6 |
| Type of: | Electric ATV |
Price: 36845 rub 29900 rub
Children's ATV on the El-Sport Kid ATV 800W 36V / 12Ah battery
| Speed: | 25 km / h |
| Power: | 800 W |
| Power reserve: | 20 km | 60 Kg |
| The weight: | 40 kg |
| Wheel diameter: | 13" |
| Battery: | SLA (Lead Acid) 36V / 12Ah |
| Charging time: | 6-8 hours |
| Suspension: | Front and rear spring |
| Drive unit: | Chain |
| Brakes: | Disk |
| Dimensions: | 1020 × 660 × 650 |
| Colour: | Orange |
| Additionally: | Wheelbase 13x5 - 6 " |
| Type of: | Electric ATV |
Price: 37670 rub 34500 rub
Children's electric ATV El-Sport Children ATV 1000W 36V / 12Ah
| Speed: | 25 km / h |
| Power: | 1000 W |
| Power reserve: | 20 km | 60 Kg |
| The weight: | 55 kg |
| Wheel diameter: | 13" |
| Battery: | SLA (Lead Acid) 36V / 12Ah |
| Charging time: | 6-8 hours |
| Suspension: | Front and rear spring |
| Drive unit: | Chain |
| Brakes: | Disk |
| Dimensions: | 1020 × 660 × 650 |
| Colour: | Green, blue spider |
| Age: | From 4 years |
| Additionally: | Wheelbase 13 × 5 - 6 " |
| Type of: | Electric ATV |
Price: 43470 rub 37900 rub
Electric ATV Mytoy 500D
| Speed: | 35 km / h |
| Power: | 500 W |
| Power reserve: | 35 km | 90 Kg |
| The weight: | 70 Kg |
| Material: | tubular steel |
| Wheel diameter: | 14" |
| Battery: | 48V (4x12V) / 20Ah |
| Brakes: | |
| Dimensions: | 1150x550x700 |
| Colour: | Autumn camouflage, hip hop, matte khaki, red |
| Shock absorbers: | front / rear |
| Age: | from 4 years |
| Additionally: | Electric motor, brushless, 500 watts, built into the rear axle; Full rear axle differential; Speedometer with battery charge indicator. Front LED headlights. Turn signals; Remote on / off at a distance of up to 50 meters; The ability to set an automatic shutdown for 5-10 minutes; Speed limiter from 5 to 35 km / h; Reverse; Tubeless pneumatic rubber tires 14х4,10-6; Reinforced steering rods; Steering hubs on bearings; |
Price: 63000 rub
Mytoy 750E electric ATV differential
| Power: | 600 W |
| Power reserve: | 25 km | 100 Kg |
| The weight: | 70 Kg |
| Material: | Reinforced steel frame, tubular |
| Wheel diameter: | 16" |
| Battery: | 48V (4x12V) 20Ah |
| Suspension: | Independent front |
| Brakes: | Front / rear manual disc hydraulic |
| Speeds: | Three speed limiters: First speed: 7-9 km / h; Second speed: 12-15 km / h; Third speed: up to 25 km / h; |
| Dimensions: | 1400x760x900 |
| Colour: | yellow camouflage, autumn camouflage, maple |
| Shock absorbers: | Oil |
| Age: | from 6 years |
| Additionally: | Electric motor, brushless, 600 watts, built into the rear axle; Full rear axle differential; Speedometer with battery charge indicator; Headlight; Rear stop; Sound signal; Turn signals; Mirrors; Remote on / off at a distance of up to 50 meters; The ability to set an automatic shutdown for 5-10 minutes; Reverse; Pneumatic rubber tubeless tires 16x8.00-7; |
Price: 77 700 rub
Electric ATV Mytoy 500D Lux
| Speed: | 30 km / h |
| Power: | 500 W |
| Power reserve: | 35 km | 90 Kg |
| The weight: | 70 Kg |
| Material: | tubular steel |
| Wheel diameter: | 14" |
| Battery: | 48V (5x12V) / 20Ah |
| Brakes: | Rear foot disc hydraulic |
| Dimensions: | 1150x550x700 |
| Shock absorbers: | front / rear |
| Age: | from 4 years |
| Additionally: | Electric motor, brushless, 500 watts, built into the rear axle; Full rear axle differential; Speedometer with battery charge indicator; Silencers-speakers imitating the sound of the engine when you press the gas; Front LED headlights; Turn signals; Remote on / off at a distance of up to 50 meters; The ability to set an automatic shutdown for 5-10 minutes; Speed limiter from 5 to 30 km / h; Reverse; Tubeless pneumatic rubber tires 14х4,10-6; Reinforced steering rods; Steering hubs on bearings. |
Price: 69300 rub
Electric bags MYTOY 500W
| Speed: | 30 km / h |
| Power: | 1000 W |
| Power reserve: | 30 km | 60 Kg |
| The weight: | 68 kg |
| Wheel diameter: | 13" |
| Battery: | 48V / 20Ah (removable) |
| Brakes: | Disc hydraulic |
| Speeds: | First 5-8 km / h; The second is 15-18 km / h; Third 25-30 km / h |
| Dimensions: | 1330x810x930 |
| Colour: | Red Blue |
| Age: | From 7 years |
| Additionally: | Charging indicator; Safety belt; Smooth gas pedal; Reverse speed: (reverse); Seat adjustment (forward, backward); Steel frame, tubular; Front LED headlights; LED strip around the perimeter; 13x5,00-6 "(rubber, pneumatic, tubeless) |
Price: 82900 rub
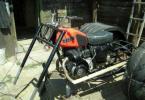
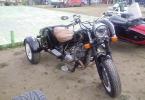
Was going purely for entertainment purposes, so the author focused on industrial ATVs and the collection of his car. However, there are a number of design differences that have a positive effect on the cross-country ability of the all-terrain vehicle and significantly distinguish it against the background of standard ATVs.
The machine has excellent cross-country ability and reliability, largely due to its low weight.
During the construction of this model of a homemade ATV, the following parts and materials were used:
1) water pipe with a diameter of 32 mm
2) pipe 27 mm
3) Internal combustion engine from the car Oka 11113
4) Gearbox from the same oki
5) front and rear gearboxes from the classic vase
6) hubs and grenades from vaz 2109
7) fiberglass
Let's take a closer look at the stages of building this all-terrain vehicle:
The suspension of an all-terrain vehicle of a home-made design is organized using A-shaped levers, which are made from a pipe with a diameter of 27 mm.
The engine and gearbox from the car was installed, the differential was welded.
The gear ratio ratio of the front and rear gearboxes is 43 to 11, they were redesigned for internal grenades from the fret of the nine.
Hubs and disc brakes from a VAZ 2109 were installed, and the wheels were supplied with a 15 radius through spacers.

Initially, it was planned to make the grip on the handlebars similar to those of motorcycles, but then it was nevertheless decided to make it under the left foot, despite the unusual solution for an ATV, it turned out to be quite convenient according to the author. That is, there are no problems with shifting gears on the go. Moreover, the all-terrain vehicle is able to get under way in any gear, even with a passenger on board, the engine power is quite enough. Therefore, the gears are not changed so often, when driving on the road, only the third and fourth gears are used, and off the road, respectively, the first and second as low gears.
A transfer case of the author's own design was organized, thanks to which it became possible to disconnect the front axle. Below is a photo of the entire front axle disengagement mechanism, where you can see the main elements of the parts:

Work was carried out on the rear suspension of the all-terrain vehicle:

The frame of the machine for pasting with fiberglass is being prepared:

The process of fixing fiberglass on the machine:

Then the author proceeded to paint work on the all-terrain vehicle:

The weak point of the design, as you can see from the photographs, is the anthers on the grenades. The author has not yet decided how exactly to protect them from possible breaks.
The next photo clearly shows the gear selection mechanism, as can be seen in the photo, the lever was slightly distant from the engine, since before that it was installed closer and the author often burned himself against the muffler, especially there was a high probability of such an injury when engaging in reverse. For now, the issue has been completely fixed by moving the lever:

There is no photo on the radiator yet, but what exactly are you interested in?
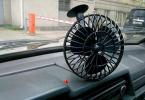
The radiator of the all-terrain vehicle is hidden under the plastic right in front of the instrument panel, despite the fact that the hole, which there is very small, is quite enough for cooling the car. However, problems can arise when driving in heavy mud, since the hole is easily clogged, and cooling from the incoming air does not work. But the fan copes with such a load, although the all-terrain vehicle is not operated on heavy mud. In addition, the fan turns on only under really heavy loads, which is extremely rare.
The reason for this is that the device itself turned out to be quite light and the engine from the oka copes well with the loads.
Below is a photo of the radiator placement:

The all-terrain vehicle has an approximate mass of about 450 kilograms.
Video of tests of the all-terrain vehicle when driving on snow:
If you watched the video, you probably noticed that the rear wheel is slipping by as many as several meters, which should say about the operation of the rear differential. In this, this all-terrain vehicle is very different from industrial ones, since they have no rear differential and the rear axle always row, which does not interfere with ATV handling, since the width of the vehicle is small.
The author also wanted to initially weld the rear differential, but thought that he would always have time to do this, and decided to try to ride with a differential for now. But since the cross-country vehicle was satisfied and there were no problems with the rear axle, the author did not have any desire to disassemble the structure and weld the rear differential.
That is why the all-terrain vehicle remained with a rear differential.
The only author is planning to install more serious wheels on the all-terrain vehicle. Or remove the 15 disc stands by installing discs with a bolt pattern of 4 to 100 from Logan or Opel, which perfectly fit VAZ hubs.
Any ATV experiences a lot of stress when driving, and therefore, to provide the right conditions for movement, manufacturers try to create the frame that is as strong as possible. It is the frame that must withstand not only the weight of the ATV and the driver, but also sharp falls and maneuvers. The frame is created according to a special drawing, from well-known Japanese and Chinese companies, the frame is reliable and has an excellent functional design. But if it is not possible to buy a branded model, and the desire to ride off-road is great, we suggest making an ATV yourself, while some structural details will be no worse than foreign counterparts.
The dimensions of the ATV frame usually differ depending on the technical properties of the model. If the equipment has a simple engine and it must withstand the load of 1 person, a small, strong frame will be optimal. For example, the frame of the Stealth 800 ATV has a length of 2,088 mm and a width of 1,213 mm, which is already an excellent indicator. But another representative of the Irbis 200U received a length of 1,760 mm and a width of 1,060 mm. That is, the difference is significant.
In addition to these requirements, the frame must be welded and constructed of durable materials. Usually, round steel pipes and metal profiles are used, they are best withstand heavy loads. If you bought equipment of a certain brand, then, regardless of the technical characteristics, the frame must have mandatory design features. Also, many are wondering where is the frame number on the ATV? It must be mandatory, so there is no standard location. Usually try to look for the frame number under the seat, many have it on the front at the bottom. Others advise looking at the frame number on the right side under the front arm. It is imperative to find the frame number, without this data you will not be able to register your ATV.
DIY ATV frame
If you decide to create a four-wheeled all-terrain vehicle with your own hands, the first thing to do is to create a frame. Experts advise using frames from the Urals and the Oka car, they lend themselves better to changes. If you do not have the specified technique, use standard schemes and create an ATV frame from steel pipes and metal profiles. Sometimes, if you have a Ural motorcycle around its frame, you will additionally have to install a homemade frame. This is a big plus when creating an ATV, because it is possible to install a native Ural engine on a motorcycle frame, and an additional frame will create the design of a real ATV. If you are unsure of how to weld an ATV frame, first study the diagram below. After that, you can consult with a welder or mechanic, who can quickly weld all the parts for you.
As you can see, the ATV frame diagram below is quite standard and has a simple design, the main thing is to carry out all the processes correctly. In the case of using a frame from the Urals with an additional frame made of pipes, such a structure will be much simpler. The fact is that the motorcycle frame will already have a finished box, engine and other elements without additional welding, and the installed frame will directly hold the wheels and the driver.
Power unit homemade ATV became the engine from the car "Oka" - 32-strong, two-cylinder, four-stroke, liquid cooling. And if for a car its power was often not enough, then for an ATV it should have been more than enough.
And this is just the dream of every man !!! I want this !!!
Homemade ATV frame- spatial, welded. Its main elements (two pairs of spars: upper and lower) are made of round pipes of the VGP-25 type (water and gas pipes with a diameter of 25 mm and a wall thickness of 3.2 mm), auxiliary (struts, crossbars, etc.) are made of VGT-20. The side members are bent: the lower ones are in the horizontal plane, the upper ones are in the vertical plane. He bent pipes on a pipe bender, "cold". I welded the lugs (pairs of lugs) for fastening the levers and shock absorbers to the frame at once, and welded various brackets as the assemblies and assemblies were mounted (in place).
Homemade ATV ATV:
1 - front wheel (from the Chevrolet-Niva car, 2 pcs.);
2 - engine (from the car "Oka");
3 - front wheel drive transmission;
4 - a gearbox (from the Oka car);
5 - rear wheel drive transmission;
7 - rear wheel (from the Chevrolet-Niva car, 2 pcs.);
8 - fuel tank (20 liter canister);
9 - rear trunk;
10 - muffler;
11 - backrest of the passenger (headrest from the car "Oka");
12 - saddle;
13 - clutch basket (from the Oka car);
14 - gear fixing lever;
15 - body kit (fiberglass);
16 - steering wheel (from the Ural motorcycle);
17 - instrument panel (from the car "Oka");
18 - front trunk
Homemade ATV transmission- kind. Although the car is all-wheel drive, there is no transfer case in it. As you know, in "Oka" the engine is located across, and on the ATV it is installed along. This made it possible to direct the output shafts from the gearbox (gearbox) not to the right and left wheel (as in a car), but to the front and rear axles. Here are just the power unit itself, interlocked with the "basket" of the clutch and the gearbox, had to be shifted relative to the longitudinal plane of symmetry slightly to the left in order to reduce the horizontal angle of the longitudinal joint shafts of the transmission. Well, their vertical angles turned out to be insignificant.

The transmission has been assembled from units of various domestic cars, mainly "VAZ" models. But the finished industrial units also had to be refined. For example, from the checkpoint (from "Oka") to ensure the optimal (reduced) speed and increase the torque, he removed the main gear pair and replaced it with a chain transmission. The gearshift rod was also made different - lengthened, with outlets on both sides of the gearbox. The stem can be fixed in three positions: to engage 1st and 2nd gears, 3rd and 4th and reverse. The lever for selecting these positions is on the right side, and the gearshift lever is on the left.
Interwheel reduction gears are from the rear axles of the VAZ "classics", only their axle shafts together with the "stockings" were removed and replaced with shafts with CV joints from the front-wheel drive models. CV joints are used as hinges in the rest of the transmission intermediate shafts.

Kinematic transmission diagram of a homemade ATV from Oki
1 - motor (from the car "Oka");
2 - clutch (from the Oka car);
3 - gearbox;
4 - CV JOINT (from the VAZ-2108 car, 12 pcs);
5 - main gear reducer with differential (from VAZ-2105, 2 pcs.);
6 - shaft (from the car VAZ-2108, 6 pcs.);
7 - wheel (from the car "Chevrolet-Niva")
There are no low gears and no differential locks.
Steering - motorcycle type (lever and shaft) at the top and car type (with steering rods) - at the bottom, only simplified, without a steering mechanism, with one bipod. At first I used the steering wheel from a motorcycle "Minsk", with a pipe diameter of 22 mm, but it turned out to be a little thin. Later I found and delivered it from a Ural motorcycle. The steering shaft is made of a tube with a diameter of 20 mm and a wall thickness of 2.8 mm. It has a travel stop at its lower end. At the bottom, the shaft rests on a thrust bearing, and in the middle part it turns in a split nylon bracket-sleeve.
The bipod is made of steel sheet 8 mm thick and shaped like the letter "T". A hole with a diameter of 20 mm is made at the edge of the "rack" - the steering shaft is inserted and welded into it, and in the ears there are tapered holes for the ball ends of the steering rods. These holes are reinforced with matching welded washers. The bipod ears are slightly bent down so that they are almost parallel to the rods.
Wheels - 15-inch, from the car "Chevrolet-Niva". Tires with the corresponding rim dimensions 205/70 (width / height as a percentage of the width) with an off-road tread pattern. The wheel roll-in diameter is about 660 mm.

Homemade ATV frame drawing:
1 - lower spar (pipe d25x3.2, 2 pcs.);
2 - upper spar (pipe d25x3.2, 2 pcs.);
3 - stand (pipe d25x3.2, 2 pcs.);
4 - support of the rear upper suspension arm (pipe d25x3,2,2 pcs.);
5 - rear strut (pipe d20x2.8, 2 pcs.);
6 - support of the front upper suspension arm (pipe d25x3.2, 2 pcs.);
7 - front strut (pipe d20x2.8, 2 pcs.);
8 - the upper support of the front shock absorber (corner 35 × 35);
9 - rack of the upper support of the front shock absorber (sheet s5, 2 pcs.);
10 - front engine mounting support (sheet s3, 2 pcs.);
11 - rear engine mounting support (sheet s3,2 pcs.);
12 - lugs for fastening levers and shock absorbers of suspensions (sheet s5, 18 pairs);
13 - saddle mounting bracket (sheet s3, 2 pcs.);
14 - upper transverse link (pipe d20x2.8);
15 - lower transverse link (pipe d20x2,8,2 pcs.);
16 - radiator support (pipe d25x3.2 cut in half lengthwise, 2 pcs.);
17 - front console of footrests (pipe d20x2);
18 - rear console of footrests (pipe d20x2);
19 - connection of the front and rear footrest consoles (pipe d20x2);
20 - footboard cross member (sheet s5, 4 pcs.);
21 - an eyelet for attaching a fiberglass body kit (sheet s5, set)
Wheel suspensions are independent, on two triangular wishbones each (upper and lower) with shock absorbers from the Oka car (front). Levers are welded from round pipes of the VGP-20 type. Elastic elements (springs) and shock absorbers - from the car "Oka" (rear). Wheel hubs and steering knuckles are welded into the wheel ends of the front levers - from the VAZ-2109 car. Both those and others had to be finalized. In the hubs I installed studs under the wheels from the "Niva", and in the front fists - homemade swivel levers.
The muffler is homemade, two-piece. To protect it from thermal warping, the body kit covered it with a remote cover, and insulated the inlet pipe with asbestos.
ATV body kit - fiberglass. I pasted it for the first time, and therefore first studied the recommendations for performing the relevant work. But as it turned out, this process is painstaking, although the result is worth it.

Wheel suspension arms
(a - upper arm of the front suspension; b - lower arm of the front suspension; c - lower arm of the rear suspension; d - upper arm of the rear suspension; all parts, except those noted specially, are made of VGT-20 pipe):
1 - beam (2 pcs.);
2 - cross member;
3 - bushing (pipe d37x32, 2 pcs.);
4 - shock absorber mounting eye (steel, sheet s3);
5 - ball joint (from the steering rod of the car "Zhiguli")
First, I made the required contours of the body kit from a steel square pipe with a section of 10x10x1 mm. Fortunately, this pipe bends easily even with hands over the knee. The contour was welded to the frame with the help of jumpers from the same pipe, in places where later (after gluing the body kit), one could easily cut the "tack". Then he bent the "wings" from hardboard (fiberboard) and fixed them with self-tapping screws to the contour and lintels. Where the bend turned out to be steep, I fastened separate strips of the same hardboard. The front end was taken out with styrofoam purchased from a hardware store. It was possible to use polystyrene or the same polyurethane foam, but expanded polystyrene turned out to be a more suitable material - it is cut well with a sharp thin knife. I glued individual elements from it into a general structure on polyurethane foam.

Steering column assembly:
1 - steering shaft (pipe d20x2.8);
2 - rudder connection plate (steel, sheet s6);
3 - brace of the plate (steel, sheet s6, 2 pcs.);
4 - split bracket-sleeve of the steering shaft (nylon, sheet s18);
5 - support washer (steel, sheet s6, 2 pcs.);
6 - bipod (steel, sheet 18);
7 - rudder travel stop (steel, sheet s6);
8 - bearing housing;
9 - a persistent tip (steel, circle 15);
10 - thrust bearing
The false tank is of a complex shape. It was not possible to bend it out of hardboard. Therefore, having wrapped the engine with plastic wrap, I began to fill the space intended for it with layers of polyurethane foam. After each layer, drying is mandatory, otherwise a thick foam volume may not dry out inside. I filled it until the layers went beyond the outline. Finally, after the foam was completely dry, I began to draw the desired shape with a knife. The edges were smoothed out with coarse sandpaper. 
A part of the “Oka” dashboard was used under the dashboard. I also fixed it on the disc with the help of polyurethane foam. Since the foam is coarse, the pores were filled with gypsum and then processed. When the shape of the blank began to respond to the conceived design and its surface became more or less smooth, I covered the blank with PF-115 paint. Since I was not going to make a matrix for gluing the body kit on the dummy, but immediately glued the body kit on it, followed by finishing the surface to an ideal state, then plastering with plaster and painting the dummy could be neglected.

The ATV is a four-wheeled hybrid of a motorcycle and a tractor, a vehicle that is equally successfully used in both agriculture and recreation. A few years ago, a Russian person considered the ATV to be a foreign curiosity. And today he is able to independently design and manufacture it. In addition, today homemade ATVs are much more common in Russia, not factory ones. Next, we will try to understand why it happens this way and not otherwise.
A self-assembled ATV is a common occurrence
Every day there are more and more daredevils who decided to create an ATV from improvised means and parts of old Soviet motorcycles. Naturally, self-made vehicles are significantly different from the factory ones. And it is often more powerful, but economical. The mass of a homemade ATV usually does not exceed 300 kilograms, which also greatly facilitates its operation.
The names and essence of the main stages of creating an ATV

Final stage and finishing works
The final step in creating a homemade ATV is to install the seats and headlights. In this case, anti-theft headlights are the ideal choice, because the ATV should be suitable for use in any weather. Particular attention should be paid to the number of seats on the ATV and whether the seat is for the driver only or for the driver and passenger.

Finishing work when creating an ATV consists in sheathing the resulting structure with metal and painting.
ATVs, designed on the basis of "Oka"
For 20 years (from 1988 to 2008), in the vastness of our endless homeland, one of the most common cars was the domestic "Oka" (VAZ-1111, SeAZ-11116). Today "Oka" is one of the most popular options for vehicles, on the basis of which homemade ATVs are created. In the manufacture of ATVs, the engine, gearbox, wheels and other auxiliary parts of this vehicle are usually used. Direct assembly and design of an ATV based on the Oka car is carried out in accordance with the drawings created by experienced designers. The defining moment when creating an ATV is the formulation of the purpose of its use. Based on this, the future owner of the ATV chooses one of the two existing variants of the Oka engine (35 hp and 53 hp).
ATVs designed on the basis of the Ural motorcycle
At the moment, a few decades ago, domestic "Urals" popular in Russia were replaced by much more nimble and economical foreign models. In this regard, for many in garages, a still recent best "friend" is idle and rotting. But not a single Russian person is capable of allowing good to be wasted. Therefore, the "Urals" are increasingly used to create a relatively new type of transport for a Russian person. This motorcycle is unanimously recognized by folk craftsmen as the optimal basis for creating an ATV. Homemade ATVs from it turn out to be an order of magnitude more economical and have more tractive power than their factory counterparts.

The creation of an ATV based on the "Ural" consists of two stages: the design of the rear and the front. The use of the "Ural" gearbox when creating the rear part of the ATV will provide the structure not only with strength, lightness, but also with simplicity. As a result, the finished tool will not be equipped with a differential, which, in essence, can be sacrificed in the name of reducing the time spent on its creation. As for the design of the front of the future vehicle, it will take much more time and effort than the previous stage. Most of the work goes into fine-tuning the front levers of the ATV. This is due to the fact that they should be less rigid than that of a car, but more powerful than motorcycle ones.
ATVs built from scooters
A motor scooter (scooter) - a light motorcycle with an engine located under the seat - is an ideal option on the basis of which you can create a homemade ATV. A vehicle created by craftsmen on the basis of a scooter is an excellent alternative to the best factory copies.

It is extremely economical in terms of fuel consumption and at the same time possesses such qualities necessary for an ATV as mobility, light weight and a relatively large carrying capacity. The peculiarities of creating an ATV from a scooter are that the frame, engine, power supply and ignition system must be transferred from the same machine. But the fuel tank of the future vehicle should be a motorcycle tank, and not a scooter one, since it has a significantly larger capacity. The rear and front axles are likely to be borrowed from a cargo scooter, the suspension from the shock absorber of a large motorcycle, and the control from the Oka or any Russian motorcycle.
ATVs, designed on the basis of the "Ant" motor scooter
For 36 years, the Soviet plant "Tulmash" organized the production of scooters "Muravei". In total, over the years, 8 models have been produced, differing in the volume of the gas tank and the power of the engine. Today the Ant motor scooter is an ideal base for making an ATV with your own hands. In order to convert the "Ant" into an ATV, you should perform some fairly simple steps: redesign the frame somewhat, work on reinstalling the seat posts, and so on. The installation of the steering wheel and brakes of the future ATV will require special attention, long-term efforts and time. When constructing homemade ATVs, it is strongly discouraged to use a previously used brake system. It will be much safer to buy a new one. At the same time, the steering system can also be used from an old Muravei scooter or an Oka car. The final stage in the creation of an ATV from a motor scooter "Ant" is the installation of turn signals, headlights and stops.
Instead of a conclusion. Why do many people prefer home-made ATVs rather than factory ones?
A home-made ATV, in comparison with a serial factory one, is much more economical, lightweight and comfortable to operate.
When assembling a vehicle with his own hands, the owner takes into account his taste preferences and requirements in the field of functionality.
Assembling the ATV on his own, the master has the opportunity to carry out finishing work (sheathing, painting, tuning, the presence / absence of pleasant things), based on his wishes.