Domestic craftsmen are able to design almost any device. Home-made mini tractors and full-fledged tractors do not seem to be a difficult design task for them. We present to your attention a selection of videos about homemade tractors.
Homemade products with elements from cars
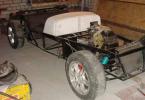
1. A mini tractor with a frame like the K700 - it also breaks in half for turning. The drive and steering are installed from a VAZ 2109 car. This four-wheel drive iron horse is pulled by the Tula engine. The author of the design and invention is Mikhail Poddoskin.
2. The next instance is a home-made tractor equipped with a gearbox and an engine from a Zaporozhets car. A 100 mm channel was used as a frame. To use attachments, a hydraulic system is installed in the tractor.
3. Minitractor, equipped with an engine from the machine "Oka". It has four-wheel drive and a good hydraulic system. The rear lights are installed from Gas 53.
Mini tractors from different parts
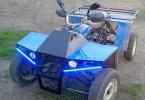
1. Video recording with a home-made tractor, the traction unit on which is installed from the Chinese heavy motoblock ZIRKA. Engine power is only 10 horsepower.
2. The next unit has a UD-15 engine. The ignition system, that is, the magneto, rotates in the opposite direction. The gearbox and flywheel are from the Dnepr motorcycle. The transmission of torque to the wheels is obtained through the use of a chain transmission. An NSh10 pump is installed for hydraulics.
3. One more exhibit with a UD-2 engine with a capacity of 8 l / s. according to the author's recommendations - better than UD-25. The bridge is from ZIL, and the box is from GAZ-51.
Such homemade products have been known since the Soviet era. And the way in which they were made was usually invented on the basis of individual developments, in many respects that have survived to our time.
There may be several reasons that are pushing more and more people to turn to their own production of a tractor. The main ones are:

- lack of funds to buy even a used model, produced decades ago, not to mention new cars that sometimes cost a fortune;
- the desire to create your own unique mechanism that would fully correspond to the user's personal ideas about the quality, power and productivity of such a technique.
It doesn't matter for what reason you turned to this topic. One thing is important, having a sufficient supply of spare parts and components, having at least primary technical knowledge and a desire to create with your own hands, this will not be particularly difficult.
 Tractor vehicles from Oka, Zhiguli, UAZ, LUAZ, Zaporozhets, Niva, Gaz-66, Moskvich and other vehicles are popular today.
We will try to figure out how much stock of raw materials you need to have in order to make your technical dream come true.
Where to start assembling a homemade tractor?
Self-made tractors belong to the category of agricultural machinery, in the design of which rigor, clarity, rationality must be maintained, which will allow them to maximize their production potential.
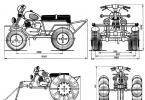
Therefore, before starting work, you need to think over and execute the drawings of the future machine, or use ours presented below. They will serve as a reliable clue for the next transformations.
 The key elements of any tractor, not just the one we propose to make ourselves, are:
- frame;
- motor;
- transmission;
- Tie Rod;
- hydraulic drive;
- driver's cab.
Let us consider in turn the features of their design.
Frame
It should serve as a solid foundation underlying any agricultural technology, be it a combine or a tractor. Its manufacture should be made of high-strength metal that could withstand the weight of both the main mechanisms and additional attachments, without which no tractor can do.
 Frames are:
- one-piece construction;
- breaking point.
Moreover, units with a break frame are more maneuverable and reliable, which is determined by a number of advantages, namely:
- simplify the process of turning equipment in limited field conditions;
- determine good cross-country ability even on those sections where instead of a road there is only a direction;
- better balance;
- the ability to demonstrate high power parameters with low fuel consumption.
Creating a 4x4 fracture will complicate the frame assembly process a little, but it will be worth it.
Frame Assembly - Detailed Guide
Consists of the following actions:

- welding to semi-frames, for which you need to have channel No. 8. The dimensions of the front are 90 x 36 cm, and the rear is 60 x 36 cm. They are joined at an angle of 45 0;
- installation of 2 cut out square-tube blanks on the front half-frame, which will form a subframe for localizing the motor;
- welding additional metal pieces for other parts;
- mounting on the rear frame of metal supports in a vertical configuration, which can be reinforced with an ordinary corner;
- fix a metal plate with a thickness of at least 1 cm at the rear on the racks, where the hitch for the future tractor will be aggregated;
- welding a sheet of metal to the top of the semi-frame to indicate the seat of the tractor driver and provide additional protection in the place where the breaking point will be;
- we use a cardan mechanism for articulating both half-frames, for which we weld forks to them, preferably made of steel, and a hinge, for which a trunnion and bearings are needed, which can be taken ready-made, for example, from Gaz-66;
- we check the good adhesion of the front and rear traverse both horizontally and vertically, so that the future tractor unit can easily plow not always even and straight village roads. For the same purpose, you can equip the chassis with a rigid coupling;
- equipment of the front half-frame with a hub, which can also be easily taken from the "UAZ" in order to indicate a greater mutual range when the main components of the construct diverge.
Thus, we can conclude that, despite the first glance, the intricate design of such a frame, there are 2 main parts in it:
- traverses, which can be welded from improvised means, even without having new rolled metal;
- spars, which can be made from a channel.
Motor
 The engine part for the tractor is taken ready-made, which greatly simplifies the design task. For such purposes, a motor from "Moskvich" or from "Niva" or another vehicle is suitable. It is installed on a special subframe, to which it is securely attached with bolted ties. No less popular today is a home-made tractor with a Lifan engine, which is made in China and has shown itself well in field tests.
All the work that is planned to be performed using such a unit is quite laborious and time-consuming. And in order for the motor from passenger car models to most organically "adapt" to a difficult working pace, it is worthwhile to initially provide for its thermal protection.
Otherwise, the engine may experience overheating, as a result of which we will receive not only greater wear of parts, but also breakdowns that are not needed either during the sowing or harvesting season.
The gear ratio should also not be ignored, because given that the maximum operating speed in the field of such equipment does not exceed 5 km / h, the motor must demonstrate at least 2 thousand revolutions per minute. Otherwise, a productive process will not work.
Each of the plowshares must accept a pulling force of at least 190, but not more than 300 kg / cm in order to ensure optimal technical characteristics of such a unit.
Transmission
 Now let's move on to the transmission and gearbox. To establish this process, too, a motorcycle clutch from any brand or model will come in handy. It is needed so that the torque is transmitted to the gearbox, or rather, its primary shaft. If desired, the gearbox can also be taken from any old car, for example, from Zaporozhets or Zhiguli, if there is no way to buy a new one.
It is very important that both rear and front drive wheels are used. the tractor was all-wheel drive. This is achieved by connecting the gearbox to the chain reducer through the hub, giving speed to the front axle. The articulated connection of the traverses ensures the transmission of torque to the rear axle of the tractor.
The classic design of homemade equipment is usually with a belt clutch, but it can be with a toothed, toothed-worm, etc.
Steering gear
 In its design, the main rule is one - it is better to take the control system from an old tractor or automobile equipment than to try to recreate everything from scratch. Hydraulic cylinders, which play a leading role in the agility of the agricultural unit, can be borrowed from MTZ or Vladimirrets equipment. The required pressure level in them is created by a pump, which, in addition, starts the oil circulation. Therefore, you also need to find it before starting the assembly.
The most optimal option is when a gearbox drives the wheels of the main shaft.
The steering wheel and seat can be taken from a regular passenger car. They should be secured in accordance with the ergonomic preferences of the person who will be working on them in order to avoid inconvenience and pinching.
Operator's cab
 As a body, you can take sheet steel, with which both the tractor driver's workplace and the hood itself are simply sheathed. A more complex option involves the use of metal, steel corners, factory windows, shelves, doors, mirror equipment and many other elements that are not always available to everyone.
We recommend a less costly method - insulate the metal sheathing from the inside by installing front windows from old technology, thereby simplifying your task several times. If you do not plan to operate the tractor in the cold season, you can take your time with the cab, just pull the tarp up.
Assembly stage of a complete mechanism
 At the final stage, it is necessary to make a single whole from the prepared elements. Necessarily the equipment is equipped with a fuel tank, brakes, clutch, as well as parking lights and headlights for movement at night.
In conclusion, I would like to add that building such a structure at home is not very difficult, as it seems at first glance. The main thing is to stock up on the necessary set of tools and prepare consumables and finished parts, such as the engine, clutch, steering column, hydraulic cylinders, oil pump, fuel tank, wheels, which do not have to be purchased in a new and unused form. It is good if you have welding equipment, power tools, without which this process will not budge.
We hope that with our instructions, there will be no questions about how to assemble a single technique from individual units, thereby providing every summer resident or farmer with good-quality equipment from literally nothing.
In agriculture, you cannot do without a tractor. However, this pleasure is expensive, so a self-made tractor with your own hands can be a worthy solution to this problem. This is not an easy task and requires the availability of tools, the necessary materials and knowledge, however, the result will also please.
How to make a mini tractor with your own hands: what is needed for this?
The most affordable option for a mini-tractor with your own hands is a tractor with a so-called broken frame. Such a frame consists of 2 parts, which are connected by a special mechanism based on hinges. All controls and chassis are located in the front of the machine. The steering is hydraulically based, and when the steering wheel is turned, the entire front section arches, resulting in a turn. This approach allows you to simplify the design and save on some details.
The rear part is simpler in design, it contains a workplace for the tractor driver, the rear axle and various devices for installing attachments that are used to process the soil.
The advantages of a homemade mini-tractor for the household:
- With its small size and simple design, it is capable of producing results comparable to industrial technology.
- It has excellent maneuverability, is able to make a U-turn on almost one piece of land, which is quite an important quality for tillage.
- Low fuel consumption. Of course, fuel consumption depends on the design of the machine and the work performed, however, fuel consumption is usually minimal.
- Low cost, incomparable with the purchased unit. The low cost is provided by the cheapness of components and parts, which can often be bought from hands or found at all.

Disadvantages of homemade tractors:
- the unit is made from old, sometimes obsolete parts, therefore it is recommended to regularly carry out maintenance of the machine (in any case, there is no guarantee that the old unit will not fail);
- when an old unit or part fails, it is not always possible to find a replacement, since in most cases such components have already been discontinued.
Before you start looking for parts and mechanisms, you need to think about the design of the machine and find drawings. You can come up with drawings yourself, but it is best to use the projects of folk craftsmen who already had experience in assembling such equipment. You can consult in advance with an experienced locksmith who will help to take into account and eliminate possible problems in advance and advise on how to assemble the tractor.
Required materials and tools
To work, you need the following tools:
- welding machine with a stock of electrodes;
- a cutting machine with a set of cutting and grinding discs, a hard brush for cleaning metal;
- wrenches, hammer and chisel;
- electric drill and drill set;
- equipment for painting;
- you may need a lathe to bore some parts.
Materials that will have to be found in order to assemble a mini tractor:
- metal channel for the frame;
- axle with wheels;
- nuts, bolts and washers of various sizes;
- driver's seat;
- engine, gearbox, transmission;
- materials for creating the hull, roof, wings;
- consumables for painting;
- grease for tractor units.
Search for the necessary spare parts and assembly of the structure
Before you start searching for all units and mechanisms, you should know that the gearbox, engine and chassis must be taken from the same tractor - this will avoid the complicated work of adjusting the units to each other.
What is the most preferable engine for a homemade tractor? Here the choice is small: it is recommended to find the UD-2 or UD-4 engine, the M-67 engine would be a good option, since it is quite economical and durable, and requires minimal participation in maintenance and repairs. Some folk craftsmen used engines from a Zhiguli car as a power unit. In this case, the engine with the gearbox and transmission is removed from the car, there is no need to adjust the mechanisms to each other, which greatly facilitates assembly.
Before installing such an engine, it should be upgraded. It does not have a cooling system; for this, you can use a fan that is installed on the crankshaft. It is also necessary to install a casing that will direct the flow of cold air.
If an engine from a car is used, it is necessary to reduce its speed by 3 times using the corresponding gears, since such a high speed is not needed for the tractor.
The choice of wheels depends on the purpose for which the homemade mini-tractor is intended. If the purpose of using the machine is to move various loads, then 16-inch wheels can be dispensed with. If the tractor is going to work in the field and work the soil, it is recommended to use larger diameter wheels - this will provide better traction. If you want to save money on wheels, you can also use car tires, but it should be borne in mind that in this case traction with the soil may be insufficient, and control may be difficult.
Frame, rear axle and exterior trim for mini tractor
The frame of the assembled mini-tractor consists of 2 parts, connected by a hinge mechanism. For the manufacture of such a mechanism, you can use a driveshaft from a large truck, for example, a GAZ. It is not so important which specific car model will be used: the cardan shaft does not have any special differences.
The rear axle is quite suitable from the old Volga or Moskvich car, but in this case they will have to be shortened, since the standard axle is not included in the dimensions of the mini-tractor.
The frame is made of a metal channel. This material has sufficient strength and rigidity for such a load. After mounting the frame, holes of various diameters are drilled on it in order to secure the main components and mechanisms.
The exterior can be made of any material: metal, plastic or fiberglass with epoxy resin. The structure must be well painted with at least 2 layers of paint for metal. This is necessary not only to give the tractor a good appearance, but also to protect its components from corrosion.
As you can see, homemade work pays for itself, and there are no special difficulties in making a small tractor for agricultural work (if you have the skills and tools).
The presence of a piece of land imposes on its owner the obligation to provide care for it. And one of the urgent tasks that must be solved is tillage. Such work can be done manually if the area of the site is no more than 10 acres, and even then this is already problematic.
For large areas you can use a homemade mini tractor which is ideal. At the same time, it is not necessary to purchase a mini-tractor from an official distributor or at a factory, because such equipment can be assembled with your own hands, it is enough to have at least minimal knowledge of technology.
If we compare home-made cars with factory ones in terms of technical characteristics, then the superiority will be on the side of the latter. However, it is still wrong to use the new technique for cultivating small plots of land. Moreover, this is due not only to the high costs associated with the maintenance and purchase of fuel and lubricants. This technique can seriously damage the soil structure. Therefore, a homemade mini-tractor is a much more preferable alternative. Next, we will talk about how to assemble a mini-tractor at home.
Advantages and disadvantages of homemade mini tractors
If you need equipment for processing a land plot, then do not immediately discard the idea of \ u200b \ u200bcreating a mini-tractor do it yourself. In addition to the fact that you can save a lot of money, you will have the opportunity to make a machine that can demonstrate much more functionality than tractors with more power. A homemade mini-tractor can be a faithful assistant for you, which can be used for plowing vegetable gardens and planting orchards, as well as cultivating sown areas, transporting small-sized cargo and harvesting.
A the cost of manufacturing such equipment is so small that one season of its operation is enough to cover all costs. The fact is that for the manufacture of such a tractor, units and mechanisms are suitable that can be borrowed from broken equipment or bought at bargain prices. Some owners often show ingenuity in this matter, and, taking other equipment as a basis, make certain changes to it, as a result of which they have a homemade mini-tractor. Naturally, in this case, you will have to perform even less operations in order to assemble a mini-tractor.
Truth, there are some disadvantages here to be mentioned. For the manufacture of a mini tractor, certain parts will be required, which may not be so easy to find. Difficulties can be encountered even when certain mechanisms fail, and it is not known whether it will be possible to find an equivalent replacement for them. It must be remembered that for the assembly of such equipment, units and mechanisms are used, borrowed from a long-unreleased equipment. Therefore, it is possible that it will not be possible to find certain details.
An important stage in the manufacture of a homemade mini-tractor is drawing up a drawing. Getting it right requires technical skills and knowledge. You also need to take into account that the mini-tractor will be used with attachments and trailed equipment, and therefore the owner will have to calculate the tractive effort of the engine.
Drawing up drawings
 Usually, when a person has a desire to assemble any home-made technique, then everything starts with an idea... Some people can do without a work plan presented on paper, relying on their own knowledge of technology. However, not everyone is such a master, so it will be better if you start the process of assembling a homemade mini-tractor by preparing a drawing of the main components.
If it is difficult for you to solve this problem, you can contact your friends if they have already had to do something similar. As a last resort, you can use the Internet and try to find the necessary information there.
After you receive the finished drawing, you can easily assemble a mini tractor. It will not be more difficult than playing with a construction set. Schematically, the work will look like this: you will need to take part A and connect it to part B.
 Please be aware that certain components and mechanisms will have to be prepared in advance before assembling the tractor... Bearing in mind that you borrowed them from another technique, most likely their sizes and other characteristics will differ from those required. But, having a ready-made drawing in your hands, you can easily modify all the mechanisms, because you will clearly know what they should be.
In the process of drawing up a drawing, it is important to decide the question of what design a mini-tractor should have. Quite often, farmers choose the 4 x 4 break option.
This is a version of the tractor that uses an articulated frame, complemented by a 4-wheel drive. This technique will be an excellent option for processing farms.
How to assemble a mini tractor with your own hands?
After the drawing is drawn up, you can start preparing the necessary parts. You should have the following in stock:

Not every owner will find the above details on his farm. Therefore, be prepared for the fact that you have to go through the flea market, as well as look at sites selling spare parts. Surely on one of them you will find the parts you need at bargain prices.
Frame
For making fractures most often they use metal channel # 5 or # 9... This material is best suited because it has the necessary flexural strength. On the basis of the channel, you will have to make two half frames by welding. After that, they are connected to each other using hinges. You can use the propeller shaft of a truck as a fastener.
 Perhaps a fracture will not work for someone. In this case, an all-metal frame can be an alternative. As part of this design, the following elements are present: right and left side members and front and rear cross members.
To create side members, you can take channel number 10... And to make the rear and front traverses, you can use channels No. 16 and No. 12. The crossbeam can be made of a metal bar.
Engine
On a homemade mini tractor any engine can be installed, the main thing is that it has the required power. In order for home-made equipment to be able to cope with all tasks, it is best to equip it with a power unit with a capacity of 40 liters. With.
In most cases, the following types of motors are used for homemade mini tractors:

Also, instead of them, you can borrow an engine from domestic passenger cars of the Zhiguli or Moskvich brands.
In that case, if you decide to stick with the 4 × 4 option, then you will have to modify the M-67 motor: it is necessary to increase the transmission ratio. If this is not done, then the power of the power unit will be insufficient for the equipment to be able to move. Also make sure that the motor is equipped with an additional cooling system.
Transmission
![]() As a gearbox and a power take-off shaft, you can borrow the necessary mechanisms from the GAZ-53 car. The clutch can be taken from the GAZ-52. Keep in mind that these nodes will need to be improved.
As a gearbox and a power take-off shaft, you can borrow the necessary mechanisms from the GAZ-53 car. The clutch can be taken from the GAZ-52. Keep in mind that these nodes will need to be improved.
One of the challenges you need to accomplish at this stage is to keep the clutch in sync with the engine. For this the new clutch basket is being welded, after which it is finalized, giving the required dimensions. Certain manipulations will have to be performed with the engine flywheel, in which you need to shorten the rear plane, and also create a hole in the center. If your farm has a lathe, then you can easily perform these operations.
Steering
 Considering that this mechanism is intended for use on a mini-tractor, it has there must be hydraulic cylinders... In this case, your homemade technique will be more manageable. Keep in mind that the hydraulic system is a complex mechanism, so you cannot make it yourself at home. Therefore, you will need to find a suitable agricultural equipment and borrow from it the hydraulic system available there. For the hydraulics to work properly, oil must flow into it, and therefore you need to get a pump.
Rear axle
 This mechanism you can borrow from a car or truck and then put it on your homemade mini tractor. However, first you have to modify it: you need to reduce the axle shafts using a lathe.
In the event that you do not find a ready-made bridge, you can collect it from different cars. Keep in mind that the rear axle will act as the driver. Therefore, for the front, you can use any available mechanism, the main thing is that it matches the required dimensions.
Wheels
Looking for wheels for a mini tractor, consider their radius that should be consistent with the purpose of using the technique.
- If you are going to transport goods with this machine, then it is best to choose discs with a radius of 13 to 16 inches.
- If you need a mini-tractor to carry out agricultural work, then it is recommended to install wheels of 18-24 radius on it.
Conclusion
Private farms have to solve many problems every year associated with the care of the land. To spend less time and effort on such work, you need a special technique. Buying a factory tractor is not affordable for everyone, so many are considering the option of making a homemade mini-tractor with their own hands. It is not so difficult to make such a machine, since components and mechanisms from other types of technology are used for it. However, in order for the assembled car to be in working order, you first need to draw up a drawing and adhere to it during the entire assembly process.