Homemade products from the engine from the washing machine (video selection, photos, diagrams)
1. How to connect a motor from an old washing machine with or without a condenser
Not all "washing" motors will operate with a capacitor.
There are 2 main types of engines:
- with capacitor start (permanently switched on capacitor)
- with a starting relay.
As a rule, "capacitor" motors have three winding leads, power 100 -120 W and speed 2700 - 2850 (washing machine centrifuge motors).
And motors with a "start relay" have 4 outputs, power 180 W and revolutions 1370 - 1450 (washing machine activator drive)
Connecting a "capacitor" motor via the start button may result in a loss of power.
And the use of a permanently switched capacitor in a motor designed for a starting relay can lead to burnout of the windings!
2. Homemade emery from the washing machine engine
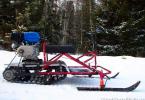
Today we will talk about converting an asynchronous electric motor from a washing machine to a generator. In general, I have been interested in this issue for a long time, but there was no particular desire for reworking the electric motor, since at that time I did not see the scope of the generator. Since the beginning of the year, work has been going on on a new model of the ski lift. My own lift is a good thing, but riding with music is much more fun, so I quickly got the idea to make such a generator so that I could use it to charge the battery on the slope in winter.
I had three electric motors from the washing machine in store, and two of them are absolutely serviceable. Here I decided to convert one of these asynchronous electric motors into a generator.
Running a little ahead, I will say that the idea is not mine and not new. I will only describe the process of converting an induction motor into a generator.
It was based on the 180-watt electric motor of a washing machine made in China in the early 90s of the last century.
I ordered magnets from NPK Magnets and Systems LLC, before I had already bought magnets when building a wind farm. Neodymium magnets, magnets size 20x10x5. The cost of 32 pieces of magnets with delivery is 1240 rubles.
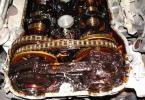
Alteration of the rotor consisted of removing the core layer (deepening). In the resulting recess, neodymium magnets will be installed. At the beginning, a 2 mm core was removed on a lathe - a protrusion above the side cheeks. Then a 5 mm recess was made for the neodymium magnets. The result of the rotor rework can be seen in the photo.
Having measured the circumference of the resulting rotor, the necessary calculations were made, after which a strip template was made of tin. Using a template, the rotor was divided into equal parts. Between the risks, neodymium magnets will then be glued.
8 magnets were used per pole. There are 4 poles on the rotor in total. With a compass and a marker, all magnets have been marked for convenience. The magnets were glued to the rotor with “Superglue”. I will say that this is a painstaking business. The magnets are very strong, you had to hold them tight when gluing them. There were moments when the magnets came off, pinched the fingers, and glue flew into the eyes. Therefore, you need to glue the magnets using protective glasses.
I decided to fill the cavity between the magnets with epoxy resin. For this, the rotor with magnets was wrapped in several layers of paper. The paper is secured with tape. The ends are plastered with plasticine for additional sealing. A hole has been cut in the shell. A neck is made around the hole made of plasticine. Epoxy resin was poured into the shell hole.
After the epoxy cured, the sheathing was removed. The rotor is clamped into a drill chuck for further processing. Sanding was carried out with medium grit sandpaper.
4 wires came out of the electric motor. I found a working winding, and cut the wires from the starting winding. I installed new bearings, since the old ones were spinning a little. The bolts tightening the body are also installed new.
The rectifier is assembled on D242 diodes; the "SOLAR" controller purchased several years ago on Ebay is used as a charging controller.
You can watch the tests of the generator in the video.
To charge the battery, 3-5 turns of the generator are enough. At maximum speed of the drill, 273 Volts were squeezed out of the generator. Alas, the sticking is decent, so it makes no sense to put such a generator on a wind turbine. Unless the wind turbine will be with a large propeller or gearbox.
The generator will stand on the ski lift. Field tests already this winter.
Source www.konstantin.in
4. Connecting and adjusting the speed of the collector motor from the automatic washing machine
Regulator manufacturing:
Controller setting:
Regulator test:
The regulator on the grinder:
Download:
5. Potter's wheel from the washing machine
6. Lathe from washing machine automatic machine
How to make a wood lathe headstock from a washing machine motor. and a speed control with maintaining power.
7. Wood splitter with a washing machine motor
The smallest single-phase, screw splitter with a 600 W washing machine motor. with speed stabilizer
Working speed: 1000-8000 rpm.
8. Homemade concrete mixer
A simple home-made concrete mixer, consists of: a 200 liter barrel, an engine from a washing machine, a disc from a classic Zhiguli, a gearbox made from a Zaporozhets generator, a large pulley driven by a fairy washing machine, small self-grinding pulleys, a drum pulley made of the same disk.
Prepared and put together by: Maximan
Any machines for washing after a period of time become unusable, and most often they are simply sent to a landfill. But some details from it can be given a second life. For example, an engine from an old washing machine that has failed can become the basis for a new homemade fixture or tool. There are many different uses for household benefits. True, it all depends on the imagination and skill of the home master.
Engine types
The type of electric motor chosen for homemade products depends on the age and model of the washing machine. For example, if it was an old washing machine from Soviet times, then it was most likely equipped with a reliable asynchronous electric motor. Such a motor from a washing machine has a power of 180 W, has excellent torque indicators and is the most convenient motor for homemade products. Also in the hands of the master may be a two-speed electric motor, a collector motor or an engine from a modern SM of any model and class.
Asynchronous motor
Asynchronous motors used for washing units can be with two or three phases. But since about 2000, the production of motors with two phases practically ceased, and they were replaced by more modern three-phase, with frequency control of rotation speed.
Such a device consists of a stator, which is a stationary element of an electric motor and a rotor that drives the drum of the device.
The advantage of this device is:
- In a simple design.
- Ease of maintenance.
- At a low noise level.
- At a low cost.
The disadvantages include the large size, low efficiency, the complexity of the electrical circuit and its control. Such electric motors can still sometimes be found in old, inexpensive models of washing machines. They are not used in powerful modern devices.
Collector motor
Such electric drives have been used since the 90s and are considered almost universal due to the ability to connect them not only to AC, but also to DC voltage,
The electric motor has an aluminum housing, which contains a collector rotor, a stator and a block with contact brushes.
Advantages of the collector motor:
- Small size.
- Infinitely variable speed control by increasing or decreasing voltage.
- Ability to work with different types of voltage.
- There is no reference to the frequency of the electrical network.
The disadvantage is expressed in the frequent change of contact brushes and a short service life.
Inverter drive
 This is a direct drive motor, also called an inverter motor. It does not have a collector rotor. Developed by the Korean company LG and belongs to the latest technology. Inverter drive motors have been mass-produced since mid-2005. With their robust, durable and simple design, they firmly hold the leading position in the electric drive market.
The advantages of the inverter drive include:
- Compactness.
- Low machine vibration.
- High efficiency
- Lack of contact brushes and belt transmission.
- Virtually silent operation.
The disadvantage of inverter motors in the form of a complex electronic control circuit is more likely to concern manufacturers than consumers,
Connection and launch
When dismantling the electric motor from the washing unit, it is recommended to make special marks on all its wires. These actions in the future will help to connect the motor directly to the electrical network (this is especially true for asynchronous electric motors from old washing units, where the connection of starting capacitors is required). Other types of motors also have their own characteristics.
Therefore, for the correct connection of each type of electric motor, it is best to search for information on the Internet or use special reference books for this. And if during dismantling all the contacts were marked, then starting the motor from the washing device will not be difficult. To do this, you just need to follow the instructions for connecting a certain type of engine to the network and adhere to security rules.
The second life of the electric motor
 From an old, out of order washing machine, it is possible to make many homemade products for household needs. Many of its elements are suitable for this, including the body, drum, covers, etc. But most often units are made for use in household purposes, home workshops or garages, using a motor.
You can use an electric motor from a washing unit, for example, by making a homemade juicer for the kitchen, a vibrating table for a workshop, as well as making many other useful devices and gadgets that can greatly simplify some types of work for a home craftsman.
Grinder
For the manufacture of a grinding machine, a high-power motor is not required, and in terms of the number of revolutions, any electric motor from an old washing machine can be suitable.
To build a machine, you need to prepare a base plate for it from a cut of a thick wooden board and fix an electric motor and a switch on it, removed from the same washing machine. Metal brackets can be used for fastening.
Next, cut the thread and fix the adapter-nozzle on the shaft for attaching the grinding wheel. An adapter with a neck for a cut-off abrasive wheel can be prepared in the kit for the nozzle. Then you will already get a cutting machine that can cut plastic pipes, as well as fittings, a metal sheet or corner.
As a result, you can get a compact, portable and practically universal grinding and cutting machine, in the manufacture of which you do not need to use electric welding.
Feeder and grain grinder
 Another homemade product to help those who are engaged in agriculture can be made from an electric motor removed from washing equipment. It is a grain crusher and feed cutter in one piece.
Converting a washing machine to a feeder cutter is easy. To do this, you only need the body of the machine with the top load of linen and the electric motor itself. The case can be purchased for a penny at points where scrap metal is accepted or searched in a landfill.
The very technology of manufacturing a feed cutting unit will be as follows:

A self-made device will cost much less and will work practically no worse than a factory-made one.
Mortar mixer production
For those who are going to build or make repairs in the future, the motor from the washer can be useful for making a full-fledged mortar mixer, which can facilitate the process of construction work and at the same time save significant funds. This will be especially beneficial for residents of rural areas, where the construction process practically does not end.
The process of making a mortar mixer looks something like this:

This design is convenient in that it works like a swing, and the prepared solution can be easily poured out of the mixer by simply tilting the tank.
 It is best to use a top-loading washing tub to mix the solution. Its capacity is just enough for mixing several buckets of solution.
The activator is removed from the tank and the water drain hole is tightly closed. Instead of the activator, a shaft is installed, on which a steel strip with sheet metal blades is attached inside the tank.
The tank is stacked and secured to a movable frame welded to the agitator base tube. Outside, an electric motor is attached to its bottom, connected to the shaft. To do this, two holes are drilled in the bottom of the tank to the size of those on the motor housing, after which the tank is rigidly bolted to the barrel.
After that, it remains only to connect the electric motor and test the operation of the mortar mixer.
How to make a lawn mower
A homemade lawn mower is one of the options for using an electric motor from a decommissioned washing machine. This tool will come in handy for owners who own a personal plot or summer cottage allotment. At the same time, the homemade product does not need to purchase any additional spare parts, which can always be found in the shed or in the landfill.
A homemade lawn mower with a motor from a washing machine can be made in this way:

This completes the manufacture of a homemade lawn mower, and it is ready to go.
The area of use of electric motors from washing machines is very wide. A lot of material on homemade products can be found freely on the Internet - on thematic sites or forums.
A variety of useful devices and fixtures can be made from parts from a washing machine, regardless of its condition and type.
They can perform various mechanical work, as well as play the role of generators of free reserve energy. For the manufacture of homemade products with an electric motor, housings, wiring and other spare parts will fit.
Fixture options
Here's what you can do with an old washing machine. These devices will be useful for household, construction, gardening and renovation.
The most common homemade product is emery.... Since the diameters of the motor shaft and the grinding stone are different, a matching adapter will need to be made. Its role will be played by a piece of a 20-centimeter pipe. At the end of the latter, a thread should be made so that it is twice as long as a whetstone. Its direction should be opposite to the rotation of the motor. This is necessary so that the grinding wheel does not unscrew and fall off.
The adapter must be fastened to the motor shaft. Then you will need to drill a hole there, and screw in the bolt and nut in order to finally fix the emery wheel with the adapter. It remains to strengthen the homemade product on a reliable basis.
The motor power from the washing machine is enough for a small lathe or drum grinder... In the first case, you can slowly machine the cylindrical workpiece. For more reliable fastening, a support should be used that protects the motor from excessive lateral loads. In the second case, a cylinder is put on the engine shaft, on which sanding paper is put on. A steel bar should also be installed inside it, with which you can fasten it to the motor shaft.
An old activator-type washing machine can turn into a small concrete mixer. To do this, you should:
- Make the blades, for which it is necessary to cut out blanks from 4-5 mm steel, connect them at right angles (in the form of the letter P), and weld.
- Attach the part to the place of the activator.
- Connect the motor to the mains (see below).
- All that remains is to put the necessary building materials into the tank.
- In this case, the motor power will be sufficient for small volumes.
You can also make a feed cutter. In addition to the engine, you will need a drum from a washing machine. It is necessary to make two sharpened blades that play the role of knives. The drum is bolted to the base frame. An outlet hole should be made in its lower part. One blade with a knife is installed at the bottom, and the other is closer to the top. A lid must be fitted to the opening in the front of the drum to prevent feed scattering to the sides.
Another possible DIY is a lawn mower. It will work just as well as the factory one. To make it you will need:

First you need to weld a square frame with axles. In the base, which is attached from its bottom side, a hole should be made for the motor shaft, and then secured. A U-shaped handle should be made from longer pipes. A rubber casing is put on its horizontal part to make it easier to hold. A wire with a switch is connected to the motor. If it is planned to use it for cutting wet grass, then all conductive parts must be carefully insulated.
Finally, the last device that can be made from a washing machine is generator... The asynchronous motor will require revision. It is necessary to disassemble it, cut grooves in the rotor into which neodymium magnets must be inserted and glued with cold welding. The working winding will need to be connected to a controller, which stabilizes and rectifies the current induced in it and provides a given voltage.
Such a generator will be able to power the lamp or charge the battery. The rotor can be driven by a drill, screwdriver, or pedal mechanism. Other options are also possible.
Types of motors
Older washing machines used induction motors. They consist of a wound stator and a cylindrical rotor that is driven by a rotating magnetic field. They are distinguished by low noise, simple design, and sufficiently high power. But there are also disadvantages - these are large dimensions and weight, the complexity of smooth speed control, and low efficiency and torque. They also cannot function as a generator without rework.
 The most common are two-phase induction motors... They have a working and starting winding. The first is connected directly, and the second is connected through a phase-shifting capacitor. Currently, asynchronous motors are not used in washing machines.
The collector motor is used in all modern automatic washing machines. Powered by AC and DC. It consists of a stator and a rotor, the magnetic fields of which interact, as a result of which the latter rotates. It is equipped with a collector through which voltage is supplied to the winding through the brushes. Advantages - high torque and considerable rotation speed, which can be easily and smoothly adjusted. Brush motors are also capable of operating as an externally excited generator.
The inverter motor is directly connected to the drum. It has a rather complex design. This motor can work as an efficient generator if the manufacturer of the electric motor has installed magnets in the rotor, due to which a considerable current will be induced in the stator.
Connection and verification
Make sure the selected motor is running. To do this, determine the conclusions of the windings using a tester or multimeter. To check the operation of the collector motor, you need to connect one wire of the cable with a plug to one brush, and the other to the winding terminal. Free conductors are interconnected. If the engine is working properly, the rotor will start to rotate.
The asynchronous motor is connected in a different way. First, you need to determine the working and exciting windings. The first will have more resistance. Power is supplied to it directly, and to the exciting one - through a phase-shifting capacitor.
Looking at an old washing machine, any housewife wants to quickly replace it with a new assistant. A home craftsman, on the contrary, does not rush to throw the machine into the junk. He ponders where this "wealth" can be accommodated.
Answering the question of what can be done from a washing machine, we will carefully consider it from all sides.
We will see that there are many useful components and assemblies in the design that can get a new life in the hands of a good master.
Judge for yourself: the body and engine, pulleys and drum, a window with a sealed door, relays and switches - this is a list of components from which you can make a lot of things and mechanisms useful in the household.
Let's explore together the most popular homemade options from old washing machines, both conventional and automatic.
Grinder
The first thing you should pay attention to after examining an old household washing machine is the engine. It has enough power and speed to make a homemade sharpener. Complex modifications are not required here.
For the shaft, you need to make an adapter nozzle on which the grinding wheel will be attached. If we provide an additional "neck" for the cutting wheel at the seat, then together with the sharpener we will get a cutting machine. They can cut not only plastic pipes, but also metal (reinforcement, sheet or corner).
As you can see in the photo, the washing machine motor is attached to the frame with four brackets. The switch for him is removed from the same washing machine. As a base, a regular piece of thick board was used. The option turned out to be quite acceptable, especially considering its mobility and ease of manufacture (no welding required).
Here is another similar use of the motor for installing a grinding and cutting discs. Having put them on a common adapter, they are clamped with a nut with a left-hand thread.
Simple crafts from an old washing machine
Not every person knows how to masterfully work with welding or a lathe. Nevertheless, even in this case, you will be able to find a worthy use for the old washing machine. Look at the window that covers the drum. This is an engineering masterpiece and a godsend for design.
Without further ado, many use it for its intended purpose, but in a renewed context. Cut out the washer door along with a part of the body and you get an excellent "sea" porthole. It will look original in any interior.
If you love your yard guard, then be sure to decorate his booth with such a modern "facade".
In addition to the original appearance, this option has practical value: if necessary, the dog can be easily isolated from the guests without fear for their legs and clothes.
Just do not forget to make side ventilation holes in the booth (the window at the washing machine is sealed!).
Washer coffee table
Your old washing machine is an automatic machine, or rather its drum, will help to decorate the interior of the apartment. You can build an original coffee table from it. Perforated stainless steel, complemented by colored lighting, looks great.
It is not difficult to make such an unusual piece of high-tech furniture. You will need a few steel rods to attach to the washer drum. A round glass or MDF board is fixed on them.
Brazier
The body of the washing drum, made of durable and high quality "stainless steel" withstands very high temperatures. Therefore, it can be used as a barbecue.
Several pipes, half an hour of welding and a convenient barbecue grill will appear on your estate. Having made the supporting part of the structure collapsible, you can take it with you to suburban picnics.
For the manufacture of barbecue, drums from front-end machines, as well as from top-loading washing machines, are suitable. In this case, you will have to cut off one of the sides of the case with a grinder, and provide it with a stable support from below.
Mobile smokehouse
Why buy an expensive smokehouse for fish and meat when an old washing machine is idle on the farm? There are many options for its use in this capacity.
We will focus only on a mobile device. It can be made from a drum removed from a top-loading washer.
To prevent smoke from escaping through the side perforated holes, they must be muffled with a thin sheet of steel, wrapped and secured around the body. From above, as it should be in a real smokehouse, we make a hole for the chimney. We fix the smoking grate inside the drum (you can take it from the old gas stove).
Concrete mixer
This is a rather complex device, which, in addition to mixing concrete, must ensure its unloading. Therefore, when planning to make a concrete mixer out of an old washing machine, first weigh your locksmith skills and knowledge.
The easiest way to turn a washer-barrel into a concrete mixing device is to replace the standard activator with two-way blades. They can be made from 4-5 mm thick steel strip. To do this, you need to cut it to size, then bend the two blades and rotate them 90 degrees relative to each other.
Then they need to be welded to the shaft passed through the hole for the remote activator.
The drain hole, which is in every washer-barrel, must be plugged. Next, we proceed depending on how much concrete will need to be kneaded. If we are talking about 1 bucket, then you can leave the old single-phase motor.
If you need to prepare a large volume of concrete, then in place of the old motor you will have to install a more powerful one (0.75-1.2 kW) with low revolutions (1300-1500 per minute).
In addition, the "native" belt drive must be replaced by a gearbox that reduces the speed (from 1300 to 25-30) and increases the torque on the agitator blades.
Note that the best mixing quality is obtained when not the shaft with the activator rotates, but the concrete mixer body itself with the blades fixed in it. However, to create such a structure, a deeper and more complex modification of the washing machine is required.
Sterilizer for conservation
Another homemade product from an old washing machine-barrel will be useful for giving and part-time farming. This is a sterilizer in which you can install a dozen cans for heat treatment.
The only point that needs to be taken into account: such a device is suitable for sterilizing fruit and vegetable products. To process meat, a higher temperature is needed (above + 100C).
The sequence of rework looks like this:
- A plug is placed on the activator hole;
- A thick wire mesh for cans is mounted on the bottom;
- You need to substitute a support under the mesh;
- A hole is drilled in the body for the installation of a 2 kW electric boiler.
1. Cap of the activator;
2. Water level;
3. Tank from the washing machine;
4. Cover;
5. Drain hose;
6. Banks with conservation;
7. Wire mesh;
8. Electric boiler (heating element) for 2 kW;
9. Electric cable.
Juicer
Two options are possible here:
- Using an old machine with a centrifuge and a washing compartment;
- Alteration of a conventional washing machine-barrel.
Let's say right away that the first option is better, because it allows you to implement two processes in one device with minimal modifications: chopping and squeezing fruits. To do this, you will need a washer, in which the activator is located at the bottom, and not on the side wall. Replacing it with three homemade strip steel knives will create a fruit slicer.
Knife installation diagram:
1. Knife,
2. Shaft;
3. Clamping nut;
4. Washer;
5. The bottom of the tank;
6. Bearing unit with oil seal;
7. Activator pulley;
8. Locking screw.
The drain hole of the washing tank must be plugged.
Additional treatments for the second unit - there are not many centrifuges. It is necessary to install a stainless steel mesh in it (mesh size 1.5 mm, wire thickness 0.2 mm) so that it covers the side surface of the centrifuge.
Thoroughly washing the centrifuge, washing tank, hoses and pump with baking soda, you can make the first bookmark.
The principle of operation of such a juicer is very simple. The fruits are washed and in small portions (1/2 -1 bucket) loaded into the washing tub (knives must be turned on). After 15-20 minutes of cutting, the engine is turned off and the crushed mass is transferred to a centrifuge (in portions of 3-4 liters). Turning on the centrifuge, squeeze the juice.
It is much more difficult to make a juicer from a washer-barrel or automatic machine. A homemade centrifuge can become a stumbling block in the barrel. Making it is half the battle, the main thing is to achieve perfectly accurate alignment. Without this, at high speeds, it begins to vibrate strongly and it will be impossible to squeeze out the juice.
Here is a drawing of a working sample. The master had to work hard to reduce the beating of the centrifuge (the engine is suspended from the washer body on 6 springs). Of these, 3 balance the engine in the horizontal plane, and 3 others press it up. The body itself rests on an old car tire that dampens vibration.
Feathering machine
The body of an old washing machine is suitable for assembling a device with which you can remove feathers from poultry carcasses. To make it, a steel disk with a thickness of 3 mm and a diameter slightly smaller than the diameter of the tank must be installed at the bottom of the tank.
Holes are drilled in it and special rubber fingers are placed in them. They are the most expensive elements of the future design ($ 1.5-2 per piece). On average, you need 120-140 pieces. The diameter of the fingers depends on the type of bird being plucked. Consider this moment when you place your order.
All other units of the washer, including the engine, can be left unchanged. Holes are drilled in the side walls of the case for installing feather (biting) fingers. To do this, you need to step back 15 cm from the bottom of the tank.
The distance between the holes for the fingers is chosen within 3-4 cm. The lower disc is mounted on the drive shaft.
The drain hole does not need to be plugged here. It will be needed to drain the water that flows from the carcasses. After scalding the bird in boiling water, it is placed in a tank and the engine is turned on. The rubber fingers remove the nib quickly and cleanly.
The electric motor of out-of-order washing machines is often used to create new devices. Grinding machines, drilling machines, a generator, circular saws are made of them - and this is just the tip of the iceberg. To regulate the engine speed from the washing machine, you need to decide on its type and power.
What is the power of the CM engine
The performance of the motor depends on its type. Three types are used in the complete set of washing machines:
- asynchronous;
- collector;
- inverter (brushless).
Asynchronous motor
It was installed in machines manufactured before 2000. The motor of the semiautomatic washing machine has 2800 rotations per minute, power - 180-360 W. To adapt such an engine for garage "homemade products", you need a three-phase network, a frequency converter, a set of capacitors. This is expensive, so asynchronous devices are not popular with DIYers.
Collector motor

The favorite of the craftsmen. Operates on direct and alternating electric current, power 300-800 W, number of armature turns 11,500-15,000 rpm. From the pros - the cycle is easily adjusted without loss of power. Minus - brushes are often erased.
Inverter motor

The most modern and economical look. Converts AC to DC. It operates without a belt drive and brushes with a power of 400-800 W, making the number of turns from 16,000 to 20,000 per minute.
Currently, the brushed electric motor is the best option in terms of affordability and price for home workshops. It is versatile and easy to operate. Let's look at its device, connection and adjustment methods.
The device of the collector motor of the washing machine

The appearance of motors of different models may differ, but the device, the principle of operation are almost identical. The device consists of:
- hulls;
- starter;
- starter coils (shoes) with two or three leads;
- anchors;
- pulley;
- two brushes;
- collector;
- tachometer (with two or three wires);
- terminal block.
To connect the engine, you need to know the outputs of the armature windings, starter and tachometer. The tester will help you not to get tangled in the wires.
Easy connection of the electric motor

Set the tester to the mode of least resistance and ring the tachometer windings, coils and armature. Make the connection using the terminals that ring among themselves. A properly connected device picks up speed smoothly, does not crack or sparkle. You can check how many revolutions the motor makes with the speed sensor.

A clear step-by-step inclusion can be seen in this video:
How to adjust rotation
There are many ways to manage turnover:
- laboratory autotransformer;
- home appliance adjustment board;
- buttons for screwdrivers, grinders;
- lighting controllers (switches, toggle switches).
The adjustment scheme is simple, you can do it yourself.

This is a satisfactory option for a pump or fan. For more powerful mechanisms (for example, machine tools), you will need a different regulator circuit.

The essence of the question is how to reduce the speed without losing efficiency? The connection is made through a tachogenerator, which transmits the number of turns to the speed controller microcircuit, which coordinates the cycle using a thyristor.

Such a board allows both to increase the speed, and to decrease, but requires constant, intensive cooling due to overheating. A detailed video on how the speed and force of the stroke are controlled by connecting to a microcircuit can be viewed here.