A mini tractor for a household is a very useful technique. With the help of it, you can easily move and lift any cargo, collect, for example, hay or cultivate a plot. At the same time, the range of possibilities of this technique can be significantly expanded, for this it is enough just to equip it with several additions. However, today we are not talking about attachments, but about how to make a mini-tractor for a household with your own hands.
Frame
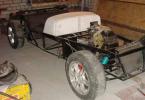
This element is the most important and necessary for most units of special equipment (including such as a mini-tractor). Therefore, in order to avoid unpleasant consequences, it is necessary to draw up a drawing or diagram of the future structure in advance. After that, you can safely start making it. For the frame, several lightweight metal channels should be selected and connected to each other by the method of automatic or semi-automatic welding. Also pay attention to the length of this element. The dimensions of the frame must be proportional to the dimensions of the mini-tractor. The longer this element, the larger the whole equipment.

Other details
After welding the channels, holes are made along the contour, which will serve for fastening various attachments and other structural elements. Consideration should be given to footpegs as they cling to either side of the frame. The main material used here is an 8 mm steel sheet "St-3", which will also be used for the steering column transverse bracket. For additional strength of the joints, the cross sections are supplied with "gussets" made of the same steel that was previously used for the footrests (however, the width of the sheet here will be slightly less, 5 millimeters).
How it is made further After that, the axle hinge bushings are welded to the front crossbeam. They will also be made of ST-3 sheet metal products. Sheet thickness - 2 centimeters. After that, the bridges are attached to the frame (front and rear, respectively).
Homemade products: mini-tractors and parts for them. Learn more about bridges and girders
The bridge is made from separately taken parts and assemblies taken from similar agricultural equipment. Some use bridges from the 24th "Volga"
or "Moskvich". But in our case, such parts will not be used, because they simply do not fit into the dimensions of the mini-tractor. The exception is More details about it we will talk a little later.
Details to do yourself
Parts such as bushings for pivoting, wheel and supporting axle shafts must be made by hand. The transverse beam is also independently manufactured. For this, a piece of pipe with a square section measuring 65x65x5 millimeters is taken.

If this is not the case, the beam can be made from Axle bushings made from Slewing bearings made from pieces of metal pipe. For this, a pipe with a cross section of 70x14 millimeters is taken and cut into several pieces 120 millimeters long each. Also, it is necessary to make seats for bearings in them. After that, the resulting part is covered with metal welded covers. An assembled assembly is welded into the center of the beam (it should consist of 2 roller bearings and a cylindrical cage), with the help of which this axle will be allowed to roll.
Bolts and nuts marked "M-30" should be used as fasteners for this unit. They completely fasten the entire front beam. When tightening, place a special spring washer under the nut. It is worth noting that with each tightening of the bolt connection, you reduce the amount of front axle play relative to the mini-tractor. Thus, you will have the opportunity to adjust this unit, if necessary, before each new execution of agricultural work.
About the rear axle
Unlike the front one, it is not necessary to make it yourself. Here it is enough to install a standard "Volgovsky" element. But, since the width of the mini-tractor does not correspond to the dimensions of the bridge from the GAZ-24, we will have to shorten it to 80 centimeters. For this, the fixation of the "stockings" is removed, the heads of the rivets are cut off, and the rest is pushed deeper. The axle is disconnected from the gearbox housing using a sledgehammer with the first element fixed in a special mandrel.

Thanks to these actions, you will ensure the docking with the reverse gear, due to which the cardan's fracture will be excluded. Also, you will no longer need to balance and install counterweights on mini-tractors for summer cottages, which will significantly speed up the time of the work performed.
To fix the shortened "stockings" in the holes, a thread is cut ("M-12") and screws are screwed in there. The resulting bridge is attached to 8 plates. The latter are welded with bolts ("M-10" 4 for each plate) and nuts to the side members. A spring washer is used to lock the connections. For this, identical plates are welded onto the bridge. At the final stage, self-made brackets are installed under the attachment of the hinged frame. For the hoisting mechanism, the hoist shaft housing is welded to the axle housing.
The final stage
Now the matter remains small: a seat is welded to the resulting structure, and all equipment is painted in one monotonous color (if you wish, you can use several aerosol cans of different shades). It is installed at the back to the equipment to be able to work in hitch with the plow.
How to make a mini tractor for a household with your own hands? Method number 2
This method is simpler than the previous one, but here you will need to have your own walk-behind tractor to perform the work. At the same time, it is not necessary to purchase a new one, some old Soviet "Ural" or "Neva" will do quite well for the tractor.
What do we take from the walk-behind tractor?
The "heart" will be removed from this unit, that is, the motor, which will be the main traction device of the tractor. All other parts can be used for spare parts. In addition, during the work you will need a starting device, axles and wheels for them.

Further assembly technology practically does not differ from the previous one; a welding machine, metal pipes and
Getting Started
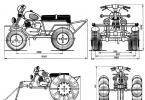
So, how it is done First, the kinematic system of technology is designed. The traction forces coming from the engine of the walk-behind tractor must be transmitted through the roller chain to the intermediate shaft. Also, with the help of the penultimate device, power will be transmitted to the drive wheels. There is a brake (band) on the output shaft, and the gearbox lever is installed along the axis. The engine will be started via the starter pedal. In principle, a mini-tractor for a household is not such a complicated technique as it seems at first glance, so it can be made on the basis of just one drawing.

The frame will be made of steel pipes and angles. You should also provide for a fork with a sleeve for turning the trailer (in the case of a tractor working in conjunction with it or a plow). The so-called "cheeks" are attached to the housing of the bearing assembly, and the output shaft is tightly welded to the "gussets" of the socket. We do the front beam and rear axle in the same way as in the previous method.
Further, a homemade mini-tractor is supplied with a metal body with a side at least 30 cm high. All this must be made of sheet steel. At a distance of 80-85 centimeters from the end of the backbone, a soft seat made of a thin sheet of plywood is installed (additionally, it can be sheathed with leatherette filled with foam rubber).

At the final stage, we equip a mini-tractor for a household with our own hands with a trailing device. After that, the technician undergoes a priming and painting procedure.
So, we figured out how to make a mini tractor for a household with our own hands.
The presence of a piece of land imposes on its owner the obligation to provide care for it. And one of the urgent tasks that must be solved is tillage. Such work can be done manually if the area of the site is no more than 10 acres, and even then this is already problematic.
For large areas you can use a homemade mini tractor which is ideal. At the same time, it is not necessary to purchase a mini-tractor from an official distributor or at a factory, because such equipment can be assembled with your own hands, it is enough to have at least minimal knowledge of technology.
If we compare home-made cars with factory ones in terms of technical characteristics, then the superiority will be on the side of the latter. However, it is still wrong to use the new technique for cultivating small plots of land. Moreover, this is due not only to the high costs associated with the maintenance and purchase of fuel and lubricants. This technique can seriously damage the soil structure. Therefore, a homemade mini-tractor is a much more preferable alternative. Next, we will talk about how to assemble a mini-tractor at home.
Advantages and disadvantages of homemade mini tractors
If you need equipment for processing a land plot, then do not immediately discard the idea of \ u200b \ u200bcreating a mini-tractor do it yourself. In addition to the fact that you can save a lot of money, you will have the opportunity to make a machine that can demonstrate much more functionality than tractors with more power. A homemade mini-tractor can be a faithful assistant for you, which can be used for plowing vegetable gardens and planting orchards, as well as cultivating sown areas, transporting small-sized loads and harvesting.
A the cost of manufacturing such equipment is so small that one season of its operation is enough to cover all costs. The fact is that for the manufacture of such a tractor, units and mechanisms are suitable that can be borrowed from broken equipment or bought at bargain prices. Some owners often show ingenuity in this matter, and, taking other equipment as a basis, make certain changes to it, as a result of which they have a homemade mini-tractor. Naturally, in this case, you will have to perform even less operations in order to assemble a mini-tractor.
Truth, there are some disadvantages here to be mentioned. For the manufacture of a mini tractor, certain parts will be required, which may not be so easy to find. Difficulties can be encountered even when certain mechanisms fail, and it is not known whether it will be possible to find an equivalent replacement for them. It must be remembered that for the assembly of such equipment, units and mechanisms are used, borrowed from a long-unreleased equipment. Therefore, it is possible that it will not be possible to find certain details.
An important stage in the manufacture of a homemade mini-tractor is drawing up a drawing. Getting it right requires technical skills and knowledge. You also need to take into account that the mini-tractor will be used with attachments and trailed equipment, and therefore the owner will have to calculate the tractive effort of the engine.
Drawing up drawings
 Usually, when a person has a desire to assemble any home-made technique, then everything starts with an idea... Some people can do without a work plan presented on paper, relying on their own knowledge of technology. However, not everyone is such a master, so it will be better if you start the process of assembling a homemade mini-tractor by preparing a drawing of the main components.
If it is difficult for you to solve this problem, you can contact your friends if they have already had to do something similar. As a last resort, you can use the Internet and try to find the necessary information there.
After you receive the finished drawing, you can easily assemble a mini tractor. It will not be more difficult than playing with a construction set. Schematically, the work will look like this: you will need to take part A and connect it to part B.
 Please be aware that certain components and mechanisms will have to be prepared in advance before assembling the tractor... Bearing in mind that you borrowed them from another technique, most likely their sizes and other characteristics will differ from those required. But, having a ready-made drawing in your hands, you can easily modify all the mechanisms, because you will clearly know what they should be.
In the process of drawing up a drawing, it is important to decide the question of what design a mini-tractor should have. Quite often, farmers choose the 4 x 4 break option.
This is a version of the tractor that uses an articulated frame, complemented by a 4-wheel drive. This technique will be an excellent option for processing farms.
How to assemble a mini tractor with your own hands?
After the drawing is drawn up, you can start preparing the necessary parts. You should have the following in stock:

Not every owner will find the above details on his farm. Therefore, be prepared for the fact that you have to go through the flea market, as well as look at sites selling spare parts. Surely on one of them you will find the parts you need at bargain prices.
Frame
For making fractures most often they use metal channel # 5 or # 9... This material is best suited because it has the necessary flexural strength. On the basis of the channel, you will have to make two half frames by welding. After that, they are connected to each other using hinges. You can use the propeller shaft of a truck as a fastener.
 Perhaps a fracture will not work for someone. In this case, an all-metal frame can be an alternative. As part of this design, the following elements are present: right and left side members and front and rear cross members.
To create side members, you can take channel number 10... And to make the rear and front traverses, you can use channels No. 16 and No. 12. The crossbeam can be made of a metal bar.
Engine
On a homemade mini tractor any engine can be installed, the main thing is that it has the required power. In order for home-made equipment to be able to cope with all tasks, it is best to equip it with a power unit with a capacity of 40 liters. With.
In most cases, the following types of motors are used for homemade mini tractors:

Also, instead of them, you can borrow an engine from domestic passenger cars of the Zhiguli or Moskvich brands.
In that case, if you decide to stick with the 4 × 4 option, then you will have to modify the M-67 motor: it is necessary to increase the transmission ratio. If this is not done, then the power of the power unit will be insufficient for the equipment to be able to move. Also make sure that the motor is equipped with an additional cooling system.
Transmission
![]() As a gearbox and a power take-off shaft, you can borrow the necessary mechanisms from the GAZ-53 car. The clutch can be taken from the GAZ-52. Keep in mind that these nodes will need to be improved.
As a gearbox and a power take-off shaft, you can borrow the necessary mechanisms from the GAZ-53 car. The clutch can be taken from the GAZ-52. Keep in mind that these nodes will need to be improved.
One of the challenges you need to accomplish at this stage is to keep the clutch in sync with the engine. For this the new clutch basket is being welded, after which it is finalized, giving the required dimensions. Certain manipulations will have to be performed with the engine flywheel, in which you need to shorten the rear plane, and also create a hole in the center. If your farm has a lathe, then you can easily perform these operations.
Steering
 Considering that this mechanism is intended for use on a mini-tractor, it has there must be hydraulic cylinders... In this case, your homemade technique will be more manageable. Keep in mind that the hydraulic system is a complex mechanism, so you cannot make it yourself at home. Therefore, you will need to find a suitable agricultural equipment and borrow from it the hydraulic system available there. For the hydraulics to work properly, oil must flow into it, and therefore you need to get a pump.
Rear axle
 This mechanism you can borrow from a car or truck and then put it on your homemade mini tractor. However, first you have to modify it: you need to reduce the axle shafts using a lathe.
In the event that you do not find a ready-made bridge, you can collect it from different cars. Keep in mind that the rear axle will act as the driver. Therefore, for the front, you can use any available mechanism, the main thing is that it matches the required dimensions.
Wheels
Looking for wheels for a mini tractor, consider their radius that should be consistent with the purpose of using the technique.
- If you are going to transport goods with this machine, then it is best to choose discs with a radius of 13 to 16 inches.
- If you need a mini-tractor to carry out agricultural work, then it is recommended to install wheels of 18-24 radius on it.
Conclusion
Private farms have to solve many problems every year associated with the care of the land. To spend less time and effort on such work, you need a special technique. Buying a factory tractor is not affordable for everyone, so many are considering the option of making a homemade mini-tractor with their own hands. It is not so difficult to make such a machine, since components and mechanisms from other types of technology are used for it. However, in order for the assembled car to be in working order, you first need to draw up a drawing and adhere to it during the entire assembly process.
As a rule, the sphere of agriculture is mainly associated with the cultivation of land for many of us. However, for sowing grain crops and growing vegetables, berries and fruits, it is necessary not only to plow the soil and apply fertilizers, but also to ensure regular watering and weeding. Of course, if a farmer has such specialized equipment as, for example, a mini-tractor, then he can significantly simplify the implementation of many types of work. Speaking about this technique, one should first of all note its small dimensions, but at the same time it successfully copes with the main tasks: plowing the land, loosening, mowing grass and other operations related to soil cultivation.
Large agricultural complexes and firms thoroughly approach this issue and, as a rule, use imported or domestic models. As for private farms, due to limited financial capabilities, they often have to use homemade mini-tractors. Although this approach to business and allows you to save however, the assembly process is fraught with difficulties. But nevertheless, this does not stop many, since it is in the power of every private farmer to make with his own hands not just a homemade mini-tractor, but agricultural machinery, which, after being equipped with additional equipment, can be used to solve a wider range of tasks.
Homemade mini-tractors: types and features
To this class of agricultural machinery it is customary to attribute three types, each of which has its own characteristics:
Homemade mini tractor: pros and cons
First of all, such machines are in demand among the owners of private subsidiary farms. There they are used to perform tasks such as the outbreak of vegetable gardens, the removal and destruction of waste from tree sawing, as well as the improvement of the territory.
pros
This is a technique has certain advantages that ensured her popularity:
Minuses
There are also disadvantages to this technique. This should include the fact that the owner will have to search for components yourself for the car. In the event that during the assembly process some rare part was used, then it will be quite difficult for him to find the same one to replace it. However, the most common practice is when components are most often used to assemble mini-tractors with their own hands, which can be easily found in case of failure.
Having decided to independently assemble a homemade mini-tractor in order to drive it on public roads, keep in mind that you have there must be permission on this. Otherwise, you risk getting a fine for refitting the car.
How to make a homemade mini tractor with your own hands
The main question that arises for those who are interested in a mini tractor is how to make this machine? There are many ways to build a homemade mini-tractor at home. Myself assembly process this technique looks like this:

If you turn to the network, then there you can find many different drawings for assembly homemade mini-tractor. Therefore, having selected a suitable scheme, you can immediately start work, focusing on one or another option, or make changes to the finished one, taking into account your needs and tasks.
Conclusion
 Private farm owners and farmers are faced with many challenges, including how to cultivate the land. The easiest way is to purchase special equipment, however, given the high prices at which many Western and domestic machines are offered, most landowners are inclined to assemble a mini-tractor for cultivating the land with their own hands. Basically, this the task is quite solvable, the main thing is to understand where to start the manufacturing process of this technique. It is advisable to first prepare a drawing in order to clearly know what details should be present in a homemade mini-tractor.
The easiest option is to use the experience of other folk craftsmen who have already had to solve a similar problem. There are many resources on the network where even complete drawings are laid out, which can become a project to create a homemade mini-tractor with your own hands. After that, all that remains is to prepare the required materials and tools, after which you can get down to business.
Agricultural walk-behind tractors have one serious drawback - the operator has to walk along the treated area with them on foot. As a result, fatigue sets in rather quickly, and the time to complete the work increases, which leads to a sharp decrease in the efficiency of labor costs. Another thing is a mini-tractor, which has a full wheelbase and steering. But not everyone can afford to buy such equipment. Therefore, in the agricultural environment, you can increasingly find home-made mini tractors, which are designed on the basis of professional or semi-professional walk-behind tractors.
Converting a walk-behind tractor into a mini tractor: highlights
Unlike amateur equipment, professional and semi-professional equipment has more power. For example, from a walk-behind tractor with a 9 hp diesel engine. you can make a pretty decent mini-tractor for plowing and cultivation. Ultimately, it all depends on the goals that the owner of the modifiable vehicle is going to achieve.
Designing and assembling a homemade mini tractor is not an easy task, but it can be done. And to successfully solve it, you need to focus on two points:
- Development of a body and frame, as well as a diagram of their connection with the basis of a mini-tractor - a walk-behind tractor.
- Development of a kinematic diagram.
The homemade frame and body are made of metal corners or profiled pipes. When calculating the structure, it is necessary to take into account the ratio of its weight to the power of the motor, as well as the resistance that the machine will overcome when performing various types of work.
If you choose a powerful walk-behind tractor as the basis for a home-made mini tractor, this allows you to use ready-made car or motorcycle trailers. Moreover, the leading manufacturers of motoblocks have long provided for the constructive possibility of connecting such trailers to manufactured equipment.
The kinematic diagram of a home-made mini-tractor is a set of design solutions that provide the transfer of torque from the motor-block engine to the drive (mainly rear) wheels. When calculating, it is necessary to distribute the load on the driving axle evenly - both reliability and durability, and functionality, that is, the possibility of using technology, directly depend on this.
DIY mini tractor: where to start?
In fact, there are many options for self-designing a mini tractor. However, the principles are used everywhere approximately the same:
- swivels towards the operator and locks onto the frame.
- Control is carried out using steering rods.
- The hydraulic drum brake is applied.
- Pedal control is used for brake and clutch.
- Manual control is used for the accelerator and attachments.
- The operator's seat is located above the rear drive axle.
One of the easiest ways to create a mini tractor with your own hands is to buy an adapter - a two-wheeled cart with a seat for the operator and an aggregate system (for installing attachments).

Obviously, various parts will be needed to assemble a mini tractor. They can be easily found among automobiles. For example, a drum brake for driving wheels, a steering rack and pedal control units can be taken from a VAZ car. In the same way - by searching on the auto parts market - the seat and other structural parts for a homemade mini-tractor are selected.
But in addition to spare parts, you must have at hand a whole arsenal of tools - a welding machine, a drill, a circular saw, wrenches, etc. And it is very desirable that in the process of assembling a mini tractor you have access to a specially equipped workshop or, if necessary, can use the services of specialists in welding, milling, plumbing and car repair.
Mini tractor frame
The chassis is the basis of the mini tractor. Its main quality should be reliability, however, you need to carefully monitor the total weight of the structure in order to ensure normal adhesion of the wheelbase to the soil when performing work and at the same time not overload the engine.
For the manufacture of the frame of a homemade medium-power mini-tractor, a lightweight channel, a profiled pipe or a metal corner is suitable. The dimensions of the structure, which is assembled by welding, must correspond to the dimensions of the machine. Along the frame contour, it is necessary to make holes for mounting and fixing the structural elements of the minitractor.
The ratio of frame weight and strength should be optimal. It is not worth overloading the structure with additional stiffening ribs, as well as saving on metal, sacrificing overall reliability indicators.

Before you start assembling the frame, you need to decide which trailers and you are going to use when working with it. And in order not to lose thought in the design process, before starting work, drawings of the future machine and its main units with basic dimensions should be completed. To do this, you can use ready-made documentation that needs to be adapted to the specific parameters of your mini tractor. 
Front and rear axles
These assemblies are created from individual spare parts and assemblies taken from cars or even trucks or other agricultural equipment. However, you will have to do some details yourself, as well as the assembly itself.
To make a front axle, you will need:
- cross beam;
- bushings for supporting pivot axes;
- axle bushings;
- push the wheels;
- (ball and roller);
- bolted connections.
A section of a profiled pipe or metal corner will perfectly cope with the function of a crossbeam. Structural steel 45 is suitable for the manufacture of half-axle bushings. The slewing bearings are made of a profiled pipe, modified for the installation of bearings, and are closed with steel covers made of steel grade st3. The front axle assembly, consisting of a cylindrical cage and roller bearings, is welded to the center of the crossbeam. Using large bolts, the bridge must be fixed to the bushings in the crossbeam of the frame. 
The tightening force of the bolted connections is responsible for the amount of play of the front axle relative to the design of the minitractor. Too rigid, as well as too loose fastening negatively affects the driving comfort, therefore the play must be optimal.
The assembly of the rear axle is carried out in a similar way. The finished structure can be borrowed, say, from a UAZ car. The long stocking of such a bridge will need to be shortened so that standard short axle shafts can be used. It will not hurt to protect the rear axle, or rather its welded joints from possible impacts during operation. For this, a support is used - a metal corner, applied along the welded seams of the prefabricated bridge structure.
Wheelbase and kinematic diagram
The choice of wheels for a homemade mini tractor deserves special attention. It is quite possible to use wheels from a car, however, the dimension should be observed here. The optimal dimensions for wheel rims are 12-14 inches. When choosing a smaller diameter, there is a risk that the machine will bury its nose into the ground during operation. On the other hand, if the front wheels are too large, the operator will have to exert tremendous effort to complete the maneuvers. However, to facilitate the process of controlling the machine, you can always use the power steering from a car or other agricultural machinery. 
Mini tractor wheel tires must have developed lugs. This will increase the maneuverability of the machine, reduce the load on the chassis and facilitate the steering process.
As for the kinematic diagram, it is better to use ready-made options, the search for which does not take much effort at the moment. The scheme must be adapted to the parameters of the nodes that you are going to use to create a mini tractor. It will be useful to consider the possibility of connecting attachments, which will greatly increase the functionality of a home-made machine.
Control system and operator's seat
After the manufacture and installation of the chassis, you can proceed to the implementation of the kinematic diagram and installation of the control system. The most important thing in this business is to place it correctly. The front seat of a passenger car, which is easy to find at car services and in workshops that disassemble vehicles, will perfectly cope with this role.
The steering wheel should be set to the optimum height for the operator. The steering wheel should not interfere with the free placement of the knees - it must be mounted so that when sitting, working with it does not cause discomfort. 
All the necessary parts for foot, hand and lever control of the machine and its functional units can be found in the same place as the seat and all other spare parts - in the workshops or on the market.
Engine installation and bodywork
After assembling the undercarriage, implementing the kinematic diagram and installing the operator's seat with the control system, you can proceed to the installation of the main unit of the minitractor - the engine. To securely fix it on the frame, you should use a special slotted plate - it will also give the chassis additional rigidity. Next, you need to lay the electrical and mechanical circuits of the control system, connect and configure the operation of the control system.
The body cladding is made at the request of the user, however, it is still better to close some components and structural elements. This will prevent contamination and failure in case of contact with foreign objects and soil.