Good day, dear car enthusiasts! There is most likely no driver among us who has not at least once experienced a feeling of helplessness at the moment of braking. When the car continues to move, and not at all in the direction the driver wants. Skid.
Fortunately, engineering does not stand still. Modern driver armed with a system such as ABS. Let's take a closer look at the system and see if it is possible to bleed ABS brakes yourself.
What is car ABS
ABS (Anti-lock Braking System) is an anti-lock braking system that prevents the wheels from locking during emergency braking.
The main task of ABS is to regulate the speed of rotation of all wheels. This is done by changing the pressure in the car's brake system. The process occurs using signals (pulses) from each wheel sensor that enter the ABS control unit.
Operating principle anti-lock braking system
The contact patch of the car's wheels is relatively stationary to the road surface. According to physics, the wheels are affected by the so-called. static friction force.
Taking into account the fact that the static friction force is greater than the sliding friction force, ABS effectively slows down the rotation of the wheels at a speed that corresponds to the speed of the car at the moment of braking.
At the moment the braking begins, the anti-lock braking system begins to constantly and quite accurately determine the rotation speed of each wheel and synchronizes it.
Anti-lock braking system device
Here are the main components of ABS:
- sensors installed on the wheel hubs of a car: speed, acceleration or deceleration;
- control valves installed in the line of the main brake system. They are also components of the pressure modulator;
- ABS electronic control unit. Its task is to receive signals from sensors and control the operation of valves.


Bleeding brakes with ABS, taking into account the characteristics of the system
Leveling up brake system with ABS will require you to have certain technical skills. In addition, it will not be superfluous to first study the manual on the design and maintenance of the brake system of your car.
Features of bleeding brakes with ABS
- in cars in which the following units are located in one unit: a hydraulic valve block, a hydraulic accumulator and a pump, replacement brake fluid and bleeding the brake system with an anti-lock braking system is done in the same way, you need to turn off the system by removing the fuse. Bleeding of the circuits is carried out with the brake pedal pressed, the RTC bleeder fitting must be unscrewed. The ignition is turned on and the pump expels air from the circuit. The bleeder screw is tightened and the brake pedal is released. An extinguished malfunction light is evidence that your actions were correct.
- Bleeding the brake system with ABS, in which the hydraulic module with valves and the hydraulic accumulator are separated into separate units, is carried out using a diagnostic scanner to retrieve information from the ABS ECU. It's unlikely you have one. Therefore, bleeding of brakes with ABS of this type should most likely be done by you at a service station.
- Bleeding the brake system with ABS and electronic systems activation (ESP or SBC) is carried out only in the terms of service.
How to bleed ABS brakes
It is important! It should be remembered that the pressure in the brake system reaches 180 atm. Therefore, to prevent brake fluid from escaping, before disconnecting brake lines For any system with ABS, it is necessary to discharge the pressure accumulator. To do this, with the ignition off, press 20 times brake pedal.
Technology for bleeding the brake system with ABS
Bleeding brakes with ABS, like bleeding a conventional brake system, is done with an assistant. Turn off the ignition (position “0”). Disconnect the connectors on the brake fluid reservoir.
Front wheel brakes:
- put the hose on the bleeder fitting;
- open the fitting back;
- the brake pedal is pressed all the way and held in the depressed position;
- we observe the release of an “aired” mixture;
- tighten the fitting and release the pedal.
Rear right wheel brake:
- put the hose on the bleeder fitting, unscrew it one turn;
- press the brake pedal all the way, turn the ignition key to position “2”. In this case, the brake pedal is held in the pressed position;
- a running pump will expel air from the system. That is, as soon as the brake fluid begins to come out without air bubbles, close the fitting and release the brake.
Rear left wheel brake
- The hose is put on the fitting and unscrewed 1 turn;
- DO NOT press the brake pedal;
- a working pump pushes out the “aired” mixture;
- press the brake pedal halfway and tighten the fitting;
- release the pedal and wait until the pump stops completely.
In reverse order: ignition key to “0”, connect the connectors to the brake fluid reservoir, check the brake system for leaks (see ABS fault indicator).
Good luck with bleeding your ABS brakes.
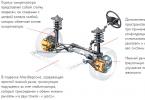
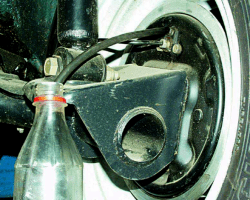
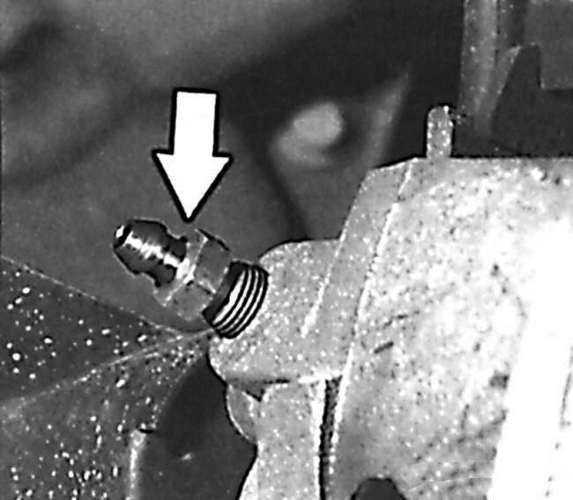
At the factory, the entire brake system is completely empty, but its design is such that the fluid reservoir is located on the main brake cylinder in engine compartment, at the very top. A little lower is usually the ABS block (who has it), and then brake pipes go to the front and rear wheels. There, in wheel brake mechanisms, cylinders can be used different options execution. But one feature unites all of them: a bleeder fitting is always located at the very top of the cylinder. It is also sometimes called an air release valve.
Elements of the service brake system of a car with ABS: 1 - brake mechanism front wheel; 2 - tube brake mechanism front wheel; 3 - ABS block; 4 - hydraulic drive reservoir; 5 - main brake cylinder; 6 - vacuum booster; 7 - brake pedal; 8 - brake tube rear wheel; 9 - rear wheel brake cylinder; 10 - rear wheel brake hose; 11 - front wheel brake hose
At the factory, a special fitting is put on the neck of the reservoir, through which brake fluid fills the system under pressure. The worker below opens the bleeder fittings on the wheel cylinders one by one. Air is first forced out of them, and then brake fluid flows. All. The fitting can be screwed on. By repeating this operation with all the wheels of the car, we obtain a fully charged and efficient braking system. All that remains is to disconnect the filling nipple from the neck of the tank installed on the master brake cylinder and tighten the tank cap.
The question arises whether ordinary car owner use the same method? If you have repaired the brake system and replaced hydraulic components, or are bleeding the system because you suspect there is air in it, I usually recommend doing a classic “pump and hold” bleed. More intensive passage of liquid in the tubes and cavities of the cylinders is guaranteed to displace air bubbles.
Don't try this at home?
What if, in accordance with the maintenance regulations for our car, we decided to simply replace the fluid? For some every two years, for others every three. And this is where the method of flushing the system with new brake fluid comes to our aid. We take advantage of the fact that the fluid reservoir is located high, and the fluid simply drains down to the working cylinders under the influence of gravity. The main advantage of the proposed method is that it does not require an assistant.
Brake fluid should be purchased with a reserve (at least 1 liter). It’s interesting, by the way, that almost everyone passenger cars, regardless of their size, off-road, the presence of systems and other differences, the capacity of the brake system is about half a liter. Please note that the replacement occurs by stirring, so you need to pour a slightly larger amount of liquid through the system. Stock up on 1 liter of brake fluid from any manufacturer (they are all compatible). DOT-4 is the most common brake fluid used in the vast majority of cars. It has to be replaced due to its high hygroscopicity - the ability to absorb moisture from the air and, because of this, lose its performance characteristics.
So, replacing the brake fluid yourself will require placing the car on an inspection ditch or overpass and providing a free passage between the place from where you can refill the brake fluid reservoir in engine compartment, and brake cylinders on all four wheels.
We work in stages
Use a rubber bulb or syringe to pump out the brake fluid from the reservoir. Top up new fluid to the top edge. To speed up the process (to release fluid from all cylinders at once), it is advisable to select four pieces of tubes that fit tightly onto the bleeder fittings of all cylinders. We lower the free ends of the tubes into small transparent bottles.
We unscrew the fittings of all brake cylinders. We make sure that the liquid has flowed through all four tubes. We control the decrease in fluid from the reservoir located on the brake cylinder and immediately replenish the reservoir. We observe an increase in the level of liquid in bottles located near the wheel brake cylinders.
It is necessary to change several times the role of an observer of fluid draining from the brake cylinder fittings to the role of a controller replenishing the fluid level in the reservoir on the brake cylinder to prevent it from drying out.
The fastest filling, as a rule, occurs in the case of a bottle in which the hose coming from the brake cylinder of the front left wheel is lowered. As soon as there is about 200 ml of liquid in the bottle of the front left wheel, wrap and tighten the fitting of the local cylinder. We repeat the same with the front right wheel. We complete the process at rear axle- here 200–250 ml of liquid should pass through each fitting.
That's it, the brake fluid replacement is complete. All that remains is to make sure that all fittings are tightened tightly. We put on the protective caps, check the fluid level in the master cylinder reservoir - and off we go.
The efficiency of the entire mechanism, as well as the safety of the vehicle, depends on its condition. Therefore, it is worth knowing how to replace it correctly, as well as determine the condition of the liquid. You can perform this operation yourself. But for this you need to have certain skills. How much brake fluid is needed to change and how to do it this work on one's own? Let's look at it in our article today.
About regulations
How often do you need to change brake fluid on Toyota and other cars? All world manufacturers recommend performing this operation once every two years, or every 60 thousand kilometers. You should also reduce given period when high load And harsh conditions operation.
Even during normal city traffic, this liquid heats up to 150 degrees Celsius. And in case of a stop, the temperature can briefly increase to 200 degrees. Some may say that the liquid is designed to withstand such loads. But they are only partly right. Yes, the new liquid can withstand temperatures of 205-250 degrees Celsius. But over time it absorbs moisture. Even a couple of percent is enough to reduce the boiling point by 50 degrees. You need to understand that the liquid is hygroscopic and the presence of moisture is detrimental to it. As a result, steam locking of the brakes occurs. When the bubbles suddenly expand, some of the liquid will be squeezed out into the tank. And when you press the pedal, sufficient pressure will not be generated in the main circuit. The pedal eventually falls through and the car does not slow down. This is very dangerous, as it grows significantly braking distances.
When should you change first?
This regulation need to be reduced if:
- The amount of moisture exceeded permissible norm at 3 percent.
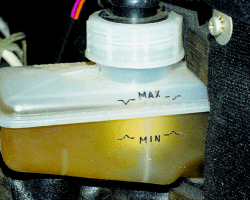
- The liquid turned black.
- The brake system is being repaired.
Please note that there are now various testers that allow you to determine the condition of the brake fluid. They determine the moisture concentration, and if it is exceeded, the corresponding red lamp lights up.

The price of such devices is small (about 250 rubles). However, this tester will not be superfluous for a motorist.
Which one to pour?
So, the life of the liquid has come to an end. Which one should I use as a replacement? This question arises for many car enthusiasts. It must be said that in the majority modern cars liquid class DOT 4 is used. This applies to both Russian cars, and foreign cars. But recently, some cars began to use class 5 fluid. We also note that it is recommended to use the DOT 3 product on older foreign cars.

Can liquids be mixed? It all depends on the class. So, in a car where the factory has prescribed DOT class 3, you can fill a fourth class product. But new cars with DOT 5 cannot be filled with DOT 4.
About quantity
How much brake fluid does it take to change? For most cars and SUVs, one liter is sufficient. In general, this system uses little liquid. Therefore, after replacing the brake fluid on a Kia, motorists often have another 200 grams left “in reserve.” The product brand can be any. If we talk about Russian brands, then this is RosDOT.
What will you need to change the brake fluid?
To do this we need to prepare:

The replacement of brake fluid on a VAZ and other cars is carried out according to a diagonal pattern. The rear is pumped first right wheel, then left front, left rear and right front. Work can be performed without removing the wheels (but only if there is access to the bleeder fittings from below and there is an inspection hole).
Let's get started
So, first we open the hood and find the fluid reservoir. We unscrew its cover and place a small object between the piston and the plate. Remove the protective cap from the rear valve of the right brake element. We put a transparent hose on the fitting and lower the end into the bottle. How do you then replace the brake fluid yourself? Next we start pumping.
To do this, we need an assistant who, at your command, will press the brake pedal all the way at two-second intervals. It is necessary to press the pedal about five times, and then keep it in the clamped position. After this, the outlet fitting is unscrewed. Liquid will begin to flow down the hose.

The next step is to tighten the fitting. After this, add new fluid to the reservoir. Then we repeat the pumping procedure. This must be done until clean liquid drains from the circuit.

After this, you need to move on to the remaining wheels according to the scheme. The replacement procedure here is the same as in the case of the rear right braking element. It is important to monitor the fluid level in the tank. It should not be allowed to fall below the minimum. Otherwise, air will enter the system. And it is not so easy to remove it. A repeat replacement procedure will be required.
At this stage, the work procedure is completed. You can remove all accessories and begin full operation of the car.
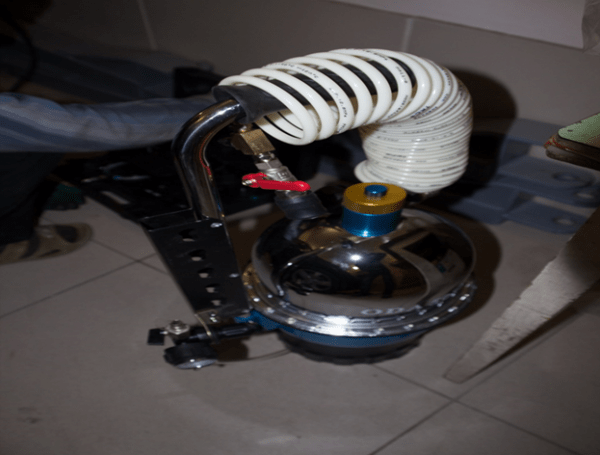
The presence of an anti-lock wheel system complicates this procedure the fact that the ABS modulator must also be pumped. And for this you need to create overpressure V expansion tank. How to replace brake fluid with your own hands in this case? We need to build a special device. You need another tank cap, a pressure bulb (can be taken from any medical device for measuring pressure) and a piece of tube with a fitting. We drill a hole in the lid and install the fitting with the tube on the sealant. According to the instructions, to change the brake fluid on a car with ABS, you need to create a pressure of 1 bar on the reservoir.

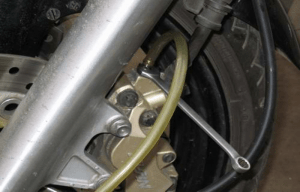
So let's get started. First, pump out the old fluid from the reservoir and add new one. Then we pump the wheels according to the same scheme. The last one left will be our modulator. Add liquid to the tank again to the maximum and take our device. Close the lid and apply pressure with the bulb. Next, we put the tube on the fitting, and lower the other end into our container (mineral water bottle). Using a 10mm wrench, unscrew the bleeder fitting. As the old fluid comes out, pump up the bulb. We do this until all the dirty liquid comes out of the modulator. Its condition can be determined visually. After this, close the fitting with a force of 8.3 Nm and add brake fluid to the upper level. Reinstall the factory cover. That's it, the procedure for replacing brake fluid on a car with ABS has been successfully completed.
note
When performing any work with brake fluid, it is important to remember that it is very hygroscopic and easily absorbs moisture. Therefore, you should not leave the eggplant open. After topping up, close it hermetically.

On scooters and motorcycles, the fluid replacement procedure is similar. The only exception is that the reservoir is initially filled to the top with liquid, and the brake lever only needs to be squeezed once. After this, the drain nut is tightened. The lever can be released. This operation is repeated until the old liquid is completely replaced by a new one.
Conclusion
So, we found out how to replace brake fluid. As you can see, this operation can be carried out independently. True, on cars with ABS it will be necessary to make special tool. Otherwise create high blood pressure We won't be able to do it in the tank. The procedure itself does not take more than two hours. However, we need an assistant who will, on command, press the brake pedal and keep it depressed for a certain time.
Anti-lock braking system components, represented by a hydraulic unit and a pressure sensor, are built into the standard brake circuit of the car. By analyzing the wheel rotation speed based on data received from sensors, the system adjusts the brake fluid pressure in the circuit, preventing it from blocking.
Existing types of ABS systems
The sequence of changing ABS brake fluid is essentially a simple and trivial procedure. Despite this, the modern auto industry takes into account safety trends: almost all car models are produced with installed systems ASC and EBD. Control over these nodes is carried out by the system directional stability— ESP.
In this regard, replacement of TZ is carried out only in authorized service centers. The reason for this lies in the need to connect the ECU to a diagnostic scanner. On those cars in which the valve system and pump with hydraulic accumulator are represented as separate units, it is impossible to change the brake fluid yourself for the same reason.
Why do you change the brake fluid in a car?
The main task of the TZ is transmission to brake cylinders and energy pads from the system's master cylinder. The frequency of its replacement is set by the manufacturer: the procedure is carried out every 1.5-2 years or every 35-40 thousand kilometers. This frequency corresponds to the normal operation of the vehicle.
The brake fluid is also changed if the brake system breaks down, especially if moisture has gotten into it. TJ itself is a very hygroscopic composition, and if it absorbs water, it immediately loses its characteristics. The brake system in a car is not completely sealed, which is why water can enter it through compensation holes.
Another reason for changing fuel oil is a common mistake - mixing different auto fluids. Of course, this can be done, but you need to take into account a large number of factors and parameters - engine model, composition, characteristics of the fluid itself, type of additives, operating conditions, and others. It is acceptable to add a small amount of the composition, but experts strongly advise a complete replacement of the fuel fluid.
The best option is to replace the fluid with a similar one from the same manufacturer and the same brand.
Myths about brake fluid
There are several misconceptions about TJ, which are taken for granted by many drivers.
The first myth is the closed mode of brake fluid operation. Compensation holes present in the brake system of a car are responsible for the movement of air inside it. Along with air flows, moisture vapor gets inside and is absorbed by the fuel fluid, which leads to a loss of its properties.
The second myth is about the possibility of mixing with each other different liquids. Of course, this can be done, but not in every case and not with all compositions. Depending on the car model and its design features In the production of TJ, certain standards are applied. For this reason, you can add fluid of a different brand and manufacturer, but extreme cases and in small quantities.
The third myth is that fluids that meet the DOT-4 standard can be poured into any car. This is not entirely true; A specific type of fluid corresponds to a specific make and model of a car. You should adhere to the requirements of the car manufacturer - safety and life are much more expensive than the price paid for a bottle of TJ.
Methods for replacing brake fluid
 It is advisable to fill in fresh fuel oil at a car service center. Actually, this thought comes first to the minds of many drivers. In this case, there is no need to delve into the car yourself, armed with keys and climbing into inspection hole. The car service has special equipment and professional specialists.
However, it is worth remembering that the services provide only the replacement of brake fluid, nothing more. In addition, the final price may increase significantly due to additional work.
The second option is to replace the fluid yourself. It is much cheaper - its price is measured only in the cost of the technical equipment itself and its own labor costs, it is profitable and also includes visual inspection car and its condition.
In the second case, the first thing you need to do is look into the car’s operating manual and take an interest in the diagram, or design, of the brake system. It can be parallel or diagonal.
The brake fluid is replaced one by one in the circuits. In the first case, they start with the right rear wheel, move to the left front, left rear and right front. In the second - from the right rear, left rear, right front and left front wheels.
To make it easier to change the fluid, it is better to lift the car onto an inspection hole or overpass and remove the wheels from it, observing safety rules. After filling in the new product, the brakes are completely bled.
Changing ABS brake fluid
This process can be seen in the video:
In the braking system of a car with ABS, when replacing a TJ, several nuances should be taken into account. As a standard procedure, the procedure is carried out provided that the pump, accumulator and valve block are located in one unit.
If the ABS system is separate, then it is better to change the fluid at a service center. In such a situation, the fuel fluid is poured into the system using a special apparatus under high pressure, which eliminates the possibility of air ingress.
In brake systems with SBC or ESP units, brake fluid can only be replaced using a special installation. This is explained by the fact that during such procedures, the sequence of opening the hydraulic module valves plays a huge role, which is impossible to do on your own.
To replace the brake fluid with your own hands in an ABS system you will need:
Transparent container.
Transparent hose 20-30 cm long.
Keys for 8 and 10.
Pear or syringe.
The procedure is carried out as follows:
Fresh composition is poured into the tank.
The right and left front cylinders of the brake system are pumped.
The rear right cylinder is pumped, at the same time the pump is turned on and the brake pedal is pressed.
The rear left cylinder is pumped with the hydraulic pump on.
The tightness of the system is checked.
If there is a drain fitting on the ABS module, all cylinders are pumped, after which the installation is “run” under excess pressure.
Changing brake fluid yourself is best done only in extreme cases and on cars produced before 1990. The best option changing the TJ is contacting service center, where the entire procedure will be carried out correctly without violating the tightness of the brake system.
As you know, in any car you have to change something from time to time. Replacing brake fluid is, of course, no exception. The safety of both the vehicle driver and other participants directly depends on its quality and purity. traffic. It directly affects the smooth functioning of the entire braking system of the vehicle, and it must be changed regularly. Many novice (and more experienced) drivers often neglect to carry out such a procedure or simply do not know about its necessity and significance for the car. Sometimes they don’t even know how much brake fluid is needed for complete replacement.
Why does brake fluid deteriorate?
It doesn’t matter at all what brand of solution is poured into the vehicle, it immediately and quite actively begins to “absorb” moisture from environment. There are several reasons for this:
- worn brake system seals;
- sealing flaps;
- long term vehicle downtime;
- incorrect mixing liquids being poured (including forced);
- the “ventilation” system of the tank itself.
It is worth knowing that if the brake fluid absorbs only an extra 3.5% of moisture, it is able to boil much faster, which seriously increases the risk of complete brake failure or cylinder blocking. Especially when doing something drastic or emergency braking. Therefore, the frequency of changing brake fluid is at least 2-4 times a year, and if the car is old enough, it can even be increased, remembering that safety is something you cannot skimp on.
Often the need to replace brake fluid is caused by using old or incorrect mixed liquid, for example, mineral or glycolic. In addition, a number of manufacturers produce unique formulations that in no case can work “paired” with other liquids.
Despite the fact that you can do all the work yourself, many, especially inexperienced car enthusiasts, are simply not aware of how to change the brake fluid in a car with their own hands. If there is no more experienced and knowledgeable car enthusiast A way out of the situation may be a visit to a service center, where the brake fluid will be replaced quickly and professionally, and the cost of the work will be quite acceptable.
Proper replacement of brake fluid with your own hands
Attention! Carrying out the brake fluid replacement procedure on your own without special equipment will require at least 2 hours of free time and an assistant.
Manual replacement of the solution is advisable on vehicles not equipped ABS system. Replacement must be carried out in all circuits of the brake system. At the same time, if the fluid on a car is changed for the first time, it makes sense to first familiarize yourself with technical description, which will allow you to know exactly the location of the highways and eliminate possible errors when performing work. Do not forget that replacement begins with the wheel furthest from the central cylinder.
There are 2 options for the location of the contours:
- parallel, in which the fluid is replaced starting from the right wheel at the rear, and then alternately the left rear, the pattern is repeated at the front;
- diagonal, where you need to start from the right rear, then the front left, then the left rear and, accordingly, the front right.
It is worth understanding that if a complete (independent) replacement of brake fluid is carried out by one person, it is better to first remove the wheels from the vehicle or drive it onto an overpass (pit). Often the motorist does not have this opportunity, so he has to remove the wheels one by one using a jack. The car should be in gear at this moment, but using a “shoe” under at least one of the wheels won’t hurt. Convenience self-replacement differs by various brands and models Vehicle, and depends on where and at what angle the fittings are located, which are used to pump the system.
Advice! First, the liquid itself is prepared, which will require no more than 1.5 liters, a transparent hose (d 5-6 mm), socket wrenches and a container for draining, preferably with a narrow neck.
Pumping - stages of work and determining its necessity
The need to pump the brake system and replace the fluid is eloquently indicated by the brake pedal. If its movement has become unusually soft, and resistance is felt only at the floor, we can say with confidence that air has accumulated in the system. If it is necessary to determine the air circuit, you can accelerate the car to 60 km/h and brake sharply. A faulty wheel will leave virtually no mark, but this test must be performed on a dry and fairly level surface.
The actual process of pumping and replacing (these are integral parts of the process) brake fluid looks approximately the same for most cars.
- A hose is placed on the fitting of the “impeller” wheel. It is more convenient if it is transparent. The second end is placed in a container with liquid, for example, plastic bottle.
- By pressing the brake at least five times, increased pressure is created throughout the entire system.
- With the brake pressed, you will need to unscrew the fitting on the wheel approximately halfway. After displacing the old fluid, where, as a rule, air bubbles are present, the fitting is tightened. The operation should be carried out until the displaced solution is free of bubbles - this must be determined visually.
Important! Quite often, motorists make a mistake - they use brake fluid that has been stored for a long time after opening the package. This should not be done, since she has already had enough water and air.
Before you replace the brake fluid on a car with ABS with your own hands, you need to completely pump out the old one from the reservoir and fill it with fresh one. Further, the algorithm, in principle, does not differ from the above. Of course, it is more convenient to use special equipment, which will completely eliminate airing of the system. In some cases, the brake fluid flows out of the fitting very slowly - turning on the ignition will help here.
Some craftsmen also use a very simple method - simple cups (250 ml) are placed under the unscrewed fittings, and while the old liquid flows out, new liquid is added to the tank. Despite the fact that the cost of replacing brake fluid is not that high, the entire procedure can be completed independently. Although for such cars it is better to use a special device for replacing the brake fluid yourself.
Possible problems when performing work
As a rule, leisurely and neat replacement, performed independently, does not threaten any negative consequences. The most common problems include, perhaps, only damage to the fitting intended for bleeding. In most cases, it simply breaks off, which necessitates replacing the cylinder, since drilling is ineffective here.
To make the process of unscrewing the fitting as easy as possible, you can pre-treat it with WD-40. Then, using a small hammer, very carefully tap it on all sides. Such measures are sufficient for easy unscrewing, and there is no need to unscrew it entirely. It will be more convenient to work with an elongated head, thus the force will be distributed more evenly.
In the case where the technology is used to “renew” the brake fluid, it can relatively easily get on the skin - this is completely unacceptable, since it is toxic. Inhalation of its vapors is also not allowed. In addition, it does not hurt to take some precautions when working:
- do not allow liquid to get on the wires, which will lead to damage to the integrity of the insulation, as well as paintwork car, having previously covered possible places of splashes/drops with a thick cloth;
- it is not permissible to change the amount of brake fluid for replacement - if 1.5 liters is specified, this volume should be filled;
- if for specific car the manufacturer recommended a certain type of fluid; it should not be changed to another;
- if you only need to add a small amount of new solution to the system, you can only use the one that has already been filled.
It is quite natural that absolutely every car that goes on the road should always be technically sound. One of the important conditions for this is an adequate interval for replacing the brake fluid - it must not be violated under any circumstances. It is worth remembering that even small change The color of the brake fluid already indicates a change in its properties. Very detailed information All the intricacies of this procedure are presented in the video: