Replacing the clutch on Toyota Corolla with robotic shifting. Everyone has a lot of heard that the robot on Toyota is very capricious and it is worthwhile to bypass him, so I want to say that everything is wrong. Robots on Toyota Corolla and Auris are pretty strong. Regarding their fellow, Honda, Mitsubishi, Opel and Peugeot. The first models with robotic boxes walked with small defects, but Toyota corrected the position upgrading no refinement in serial production. And the review of the models of old issues, with a replacement for a new model made absolutely free.
Now consider what advantages in robotic. Everything was thinking in order to unload the driver from the obligation to switch the transfer. Especially it is very boring in traffic jams and maintain the inherent inhabitants and fuel consumption of the mechanics, and they succeeded. The only minus in it is smooth delays in gear shifts. The difference in consumption is about 2 liters per hundred kilometers of run.
The frequency of clutch replacement on the robot depends on the intensity of the ride. It is about 70 to 120 thousand km. Mileage
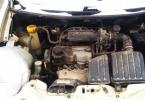
To replace the clutch we will need Clutch set, this disc with a clutch basket and clutch outlet bearing. It is very desirable everything in the original.

Disconnect the air flow sensor connector, air duct clamps and the latch of the air filter housing cover. Then we unscrew the bottom of the air filter housing.

We unscrew the cushion cushion bolt but do not take it out. Disconnect all connectors from the checkpoint. By that, unscrew the upper fastening bolts.

We unscrew the hub nuts and fastening the ball support to the lever to remove the drive shafts. We pre-drain from the checkpoint.

We unscrew the front axle cushion and pull out the drive shafts from the box for the convenience of dismantling the gearbox.

We set the stop stands on the gearbox and the engine so that it does not allow and slightly lift the gearbox to remove the upper bolt of the gearbox that we have previously unscrewed. As can be seen in the photo from the left peel of the drive, the oil suggested from why this cavity is black. When installing it, we will replace it with a new way to eliminate oil leakage. Following, unscrew the cppon fastening bolts in a circle and pull out the mounting box from the motor. It is tightly sits on the guide bushings. And here is the gearbox on the floor.

We remove the old grip from the flywheel and check the flywheel on wear itself should not exceed 03 - 05 mm. And its surface must be smooth and smooth. As a rule, the flywheel fails very rarely.

We establish a new clutch on the flywheel and center the clutch disc. We change the release bearing to the new one. And install the PPC. The assembly procedure is exactly in the reverse order.
After assembly, an initialization (adaptation) of the clutch is carried out.
Toyota Corolla's clutch initialization and Toyota Auris.
Before you start an independent clutch initialization, remember if you cannot correctly hold initialization. The transmissions will stop turning on and to transport the car to the service will have to cause a tow truck.
1.
Prepare (a "):
- Stop the car.
- Translate the gear lever to N.
- Turn off the ignition.
2.
Using SST, connect the contacts TS and CG connector DLC3.
3.
Wait at least 10 s.
4.
Turn on the ignition (IG).
5.
At least 7 times within 3 s Press Pedal.
- The buzzer emits 2 sound signals with an interval of 0.25 s.
6.
Press the brake pedal.
7.
Hold down the brake pedal, shift the shift lever in the next sequence.
- When initializing the ECU: N\u003e E\u003e M\u003e -\u003e M\u003e -\u003e M\u003e -\u003e M\u003e -\u003e E\u003e N.
- When initializing the clutch: N\u003e E\u003e M\u003e +\u003e M\u003e -\u003e M\u003e +\u003e M\u003e -\u003e E\u003e N.
- when initializing the transmission: N\u003e E\u003e M\u003e -\u003e M\u003e -\u003e M\u003e +\u003e M\u003e +\u003e E\u003e N.
8.
Release the brake pedal.
9.
Press brake pedal again.
- the buzzer will publish sound signals with an interval of 0.5 s indicated below the number of times (the interval between the cycles is 2.5 s).
- twice when initializing ECU (1 cycle)
- three times when initializing the clutch (1 cycle)
- four times when initializing the transmission (1 cycle)
Note:
- If the buzzer does not make out sound signals, as described above, turn off the ignition and wait at least 15 s. Then repeat the steps starting from step (a ").
- If the buzzer sound signals are published with an interval of 1 s (and not 0.5 s), turn off the ignition and wait at least 15 s. Then repeat the steps starting from step (a ").
10.
At least 3 times within 2 seconds Press Brake Pedal.
- The buzzer will publish 2 sound signals with an interval of 0.25 s.
11.
Turn off the ignition and wait at least 10 seconds.
12.
Initialization is completed.
13.
Disconnect the SST from the contacts of TS and CG connector DLC3.
Initialization of the Box-robot Toyota Corolla do it yourself - a procedure available for car enthusiasts. It is not necessary to go to a specialized car service to solve this problem. It is enough to explore the instructions in detail, watch the video on this topic, to get acquainted with the TechStream program, and the setting will become accessible to any owner of Toyota Corolla 2008, 2006, 2007.
How is initialization?
After replacing any details, the operation of a robotic gearbox can be broken.
In order for MMT to work out again flawlessly, it will be necessary to initialize. The instruction should be observed clearly, otherwise the procedure will have to be repeated.
First of all, it is necessary to figure out what is a robot box, then the initialization of MMT will become simpler for understanding and performing the process. The robot is constructively different from ordinary automatic transmission. It works more clearly, does not allow jerks, switches without delays, the driver does not need to apply any mechanical effort to switch the transfer.
MMT is equipped with an ECU control unit, there is a position sensor, as well as machine control sensors. The usual manual transmission has a robotic drive that independently chooses the transfer. Coupling has a car: you can install automatic, manual or semi-automatic mode of operation of the robot.
This system is convenient for this system:
- fuel consumption will be like a manual transmission;
- has high reliability;
- switched yourself like a machine.\u003e
What problems arise?
The first Toyota Corolla with a robotic box appeared in 2006. The transmission was imperfect and had a number of problems. The control unit often gave failures, initialization was required to make every 10 thousand km. If this is not done, the clutch disc was beginning to overheat, because of which it was necessary to change it every 50 thousand km. In traffic jams, the car moved jerks, the ECU also gave failures.
Toyota Corolla's clutch initialization and robot boxes are a reset of all the settings of the ECU. Corolla 2007 or another year of release may require initialize if any part of the mechanism was replaced (for example, after replacing the clutch, sensors, electric drive), if the computer stops working normally. Calibration is needed if the system gives unknown errors or works with failures.
Is initialization always useful?
There are cases when the initialization of the Ecu Corolla robot does not need to perform.
It is not necessary to carry out a procedure too often: regular initialization of the robot will lead to increased wear of the system.
When the drive is set incorrectly, the reset of the settings is not required if the transmission switch occurs with the lag or uneven at low speed. The clutch actuator settings will not help if you need to touch more smoothly or quickly.
All actions related to the initialization of the checkpoint or block should be carried out after inspection by professionals and their direct recommendations or explicit appearance of the reasons. Before initializing a robotic transmission of Toyota Corolla 150 with your own hands, you need to consult with a specialist who is well acquainted with the work and problems of the RCPP on this car model.
How is the procedure?
It is advisable to entrust to teach a robot to specialists, but it is possible to do it yourself. To do this, you will need to install the car on the handbrake, close the contacts in the DLC3 unit using a needle, clip or other thin and long object. You will need to connect CG and TC numbers 13 and 4, then you need to turn on the ignition, do not have a motor motor, and click on the brake 7-10 times.

You will hear a duplicate audio alert: this means that the diagnosis has begun. After that, the brake pedal should remain pressed. You will need to set up the computer as follows: N - E - V - choose "minus" - M - again "minus" - M - N.
After the electronic unit is configured, you can start adapting the clutch operation. The following combination will be required: n - E - M - "+" - M - "-" - M - "+" - M - "-" - E - N. Configuring MMT, it is necessary to observe the sequence: N - E - M - " - "- M -" - "- M -" + "- M -" + "- E - N.
Release and press the brake again, it will allow you to configure the selected item. If the adaptation of the robot passed correctly, the system will invite you with sound signals: first you will hear them 2, then 3, and then 4. After that, it is permissible to disconnect the ignition and disconnect TC and CG.
If, with the debugging procedure, the system notifies you with long signals or it happens after its end, then you did something wrong.
Solving the problem The following: You need to pull the key from the ignition lock and take a pause that is defined at least 20 seconds. After that, the system will reboot, and it will be possible to try to configure the student robot again.
How to work with the ECU?
If the control unit is improperly functioning, it is advisable not to try to correct errors yourself. A specialist intervention is required, with improper configuration, the system is able to start turning off or give other failures.
ECU setup should occur only after debugging the operation of the RCPP and all its control nodes has been completed.
Initialization of the box
Before running the system, you need to prepare it. Install the box lever in a neutral position. Wait before the desired settings occur, and turn on the ignition, turn off it after 20-25 seconds. After that, you can start the car motor. The brake pedal should be pressed. If all settings are correct, the "N" light will flicker. After 15 seconds of blinking, it will burn constantly: this means the completion of debugging.
Conclusion
We briefly talked about why to initialize a robotic box. Not every motorist is a specialist in technical issues, not everyone can understand why this node works with interruptions. Therefore, we recommend the production of this procedure to entrust special services to employees with all the necessary equipment and experience. Professional help will not allow you to "burn" important elements of the mechanism.
Watch an interesting video on this topic.
Toyota Corolla is a very popular car, which is considered not only high-quality, but also reliable. Nevertheless, how reliable the car was not, some parts sometimes fail, or need any configuration. One of these parts is clutch. If you changed it, or changed the associated components, the clutch must be adjusted. The benefit that this is very simple and the operation should not cause any difficulties even from those people who do not understand cars.
Clutch adjustment
The most interesting thing is that the entire process of adjustment is carried out without some special diagnostic equipment. Naturally, the first thing is necessary to adjust the clutch position. Make it easily and at the very beginning you will need to prepare a car to the subsequent operation. To do this, you will need to turn on the transmission to position n when the engine is headed, then drown out the engine and put on the handbrake. The next thing you need to move the contacts in the DLC3 connector for diagnostics. You can see detailed location of all connectors in the instructions for the car.

If you are not ready to view it, then simply remember the following location: move the 4th connector to the left in the top row and the 5th connector on the left in the lower row. The effect will be achieved only after a 10-second press. Without pressing the brake pedal, turn on the ignition, but do not start the motor, as it can interfere with the correct adjustment. Next, within 3 seconds, quickly squeeze the brake 7 times, after which the buzzer will publish several audible short signal. When the signal is over, click on the brake pedal and, without releasing, do the following gear shifts: N E M + M + M + M + M E N. When switching data, be careful. When the plus is turned on, you do not need to return to the neutral transmission mode or any other. In the neutral position, the box can be switched only after the last step. Now you can let go of the brake pedal.
After a few seconds it will be necessary to hold the brake pedal again. In this case, the buzzer will begin to publish short-range sound signals with a small interval. At this stage, be careful. In the event that the buzzer does not give signals, or between the signals, the break reaches 1 second, all actions starting from the very beginning will need to be done again. At the same time, you should not forget about the need to turn off the ignition and 15-second expectations.
If everything is in order, then press the brake for 2 seconds at least 3 times. As in the first case, the buzzer should publish two non-lifework sounds with an interval of 0.25 seconds.

Next, you should do a familiar procedure for squeezing gas pedals. In this case, the gear switch will need to be minus and release the brake. After that, completely turn off the ignition and after the break in 10-15 seconds, disconnect the contacts from previously folded contacts.
Clutch initialization
Adjusting the clutch using the MMT sensor, it is necessary to initialize it. This procedure will also not require any additional equipment from you.
As in the past case, you will need to prepare a car. This process is to switch the transfer to the neutral position and turn off the vehicle ignition. Next, you need to close the same contacts as in the past case and wait at least 10 seconds, then turn on the ignition, but not to start. As before, within 3 seconds you need to quickly press the brake pedal for 7 times. The buzzer will publish 2 short sound signals with an interval of 0.25 seconds.
Immediately after that, clamp the gas pedal and, without releasing, switch the transmissions in the following sequence: N e M + - + - M E N. At the end of the switching procedure, release the brake pedal and hush it back. In this case, the buzzer will produce two signals every half a second. If you did not wait no signals or they sound with a too large interval, turn off the ignition, wait 10 seconds and repeat everything first. If everything went well, then release the brake pedal and click on it 3 times for 2 seconds. As a result, the buzzer will publish two short beeps. After that, turn off the ignition and wait 10 seconds. The device initialization can be considered completed. Contacts from the diagnostic connector can be removed and moved to direct clutch adjustment.

Clutch setting
With this operation, you will no longer need to jumper contacts, so it will seem to you somewhat easier. The process of preparing the car, as in the previous steps, is to switch the gearbox to the neutral position and the ignition shutdown.
As for the immediate configuration procedure, to start turn on the ignition and wait 40-50 seconds. After that, turn off the ignition and wait another 20-25 seconds. Now it's not just turning on the ignition, but start the engine at a neutral gearbox position. Be careful, because when the engine is turned on on the information panel, the N indicator will be displayed. Do not do anything at the same time, and wait until the indicator stops flashing. If the indicator began to burn constantly, the setting can be considered complete.
Initialization of the Box-robot Toyota Corolla do it yourself - a procedure available for car enthusiasts. It is not necessary to go to a specialized car service to solve this problem. It is enough to explore the instructions in detail, watch the video on this topic, to get acquainted with the TechStream program, and the setting will become accessible to any owner of Toyota Corolla 2008, 2006, 2007.
How is initialization?
After replacing any details, the operation of a robotic gearbox can be broken. In order for MMT to work out again flawlessly, it will be necessary to initialize. The instruction should be observed clearly, otherwise the procedure will have to be repeated.
First of all, it is necessary to figure out what is a robot box, then the initialization of MMT will become simpler for understanding and performing the process. The robot is constructively different from ordinary automatic transmission. It works more clearly, does not allow jerks, switches without delays, the driver does not need to apply any mechanical effort to switch the transfer.
MMT is equipped with an ECU control unit, there is a position sensor, as well as machine control sensors. The usual manual transmission has a robotic drive that independently chooses the transfer. Coupling has a car: you can install automatic, manual or semi-automatic mode of operation of the robot.
This system is convenient for this system:
- fuel consumption will be like a manual transmission;
- has high reliability;
- switched yourself like a machine.\u003e
What problems arise?
The first Toyota Corolla with a robotic box appeared in 2006. The transmission was imperfect and had a number of problems. The control unit often gave failures, initialization was required to make every 10 thousand km. If this is not done, the clutch disc was beginning to overheat, because of which it was necessary to change it every 50 thousand km. In traffic jams, the car moved jerks, the ECU also gave failures.
Initialization is a reset of all the settings of the ECU. Corolla 2007 or another year of release may require initialize if any part of the mechanism was replaced (for example, after replacing the clutch, sensors, electric drive), if the computer stops working normally. Calibration is needed if the system gives unknown errors or works with failures.
Is initialization always useful?
There are cases when the initialization of the ECU is not needed.
It is not necessary to carry out a procedure too often: regular initialization of the robot will lead to increased wear of the system.
When the drive is set incorrectly, the reset of the settings is not required if the transmission switch occurs with the lag or uneven at low speed. The clutch actuator settings will not help if you need to touch more smoothly or quickly.
All actions related to the initialization of the checkpoint or block should be carried out after inspection by professionals and their direct recommendations or explicit appearance of the reasons. Before initializing a robotic transmission of Toyota Corolla 150 with your own hands, you need to consult with a specialist who is well acquainted with the work and problems of the RCPP on this car model.
How is the procedure?
It is advisable to entrust to teach a robot to specialists, but it is possible to do it yourself. To do this, you will need to install the car on the handbrake, close the contacts in the DLC3 unit using a needle, clip or other thin and long object. You will need to connect CG and TC numbers 13 and 4, then you need to turn on the ignition, do not have a motor motor, and click on the brake 7-10 times. You will hear a duplicate audio alert: this means that the diagnosis has begun. After that, the brake pedal should remain pressed. You will need to set up the computer as follows: N - E - V - choose "minus" - M - again "minus" - M - N.

After the electronic unit is configured, you can start adapting the clutch operation. The following combination will be required: n - E - M - "+" - M - "-" - M - "+" - M - "-" - E - N. Configuring MMT, it is necessary to observe the sequence: N - E - M - " - "- M -" - "- M -" + "- M -" + "- E - N.
Release and press the brake again, it will allow you to configure the selected item. If the adaptation of the robot passed correctly, the system will invite you with sound signals: first you will hear them 2, then 3, and then 4. After that, it is permissible to disconnect the ignition and disconnect TC and CG.
If, with the debugging procedure, the system notifies you with long signals or it happens after its end, then you did something wrong.
Solving the problem The following: You need to pull the key from the ignition lock and take a pause that is defined at least 20 seconds. After that, the system will reboot, and it will be possible to try to configure the student robot again.
How to work with the ECU?
If the control unit is improperly functioning, it is advisable not to try to correct errors yourself. A specialist intervention is required, with improper configuration, the system is able to start turning off or give other failures.
ECU setup should occur only after debugging the operation of the RCPP and all its control nodes has been completed.

Initialization of the box
Before running the system, you need to prepare it. Install the box lever in a neutral position. Wait before the desired settings occur, and turn on the ignition, turn off it after 20-25 seconds. After that, you can start the car motor. The brake pedal should be pressed. If all settings are correct, the "N" light will flicker. After 15 seconds of blinking, it will burn constantly: this means the completion of debugging.
Conclusion
We briefly talked about why to initialize a robotic box. Not every motorist is a specialist in technical issues, not everyone can understand why this node works with interruptions. Therefore, we recommend the production of this procedure to entrust special services to employees with all the necessary equipment and experience. Professional help will not allow you to "burn" important elements of the mechanism.
Now, the most expensive and frequent work in the Toyota service center can be attributed to such a process as the initialization of the gearbox robot or, as it is also called, "robotic" checkpoint.
Robotic gearboxes are standard mechanical transmissions that automate the clutch and switching function, thereby facilitating the control of the car. Switching clutch and gear itself occurs in automatic mode. When the driver switches the transmission, the box reads the transmitted information, it necessarily estimates the conditions during which the vehicle moves, and only after all this, the electronic control unit of the TS starts processing the information transferred to it, after which it controls the work of a robotic box with a given algorithm.
The main advantages of these boxes include:
- Minimum fuel consumption, which is achieved with proper use.
- Easy control (especially noticeable in traffic jams).
- Smooth overclocking.
- Inexpensive sale price.
The main shortcomings of the robot are:
- For a long time reacting gearbox.
- The clutch disc is often exposed to a large heating.
- A large number of robot failures (every 6 - 8 thousand kilometers).
- Minimum clutch disk strength.
- Little service life of the control unit.
- Large costs associated with carrying out frequent repair of the robot.
Thanks to the warranty at Corolla, the contemporary driver replacing the box control unit or completely all the clutch package can do absolutely free. This can be done at any warranty stations of Toyota car maintenance stations.
How to initialize a robotic gearbox
Often, such a process is required when any transmissions are appear. For example, the car is trring by jerks. First, the team of specialists conducts a complete reset of past block settings, thanks to which the robot itself is controlled. After that, work is performed related to the repair of the car transmission system:
- Full disassembly of the gearbox.
- Conducting sensor replacement for switching and gear selection sensors.
- Installing a new clutch electric drive, housing and clutch disk, flywheel, frost bearing, crankshaft and clutch running sensor. After all the actions described, further calibration is not required.
Initialization is not recommended for no reason, because if it is often often, it can damage the clutch and lead to the rapid wear of the entire set of parts. Although some owners believe that this is the opposite increases the lifetime of the clutch and it must be done after every 10 thousand runs. It is important to know that the position of the rack of the clutch failure mechanism or the elimination of blows at low speeds does not indicate the need to initialize the ECU.
Most of all there are such erroneous opinions about the number of initialization procedures:
- the position of the clutch supply mechanism can indicate the owner of the car on whether initialization is needed or not;
- to completely eliminate shocks, often disturbing driver, which moves at small speeds, in no case can initialize;
- after the proper and high-quality initialization, the vehicle is easily rudded from the place.
What you need to do for better work on initialization
First of all, initialization is better to entrust only the most proven professionals, as it gives a guarantee for the right and long work of the car. But at the same time, it is impossible to hide that today such pleasure is not available to every motorist.
To make it yourself, you need to correctly and clearly fulfill the following actions:

You can also watch a video about the initialization process:
This is the initialization of the robotic gearbox on Toyota Corolla. If all of the above works did not help you, it will correct to apply for help from the service center specialists, where they can accurately understand your problem.