As an alternative to a factory tractor for small farms, you can use "folk" designs.
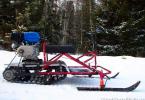
The self-made mini-tractor from a walk-behind tractor described below is created from parts of the "Ant" cargo scooter - it has proven itself perfectly when working on small-sized rural areas. You can create such a mini-tractor with your own hands if you have a small workshop and a sufficient share of skill.
Homemade mini tractor design
This design was developed and tested in practice by students of the Kharkov Institute of Mechanization and Electrification of Agriculture.
You can make such a mini-tractor yourself from scrap: various units and parts from old serial machines produced by the domestic industry.
The unit can be equipped with a wide range of interchangeable trailed and mounted implements. Thanks to this, the walk-behind tractor can be considered a universal assistant in the home garden. It can be used for plowing and harrowing, cultivation and hilling, as well as for other operations related to soil cultivation and plant care.
This tractor can also be used in conjunction with a single-axle cart to transport various household goods, garbage from the site, soil, sand. For this, a small modification of the tractor is made, and the driver is placed on a sprung seat in front of the bogie.


The main parts of a homemade mini-tractor are the VP-150M engine, transmission, power take-off system, chassis, control system and hitch. All of them are assembled on a rectangular frame made of a channel. The most suitable for a walk-behind tractor of this device can be considered the VP-150M engine from the "Electron" scooter or its analogue, which has a capacity of 7.5 liters. With. (5.5 kW), single-cylinder, two-stroke and carburetor. It has a compact, integrated gearbox and clutch and is equipped with electronic ignition. It is also valuable that this motor is equipped with a centrifugal fan, because other engines have to be cooled by various “artisanal” forced methods.


Other motors can, of course, be used. But for comparison, it is enough to give basic data on the VP-150M engine. Here, the transmission of torque to the gearbox is carried out by a helical pair of gears with a gear ratio of 3.045.


Transmission - three-stage - with constant mesh gears. The gear ratios are as follows: for the first gear - 4.883, for the second - 2.888, for the third - 1.800. The engine and gearbox are made in one monoblock unit. There are no special requirements for the operation and maintenance of the engine complete with the clutch and gearbox; in this case, they are regulated only by the recommendations of the manufacturer.


The transmission of the walk-behind tractor is mechanical, gear-chain, consisting of a serial differential with a reverse (from a cargo scooter "Ant"), an intermediate shaft, two final drives and a wheel locking mechanism. The intermediate shaft in this mechanism simultaneously serves as a power take-off and for attachments. Therefore, the torque is transmitted from the engine to the intermediate shaft using a chain with a pitch of 12.75, and then to the differential using a chain with a pitch of 15.875 mm. And then, again along the chains of final drives with a pitch of 15.875 mm, to the drive wheels. The Z1 sprocket refers to the engine, Z4 is a kit with a differential, and Z2 and Z3 are from the Voskhod motorcycle.


The intermediate shaft is made of 40 steel, it is installed in two ball bearings No. 180205. For them, you can use standard flanged housings (for example, from decommissioned agricultural machinery); attachment to the side cheeks of the transmission cover.
The diameters of the shaft seats should be selected according to the dimensions of the sprocket hubs. The length depends on the width of the transmission cover plus a small margin (for installation on the right side of a double-ribbed drive pulley with a diameter of 100-120 mm).
Photo gallery
As you can see in the photo, this homemade mini-tractor is a two-wheeled vehicle driven by a person following it.
How to make a mini tractor for a household
The frame of the walk-behind tractor can be welded from the suitable profiles available at hand. Channel No. 6 can be used for the longitudinal frame side members, and No. 8 for the transverse side members. From the bottom to the horizontal frame side members and to the brackets, it is necessary to attach the bearing housings of the axle shafts using bolts. Here it is required to put bearings No. 180207 (two for each axle shaft). Housings for them should be selected standard (preferably from decommissioned agricultural machinery).


The installation of these elements on the brackets must be carried out with particular care: it is necessary to observe the alignment of the wheels and the perpendicularity of the axle shafts relative to the longitudinal axis of the frame. This is important for the subsequent marking of holes for fastening housings with bearings and their further fitting onto a solid axle-mandrel, which must subsequently be sawn into two axle shafts.
With the correct installation of the housings, the mandrel in the axle shaft bearings will rotate freely.


After that, corners of 25 x 25 mm should be welded to the frame at its rear. Then the transmission cover is screwed to them, made of steel sheet 5-6 mm thick. This element is required as a base for installing the intermediate shaft, differential and control mechanism. The rear of the shroud should have a removable cover and the front should have a fuel tank bracket.
The front part of the frame is equipped with welded corners from the inside, which will serve as a bracket for the engine with a forced cooling fan.


The axle (or semiaxis) must be made of high quality steel. The dimensions of this element can be adjusted depending on the bearings available and the dimensions of the wheel hubs. Further, on the semi-axles from the inside, you need to fit two half-couplings.
The right half of the coupling must move freely on the square, and with the help of a lever installed on the control rod, it must be brought into engagement with the left half of the coupling. Thus, a rigid connection of the axle shafts is ensured, i.e. the wheels are locked.
The traverse should rotate 180 ° or the required intermediate angle so that additional convenience is possible when controlling the walk-behind tractor during operation.
Watch the Homemade Mini Tractor video to see how this agricultural machine is built:
Attachment to a mini-tractor for fast watering
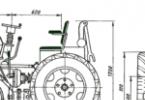
For quick watering of a large land plot by folk craftsmen, another type of homemade tractor is offered. Rather, it is a device that attaches to a mini-tractor. In this case, a four-wheeled version of the mini-tractor is used.
In addition to irrigation, a mini-tractor for a household with this attachment and with the help of various trailed and mounted devices can be used for various tillage operations.
This design was developed on the basis of the UD-2 engine with a capacity of 8 liters. With. It is recommended to weld the tractor frame from pipes with a diameter of 40 mm. For its rigidity, it is necessary to weld 35 x 35 squares on the sides. The rear axle and cardan gear can be taken from a Skoda car. These parts need to be trimmed a little and adjusted according to the drawing. The gearbox can also be taken from this vehicle (it has three speeds for forward and one for reverse). The front axle can be calculated and made independently from a 40 mm pipe in the form of a rocker arm. The rods are taken from the stroller, and the steering column is taken from the Volga car. The brake system should be hydraulic, the brake cylinder - from the GAZ-51 car, the gas tank - from the grain loader. And the tractor seat can be taken from the beet harvester and slightly altered. The wheels for this tractor, front and rear, were taken from a tractor rake.
The result is a complete mechanism. Only the sprinkler unit needs to be positioned on the front of the frame of the assembled tractor. It should consist of a gear pump taken from the hydraulic system of the MTZ-5 tractor, which will operate from the tractor engine drive.
At the end of the assembly, you need to install a water tank with a capacity of at least 200 liters on the tractor frame. During operation, the pump will pump water and supply it through a hose, thus watering the earth within a radius of up to 10 m.
In agriculture, you cannot do without a tractor. However, this pleasure is expensive, so a self-made tractor with your own hands can be a worthy solution to this problem. This is not an easy task and requires the availability of tools, the necessary materials and knowledge, however, the result will also please.
How to make a mini tractor with your own hands: what is needed for this?
The most affordable option for a mini-tractor with your own hands is a tractor with a so-called broken frame. Such a frame consists of 2 parts, which are connected by a special mechanism based on hinges. All controls and chassis are located in the front of the machine. The steering is hydraulically based, and when the steering wheel is turned, the entire front section arches, resulting in a turn. This approach allows you to simplify the design and save on some details.
The rear part is simpler in design, it contains a workplace for the tractor driver, the rear axle and various devices for installing attachments that are used to process the soil.
The advantages of a homemade mini-tractor for the household:
- With its small size and simple design, it is capable of producing results comparable to industrial technology.
- It has excellent maneuverability, is able to make a U-turn on almost one piece of land, which is quite an important quality for tillage.
- Low fuel consumption. Of course, fuel consumption depends on the design of the machine and the work performed, however, fuel consumption is usually minimal.
- Low cost, incomparable with the purchased unit. The low cost is provided by the cheapness of components and parts, which can often be bought from hands or found at all.

Disadvantages of homemade tractors:
- the unit is made from old, sometimes obsolete parts, therefore it is recommended to regularly carry out maintenance of the machine (in any case, there is no guarantee that the old unit will not fail);
- when an old unit or part fails, it is not always possible to find a replacement, since in most cases such components have already been discontinued.
Before you start looking for parts and mechanisms, you need to think about the design of the machine and find drawings. You can come up with drawings yourself, but it is best to use the projects of folk craftsmen who already had experience in assembling such equipment. You can consult in advance with an experienced locksmith who will help to take into account and eliminate possible problems in advance and advise on how to assemble the tractor.
Required materials and tools
To work, you need the following tools:
- welding machine with a stock of electrodes;
- a cutting machine with a set of cutting and grinding discs, a hard brush for cleaning metal;
- wrenches, hammer and chisel;
- electric drill and drill set;
- equipment for painting;
- you may need a lathe to bore some parts.
Materials that will have to be found in order to assemble a mini tractor:
- metal channel for the frame;
- axle with wheels;
- nuts, bolts and washers of various sizes;
- driver's seat;
- engine, gearbox, transmission;
- materials for creating the hull, roof, wings;
- consumables for painting;
- grease for tractor units.
Search for the necessary spare parts and assembly of the structure
Before you start searching for all units and mechanisms, you should know that the gearbox, engine and chassis must be taken from the same tractor - this will avoid the complicated work of adjusting the units to each other.
What is the most preferable engine for a homemade tractor? Here the choice is small: it is recommended to find the UD-2 or UD-4 engine, the M-67 engine would be a good option, since it is quite economical and durable, and requires minimal participation in maintenance and repair. Some folk craftsmen used engines from a Zhiguli car as a power unit. In this case, the engine with the gearbox and transmission is removed from the car, there is no need to adjust the mechanisms to each other, which greatly facilitates assembly.
Before installing such an engine, it should be upgraded. It does not have a cooling system; for this, you can use a fan that is installed on the crankshaft. It is also necessary to install a casing that will direct the flow of cold air.
If an engine from a car is used, it is necessary to reduce its speed by 3 times using the corresponding gears, since such a high speed is not needed for the tractor.
The choice of wheels depends on the purpose for which the homemade mini-tractor is intended. If the purpose of using the machine is to move various loads, then 16-inch wheels can be dispensed with. If the tractor is going to work in the field and work the soil, it is recommended to use larger diameter wheels - this will provide better traction. If you want to save money on wheels, you can also use car tires, but it should be borne in mind that in this case traction with the soil may be insufficient, and control may be difficult.
Frame, rear axle and exterior trim for mini tractor
The frame of the assembled mini-tractor consists of 2 parts, connected by a hinge mechanism. For the manufacture of such a mechanism, you can use a driveshaft from a large truck, for example, a GAZ. It is not so important which specific car model will be used: the cardan shaft does not have any special differences.
The rear axle is quite suitable from the old Volga or Moskvich car, but in this case they will have to be shortened, since the standard axle is not included in the dimensions of the mini-tractor.
The frame is made of a metal channel. This material has sufficient strength and rigidity for such a load. After mounting the frame, holes of various diameters are drilled on it in order to secure the main components and mechanisms.
The exterior can be made of any material: metal, plastic or fiberglass with epoxy resin. The structure must be well painted with at least 2 layers of paint for metal. This is necessary not only to give the tractor a good appearance, but also to protect its components from corrosion.
As you can see, homemade work pays for itself, and there are no special difficulties in making a small tractor for agricultural work (if you have the skills and tools).
A mini tractor for a household is a very useful technique. With the help of it, you can easily move and lift any cargo, collect, for example, hay or cultivate a plot. At the same time, the range of possibilities of this technique can be significantly expanded, for this it is enough just to equip it with several additions. However, today we are not talking about attachments, but about how to make a mini-tractor for a household with your own hands.
Frame
This element is the most important and necessary for most units of special equipment (including such as a mini-tractor). Therefore, in order to avoid unpleasant consequences, it is necessary to draw up a drawing or diagram of the future structure in advance. After that, you can safely start making it. For the frame, several lightweight metal channels should be selected and connected to each other by the method of automatic or semi-automatic welding. Also pay attention to the length of this element. The dimensions of the frame must be proportional to the dimensions of the mini-tractor. The longer this element, the larger the whole equipment.

Other details
After welding the channels, holes are made along the contour, which will serve for fastening various attachments and other structural elements. Consideration should be given to footpegs as they cling to either side of the frame. The main material used here is an 8 mm steel sheet "St-3", which will also be used for the steering column transverse bracket. For additional strength of the joints, the cross sections are supplied with "kerchiefs" made of the same steel that was previously used for the footboards (however, the width of the sheet here will be slightly less, 5 millimeters).
How it is made further After that, the axle hinge bushings are welded to the front crossbeam. They will also be made of ST-3 sheet metal products. Sheet thickness - 2 centimeters. After that, the bridges are attached to the frame (front and rear, respectively).
Homemade products: mini-tractors and parts for them. Learn more about bridges and girders
The bridge is made from separately taken parts and assemblies taken from similar agricultural equipment. Some use bridges from the 24th "Volga"
or "Moskvich". But in our case, such parts will not be used, because they simply do not fit into the dimensions of the mini-tractor. The exception is More details about it we will talk a little later.
Details to do yourself
Parts such as bushings for pivoting, wheel and supporting axle shafts must be made by hand. The transverse beam is also independently manufactured. For this, a piece of pipe with a square section measuring 65x65x5 millimeters is taken.

If this is not the case, the beam can be made from Axle bushings made from Slewing bearings made from pieces of metal pipe. For this, a pipe with a cross section of 70x14 millimeters is taken and cut into several pieces 120 millimeters long each. Also, it is necessary to make seats for bearings in them. After that, the resulting part is covered with metal welded covers. An assembled unit is welded into the center of the beam (it should consist of 2 roller bearings and a cylindrical cage), with the help of which this axle will be allowed to roll.
Bolts and nuts marked "M-30" should be used as fasteners for this unit. They completely fasten the entire front beam. When tightening, place a special spring washer under the nut. It is worth noting that with each tightening of the bolt connection, you reduce the amount of front axle play relative to the mini-tractor. Thus, you will have the opportunity to adjust this unit, if necessary, before each new execution of agricultural work.
About the rear axle
Unlike the front one, it is not necessary to make it yourself. Here it is enough to install a standard "Volgovsky" element. But, since the width of the mini-tractor does not correspond to the dimensions of the bridge from the GAZ-24, we will have to shorten it to 80 centimeters. For this, the fixation of the "stockings" is removed, the heads of the rivets are cut off, and the rest is pushed deeper. The axle is disconnected from the gearbox housing using a sledgehammer with the first element fixed in a special mandrel.

Thanks to these actions, you will ensure the docking with the reverse gear, due to which the cardan's fracture will be excluded. Also, you will no longer need to balance and install counterweights on mini-tractors for summer cottages, which will significantly speed up the time of the work performed.
To fix the shortened "stockings" in the holes, a thread is cut ("M-12") and screws are screwed in there. The resulting bridge is attached to 8 plates. The latter are welded with bolts ("M-10" 4 for each plate) and nuts to the side members. A spring washer is used to lock the connections. For this, identical plates are welded onto the bridge. At the final stage, self-made brackets are installed under the attachment of the hinged frame. For the hoisting mechanism, the hoist shaft housing is welded to the axle housing.
The final stage
Now the matter remains small: a seat is welded to the resulting structure, and all equipment is painted in one monotonous color (if you wish, you can use several aerosol cans of different shades). It is installed at the back to the equipment to be able to work in hitch with the plow.
How to make a mini tractor for a household with your own hands? Method number 2
This method is simpler than the previous one, but here you will need to have your own walk-behind tractor to perform the work. At the same time, it is not necessary to purchase a new one, some old Soviet "Ural" or "Neva" will do quite well for the tractor.
What do we take from the walk-behind tractor?
The "heart" will be removed from this unit, that is, the motor, which will be the main traction device of the tractor. All other parts can be used for spare parts. In addition, during the work you will need a starting device, axles and wheels for them.

Further assembly technology practically does not differ from the previous one; a welding machine, metal pipes and
Getting Started
So, how it is done First, the kinematic system of technology is designed. The traction forces coming from the engine of the walk-behind tractor must be transmitted through the roller chain to the intermediate shaft. Also, with the help of the penultimate device, power will be transmitted to the drive wheels. There is a brake (band) on the output shaft, and the gearbox lever is installed along the axis. The engine will be started via the starter pedal. In principle, a mini-tractor for a household is not such a complicated technique as it seems at first glance, so it can be made on the basis of just one drawing.

The frame will be made of steel pipes and angles. You should also provide for a fork with a sleeve for turning the trailer (in the case of a tractor working in conjunction with it or a plow). The so-called "cheeks" are attached to the housing of the bearing assembly, and the output shaft is tightly welded to the "gussets" of the socket. We do the front beam and rear axle in the same way as in the previous method.
Further, a homemade mini-tractor is supplied with a metal body with a side at least 30 cm high. All this must be made of sheet steel. At a distance of 80-85 centimeters from the end of the backbone, a soft seat made of a thin sheet of plywood is installed (additionally, it can be sheathed with leatherette filled with foam rubber).

At the final stage, we equip a mini-tractor for a household with our own hands with a trailing device. After that, the technician undergoes a priming and painting procedure.
So, we figured out how to make a mini tractor for a household with our own hands.
As a rule, the sphere of agriculture is mainly associated with the cultivation of land for many of us. However, for sowing grain crops and growing vegetables, berries and fruits, it is necessary not only to plow the soil and apply fertilizers, but also to ensure regular watering and weeding. Of course, if a farmer has such specialized equipment as, for example, a mini-tractor, then he can significantly simplify the implementation of many types of work. Speaking about this technique, one should first of all note its small dimensions, but at the same time it successfully copes with the main tasks: plowing the land, loosening, mowing grass and other operations related to soil cultivation.
Large agricultural complexes and firms thoroughly approach this issue and, as a rule, use imported or domestic models. As for private farms, due to limited financial capabilities, they often have to use homemade mini-tractors. Although this approach to business and allows you to save however, the assembly process is fraught with difficulties. But nevertheless, this does not stop many, since it is in the power of every private farmer to make with his own hands not just a homemade mini-tractor, but agricultural machinery, which, after being equipped with additional equipment, can be used to solve a wider range of tasks.
Homemade mini-tractors: types and features
To this class of agricultural machinery it is customary to attribute three types, each of which has its own characteristics:
Homemade mini tractor: pros and cons
First of all, such machines are in demand among the owners of private subsidiary farms. There they are used to perform tasks such as the outbreak of vegetable gardens, the removal and destruction of waste from tree sawing, as well as the improvement of the territory.
pros
This is a technique has certain advantages that ensured her popularity:
Minuses
There are also disadvantages to this technique. This should include the fact that the owner will have to search for components yourself for the car. In the event that during the assembly process some rare part was used, then it will be quite difficult for him to find the same one to replace it. However, the most common practice is when components are most often used to assemble mini-tractors with their own hands, which can be easily found in case of failure.
Having decided to independently assemble a homemade mini-tractor in order to drive it on public roads, keep in mind that you have there must be permission on this. Otherwise, you risk getting a fine for refitting the car.
How to make a homemade mini tractor with your own hands
The main question that arises for those who are interested in a mini tractor is how to make this machine? There are many ways to build a homemade mini-tractor at home. Myself assembly process this technique looks like this:

If you turn to the network, then there you can find many different drawings for assembly homemade mini-tractor. Therefore, having selected a suitable scheme, you can immediately start work, focusing on one or another option, or make changes to the finished one, taking into account your needs and tasks.
Conclusion
 Private farm owners and farmers are faced with many challenges, including how to cultivate the land. The easiest way is to purchase special equipment, however, given the high prices at which many Western and domestic machines are offered, most landowners are inclined to assemble a mini-tractor for cultivating the land with their own hands. Basically, this the task is quite solvable, the main thing is to understand where to start the manufacturing process of this technique. It is advisable to first prepare a drawing in order to clearly know what details should be present in a homemade mini-tractor.
The easiest option is to use the experience of other folk craftsmen who have already had to solve a similar problem. There are many resources on the network where even complete drawings are laid out, which can become a project to create a homemade mini-tractor with your own hands. After that, all that remains is to prepare the required materials and tools, after which you can get down to business.