How to remove the engine with your own hands? Removing and installing the engine is a rather voluminous and difficult process, but it depends more on the type of power unit. Yes, remove the motor.
possible without any problems, in the case of the VAZ, or long and hard, if it power unit foreign production.
Reasons for dismantling the power unit
Removing the engine is carried out for various reasons. Often, for repair and restoration operations, but if the motor is old and beyond repair, it is removed to install a new one. Consider and write down the main reasons why it is necessary to remove the power unit:
- Wear. This is the most common cause dismantling the engine. Wear and tear leads to the fact that the motor requires restoration, which most know as an overhaul. So, the engine is dismantled from the car, and then disassembled.
- Cracks in the cylinder block resulting from mechanical damage. In this case, the unit must be removed from the vehicle in order to replace the unit.
- A traffic accident often leads to body deformation, which cannot be eliminated without dismantling the main power unit. Of course, repeatedly, with great damage, the hull itself, as well as its structural elements, suffer.
- Other reasons, the elimination of which will require the dismantling of the engine from the car.
After considering the immediate reasons for removing the motor from the vehicle, you can proceed to consider the processes for dismantling the motor from the car.
Dismantling the motor
Many motorists are wondering - how to remove the motor? Installed engine can be removed from the car at a car service professional specialists Or do it yourself in your garage. So, dismantling it yourself will take about 8-10 hours.

But if in vehicle there are a lot of electronics and the power unit is equipped with it, it is not recommended to carry out the operation with your own hands, but it is better to turn to professionals. So, consider the process of removing the motor at the most simple options cars.
How to remove a petrol engine
Take off Gas engine, for example, VAZ or ZMZ models, is quite simple. The first recommendation is that this process should be carried out in 4 hands, since it will be difficult for one person to do this. So, consider the sequence of actions for removing a VAZ-type unit:
- For more comfortable operations and less time, it is recommended to carry out the process on a lift, pit or overpass. Also, it is necessary to assemble the tools, namely: a set of keys, screwdrivers and heads, a hoist or winch, containers for draining liquid.
- The first thing to do is to dismantle the battery and unscrew its shelf. Along with this, you can remove the air filter housing, as well as air ducts.
- The second step is to drain all liquids. To do this, it is necessary to remove the motor protection (if any), and, substituting the containers under the drain necks, unscrew the plugs. At standard engine drains the coolant (container for 10 liters) and engine oil(container up to 6 liters).
- After the liquids are removed, it is worth starting to disassemble the unit to dismantle it.
- In the first stage, it is necessary to remove the generator, starter, everything drive belts, battery wiring.
- Now we proceed to remove the elements of the cooling system: thermostat, water pump, expansion tank, pipes of the coolant system.
- Next, we dismantle the ignition system - candles, wires, distributor, injector.
- After that, we parse fuel system, namely, we remove the carburetor or fuel rail with nozzles, pipes of the power system, intake manifold.
- Another important step is the dismantling of the cylinder head. Pulley needs to be removed first. camshaft. Unscrew the bolts, remove valve cover, and then the cylinder head itself.
- We hook the motor onto the winch and fix it firmly.
- We unscrew the gearbox from the engine. In this case, the clutch must remain on the power unit.
- We unscrew the nuts securing the pillows and raise the motor, removing it carefully from engine compartment.
- Installing the motor back is carried out in the reverse order.

So, at first glance, the motor is easily and simply dismantled, but as practice shows, not everything is so easy. In the case of engines where there are many wires, you have to disconnect them from the sensors. Well, when the motor has too much wiring, then you should turn to professionals.
How to remove a diesel engine
The dismantling of the diesel heart of the car is carried out by analogy with the gasoline one. The difference is that often diesel power units are equipped with a turbine, which must be removed before the process of dismantling the fuel system.
Another difference is the injection system itself. So, instead of an injector, a diesel engine has a high-pressure fuel pump, which is usually located on the cylinder block itself. It is not so difficult to remove it, but you should not forget about it, because it makes the engine heavier.
Often, especially on older diesel products on the housing, the housing of the oil and gasoline filters is also located. fine cleaning. They must be removed after draining the lubricant.
Many car repairmen recommend dismantling from the power unit exhaust manifolds, which interfere at the moment when the engine gets from the engine compartment. If we talk about diesel engines installed on trucks, this is done in order to reduce the weight of the product.

Conclusion
How to remove the engine from the car? Dismantling a power unit from a car with your own hands can be simple and difficult at the same time, since it all depends on the type of power unit, as well as the presence of heavy electronics.
In the case of VAZ, GAZ, UAZ engines, they are easily removed, but with foreign-made engines, everything is much more complicated. Therefore, most manufacturers recommend contacting specialists who will help remove the motor and repair it.
Removing the engine
NOTES
Remove the engine assembly with the gearbox by lowering it from the engine compartment. It is more convenient to remove the engine from the car mounted on a lift.
USEFUL ADVICE
Before disconnecting hoses and electrical wires We recommend that you mark them so as not to confuse them during assembly.
You will need: wrenches "for 10", "for 13", "for 17", "for 19", an extension with a universal joint, socket heads "for 13", "for 17", "for 19", "for 22" , “24”, a knob, screwdrivers (two), a mandrel for centering the clutch disc, pliers, tal or other lifting device, slings (strong rope).
1. Disconnect the wires from the plus and minus terminals and remove the battery.
2. Remove the hood (see "Removing and installing the hood" ).
3. Drain the coolant from the engine cooling system (see "Coolant change" ).
4. Remove air filter with intake pipe hose (see "Removing and installing the air filter" ).
5. Turn away bolts of fastening and remove protection of a crankcase of the engine.
6. Remove the downpipe (see "Replacement downpipe» ).
7. Drain the oil from the crankcase (see "Changing engine oil and oil filter" ).
8. Turn the drive sector all the way throttle valve and disconnect the throttle linkage from it.
9. Turn out two bolts of fastening of an arm of draft of a drive of a butterfly valve. Take the bracket to the side, without disconnecting the rods from it, so that it does not interfere with the removal of the engine.
10. Turn away a fastening nut and remove a tip of a "mass" wire of the engine from a hairpin on a coupling case.
11. Turn away two fastening nuts and remove tips of "mass" wires from fastening pins of a back cover of a head of the block.
12. Disconnect the block with wires from the coolant temperature sensor by squeezing the plastic clip.
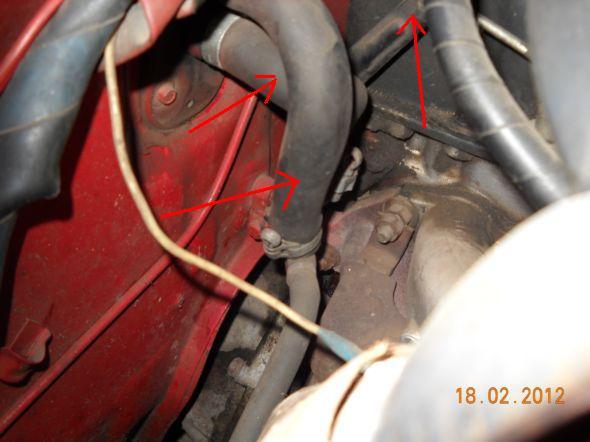
13. Loosen the clamps and disconnect the radiator inlet pipe, the inlet hose from the outlet pipe throttle assembly, disconnect the radiator supply hose from the thermostat.
14. Disconnect the outlet hose of the heater radiator and the filling hose of the cooling system from the inlet pipe of the water pump (see. ).
15. Disconnect a wire from the gauge of the index of temperature of a cooling liquid (see. "Replacing the cylinder head gasket" ).
16. Disconnect block A with wires from knock sensor B or remove the sensor by unscrewing its fastening nut and removing the sensor from the stud, leave it on the wiring harness.
17. Disconnect the block with wires from the low-voltage terminal of the ignition module by squeezing the plastic latch.
18. Disconnect the block with wires from the output "D" of the generator. Sliding rubber boot, unscrew the nut and disconnect the wires from the terminal bolt (terminal "B +") of the generator.
19. Disconnect the wire from the sensor signal lamp emergency drop in oil pressure.
20. Loosen the clamp and disconnect the hose vacuum booster brakes from the receiver fitting.
21. Disconnect the wiring harness connector from the throttle position sensor...
22. ...and regulator idle move by releasing the plastic clips.
23. Unscrew the fastening nuts, holding the hoses from twisting with the second wrench, and disconnect the fuel supply and drain hoses B from the fuel pipes (the fuel supply hose is marked with paint). Note...
24. ... that O-rings are installed on the fuel pipes. After disconnecting each hose, remove sealing ring from the tube (replace torn or loose rings).
25. Disconnect the heater outlet hose from the water pump inlet pipe.
26. Disconnect the injector wiring harness block by depressing the plastic latch.
27. Unfasten or cut the clamp securing the wiring harness to the water pump inlet pipe.
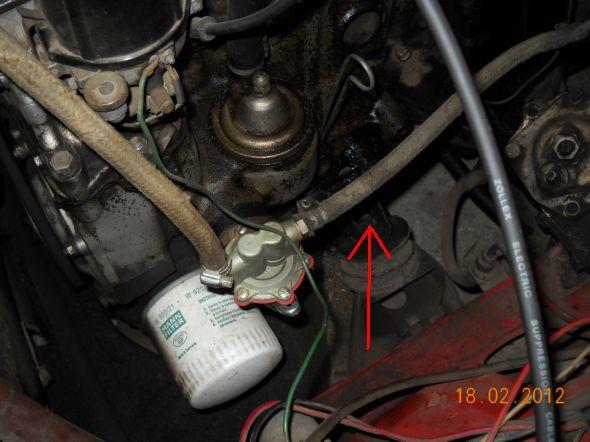
28. From the bottom of the car, disconnect the wiring harness block from sensor A of the oil level in the engine crankcase (next to oil filter B).
29. Disconnect the wiring harness block from the position sensor crankshaft.
30. Disconnect the harness connector from the vehicle speed sensor.
31. Disconnect the holder with wires from the front cover of the camshaft drive belt.
32. Remove the wiring harness from under the receiver and thermostat. Check again that all wires and hoses are disconnected from the engine.
33. Loosen the adjusting nuts, disconnect the clutch cable from the clutch release fork and remove it from the bracket on the box.
34. Loosen the clamp and disconnect the gear shift rod from the hinge tip.
35. Disconnect the wiring harness connector from the headlight switch reversing on the gearbox.
36. Loosen the nuts securing the left and right extensions to the suspension arms.
37. Turn out three bolts of fastening of an arm of an extension to a body and take away the left and right extensions in such situation that they did not interfere with removal of the power unit.
38. Remove the cotter pin of the fastening nut ball joint tie rod to the swing arm.
39. Turn away a nut of fastening of the spherical hinge of steering draft.
40. Press out the pin of the spherical joint of the steering rod from the pivot arm of the rack using a special puller.
41. Turn out two bolts and disconnect a spherical hinge of the suspension bracket from a rotary fist.
42. Using a pry bar, press out the shank of one of the internal drive joints front wheel out of the gearbox and move it aside.
43. Insert a mandrel instead of the hinge (for example, the old inner hinge) so that the side gear does not turn. After that, disconnect the second drive in the same way as the first.
44. Attach the engine to the eyelets and tighten the hoist cables.
NOTE
This is how the eye is located on the gearbox housing.
45. Turn away two nuts of fastening of a back support of the power unit to a body.
46. Turn away a nut, slightly raise the engine and take out a bolt of the right forward support of the power unit.
47. Turn away a nut and take out a bolt of the left forward support of the power unit.
48. Lower the engine onto supports, lift the car and remove the engine from under it.
USEFUL ADVICE
This section describes how to remove the engine downwards in accordance with the manufacturer's recommendations (as part of the power unit along with the gearbox). For this you need lifting mechanisms to raise the front of the car higher. AT garage conditions it is easier to remove the engine upwards, having previously removed the gearbox.
It is recommended to remove the engine and gearbox together as a single power unit and then disconnect the engine from the gearbox. The following work is carried out in the same way for all types of engines, additional instructions are given for vehicles with automatic transmission. When lifting the power unit, it must be tilted at a 45° angle to allow exit from the engine compartment of the gearbox. The power unit weighs more than 200 kg, so when removing it, special care must be taken not to damage the body surfaces or paintwork.
- To avoid damage, put on the fenders protective covers. Release the locking lever on the left bracket of the hood and lift the hood up until the lever disengages. Then release the locking lever on the right hood bracket. Move the hood to the vertical position. The figure shows the position of the latch.
Rice. Open hood to 90° position
- Disconnect negative wire from battery and remove the battery together with the mounting frame.
- Open the cap of the cooling system. The coolant temperature must not exceed 90°C.
- Remove the coolant drain plug on the right and left sides of the cylinder block. At the same time, do not confuse the plugs with the crankshaft main bearing cap bolts. The illustrations show the coolant drain plugs and the arrows show the cap bolts.
- Remove heatsink and fan. To do this, remove the rubber supports and radiator mounting brackets. Remove the radiator, then remove the oil cooler. In vehicles with automatic transmission, before removing the radiator, remove the hoses from the gearbox oil cooler and plug the holes in the hoses.
- Remove expansion tank.
- Remove the exhaust system assembly.
- Suck the oil out of the power steering reservoir and disconnect the hoses from the power steering pump.
- Disconnect all hoses and pipes of the cooling system, lubrication system, power supply system and wires between the vehicle body and the engine. It is advisable to mark the pipelines.

Rice. Location of the coolant drain plug (1) on the left side of the cylinder block. Do not loosen the bolts indicated by the arrows.

Rice. Location of the coolant drain plug on the right side of the cylinder block. Do not loosen the bolts indicated by the arrows
- Disconnect the fuel control rod.
- In vehicles with air conditioning, the refrigerant must be drained. The work must be done very carefully. If you do not have experience, please contact technical assistance and directions. Then disconnect the hoses from the double piping.
- Unscrew the bolts of the front engine mounts in the lower part of the body on the left and right; to unscrew, use an extension with a hinge that starts from below.
- Attach a lifting cable to the engine and put it on the hook of a crane or other lifting device. Tighten the cable slightly.
- On vehicles with adjustable wheel suspension, unscrew the four bolts securing the suspension hydraulic pump together with the connecting pipes, remove the pump and set it aside. Remove pump drive parts.
- Remove the cross member of the rear engine support together with the support; before removing, mark the location of the cross member relative to the body.
- Detach propshaft from gearbox and move back. clamping nut on cardan shaft do not weaken.

Rice. The arrows show the bolts of the hydraulic system pump adjustable suspension wheels
- Disconnect the wires from the gearbox (reverse light switch wire). In automatic transmissions, disconnect the wires from the Kickdown device. Loosen one side of the steering damper mounting and turn it.
- Remove the engine mount dampers.
- Loosen the gearbox-to-engine bolts.
- Place a jack under the gearbox (install a wooden spacer between the jack base and the gearbox).
- Remove the protective mudguard of the body tunnel.
- Carefully lift the engine by tilting it at an angle of approximately 45°. Raise the gearbox with a jack, following the movement of the engine. Work on lifting the engine should be carried out slowly with constant monitoring, make sure that there are no connected wires or pipelines, especially if the vehicle is equipped with optional equipment. Special attention turn to the cable mount.
This guide is suitable for owners of all representatives of the "Classic". These are VAZ cars: 2101, 2102, 2103, 2104, 2105, 2106, 2107. The principles are general for removing the engine from the rest domestic models, as well as for foreign cars.
How to remove the engine on a VAZ 2107 at home? This question interests many car owners. This procedure is simple, but requires clarification. After all, there are subtleties and tricks, from non-observance of which you can cause significant harm to your car. We present to your attention a simple step by step instructions"in pictures" and with a video lesson.
Removal: step by step instructions
Those who first encounter such a procedure are often in this situation. They open the hood, looking at the engine and feel that the task ahead is of an unprecedented scale. But in practice, things are much easier.
Two men in their garage can easily remove old engine and put a new one in its place. You just need to know how to remove the engine on the VAZ 2107.
Immediately advice for beginners: the engine can be removed entirely. However, it weighs more than a hundred kilograms in the collection. And after removing it, you still have to disassemble it. Therefore, sometimes it is easier to remove the engine with its partial disassembly right under the hood.
- The first step is to remove the hood. Although this thing is quite useful in normal operation, when replacing the engine, it will only interfere with us. To remove the hood special nuts.
But do not rush to immediately start twisting them. Remember, after the work is completed, the hood will have to be returned to its place. And in order not to be mistaken with its installation, apply special marks around the perimeter of the canopy with a black marker. This will help you save your nerves, which at this stage of work will no longer be enough. - Use soft blankets to cover the front fenders. This will prevent damage to the paint.
- Drain the coolant. To do this, use a hose and a canister. You don't want antifreeze just poured onto your favorite garage floor, do you? To drain the antifreeze, there is a special plug, conveniently located on the cylinder block.

- Some advise to also drain the liquid from the radiator. But it is better to put aside this bad idea. Your radiator valve is most likely clogged. And if you start to unscrew it, you will easily damage the radiator. So it's best not to touch it. The rest of the fluid drains into the lower radiator pipe. After the antifreeze is drained, we remove the pipes and take out the radiator out of harm's way.


- We also do not need electrical wires on the distributor, on the oil sensor, on the coolant temperature sensor and on the carburetor (if any). So we take them down without regret.
- And the fuel supply hose will only interfere with us for the time being. It must be removed by releasing the clamp with a screwdriver.
 Do you like the idea that this hose can pour gasoline on your very favorite and still clean floor in the garage? If not, then remember to lift the hose up and secure it in that position.
 - FROM right side engine compartment sorted out. Now it's the turn of the left. It is necessary to carefully unscrew the intake pipe exhaust system.
 And here we are waiting new danger! The fact is that the factory nuts that are used to fasten the exhaust pipe are made of a very soft alloy. If you push a little, then you can collapse the edges in one count. So you have to apply your experience of unscrewing rusted nuts. And since you have already decided to remove the engine yourself, we will assume that you have also learned how to turn the nuts.
 - It was the turn for the old starter. It must also be removed by first disconnecting the terminals from the battery. Three mounting bolts will help us unscrew the key by 13.
- You also need to disconnect the wires from the generator.
- Don't forget to remove the air filter housing as well.
- Our work on dismantling the machine for parts is moving forward successfully. And it's time to disconnect the engine from the gearbox. You don’t want to tear out your favorite gearbox with the roots and other contents along with the engine, do you? To disconnect the parts, you need to use the ring wrenches, bent to the side, which will easily unscrew the two upper bolts.

- While we are still above the hood, use a screwdriver to loosen the clamps of the heater radiator pipe.

- We remove the thrust of the gas pedal.
- Before leaving for the pit, we finally remove the suction cable if the car has a carburetor.
- By the way, to remove the engine, a pit can be very useful. And if you have one, then you can easily go down into it, remove the clutch cylinder spring and, using a 13 wrench, unscrew the two bolts.
- Now very carefully move the clutch cylinder to the side to remove it. And in no case do not even try to accidentally press the clutch pedal. Otherwise, you will have to supplement your epic with a new chapter: a “joyful” bulkhead of quite a working cylinder.
- Now comes the turn of the two bolts with which the gearbox is attached to the motor.

- And a little more work with the bolts. Where would we be without them! It is necessary to twist the bolts that secure the protective cover to the body.
- And a little more twist: you need to unscrew the nuts from the engine mounts with the help of a 17 head.
- And only now, when all preparatory work done, the climax of our amazing adventure comes: we begin to remove the unit from the engine compartment. A jack is placed under the gearbox and slightly raised so as to remove the motor mounts from the pillow studs.
- We cling to the motor with special belts and slightly raise it with the help of talcum powder.
- Putting the box in first gear
- Using a winch or talc, we take the engine out of the guides with light staggering movements.
- When the unit has come off the guides, we take it out.

- We roll the car aside, make a cup of coffee and relax, satisfied with the work done.
Of course, we still have a lot of things ahead of us: transporting the engine to the site overhaul or self repair directly on site, installation of a repaired or new unit in place.
Withdrawal
Remove the hood.
Remove the battery, engine mounts and drain the coolant.
|
Rice. 3.27. The sequence of removal of components and assemblies when removing the engine from the car: 1 – a wire of the negative plug of the storage battery; 2 - air filter; 3 - fuel line; 4 - return fuel line; 5 - throttle cable; 6 - speedometer drive cable; 7 - clutch cable; 8 - wire connecting the engine to the "mass"; 9 – a hose of the vacuum amplifier of brakes; 10 – the three-way valve of the hydraulic booster of a steering and an arm; 11 – heater hoses; 12 - fan and radiator; 13 - expansion tank and washer tank; 14 - generator; 15 - air conditioning compressor; 16 - hydraulic booster pump; 17 - drive shafts; 18 – draft of a gear change (manual transmission); 19 - traction extension (manual transmission); 20 - flexible connections of the exhaust system, bolts and nuts; 21 - torsion limiter of the engine mount; 22 - power unit assembly
|
Remove the air filter ( rice. 3.27 ).
Disconnect the fuel supply and output pipes from the fuel pump.
Disconnect the air and throttle actuators.
Disconnect the speedometer cable.
Disconnect the clutch cable (manual transmission) or control cable ( automatic transmission gears).
Disconnect from a transmission a wire of connection with "weight" of the car.
Disconnect the vacuum brake booster hose.
Remove the plugs from the vacuum switches and remove the bracket.
Disconnect the hoses from the heater.
Remove plugs from traction relay and vacuum sensor (if any) and unscrew them from the firewall.
Disconnect wiring connectors from engine.
Disconnect all other electrical connectors in the engine compartment.
Disconnect the wire from the ignition coil.
Disconnect the evaporator hoses from the tank (if provided by the design).
Disconnect the radiator hoses, disconnect the connector from the radiator fan motor.
Remove the radiator.
Remove expansion tank and washer tank.
Remove the generator and air conditioning compressor from the bracket (if provided by the design). Move the compressor aside, taking care not to damage the hoses (located under high pressure) and secure it with a piece of wire.
Raise the front of the car and put it on stands, remove the front wheels and mudguards.
Remove the hydraulic booster pump (if provided by the design) together with hoses, take aside and secure with a piece of wire.
Drain the gearbox oil.
Disconnect transverse link front suspension stabilizer bar and push or pull the drive shafts out of the transmission. To fix the position of the differential gears, instead of drive shafts insert special plugs into the gearbox or internal hinges equal angular velocities drive shafts.
On models with mechanical box gears, disconnect the gear shift rod and the rod extension from the gearbox.
Disconnect reception exhaust pipe from the muffler.
Remove the rubber plug and mudguard, unscrew the bolt and remove the swivel assembly. Remove covers toothed belt timing gear drive.
Attach the lift arms to the engine.
Disconnect the engine from the suspension mounts.
Raise the engine slowly and carefully, while lifting, the assistant should move the engine forward from the muffler studs and move the wiring aside.
After lifting the engine from the engine compartment, lower it to a platform suitable for further work. Remove the gearbox and differential assembly from the engine. Fix the engine in a vertical position or mount it on a stand.
Installation
Establish on the engine a transmission in gathering with differential.
The front of the vehicle must be in a raised position to allow access from below during installation.
Hang the engine exactly above engine compartment, carefully and slowly adjusting it to the desired position.
Further work is carried out with two assistants. The first directs the power unit so as not to damage the main gearbox brake cylinder and so that the engine goes onto the muffler studs, and the second one holds the power unit so that when lowering it does not damage the power steering pump.
Further installation is carried out in the reverse order of removal.
Separation of the gearbox from the engine
Automatic transmission
Remove the starter.
Turn away bolts of fastening of an arm of a hinged shaft. The drive shaft must remain inserted into the gearbox, otherwise the differential may fall into the gearbox housing.
Remove the gearbox from the engine. Have an assistant hold the driveshaft. Do not allow the gearbox to rest on the input shaft, otherwise it may be damaged.
When installing, first make sure the centering of the clutch disc is correct. For splines input shaft apply lubricant.
Install the gearbox on the engine, again asking the assistant to hold the drive shaft. If the input shaft does not fit into the splined flange of the clutch disc, then slightly rotate crankshaft or gearbox input shaft until the splines are aligned. Until the box is fully seated, rest it on the block so that the weight of the box is not perceived by the input shaft.
Tighten bolts of fastening of a transmission to the engine and bolts of a hinged shaft, establish a starter.